• Skip to primary navigation
  • Skip to main content
  • Skip to primary sidebar
  • Skip to footer

Whipperberry

WhipperBerry • Your Home For Creative Inspiration

  • Home
  • Recipes
    • Starters
    • Easy Weeknight Dinners
    • Main Dish
    • Salads
    • Side Dish
    • Soups & Stews
    • Desserts
    • Breakfast
    • Miscellaneous
  • Tutorials
    • Creative Crafts
    • DIY Decor
    • Fabric Crafts
    • Food How-To
    • Jewlery
    • Paint Projects
    • Paper Art
    • Party Styling
    • Photography and Graphic Design
    • Silhouette
  • Holidays
    • Easter
    • Mother’s Day
    • Father’s Day
    • 4th of July
    • Halloween
    • Thanksgiving
    • Christmas
    • Valentine’s Day
  • Gift Ideas
    • Gifts For Everyone
    • Gifts for Dad
    • Mother’s day
    • For The Girls
    • For The Kids
    • Teacher Gift Ideas
    • Christmas
  • Printables
    • Holiday
    • Gift Idea
    • LDS Primary
  • Travel
  • About
    • Terms
  • Contact
  • Nav Social Menu

    • Facebook
    • Instagram
    • Pinterest
    • RSS
    • Twitter

Recipe

The Carrot Cake

24 · Apr 19, 2014 · 3 Comments

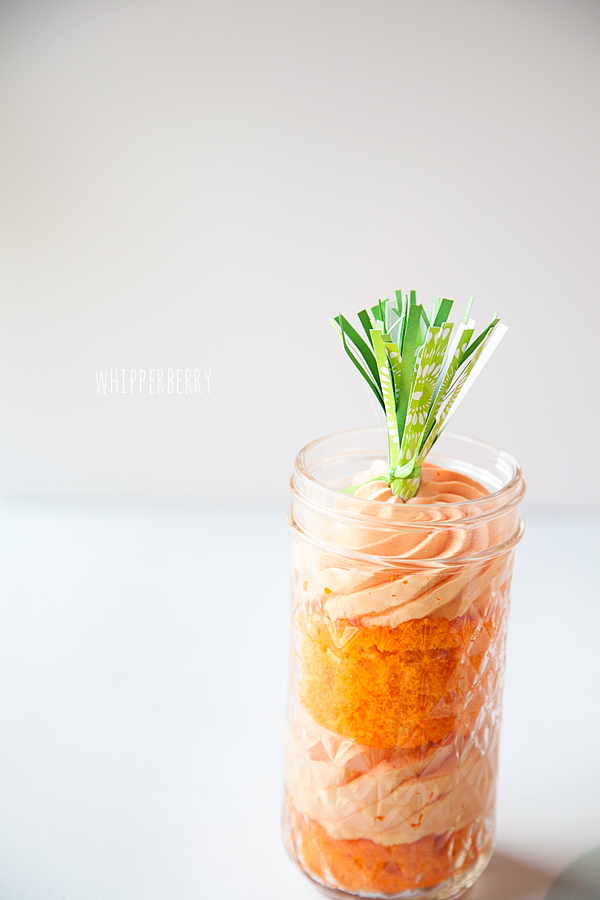
// The Carrot Cake //The-Carrot-Cake-from-WhipperBerry

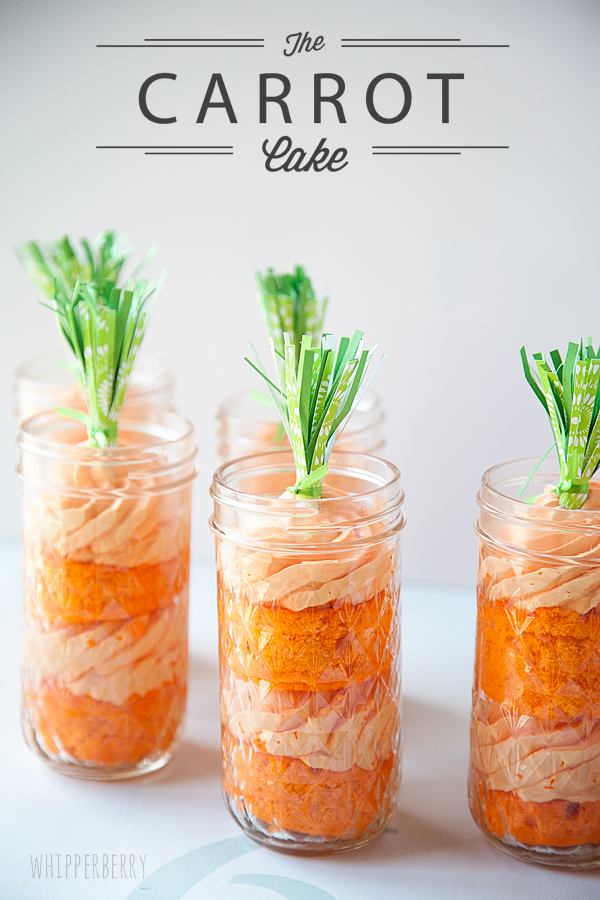
Looking for a fun spring dessert? The other day I was trying to come up with a fun idea for a dessert auction for a fund raiser at church and I came up with The Carrot Cake!! It’s a SIMPLE yet very fun dessert idea that is great for Easter or any other spring time activity. I was thinking it would look really cute with a fun sign that said, “Mr. McGregor’s Garden” for a spring baby shower or birthday party.

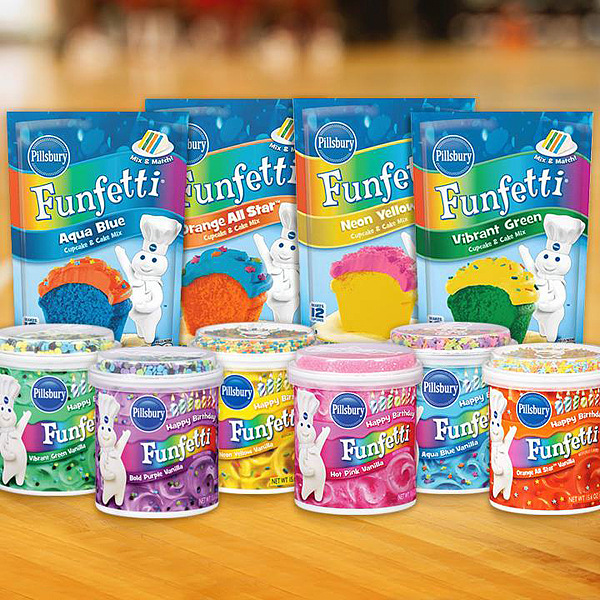
All you need is some Pillsbury Funfetti Orange All-Star Cake Mix and some Orange Funfetti Frosting. With a few little additions to the frosting you have a tasty little treat that is super easy to bake and put together.

Single-Carrot-Cake-from-WhipperBerry

How to make The Carrot Cake

  1. Mix-up the cake according to package directions but bake it on a baking sheet so that it’s stays a thin layer. Bake for 15-19 minutes at 350˚. I actually made up a double batch of cake mix to almost fill one baking sheet. Make sure to spray your baking sheet with Pillsbury Baking Spray.
  2. Using a biscuit cutter, cut circle cake rounds that will fit in your jars once the cake has cooled.
  3. Mix up the frosting the recipe for that is below
  4. Layer your jars with one cake round, a layer of frosting, another cake round and some additional frosting. If you are feeling a little fruity, you can add some mandarin oranges into the layers. I didn’t have any on hand or I would have done that with mine!
  5. Make your carrots stems…

How to make The Carrot Cake Stems

The-Carrot-Cake-Stem-by-WhipperBerry

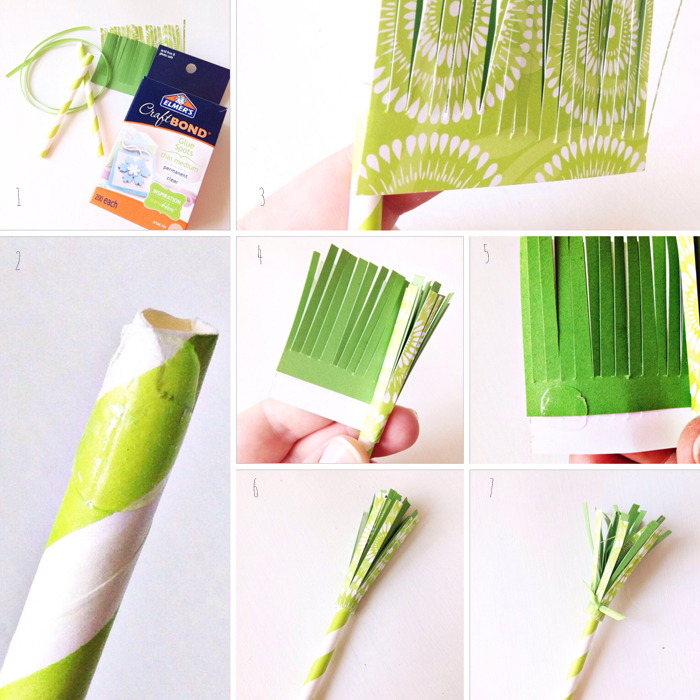
You will need two types of green paper, scissors (fringe scissors if you have them), Elmer’s Glue Spots, straws (it doesn’t matter what color, they will hide in the cake) and some thin green ribbon.

  1. Cut your straw in half. Cut your green paper fringe, paper needs to be at roughly 3 1/2 inches wide and 2 inches tall.
  2. Place a glue spot on the tip of the straw
  3. Layer your two green papers and attach to the top of the straw.
  4. Carefully wrap around the straw making sure to keep it tight.
  5. Place a glue spot on the outer edge of the fringe
  6. Secure the fringe to the straw.
  7. Tie with the ribbon to keep it secure. Rough up the paper a little to help it look like a stem.

Add your stem to the top of the cakes and serve!

Carrot-Cake-Toppers

The Carrot Cake Frosting
 
Save Print
Prep time
5 mins
Total time
5 mins
 
The Carrot Cake is a cute spring dessert that anyone will love!
Author: Heather // WhipperBerry
Recipe type: Dessert
Cuisine: American
Serves: 10-12
Ingredients
  • 2 cans of Pillsbury Funfetti Orange Frosting
  • 3-4 tablespoons of milk
  • ½ tsp. citric acid
  • 16 oz. of Cool Whip
Instructions
  1. Use a stand or hand mixer.
  2. In a large mixing bowl add the two jars of frosting, milk and citric acid. Mix on high until the frosting lightens up.
  3. Fold in the Cool Whip until completely combined.
  4. Place in a large piping bag with a large cupcake tip.
  5. Layer the cake and frosting.
3.2.2310


Disclaimer // This is not a sponsored post. I just highlighted products that I use all the time in my everyday creating!

Maple Apple Bacon Waffle Recipe

2 · Apr 17, 2014 · 4 Comments

// Maple Apple Bacon Waffle Recipe //

Maple-Bacon-Apple-Waffles-from-#whipperberry-1

My Husband LOVES waffles! He loves them so much for Christmas this last year I bought him an All-Clad Waffle Maker as his big WOW present and he was giddy when he opened it.  It’s like when I receive my Kitchenaid Mixer… a BIG deal!! Because of that, we have a waffle night each week and we’re getting pretty good and coming up with fun new waffle ideas. This one has been my favorite so far, a Maple Apple Bacon Waffle! Yep, it’s as good as it sounds!!

This recipe is actually easier than it sounds. You just need FOUR ingredients for the waffles because we use our favorite waffle mix, Hungry Jack®.  You will need bacon, Hungry Jack® Complete Buttermilk Pancake and Waffle Mix and your favorite apple pie filling… Super simple!

For the maple part of the recipe, you can use your basic maple syrup like Hungry Jack® Syrup or you can make your own. My husband’s Mother used to make her own syrup and he LOVES that kind of syrup so for special occasions we make our own and that’s super easy as well. It’s just white sugar, brown sugar, water, maple extract and butter extract. It only takes about 15 minutes to make and is TOTALLY worth it!

Here is how to make our Maple Apple Bacon Waffles…

Maple-Bacon-Apple-Waffles-from-#whipperberry-4

Maple Apple Bacon Waffle Recipe
 
Save Print
Prep time
25 mins
Cook time
20 mins
Total time
45 mins
 
This scrumptious waffle recipe is perfect for breakfast, brunch or even dinner. Your family will be WOW'd with your amazing waffle making skills, they won't even know how easy they really are to make!
Author: Heather // WhipperBerry
Recipe type: Breakfast
Cuisine: American
Serves: 5-6
Ingredients
  • Apple Bacon Waffles
  • 1 lb. bacon
  • 2 cans of apple pie filling
  • 3¼ cups of Hungry Jack® Complete Buttermilk pancake & waffle mix
  • 1½ cups water
  • 1 container of Cool Whip or fresh whipping cream
  • Maple Syrup
  • 1 cup sugar
  • 1 cup brown sugar
  • 1-2 tsp. imitation maple extract
  • ½ tsp. butter extract
Instructions
  1. Waffle Instructions
  2. Before we start the waffles, I put a pound of bacon into a preheated 375˚ oven on a wire rack over a baking sheet. I spray the wire rack with Crisco® Non-Stick Cooking Spray before I place the bacon on the rack. I cook the bacon for 10 minutes on one side and then turn the bacon and bake for an additional 10 minutes on the other side. Keep an eye on the bacon, you don't want it to become to crisp. You want it to still be a little pliable so that you can place it in the waffle iron with out it crumbling. Remove from oven and set aside.
  3. To start the waffles, pour your apple pie filling into a large bowl and using an immersion blender break down the apples. If you don't have an immersion blender, you can put the pie filling into a food processor, blender or even a food mill to break down the apples. Any option works fine.
  4. Add the waffle mix to the apples and stir. The package directions for the waffle mix calls for water, you will still add water, but it will be less than the normal amount because of the apples. Slowly add the water to the waffle and apple mixture until you achieve the desired waffle consistency.
  5. Preheat your waffle iron. Depending on the size of your waffle iron, you typically put about ¾ cup of waffle mix into the iron for one waffle. To add the bacon into the waffle, pour half of the waffle mix into the waffle iron and then lay your bacon onto of the mix in an "X" and then pour the remaining mix ontop of the bacon. Close the waffle iron and cook for 3-4 minutes or until you achieve your desired waffle color. I like mine pretty light, my husband like them darker and crispier.
  6. Top with a little more warmed apple pie filling, some warm maple syrup and a dollop of Cool Whip or fresh whipped cream and enjoy!
  7. Homemade Maple Syrup
  8. In a small sauce pan, combine sugars and water and place of medium high heat. Bring to a boil and lower the temperature to medium and let simmer for 10 minutes. Remove from heat and add maple and butter extracts. Let cool for a few minutes and then serve with your waffles.
3.2.2310

Disclaimer // This is not a sponsored post, however I am a member of the Amazon Affiliate program and I do have some affiliate links included in the post.

Tropical Green Smoothie Recipe

0 · Apr 16, 2014 · 3 Comments

Hello Whipperberry readers!  Jenn here again from Clean and Scentsible.  Easter is just a few days away, and if you are anything like me, you have already been digging into all of that Easter chocolate.  I thought that a green smoothie recipe would be the perfect way to balance out all those sweets and provide you with a little energy boost for all of your holiday festivities.  I’m sure we could all use a little detoxing after this weekend!

Tropical green smoothie - healthy and delicious!

I have really been trying to eat more fruits and veggies lately and have found that smoothies are the best way for me to fit them all in!  This tropical green smoothie recipe provides lots of healthy nutrients while still tasting delicious.  Even my kiddos give it the thumbs up!

INGREDIENTS

  • 1/2 cup mango
  • 1/2 cup sliced pineapple
  • 1/2 banana { I like using frozen bananas but you don’t have to}
  • 1/2 cup orange juice {or any other juice, almond milk, soy milk, etc.}
  • large handful of kale leaves
  • 1 tbsp sprouted chia and flax seeds {optional}

Tropical green smoothie recipe.
Just blend everything up and add a little pineapple for garnish.  If it is too thick, add a little water and if you like it thicker, add an ice cube or two.  And then just enjoy! 🙂

Tropical green smoothie recipe - healthy and delicious!

  If you are looking for other smoothie recipes, you may also like this blueberry lemon smoothie.

Blueberry Lemon Smoothie
I hope you all have a wonderful Easter with your friends and families!

Funfetti Bold Strawberry Shortcake

0 · Apr 8, 2014 · 3 Comments

// This post brought to you by the new vibrant Pillsbury Funfetti® Cake Mixes //

Pillsbury-Funfetti-Strawberry-Shortcake-#gobold-#whipperberry

I LOVE going BOLD! I LOVE finding something a little different… I LOVE standing out in a crowd!

Who doesn’t really? We all like to feel like a STAR at times…

Even on those normal, hum drum days…

When the day is normal, the meal is just your typical fair and there is nothing special to celebrate… You CAN add a little FLAIR and turn something typical, into something Funfettilicious!

Our family LOVES strawberry shortcake and we are always looking for fun new “cake” options. We’ve tried several different types of cake from sponge to pound and almost everything in-between! The folks at Pillsbury made my day when they released their new Funfetti® line of cake mixes and bold frostings.

Pillsbury-Funfetti

So many fun colors to play with… Immediately I thought of creating a BOLD Strawberry Shortcake with the Vibrant Green Cake Mix…

I knew that the bold green color would look amazing with the strawberries and the cream, together they could turn a normal dessert into something extra special!

Pillsbury-Funfetti-Strawberry-Shortcake-#gobold-#whipperberry-6

What I really love about these new products is how it make baking even more fun with your kiddos! My little guy, Gage and I worked on this project together. It was so fun to open the cake mix together and to our surprise the mix was blue. I thought this would be a fun opportunity for a little kitchen magic so I took a video of the two of us mixing the cake…

Bold Strawberry Shortcake from Heather Thoming on Vimeo.

 We had so much fun making this dessert for the family and couldn’t wait to share our goodies. We decided to make it two ways. I found these super cute baking cups from Target that are quite a bit larger than a cupcake liner. They are actually baking cups and create the cutest single serving little cake… We mixed up our cake batter…

Pillsbury-Funfetti-Strawberry-Shortcake-#gobold-#whipperberry-1

Then poured it into our cake molds…

Pillsbury-Funfetti-Strawberry-Shortcake-#gobold-#whipperberry-2

And baked them for about 19 minutes. We pulled them from the oven and let them cool for 20-30 minutes and then we got to work building our strawberry shortcakes.  First we made our simple Strawberry Shortcake by just topping a few of the single serving cakes with some strawberries and fresh whipped cream…

Pillsbury-Funfetti-Strawberry-Shortcake-#gobold-#whipperberry-4

Then for a couple more, we decided to make Strawberry Shortcake parfait’s or we could also call them a trifle. No matter what you want to call it… They turned into beautiful, layered strawberry goodness in just a few simple steps.

Pillsbury-Funfetti-Strawberry-Shortcake-#gobold-#whipperberry-10

Gage and I tore up the cake into bite sized pieces and simply layered cake, strawberries, fresh whipped cream, cake, strawberries and topped it all off with a nice dollop of whipped cream.

Pillsbury-Funfetti-Strawberry-Shortcake-#gobold-#whipperberry-11

You know what one of the perks is to helping Mom? You get the first taste…

Bold-Strawberry-Shortcake

To quote Gage, “This is TASTY!”

So… How are YOU going to GO BOLD? Check out all of the fun colors you have to choose from…

Pillsbury-Funfetti

Visit Pillsbury Baking for all kinds of fun ideas on how to turn the everyday into something special! You can even enter to win a Pillsbury Baking Prize Pack!

Disclaimer // This is a sponsored post. I did receive product and payment for this post. However, all thoughts, ideas and opinions are all my own! ©/® The J.M. Smucker Company. Pillsbury is a trademark of The Pillsbury Company, LLC, used under license.

  • « Go to Previous Page
  • Page 1
  • Interim pages omitted …
  • Page 26
  • Page 27
  • Page 28
  • Page 29
  • Page 30
  • Interim pages omitted …
  • Page 53
  • Go to Next Page »

Primary Sidebar

Heather from Whipperberry
Hello... my name is Heather and I'm the creator of WhipperBerry a creative lifestyle blog packed full of great recipes and creative ideas for your home and family. I find I am happiest when I'm living a creative life and I love to share what I've been up to along the way... Come explore, my hope is that you'll leave inspired!

Footer

  • Privacy Policy
  • Crafts
  • Food
  • Gifts
  • Holidays
  • Home
  • Mom Life
  • Recipes
  • Travel

Copyright © 2026 · Seasoned Pro