• Skip to primary navigation
  • Skip to main content
  • Skip to primary sidebar
  • Skip to footer

Whipperberry

WhipperBerry • Your Home For Creative Inspiration

  • Home
  • Recipes
    • Starters
    • Easy Weeknight Dinners
    • Main Dish
    • Salads
    • Side Dish
    • Soups & Stews
    • Desserts
    • Breakfast
    • Miscellaneous
  • Tutorials
    • Creative Crafts
    • DIY Decor
    • Fabric Crafts
    • Food How-To
    • Jewlery
    • Paint Projects
    • Paper Art
    • Party Styling
    • Photography and Graphic Design
    • Silhouette
  • Holidays
    • Easter
    • Mother’s Day
    • Father’s Day
    • 4th of July
    • Halloween
    • Thanksgiving
    • Christmas
    • Valentine’s Day
  • Gift Ideas
    • Gifts For Everyone
    • Gifts for Dad
    • Mother’s day
    • For The Girls
    • For The Kids
    • Teacher Gift Ideas
    • Christmas
  • Printables
    • Holiday
    • Gift Idea
    • LDS Primary
  • Travel
  • About
    • Terms
  • Contact
  • Nav Social Menu

    • Facebook
    • Instagram
    • Pinterest
    • RSS
    • Twitter

Archives for 2014

Zucchini Hummus Recipe

3 · Apr 30, 2014 · 3 Comments

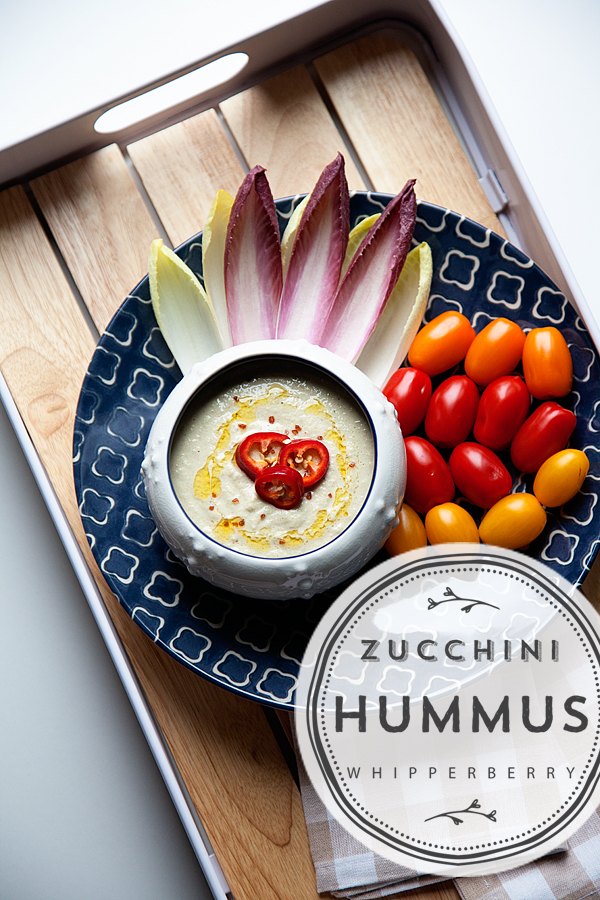
// Zucchini Hummus Recipe brought to you by Pompeian Olive Oil //

Zucchini-Hummus-with-Pompeian-Varietals-Collection-Olive-Oil-3

A few months ago, I had the exciting opportunity to travel to Israel to go on a food tour of that amazing country.  Our first full day there, we were on a quest to find the best hummus in the country. Now hummus in Israel is a BIG deal! Here in America  when we get hungry we head out to some fast food joint and grab a burger to eat on the go. In Israel, they have little hummus huts and that’s where everyone goes when they want to grab a quick bite to eat.  Our quest took us to Jaffa…

jaffa israel

… Just outside of Tel Aviv. Here is where the famous Abu Hasan Hummus hut is located, hidden within the winding streets of this ancient city.

Abu_Hassan Humus Hut

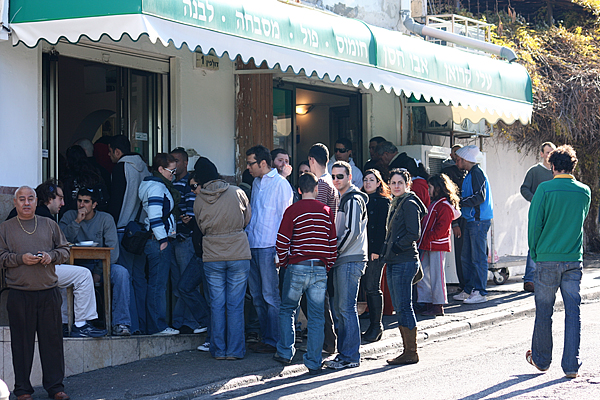
Abu Hassan is famous for one thing… Hummus! That’s about all they make and they make it well. Everyday people line up outside this little hole in the wall shop to get their hummus and when the hummus pot is empty, the shop closes for the day, so you have to get there early!

abu hasan humus

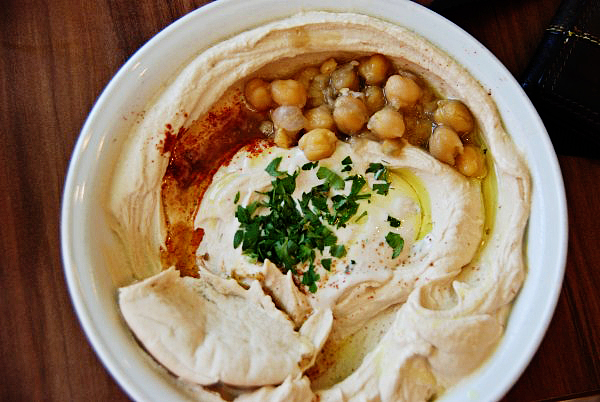
Abu Hasan’s hummus is unlike any hummus I have ever tried in the US. It’s rich and creamy with a flavor that just grabs you and then haunts you forever. They top the hummus with chickpeas, garlic, paprika, parsley and then they float a full flavored olive oil on top. It’s truly an amazing culinary experience.

When I returned home, all I could think about was that hummus. What I would give for one more taste of that magical creation. I TRIED to recreate it with a few tricks that I learned while in Israel and it was good, but not Abu Hasan good.  So, I kind of gave up my quest until the other day.

This last week I spent some good quality time with Aimée and Bettijo from Paging Supermom, while we were attending SNAP, the creative blog conference.  While we were sitting at Café Rio in the Salt Lake City Airport, Aimée mentioned one of her favorite recipes and it kind of blew my mind… Zucchini Hummus! Yea, that’s what I said… Zucchini Hummus, for real?

I have heard of making hummus out of white beans instead of chickpeas, but I have never heard of making it with zucchini! I was intrigued and had to give this new idea a go. I did a little research and then put into practice the hummus tricks I learned in Tel Aviv at the Dan Gourmet School of Culinary Arts and came up with my recipe for Zucchini Hummus.

Now, one of the keys to this tasty and good for you treat is the olive oil. For this application, you need a good, full flavored olive oil that is fruity and can hold up to the bold flavors from the garlic and cumin. I used a fabulous full flavored olive oil from Pompeian’s Varietals collection. The magic of the premium Varietals collections is that each type of oil is pressed from one single type of olive. I used the Koroneiki oil which is from the first cold press of the Koroneiki olive.

Pompeian Olive Oil

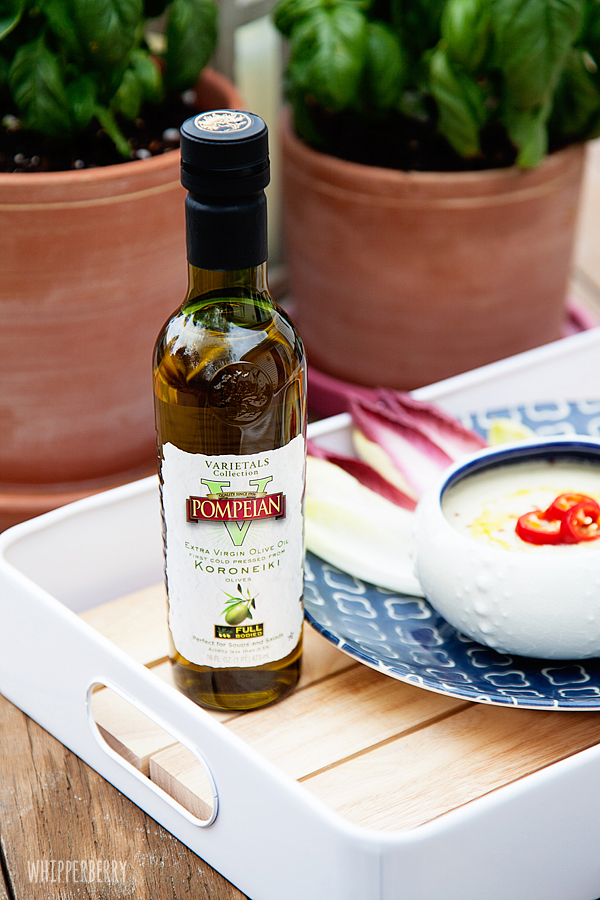
It’s bold and fruity with a peppery finish that is just perfect for my zucchini hummus. I used it in the hummus as well as floating some on top as a flavor booster as well as a garnish.

Zucchini Hummus

I was BLOWN AWAY when I tasted it for the first time. It truly took me back to Israel. It’s not Abu Hasan, but to me it’s a fresher, even healthier way to savor the flavors of one of my favorite place. Here is how you make it…

Zucchini Hummus
 
Save Print
Prep time
3 mins
Cook time
5 mins
Total time
8 mins
 
This fresh take on humus will blow you away and have you constantly coming back for more!
Author: Heather // WhipperBerry
Recipe type: light meal
Cuisine: Israeli
Serves: 6-8
Ingredients
  • 1 cup Tahini
  • 2 medium zucchini
  • 1 lemon
  • ½ teaspoon citric acid
  • 2 tablespoons of garlic paste
  • 1 teaspoon cumin
  • ½ teaspoon sea salt
  • ¼ teaspoon pepper
  • 1 tablespoon of Pompeian Varietials Koroneiki Olive Oil
Instructions
  1. Peel and chop your zucchini and add to the bowl of your food processor.
  2. Juice your lemon and add half of the lemon juice to start to the zucchini.
  3. Add the tahini, citric acid, garlic paste, cumin, sea salt and pepper and blend slowly adding the olive oil while blending.
  4. Taste the hummus and see if the seasoning needs some adjustment. You may need to add a little more of the reserved lemon juice or possibly salt. You can tweak it to your taste.
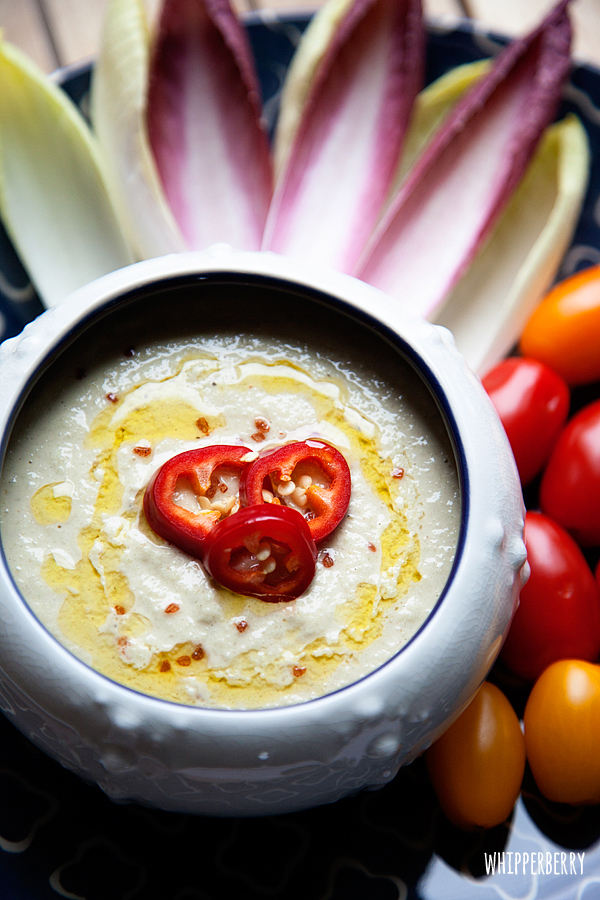
  5. Garnish with a drizzle of olive oil.
  6. Serve with veggies and pita chips or use as an addition to salads or sandwiches.
3.2.2310

Disclaimer // This post is sponsored by Pompeian, I received product and payment for this post.

The Family is of God // 3rd Verse

5 · Apr 26, 2014 · 13 Comments

Hey Primary friends! Here is the third verse for The Family is of God.  If you are looking for the first and second verses, click on the links that I have provided. The first verse has the chorus if you are needing that. Again, I have relied heavily on the talents of Susan Fitch from Susan Fitch Design… She’s aaaaaamazing!! You need to visit her site and see all of the wonderful illustrations she has created for all of us to use.

I want to thank all of you for your love and support. It really means the world to me that we can all help and support each other in our callings. Many of you have asked if I will be doing all of the verses and wanted to let you know that I am. I do my best to get them up by Saturday. Hopefully that is early enough for everyone.

Click HERE to download the full size version of The Family is of God

The-family-is-of-God--Title---verse-3page-1page-2page-3page-4

Anchor Bag with Silhouette PRINTABLE Heat Transfer Material

0 · Apr 21, 2014 · 154 Comments

This Anchor Bag project brought to you by Silhouette // Silhouette Portrait GIVEAWAY along with the April PromotionSilhouette-Portrait-Giveaway

Anchor Bag with Silhouette Printable Heat Transfer Material

But, before we get to that… I have a super cool new product from Silhouette to share with you! PRINTABLE Heat Transfer Material!

anchor-bag-with-Silhouette-printable-heat-transfer-material-#whipperberry-7

This is the coolest stuff… You can print directly on it, cut it out with your Silhouette and then iron it on to most types of fabric. I added a little flair to a canvas bag that I had sitting around and I LOVE it now.

anchor-bag-with-Silhouette-printable-heat-transfer-material-#whipperberry-5

What makes the anchor so fun is that I was able to take a fun polka-dot pattern from the Silhouette Shop and add it to a basic anchor shape to transform it into something a little extra special.

I created the anchor and then in the NEW and improved Silhouette Studio,  I used the print and cut option and then added Registration Marks to my design.

Screen-Shot-2014-04-19-at-1.27.47-PM

When I printed my out my design the registration marks are also printed and that is how the Silhouette machine can then cut out your printed design.

anchor-bag-with-Silhouette-printable-heat-transfer-material-#whipperberry-1

I cut out the anchor on my Silhouette CAMEO…

anchor-bag-with-Silhouette-printable-heat-transfer-material-#whipperberry-3

Then ironed it on to my bag following the package directions. I then used my finger nail to rough up the anchor a bit so that it looked a little worn.

anchor-bag-with-Silhouette-printable-heat-transfer-material-#whipperberry-4

It was as simple as that. It took more time trying to decide what image I wanted on the bag than actually making the project!

How fun is that?!

anchor-bag-with-Silhouette-printable-heat-transfer-material-#whipperberry-6

I love how the bag looks now and I have all kinds of fun ideas now floating around in my head for other projects.

April Silhouette Special Promotion

 This month’s special is wonderful… Here are all the details!

 April Promo, running April 21-301
Silhouette CAMEO
1 Heat Transfer Starter Kit
1 Printable Heat Transfer Material for Dark Fabrics
1 Printable Heat Transfer Material for Light Fabrics
$269.99
 Silhouette Portrait
1 Heat Transfer Starter Kit
1 Printable Heat Transfer Material for Dark Fabrics
1 Printable Heat Transfer Material for Light Fabrics
$139.99
All Heat Transfer materials will be 30% off as well!
And FREE Shipping!!!
button_aprilpromo
CLICK HERE to visit the April Promo shop, make sure you use the promo code WHIPPER when you check out to receive the special deal!

Silhouette Portrait + 12 month Deluxe Subscription GIVEAWAY // A $360 Value

For those of you feeling LUCKY… The lovely folks at Silhouette are giving away a Silhouette Portrait along with a 12 month Deluxe Subscription to the Silhouette Online Store where you have access to THOUSANDS of fabulous images and design ideas to help you create all kinds of masterpieces… This is a $360 VALUE!!

All you have to do if follow the directions in the Rafflecopter Box below to enter…

a Rafflecopter giveaway

Disclaimer // I was not paid for this post however, I am a member of the Sillhouette Circle which means I am an affiliate with Silhouette.

The Carrot Cake

24 · Apr 19, 2014 · 3 Comments

// The Carrot Cake //The-Carrot-Cake-from-WhipperBerry

Looking for a fun spring dessert? The other day I was trying to come up with a fun idea for a dessert auction for a fund raiser at church and I came up with The Carrot Cake!! It’s a SIMPLE yet very fun dessert idea that is great for Easter or any other spring time activity. I was thinking it would look really cute with a fun sign that said, “Mr. McGregor’s Garden” for a spring baby shower or birthday party.

All you need is some Pillsbury Funfetti Orange All-Star Cake Mix and some Orange Funfetti Frosting. With a few little additions to the frosting you have a tasty little treat that is super easy to bake and put together.

Single-Carrot-Cake-from-WhipperBerry

How to make The Carrot Cake

  1. Mix-up the cake according to package directions but bake it on a baking sheet so that it’s stays a thin layer. Bake for 15-19 minutes at 350˚. I actually made up a double batch of cake mix to almost fill one baking sheet. Make sure to spray your baking sheet with Pillsbury Baking Spray.
  2. Using a biscuit cutter, cut circle cake rounds that will fit in your jars once the cake has cooled.
  3. Mix up the frosting the recipe for that is below
  4. Layer your jars with one cake round, a layer of frosting, another cake round and some additional frosting. If you are feeling a little fruity, you can add some mandarin oranges into the layers. I didn’t have any on hand or I would have done that with mine!
  5. Make your carrots stems…

How to make The Carrot Cake Stems

The-Carrot-Cake-Stem-by-WhipperBerry

You will need two types of green paper, scissors (fringe scissors if you have them), Elmer’s Glue Spots, straws (it doesn’t matter what color, they will hide in the cake) and some thin green ribbon.

  1. Cut your straw in half. Cut your green paper fringe, paper needs to be at roughly 3 1/2 inches wide and 2 inches tall.
  2. Place a glue spot on the tip of the straw
  3. Layer your two green papers and attach to the top of the straw.
  4. Carefully wrap around the straw making sure to keep it tight.
  5. Place a glue spot on the outer edge of the fringe
  6. Secure the fringe to the straw.
  7. Tie with the ribbon to keep it secure. Rough up the paper a little to help it look like a stem.

Add your stem to the top of the cakes and serve!

Carrot-Cake-Toppers

The Carrot Cake Frosting
 
Save Print
Prep time
5 mins
Total time
5 mins
 
The Carrot Cake is a cute spring dessert that anyone will love!
Author: Heather // WhipperBerry
Recipe type: Dessert
Cuisine: American
Serves: 10-12
Ingredients
  • 2 cans of Pillsbury Funfetti Orange Frosting
  • 3-4 tablespoons of milk
  • ½ tsp. citric acid
  • 16 oz. of Cool Whip
Instructions
  1. Use a stand or hand mixer.
  2. In a large mixing bowl add the two jars of frosting, milk and citric acid. Mix on high until the frosting lightens up.
  3. Fold in the Cool Whip until completely combined.
  4. Place in a large piping bag with a large cupcake tip.
  5. Layer the cake and frosting.
3.2.2310


Disclaimer // This is not a sponsored post. I just highlighted products that I use all the time in my everyday creating!

  • « Go to Previous Page
  • Page 1
  • Interim pages omitted …
  • Page 27
  • Page 28
  • Page 29
  • Page 30
  • Page 31
  • Interim pages omitted …
  • Page 46
  • Go to Next Page »

Primary Sidebar

Heather from Whipperberry
Hello... my name is Heather and I'm the creator of WhipperBerry a creative lifestyle blog packed full of great recipes and creative ideas for your home and family. I find I am happiest when I'm living a creative life and I love to share what I've been up to along the way... Come explore, my hope is that you'll leave inspired!

Footer

  • Privacy Policy
  • Crafts
  • Food
  • Gifts
  • Holidays
  • Home
  • Mom Life
  • Recipes
  • Travel

Copyright © 2026 · Seasoned Pro