• Skip to primary navigation
  • Skip to main content
  • Skip to primary sidebar
  • Skip to footer

Whipperberry

WhipperBerry • Your Home For Creative Inspiration

  • Home
  • Recipes
    • Starters
    • Easy Weeknight Dinners
    • Main Dish
    • Salads
    • Side Dish
    • Soups & Stews
    • Desserts
    • Breakfast
    • Miscellaneous
  • Tutorials
    • Creative Crafts
    • DIY Decor
    • Fabric Crafts
    • Food How-To
    • Jewlery
    • Paint Projects
    • Paper Art
    • Party Styling
    • Photography and Graphic Design
    • Silhouette
  • Holidays
    • Easter
    • Mother’s Day
    • Father’s Day
    • 4th of July
    • Halloween
    • Thanksgiving
    • Christmas
    • Valentine’s Day
  • Gift Ideas
    • Gifts For Everyone
    • Gifts for Dad
    • Mother’s day
    • For The Girls
    • For The Kids
    • Teacher Gift Ideas
    • Christmas
  • Printables
    • Holiday
    • Gift Idea
    • LDS Primary
  • Travel
  • About
    • Terms
  • Contact
  • Nav Social Menu

    • Facebook
    • Instagram
    • Pinterest
    • RSS
    • Twitter

Cricut

Toddler Activity Pencil Jars 

27 · Nov 7, 2018 · Leave a Comment

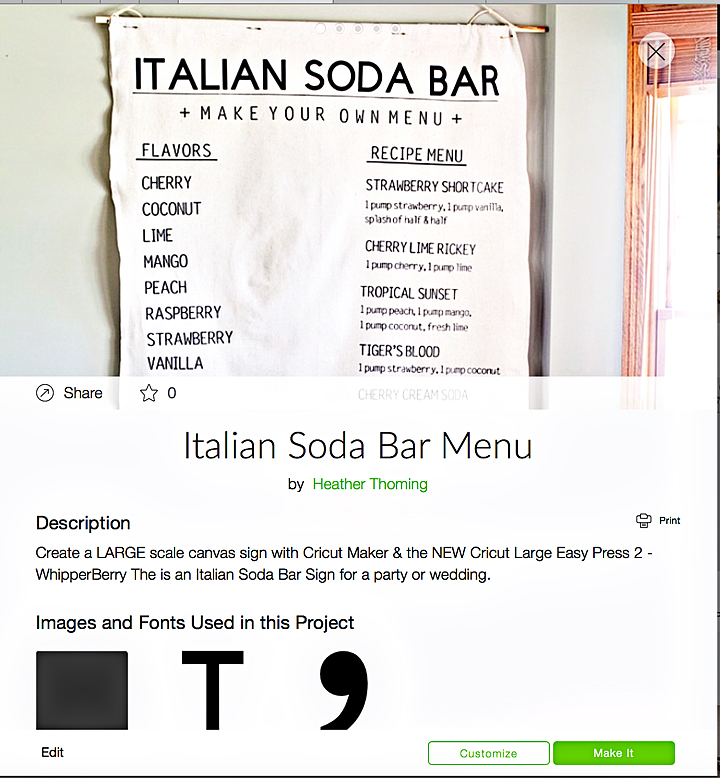
This post is brought to you by Ball® Fresh Preserving Products by Newell Brands

Do you know that old saying from Chaucer, “Idle hands are the Devil’s tools”? It’s an understatement when it comes to toddlers and preschoolers. I’m the mother of four and I would have to say, I’ve experienced love from those cute little puggy hands along with total mayhem. We have one member of our family who has been called “Poopy Picasso” a few times in their life. I’ll let you figure that one out on your own. I’ve also worked in early childhood education and have learned that busy hands that have been guided successfully, are hands that are constantly learning and growing. That’s why I am making these Toddler Activity Jars for all of my younger friends this year for the holidays. 

busy hands that have been guided successfully, are hands that are constantly learning and growing. That’s why I am making these Toddler Activity Jars for all of my younger friends this year for the holidays. 

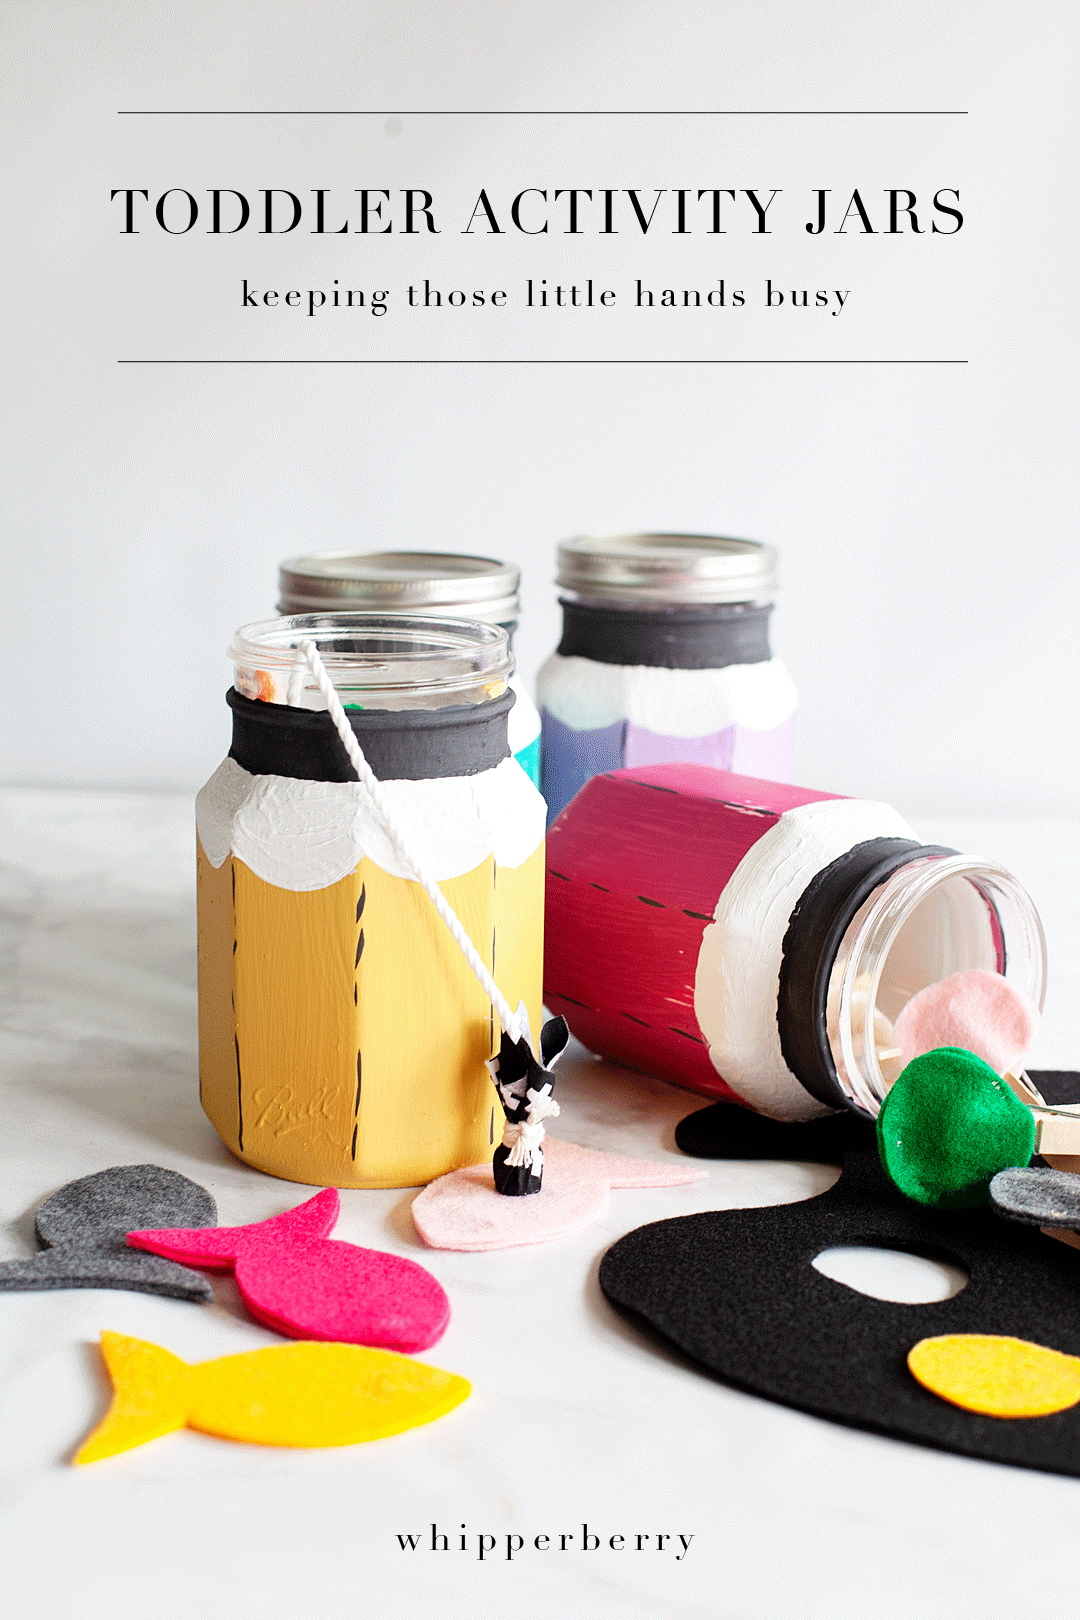
There are two key components for this project. The cute Ball® Sharing Jars along with fun activities inside of the jars.  These jars are meant to be managed by an adult so that the kiddos won’t risk breaking the jars. I like to keep mine on a shelf where the little ones can see them but have to ask to have them brought down by a grown-up. They know there are going to have something fun inside, and each time you bring one of the jars down, they never know what they are going to find. One time the yellow jar will have the fishing game, the next time it might have a matching game or, maybe a pad of paper and some fun crayons. That’s what’s fun about these jars, they will always have something fun and colorful inside. That’s pure magic for this age group. Here’s what you need to do to make some of your own.

Toddler Activity Jars Supplies

  • Ball® Wide Mouth Quart Sharing Jars
  • Chalk Paint
    • White
    • Black
    • 4 complimenting colors
  • Chalk painting brush
  • Small flat paint brush
  • 600 grit sandpaper

Instructions

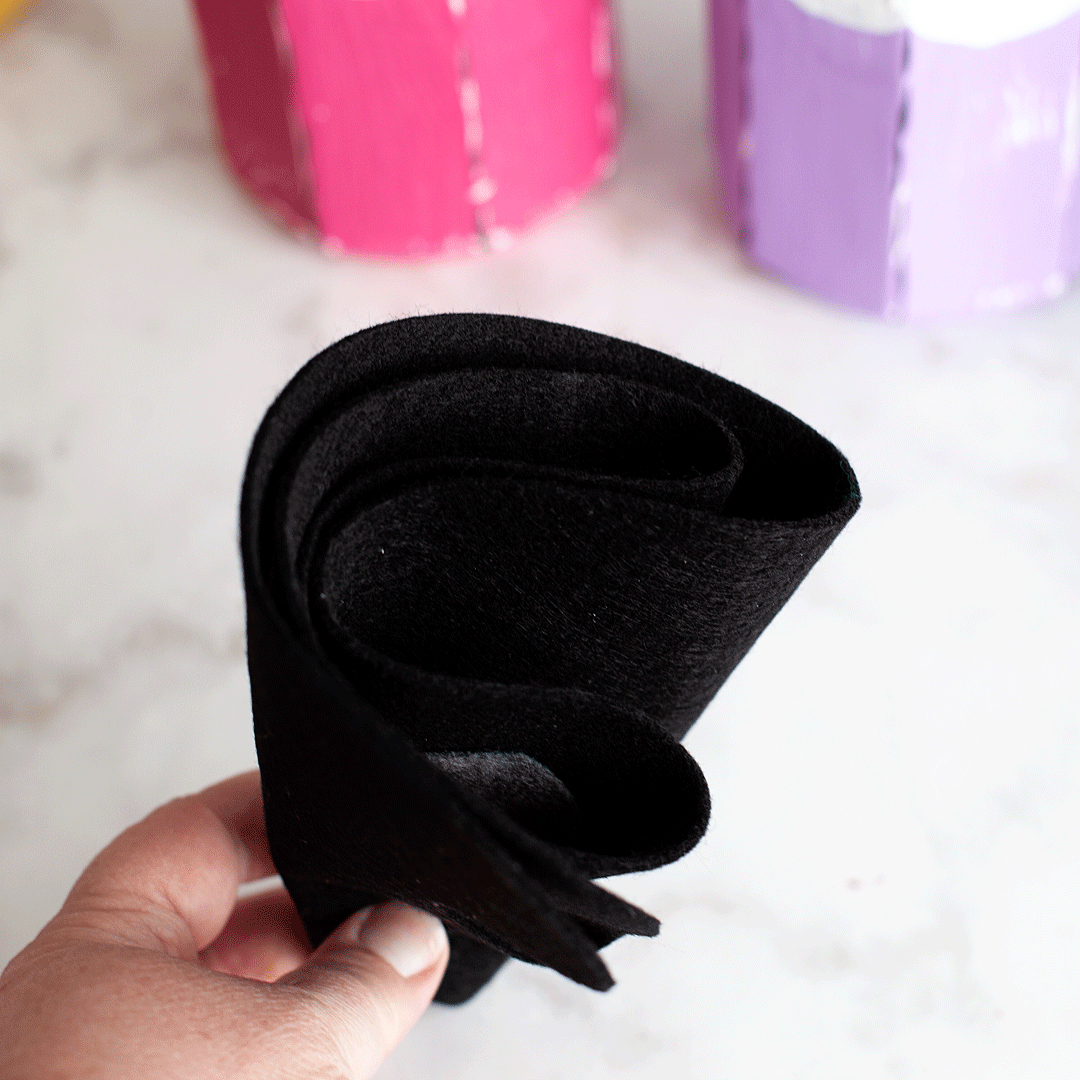
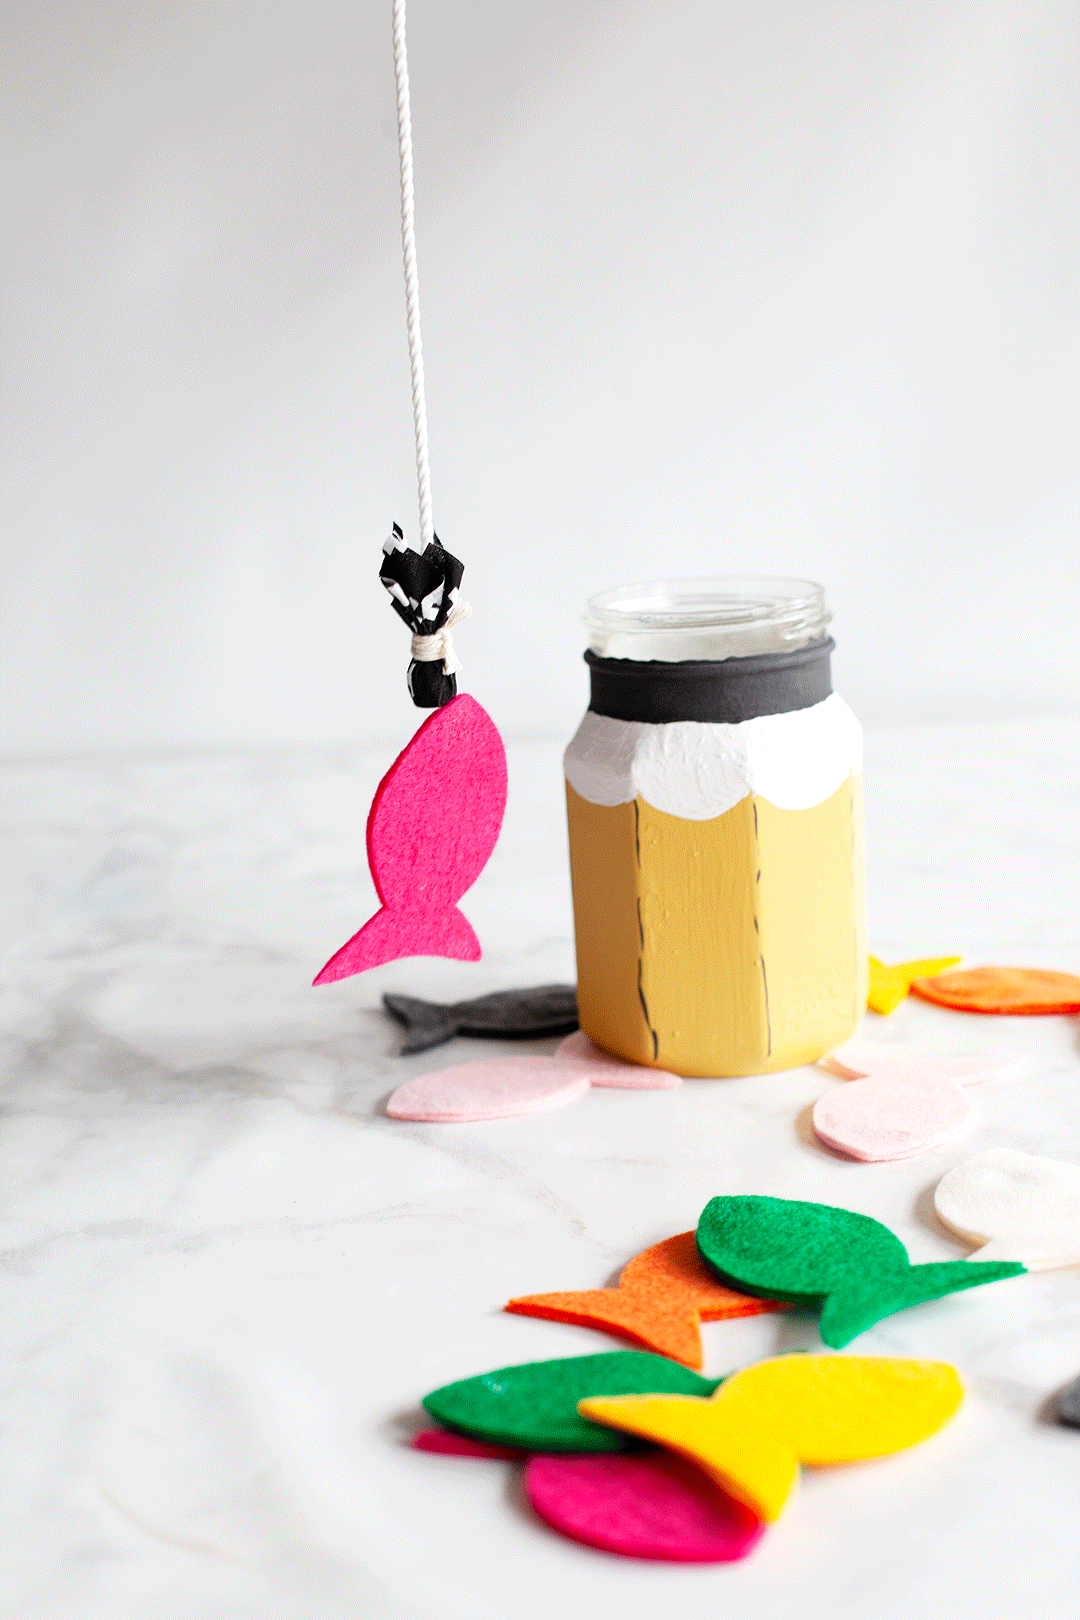
The minute I was introduced to the Ball® Sharing Jars I thought they would look super cute as a pencil jar and couldn’t wait for a chance to give that project a go. Now, when chalk painting jars like this, the plan from the beginning is that you will distress them a bit as you are finishing up the project. With that in mind, you will want to decide on what color you want to come through as you distress down through the paint. For this project, I decided to go with white as an undercoat and then set to work.

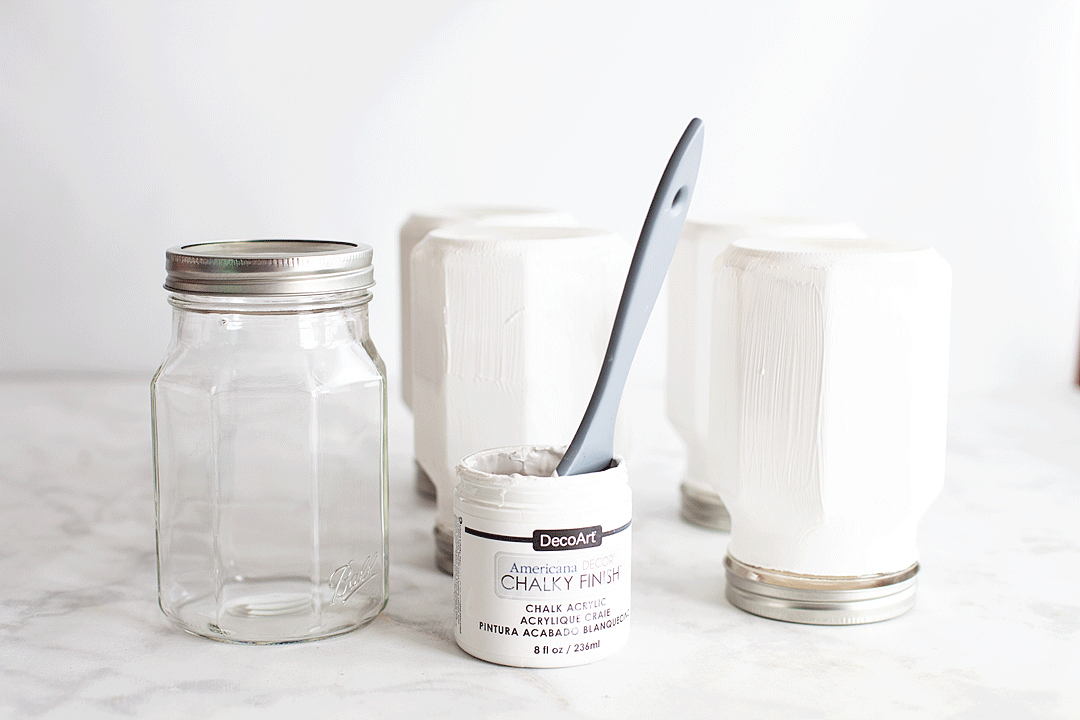
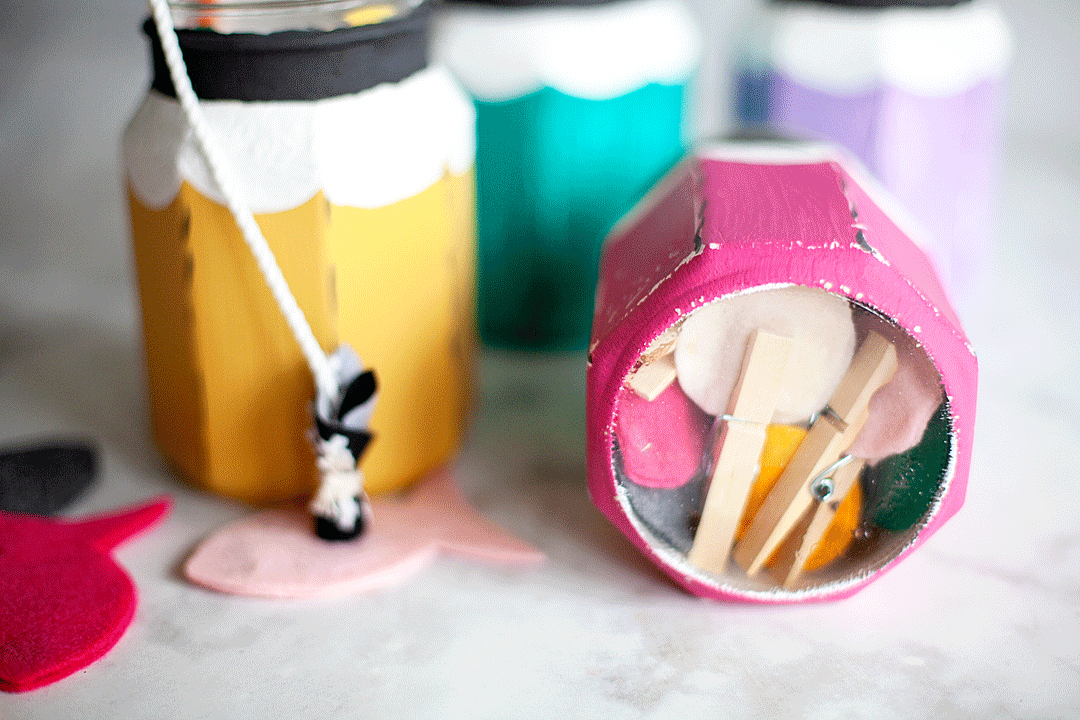
I painted two coats of the white letting it dry in between coats. Make sure that you don’t paint the bottom of the jar. This is a fun little element that the toddlers will love. It’s a little window where they can sneak a peek to see what’s inside.

Next, I painted the four different colors, one on each of the four jars. 

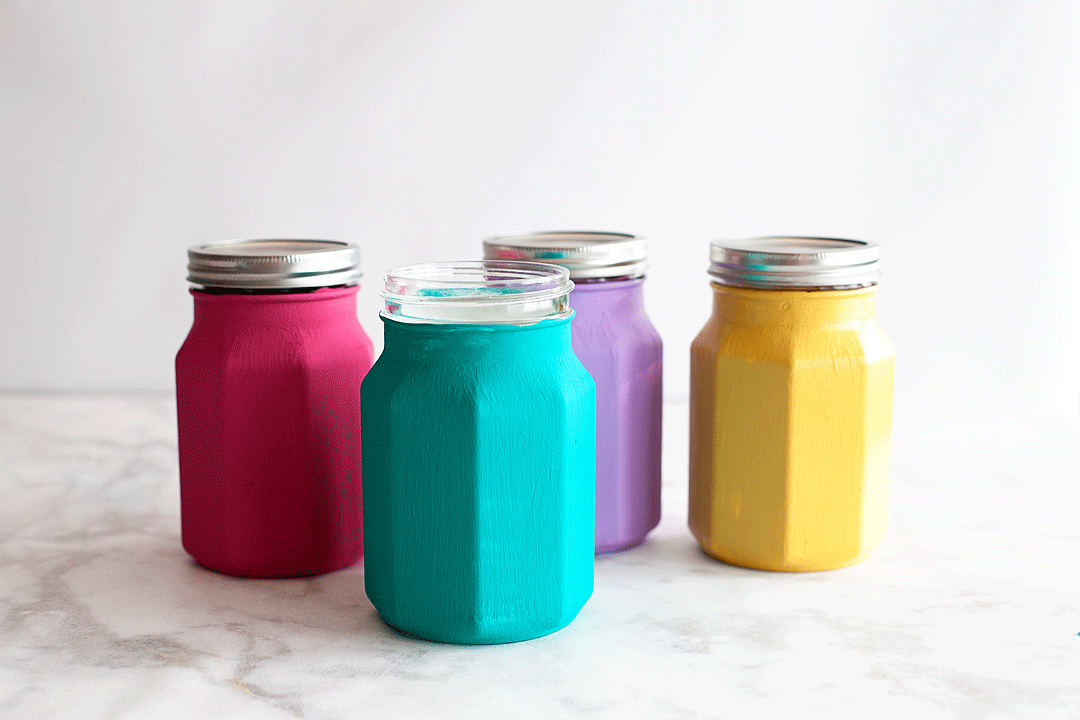
Because of the nice white bottom layers, I didn’t really need a 2nd coat for the other colors. I let these dry overnight at this point. You really need the paint to have time to not only dry but to also cure. The following day I distressed the jars to give them that worn-in look. 

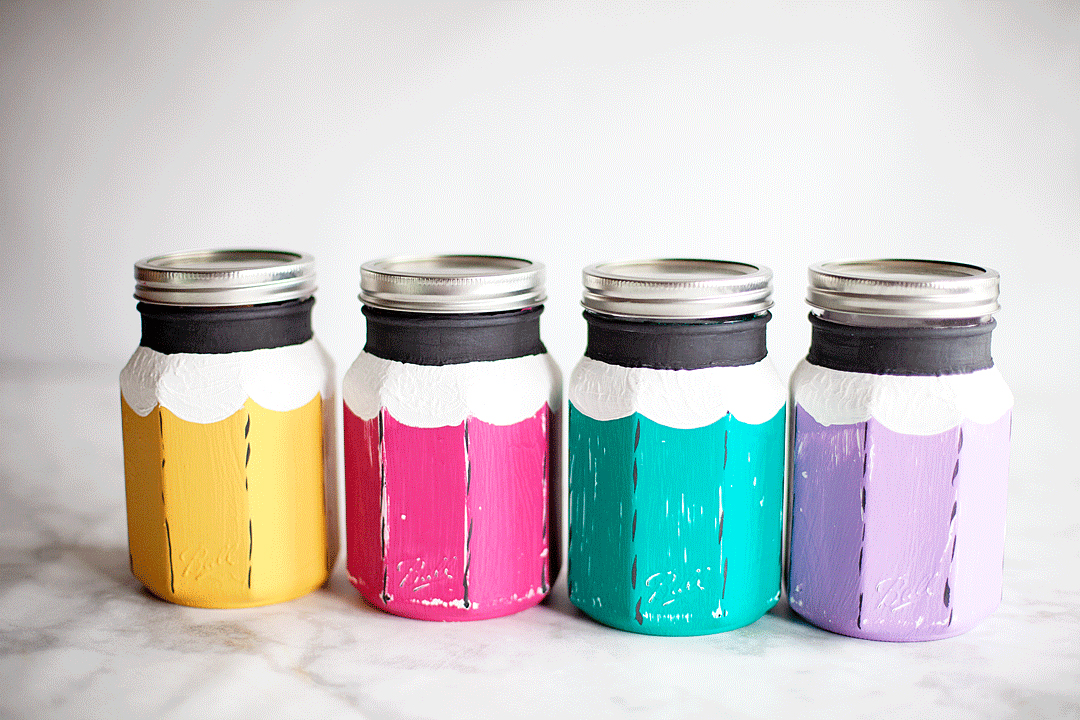
Once the distressing was finished and I had wiped the jars down with a damp cloth and let them dry, I added the white scallop at the top to look like the sharpened pencil. I just followed the lines of the Sharing Jar which are perfect for the pencil shape. I painted in rough small circles with a thicker chalk paint to add some texture to the surface to make it look more like wood. Once that had dried, I added a ring of black chalk paint to make it look like the pencil lead. I also used the small flat brush to lightly line the raised edges on the side of the Sharing Jar to highlight the jars structure and its pencil-like shape.

Now, with these jar being used by sticky little fingers, I would use a chalk paint finishing wax to protect the paint and keep it from distressing any further. 

Pro Tip – If brush lines bother you in your finished project (sometimes it adds to the effect of the project) all you have to do is smooth the surface of the paint after each layer of paint. You can do that by lightly sanding it with a 600 grit sandpaper. 

Toddler Activity Ideas

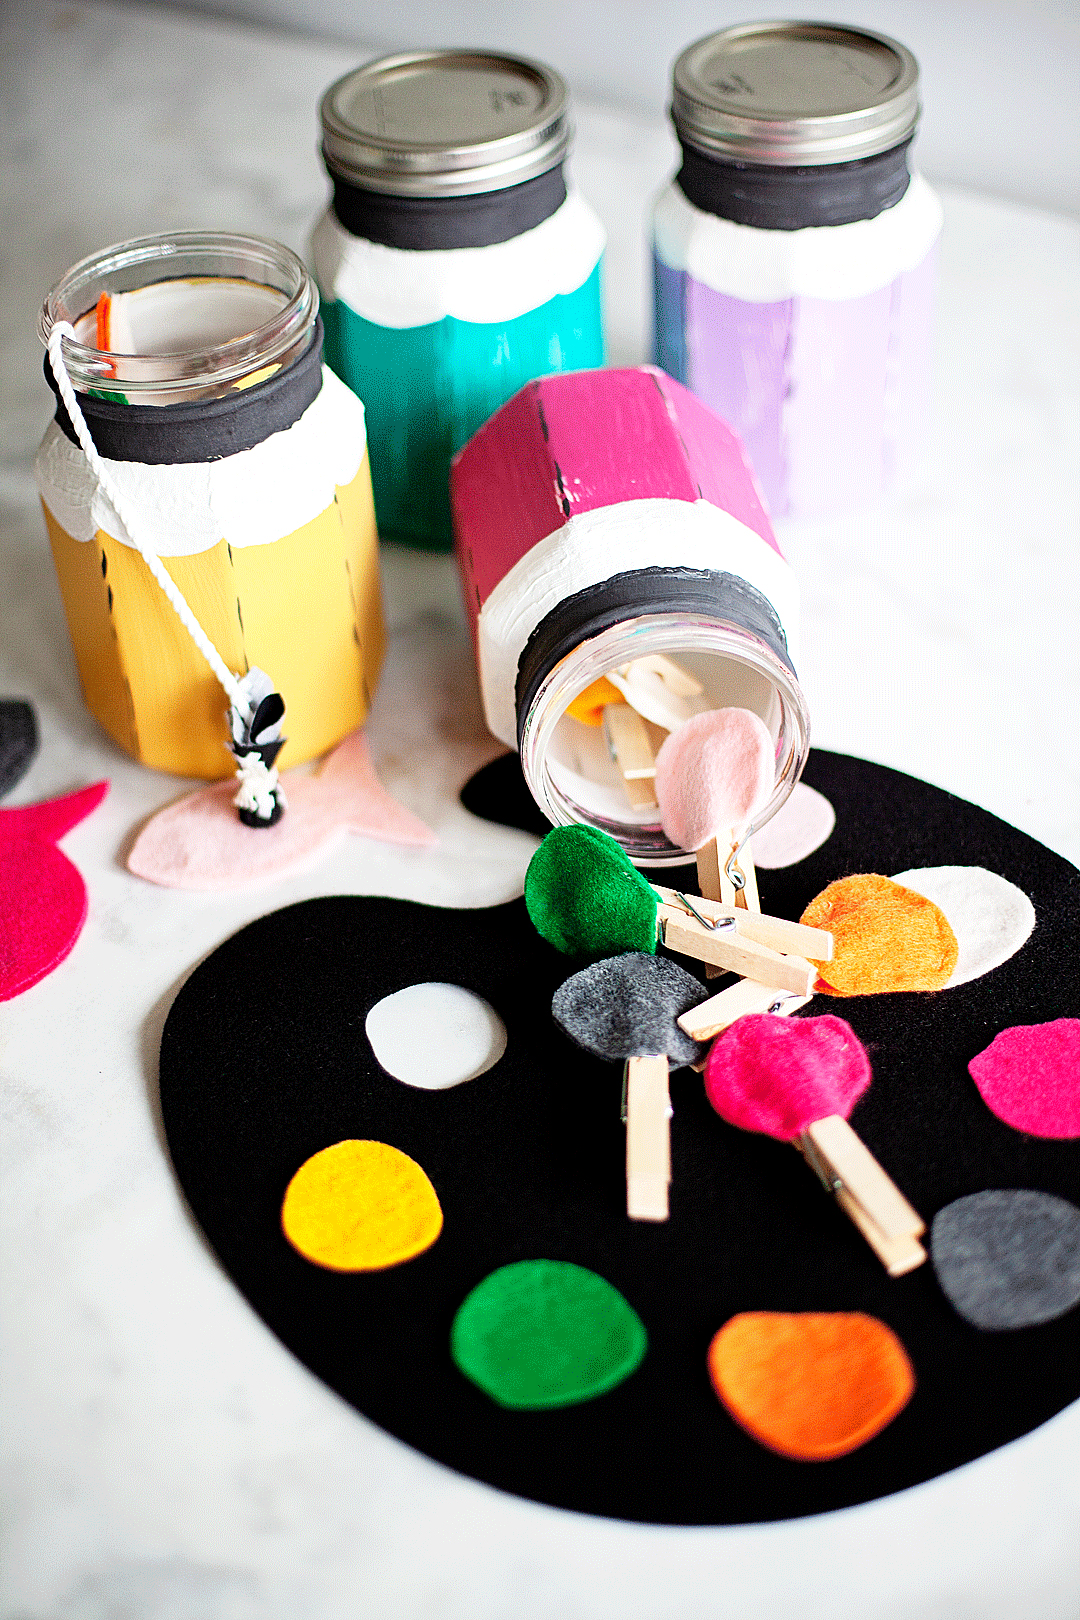
 Here is where the sky is the limit. You can fill these jars with all kinds of fun for toddlers and preschoolers alike. I made a couple to show what you could with these fun jars. A color matching paint palette & a fishing game. Both of these projects were no-sew and easy to put together. I used my Cricut cutting machine to cut the felt, but you could always print a pattern and then cut them out yourself. If you do happen to have a Cricut Maker, you are more than welcome to use my Toddler Activity cut files for this project. It’s already sized and ready to go.

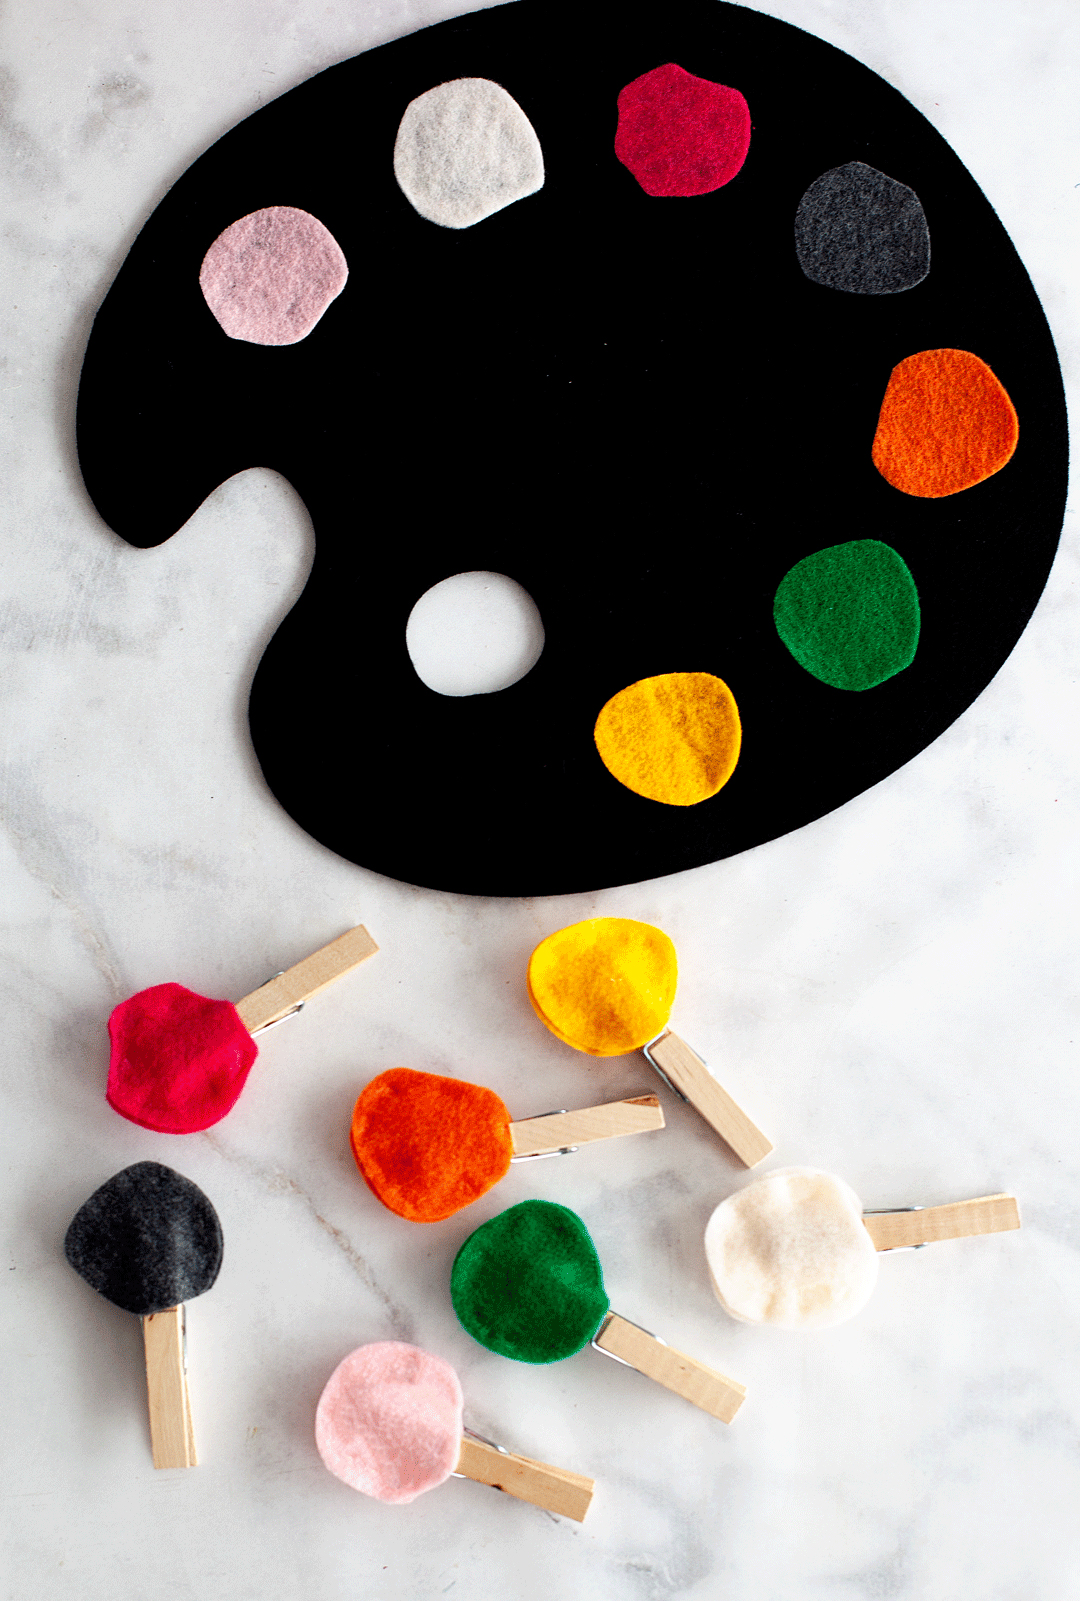
The paint palette was easy, I glued the circles of “paint” onto the artist’s palette with some fabric glue and then glued two other circles of “paint” onto a clothespin. One on the top of the clothespin and one sandwiching the top section of the clothespin, inside of the open pin, so the top piece of wood is sandwiched in felt and the bottom section is free. This way your little ones can clip the paint sticks onto the corresponding paint on the palette. 

When the glue is totally dry, I fold the palette in half and then roll it up like a cone and place it inside of the jar and put all of the paint sticks inside as well.


The fishing game is just as simple. Just a little cutting and gluing.


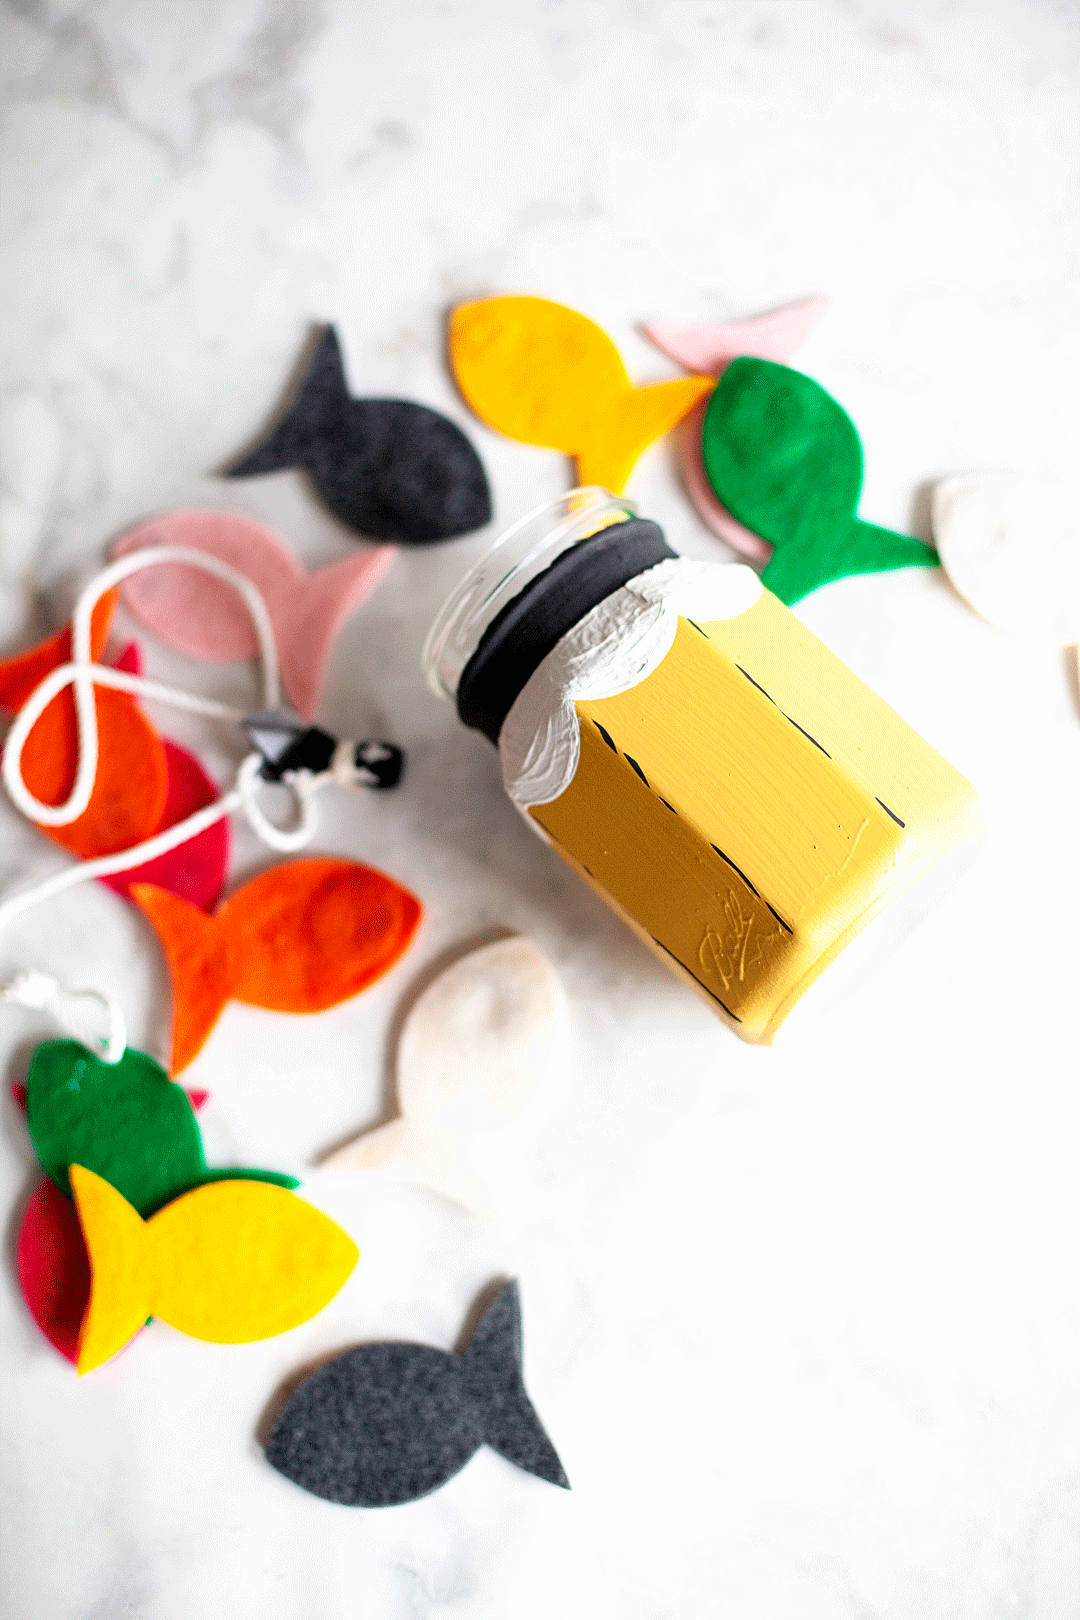
I placed a heavy-duty washer in between two layers of felt fish and used a fabric glue to glue the two pieces of felt together.

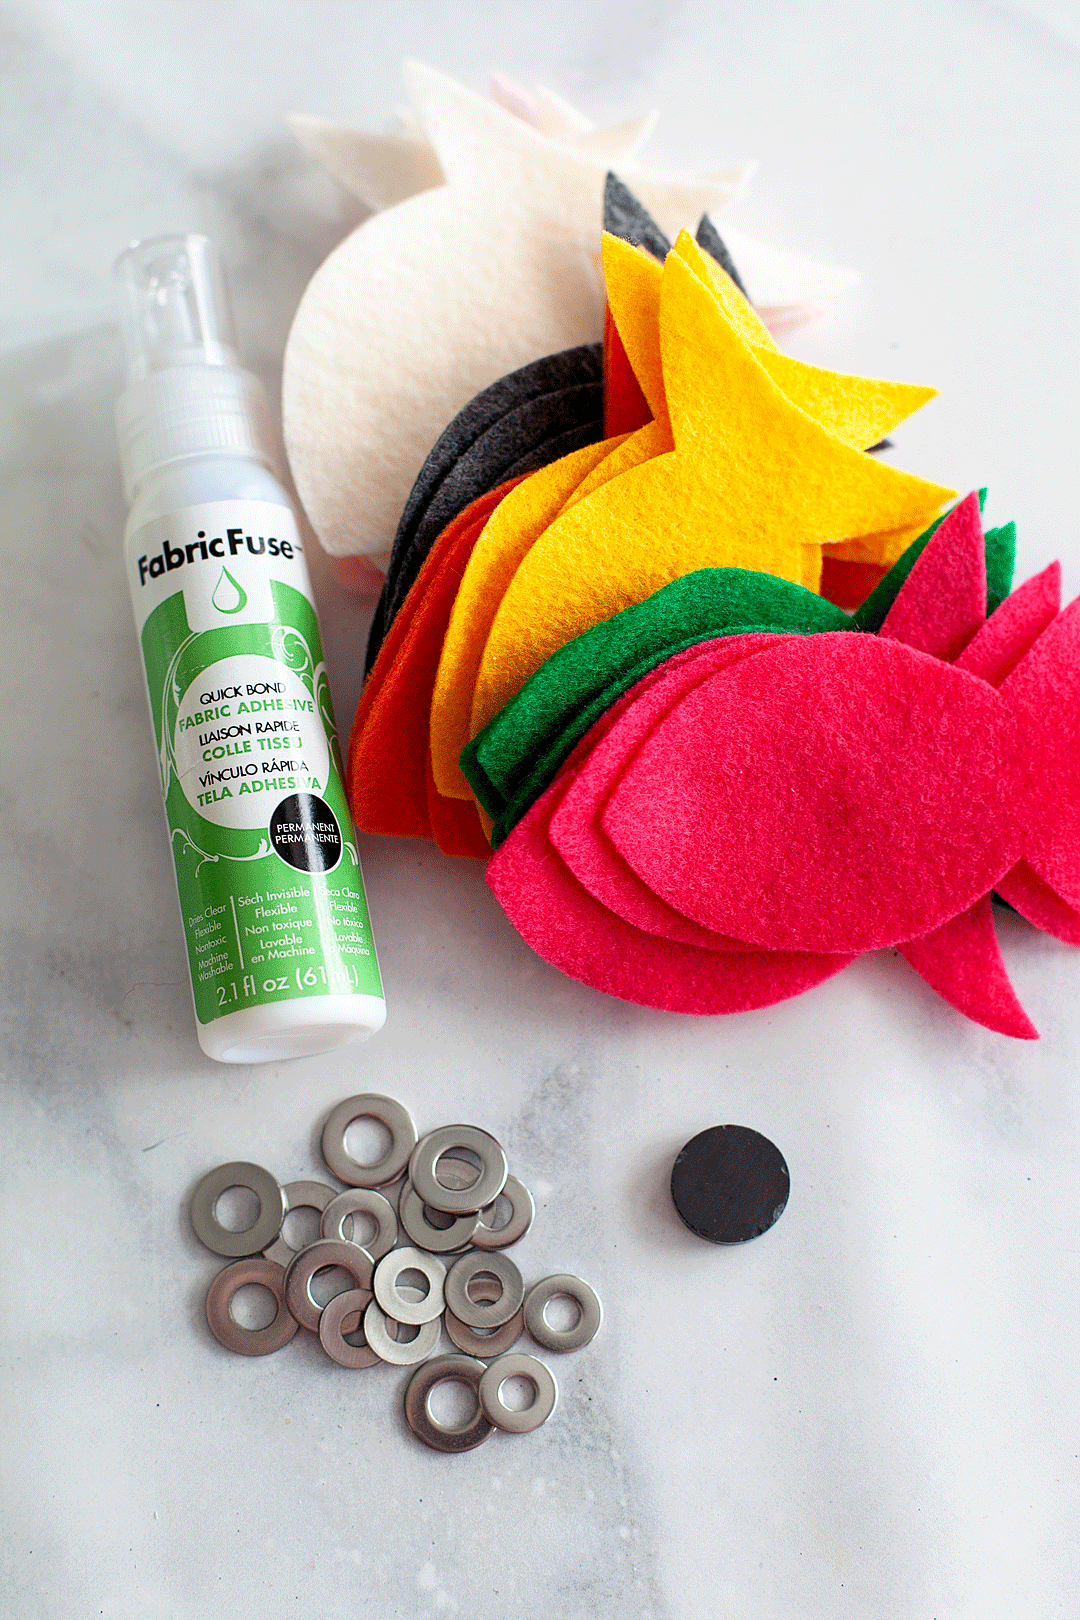
Then I wrapped a strong magnet in fabric (to minimize the choking hazard) tied it off with a string. Then, I hot glued a piece of rope to the wrapped magnet. I put a finger loop at the top of the string for our little friends to slip their finger into and go fishing!

These are just two ideas to fill your fun pencil jars! You can make some memory games, matching letters and number games. All kinds of stuff will go in these fun jars.  

Macrame Autumn Door Hanging

7 · Sep 17, 2018 · Leave a Comment

We’ve kind of fallen in love with the macrame trend at our house lately. We made a HUGE macrame celebration arch for my daughter Haley’s wedding a few weeks ago and I then felt inspired to make a macrame Autumn door hanging for my front entry for the impending season change. Oh, Autumn… You truly are my favorite!!

• This post is brought to you by Michaels Craft Stores •

We've kind of fallen in love with the macrame trend at our house lately. We made a HUGE macrame celebration arch for my daughter Haley's wedding a few weeks ago and I then felt inspired to make a macrame Autumn door hanging for my front entry for the impending season change. Oh, Autumn... You truly are my favorite!!

I’m going to date myself here, I’m not old enough to remember the first macrame trend in the 1970’s. However, I do remember the aftermath of that trend. Garage sales full of macrame goods looking desperately for a new home. Needless to say, when the Boho trend started a new a few years ago, I kind of chuckled a bit when macrame returned in fashion. Then my little side chuckles disappeared and I kind of fell in love with the look. Like fell hard… I want to macrame all the things now. My Macrame pinboard has gone nuts with all of the fun macrame projects I would like to tackle.

Macrame Autumn Door Hanging Supplies

Of course, when it came time to stock up on supplies I ran to Michaels my go-to supply store. They have everything you need to make all things macrame, fall decor & blank surfaces for signs. I especially love that you can order online and pick-up easily at the store. I save so much time just placing my order online and then my husband or daughter can run over and grab my supplies when they are out and about. We no longer have frustrating phone calls with my husband trying to find something at Michaels only to have him come home with the wrong item or not enough for what I need. I have the isles memorized but he sure doesn’t! It’s also nice to tack a pick-up to another errand without having to spend too much time walking through the store. Yep, I’m a big fan!

  • Cotton Rope
  • a branch from your yard or, wood dowel
  • square 9×9 galvanized metal sign
  • 1-2 Fall floral picks
  • scissors
  • wire cutters
  • hot glue gun and hot glue
  • Cricut Premium Vinyl
  • Cricut cutting machine

Instructions

For this project, I’m not going to share a tutorial for the macrame. Now don’t worry, I have you covered. I’m going to send you over to A Beautiful Mess to share the tutorial that I used to learn how to macrame. Seems only fair, right?

My neighbors were trimming their trees and I found a fun branch that would be perfect for a macrame door hanging and asked if I could snag it. I scaled down the macrame project from the curtain with 15 sections to 5 sections and set to work.

We've kind of fallen in love with the macrame trend at our house lately. We made a HUGE macrame celebration arch for my daughter Haley's wedding a few weeks ago and I then felt inspired to make a macrame Autumn door hanging for my front entry for the impending season change. Oh, Autumn... You truly are my favorite!!

Next, I cut the vinyl for the sign part of the door hanging with my Cricut Maker. You can even use my design if you’d like in Cricut Design Space. I then affixed the vinyl to the galvanized metal sign base.

I originally started with white vinyl and it didn’t stand out as I had hoped on the galvanized metal. So, I switched to some black vinyl to go with my door. You may want to try a different color that fits the color of your entryway.

Then I used my wire cutters and cut sections of the Fall floral picks of the pick and hot glued them onto the galvanized metal. Then I hot glued the metal sign onto the macrame and that was it. I had a perfect door hanger to use in Autumn.

For more Fall inspiration, visit Michaels. They have all kinds of fabulous Fall finds!

Italian Soda Bar Menu Created with Cricut EasyPress 2

30 · Aug 15, 2018 · Leave a Comment

You guys, I’m so excited! I’ve been madly working on a fun project this summer… Creating for my oldest daughter’s wedding. Seriously, there is nothing more fun than to create for a wedding. One thing that is needed when creating for a wedding are LARGE scale displays, that’s how to create WOW factor. Anyone can create small scale stuff but, when you have the tools to create something larger than life, that’s when things go from typical to magical! I’ve been creating with my Cricut machines for years and with my inaugural Cricut EasyPress for over a year now but, I’m excited to introduce you to the Large Cricut EasyPress 2… A true makers dream! I’ve used the NEW Large Cricut EasyPress 2 to create a huge canvas sign for Haley’s wedding reception. We are going to have an Italian soda bar and I wanted to create a larger than life menu to place next to the bar. Here she is… Let me show you how to make this large scale canvas sign!

+ This post brought to you by the talented folks at Cricut +

HUGE Canvas Italian Soda Bar Menu Sign create with my favorite Cricut Maker & the NEW Cricut Large Easy Press 2 • WhipperBerry

THE ITALIAN SODA BAR Menu

Early on in our wedding planning, Haley expressed that she would love to have an Italian Soda Bar as one of the elements to the reception. I was totally on board because I LOVE Italian sodas. If you aren’t familiar with an Italian soda, it’s a sparkling water with some added syrup and possibly added creamer or half & half depending on your taste. They are super scrumptious and fun to play around with.

Peach Melba Italian Soda • WhipperBerry
peach melba italian soda • whipperberry

I thought it would be a great idea to create a stylish life-size menu to place next to the soda bar to draw peoples attention to our drink options at the reception. I, of course, turned to my favorite creative tools, my Cricut Maker and the NEW Large Cricut EasyPress 2! I loaded up an arm full of Cricut Everyday Iron-On™in black and set to work.

The Cricut EasyPress 2

What makes the EasyPress so cool? Well… First of all, the original EasyPress is still a total rockstar and will work just perfect for this project as well if you already have one. If you don’t already own an EasyPress, you love the features on the THREE NEW EasyPress 2 machines…

  • Three unique sizes (6×7, 9×9, and 12×10) to suit every project you can dream up
  • Professional iron-on success in 60 seconds or less
  • Easy to learn and simple to use
  • Ceramic-coated heat plate means dry, even heat for flawless transfers
  • Faster heat-up time
  • Precise temperature control up to 400˚ F (The old EasyPress only goes to 350˚)
  • Insulated, streamlined Safety Base keeps EP2 in protected resting position while also protecting the pressing surface
  • Easy to read digital display
  • Scrumptious raspberry color
  • USB port for firmware updates
HUGE Canvas Italian Soda Bar Menu Sign create with my favorite Cricut Maker & the NEW Cricut Large Easy Press 2 • WhipperBerry
the NEW large EasyPress 2

The Design

I created my design in Cricut Design Space…

You can use my exact design by clicking HERE and heading to Cricut Design Space

Then measured the “secret” material that I was going to use. It is 4 feet wide, so I then sized it appropriately within the software so that it would cut at the right size. Because of the size of the design, I knew that I was going to have to piece some things together like the underline in the title but, that wasn’t an issue at all.

Large Canvas Sign Supplies

Large Canvas Sign Supplies • WhipperBerry
  • Cricut cutting machine – I used the Cricut Maker
  • 12×24 light grip cutting mat
  • EasyPress Protective Mat
  • Cricut EasyPress 2 – large with the 10×12 plate
  • Cricut Everyday Iron-On – black, I used 10 rolls for this project
  • EasyPress Mat 12×60
  • canvas drop cloth – I found a 4 ft wide drop cloth at Home Depot for about $9
  • 2 wood dowels
  • 1 1/2 yards cotton rope

That’s right, I used a DROP CLOTH as my canvas for this life-sized menu sign and it turned out great. What I am loving more than anything is the NEW Cricut EasyPress 2, especially for a project of this size.

The NEW @cricut Easy Press 2 with the large 10x12 inch plate. Great for large scale projects • WhipperBerry

This menu sign is as tall as I am! Having the large EasyPress 2 made all of the difference. Not to mention the improved design and heat plate. This new EasyPress is a dream! I’ve longed for days when I could easily and cost-effectively made large-scale projects like this without spending an arm and a leg, I love how Cricut works to understand what makers are looking for and then work their little behinds off to create tools that are inspired by US!

Instructions

Now, this project may seem daunting, it’s really not. It’s your typical sign making but, on a larger scale. You have to click on my Italian Soda Bar sign in Design Space and then size it to the size you would like your sign to be. This is the beauty of design space. We can easily share projects and then customize it for our needs. Then, all you need to do is click the MAKE IT button. Design Space does all of the work when it comes to making sure you don’t waste your precious Everyday Iron-On material by placing your welded groups into sections that utilize the materials the most efficient way.

IMPORTANT | Make sure that BEFORE you cut your vinyl you select the MIRROR button when preparing your cutting mats for final cutting.

Here’s how to make your Italian Soda Bar sign,

  • Cut Everyday Iron-On Material on Cricut Maker or Explore Air 2 machine. DON’T FORGET TO MIRROR YOUR IMAGES.
  • Your sign will be jumbled up a little bit on your cutting mats but, don’t worry. You will cut them into sections after you weed the iron-on and place them on your drop cloth in the right order.
  • Weed material. This means to remove the excess iron-on material around your words to then discard. Make sure to weed carefully so that you don’t remove or tear any letters or numbers. You also want to make sure that you don’t accidentally remove punctuation and those little dots on top of the “i” and other letters.
  • Prepare your drop cloth. Layout your drop cloth on a large flat surface and make sure it is wrinkle free and ready to go.  TIP | Use the EasyPress to iron your drop cloth to prepare it to add the Everyday Iron-On™.
  • Cut and arrange your sign sections on your drop cloth. Now, I did this a little bit at a time starting with the title once I had the title pressed then I move down and work on another smaller section.
  • Measure – Now, I’m not really a measuring type of person but, (I should be) if eyeballing isn’t your thing. You may want to take out your measuring tape and to make sure everything is lined up appropriately.
HUGE Canvas Italian Soda Bar Menu Sign create with my favorite Cricut Maker & the NEW Cricut Large Easy Press 2 • WhipperBerry
  • Turn-on your EasyPress 2 and set it to the following settings,
    • 340°F / 171°C
    • Pre-heat your surface: 5 sec
    • Press: 60 sec
    • Warm Peel (leave for 30-60 seconds and then gently peel)
  • Place the EasyPress Mat under the first section to press and cover with the protective cover and press the 1st section according to the guidelines above.
  • Repeat for the remaining sections.
HUGE Canvas Italian Soda Bar Menu Sign create with my favorite Cricut Maker & the NEW Cricut Large Easy Press 2 • WhipperBerry

The Cricut EasyPress 2 will be available this Fall from Cricut. What HUGE project would you like to make with an EP2? Stay tuned I have all kinds of goodies that I’m working on for the wedding that are going to look amazing thanks to the EP2.

This is a sponsored conversation written by me on behalf of Cricut. The opinions and text are all mine.

Linen Wedding Organizer Envelopes with a Little Flair

8 · Jul 23, 2018 · Leave a Comment

Wedding planning… I am DEEP into the planning of my first daughter’s wedding that is coming up in a little over a month. I have taken the approach of staying as organized as possible for this monster project. Really, that’s the only way you can prepare for a wedding and not lose your mind! I found some linen organizing envelopes at Target from the Hearth and Hand line created by Joanna Gains the other day and thought they would be perfect to keep things organized for the wedding. Of course, I needed to add some labels and in true WhipperBerry fashion, they needed to look classy. I turned to DecoArt for a little help with their Stylin’ paint perfect for home or fashion accessories of all kinds!

• This post is brought to you by DecoArt •Add some style to fabric or leather office supplies with @decoart Stylin' Paint | #paint #homedecor #officesupplies #wedding #weddingplanning

Wedding Organization

Wedding planning is NOT for the faint of heart. So many details, so many emotions, so much stuff! It really pays to be as organized as possible. Like I said before, I found some linen envelope organizers that I thought would be perfect to keep receipts, notes, menus and the like organized. I identified 4 areas that I thought would be good to have specific folders for,

  1. Budget
  2. Travel
  3. Food
  4. Design

Budget

This is where you can keep your notes as far as your budget goes along with receipts for everything purchased and paid for.

Travel

If your family is anything like ours, not everyone lives in the same place. Many family and friends will be traveling from elsewhere and this is a great way to keep track of those notes and itineraries.

Food

Food is one of the big elements to the reception. This is where you can keep track of proposals, budget, menu items, and such.

Design

You can think of this folder as your Pinterest hardcopy. Notes for your overall design of the event, different design elements, floral ideas, invitation ideas and so much more. Keep track of those ideas here along with any other pertinent information for the overall look of the event.

Linen Organizer Wedding Labels

There are a couple of different steps to this easy project and here’s a quick snippet of my Instagram Story to show a little more about how this works.

Label Design

I designed the labels in Cricut Design Space and used my Cricut Maker to cut out the vinyl for the project. I love making stencils with leftover vinyl and then using some DecoArt paint to create all kinds of projects. I’m thrilled to find that I can do the same with fabric, canvas, and leather now as well with DecoArt Stylin’. Here are some the key benefits to DecoArt Stylin’,

  • Flexible paint specially-formulated to prevent cracking or peeling
  • Bonds to surface to create a seamless finish
  • An ideal color palette for fashion décor
  • Water-based
  • Soap and water clean-up

If you are a Cricut user (if not, I highly suggest that you should be, they go hand in hand with paint!) you can access my design in my Design Space profile.  If not, you can create your own stencils designs using other design software and use either a cutting machine or craft knife to cut your stencil out of vinyl or freezer paper.

Linen Wedding Organizer Envelope Supplies

Here are the supplies you will need for your project.

  • linen or canvas folders
  • DecoArt Stylin’ Paint
  • vinyl, stencil vinyl
  • transfer tape
  • stencil sponge brush or a makeup sponge

Instructions

Add some style to fabric or leather office supplies with @decoart Stylin' Paint | #paint #homedecor #officesupplies #wedding #weddingplanning

  1. Cut out your stencil and weed the vinyl make sure to keep the negative side of the design. That just means that you’ll need to remove the letters from the vinyl and leave the rest of your vinyl as the stencil. Be careful that you keep a good eye on the middle sections of letters and those darn dots at the top of “i”.
  2. Cover your stencil in transfer tape and remove the back of the vinyl.
  3. Carefully place the stencil onto the fabric folder and press down with a brayer or scraper tool. Fabric typically has a texture that is going to make it a little tricky to get a truly clean line but, if you press your vinyl down well, you’ll have a pretty good seal.
  4. Remove the transfer tape carefully.
  5. Place a quarter size amount of paint onto a paper plate and use your sponge to lightly dab the paint onto the surface of your organizer. Add some style to fabric or leather office supplies with @decoart Stylin' Paint | #paint #homedecor #officesupplies #wedding #weddingplanningKeep the paint LIGHT to avoid any paint leaking under the stencil. It’s better to have several rounds with light paint than to have an unsightly leak area.
  6. Cover your stenciled image until you have the coverage you would like.Add some style to fabric or leather office supplies with @decoart Stylin' Paint | #paint #homedecor #officesupplies #wedding #weddingplanning
  7. Let dry.
  8. When the paint is dry, remove the stencil and get to work on that darn wedding!

Add some style to fabric or leather office supplies with @decoart Stylin' Paint | #paint #homedecor #officesupplies #wedding #weddingplanning

Disclaimer • This is a paid post with my friends at DecoArt. I am a member of the DecoArt Core Creator program and do receive payment and product to help facilitate these creative posts. However, keep in mind… I will NEVER share something I don’t truly love and use in my everyday life.

SaveSave

SaveSave

SaveSave

SaveSave

SaveSave

SaveSave

SaveSave

SaveSave

SaveSave

SaveSave

  • « Go to Previous Page
  • Page 1
  • Interim pages omitted …
  • Page 3
  • Page 4
  • Page 5
  • Page 6
  • Page 7
  • Interim pages omitted …
  • Page 13
  • Go to Next Page »

Primary Sidebar

Heather from Whipperberry
Hello... my name is Heather and I'm the creator of WhipperBerry a creative lifestyle blog packed full of great recipes and creative ideas for your home and family. I find I am happiest when I'm living a creative life and I love to share what I've been up to along the way... Come explore, my hope is that you'll leave inspired!

Footer

  • Privacy Policy
  • Crafts
  • Food
  • Gifts
  • Holidays
  • Home
  • Mom Life
  • Recipes
  • Travel

Copyright © 2026 · Seasoned Pro