• Skip to primary navigation
  • Skip to main content
  • Skip to primary sidebar
  • Skip to footer

Whipperberry

WhipperBerry • Your Home For Creative Inspiration

  • Home
  • Recipes
    • Starters
    • Easy Weeknight Dinners
    • Main Dish
    • Salads
    • Side Dish
    • Soups & Stews
    • Desserts
    • Breakfast
    • Miscellaneous
  • Tutorials
    • Creative Crafts
    • DIY Decor
    • Fabric Crafts
    • Food How-To
    • Jewlery
    • Paint Projects
    • Paper Art
    • Party Styling
    • Photography and Graphic Design
    • Silhouette
  • Holidays
    • Easter
    • Mother’s Day
    • Father’s Day
    • 4th of July
    • Halloween
    • Thanksgiving
    • Christmas
    • Valentine’s Day
  • Gift Ideas
    • Gifts For Everyone
    • Gifts for Dad
    • Mother’s day
    • For The Girls
    • For The Kids
    • Teacher Gift Ideas
    • Christmas
  • Printables
    • Holiday
    • Gift Idea
    • LDS Primary
  • Travel
  • About
    • Terms
  • Contact
  • Nav Social Menu

    • Facebook
    • Instagram
    • Pinterest
    • RSS
    • Twitter

DecoArt

Farmhouse Inspired Christmas Tree – Dream Tree Challenge

75 · Nov 1, 2017 · 1 Comment

It’s getting close to my favorite time of year… Christmas!! Every year it’s so fun to participate in the Michaels Dream Tree Challenge and this year has been EXTRA FUN!  We gathered together as a family and crafted our Christmas tree together and it was so fun. From trees to ornaments and holiday décor, Michaels has everything you need to MAKE this holiday your own! You can even shop over 100 Christmas Trees at Michaels.com. Crafting your tree together is a  great way to bring the family together at the beginning of the Holiday season. Here is what we created to make our 2017 tree magical for our home and family.
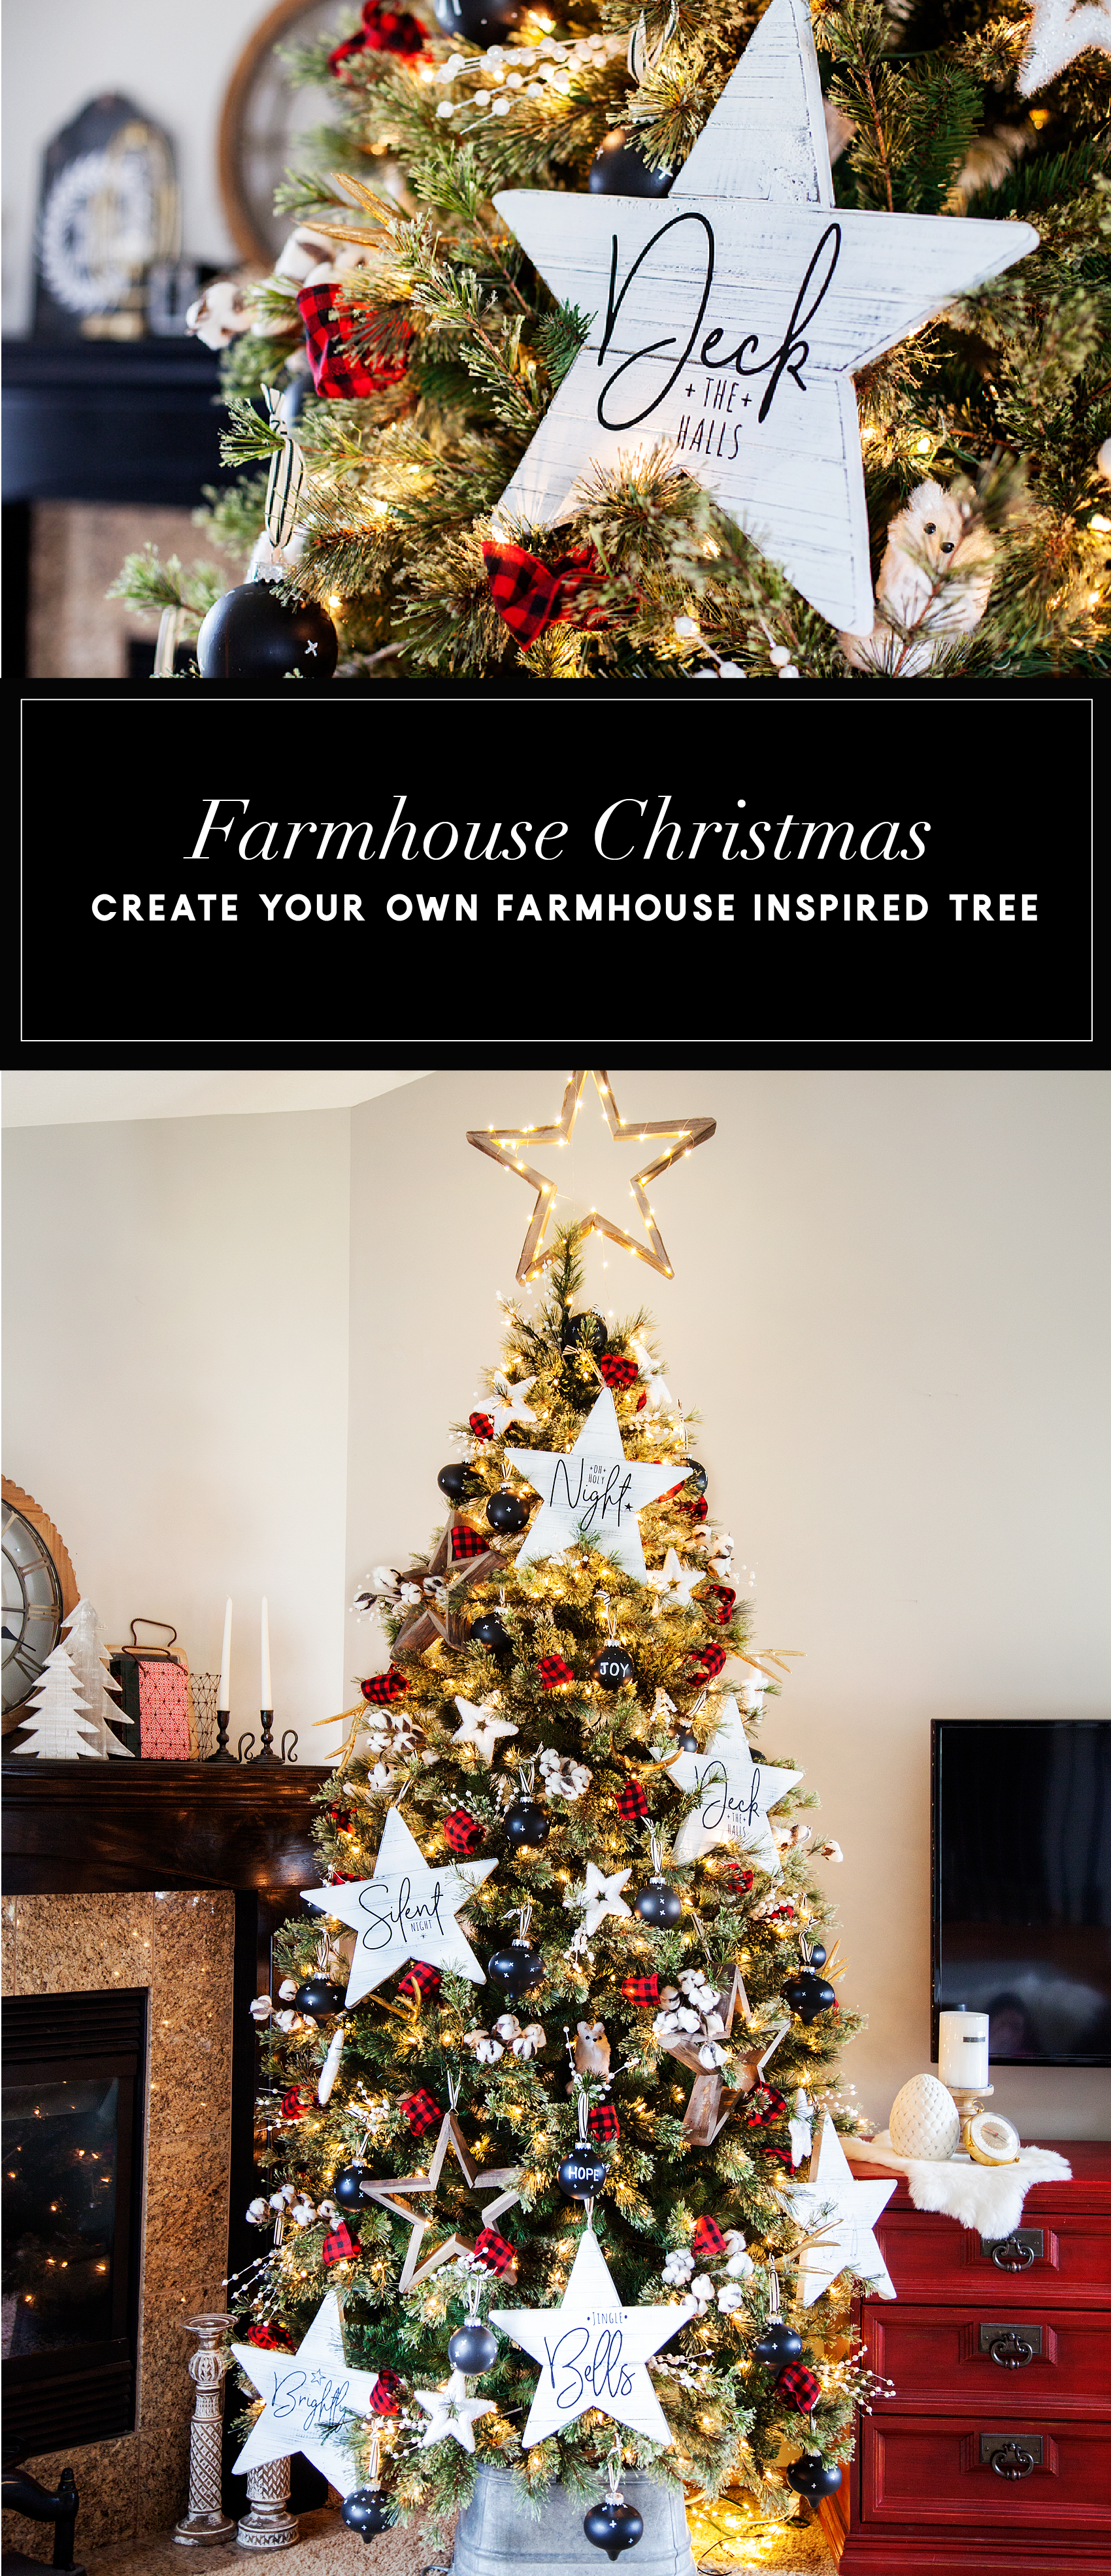
Farmhouse Inspired Christmas Tree -WhipperBerry-100

The Christmas Tree

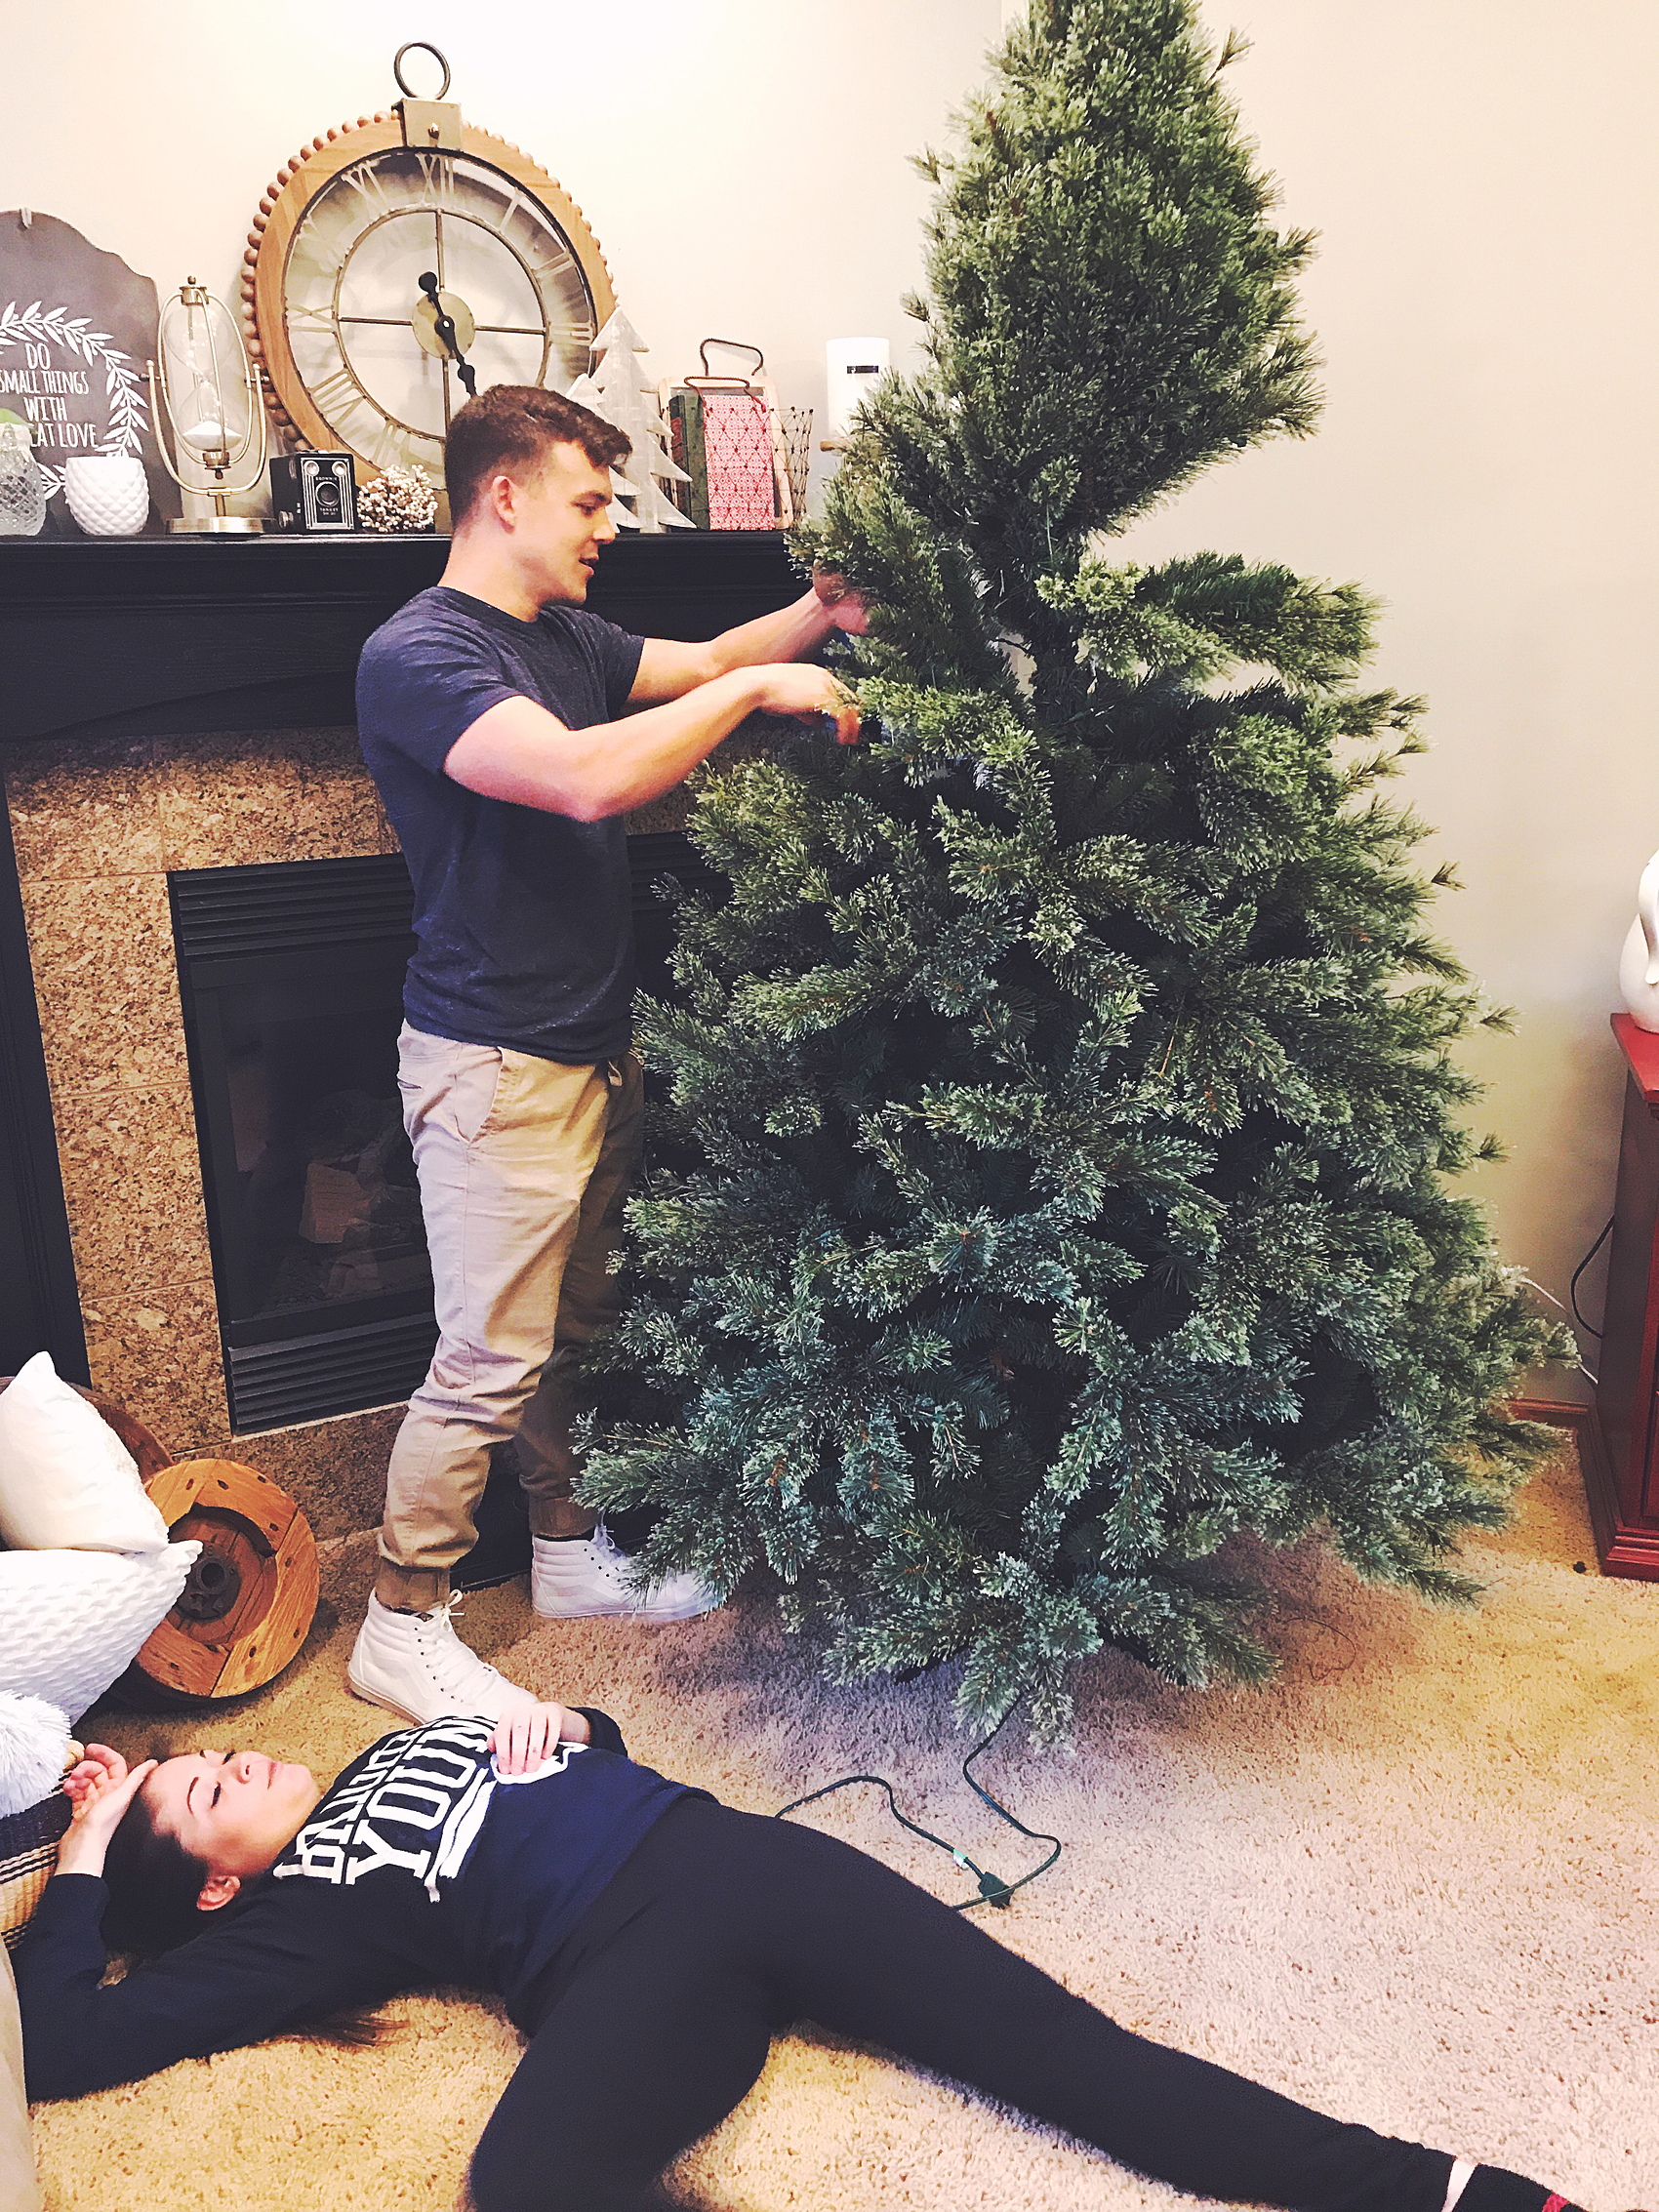
This year, I picked the 7.5 Ft. Pre-Lit Jasper Cashmere Artificial Christmas Tree, Clear Lights by Ashland™.  At first it was a little wide for our space. BUT… We placed it on top of an old bucket I had and then bent the lower branches down to give it a slimmer figure. I wish ‘slimming-down’ was that easy for all of us! 😉 That also raised the tree up a bit, which makes it look better in a room with vaulted ceilings.

Regardless of what this photo looks like below (someone was being a bit dramatic…) The Jasper tree is super easy to set-up. It’s literally plug and play. The electricity runs through the poll of the tree so you don’t have to go hunting around for all of the connections. Then all you have to do is fluff the branches.

setting-up-the-tree

Farmhouse Inspired Christmas Ornaments

Part of the fun when decorating for the Holidays is actually making some of your own decor. This year I was inspired by some ornaments that Joanna Gains has created for another store. I LOVE them and thought we could make some of our own with supplies from Michaels.

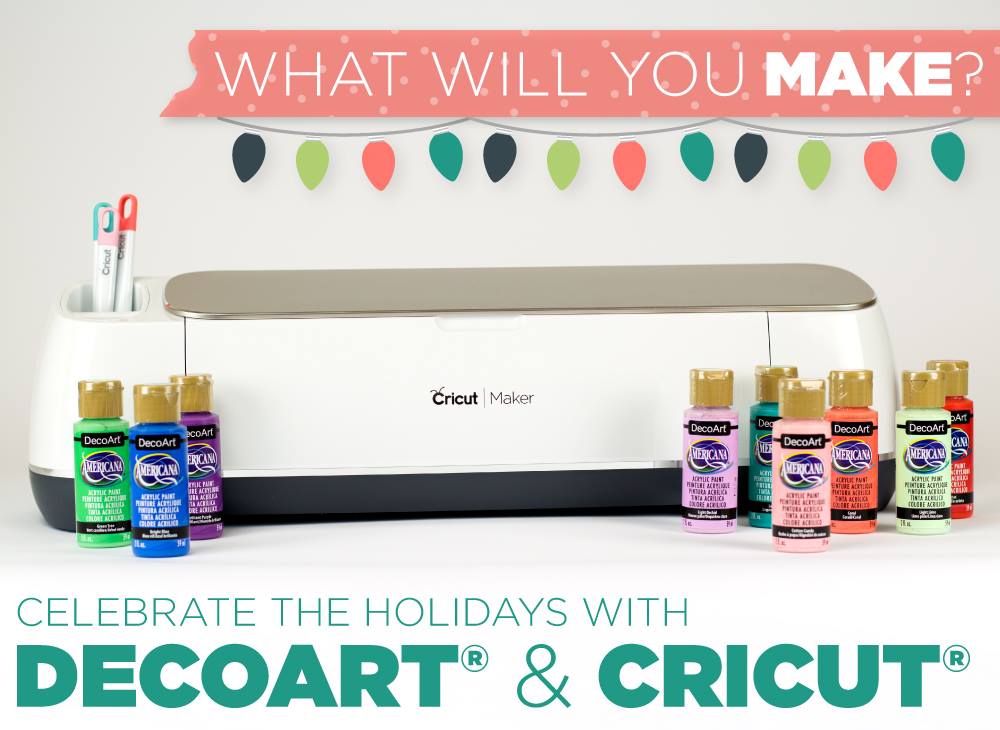
I grabbed some of the shatter proof ornaments at Michaels along with some of the Americana Chalkboard Paint from DecoArt…

Shatter proof ornaments from @Michaels

  • Plastic Onion Ornaments By Artminds™

  • Clear Plastic Ornaments By Artminds™

  • Americana Chalkboard Paint

Americana Chalkboard Paint for Christmas Ornaments

paining ornaments-100

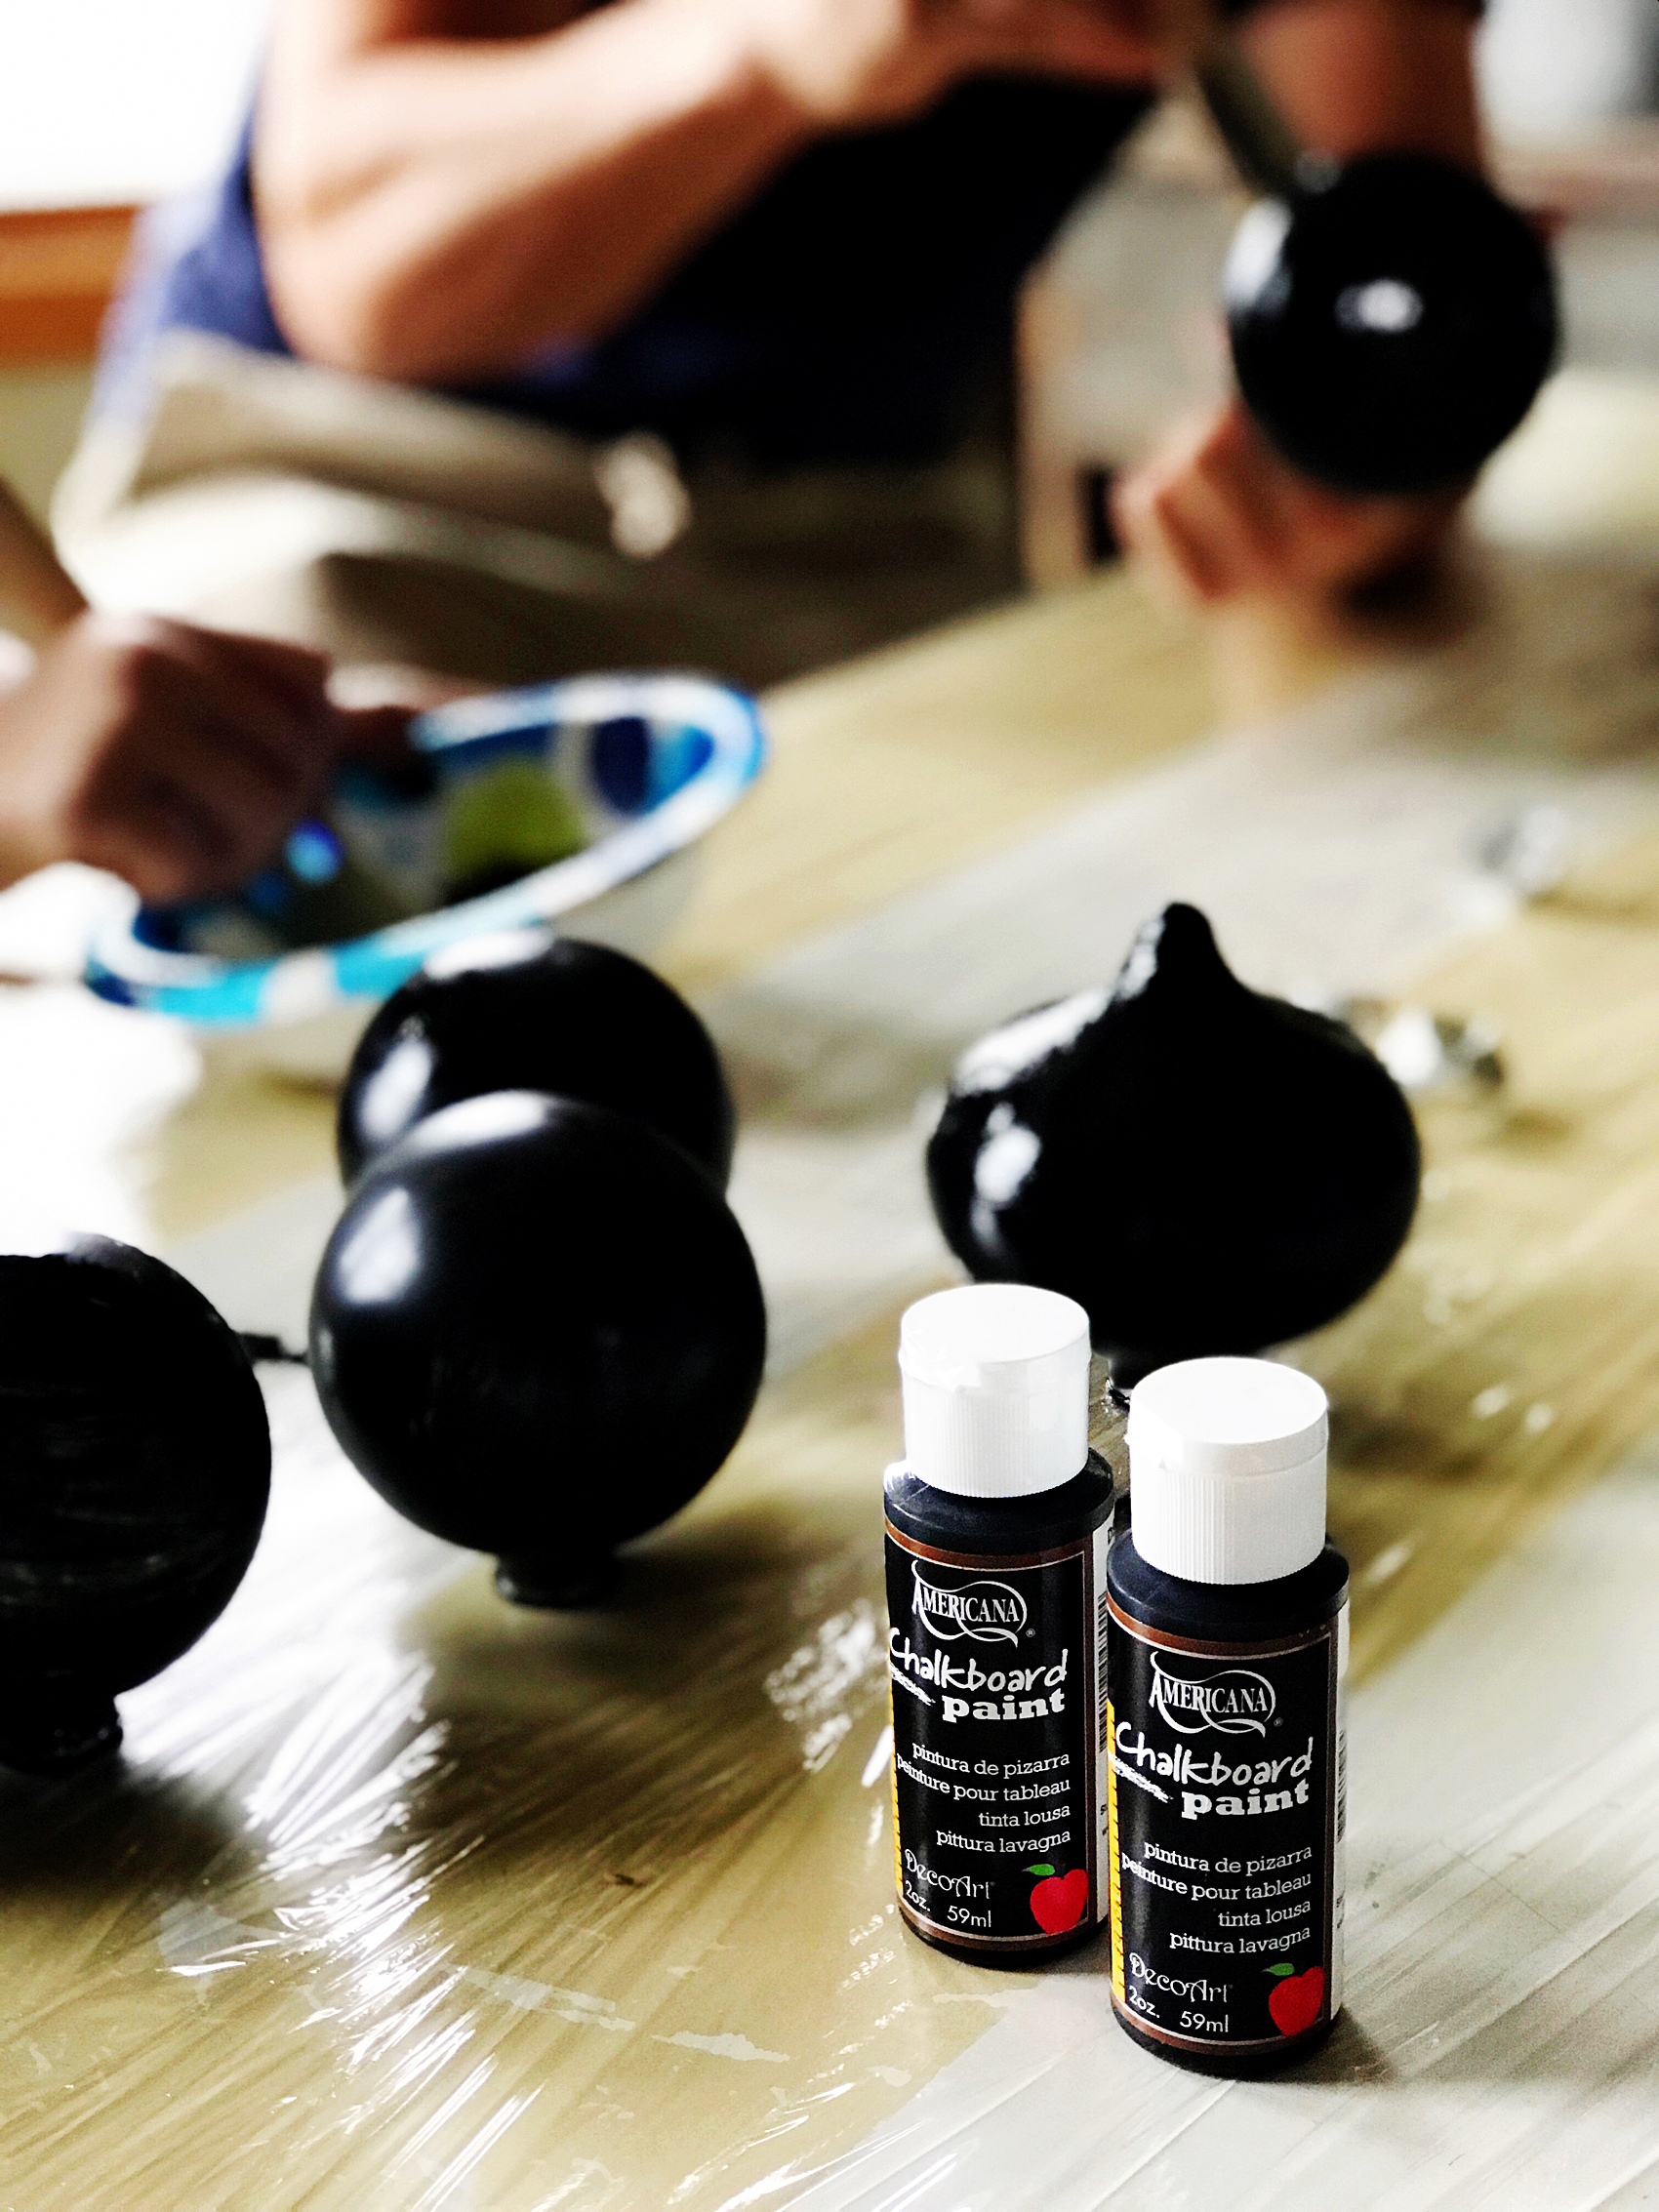
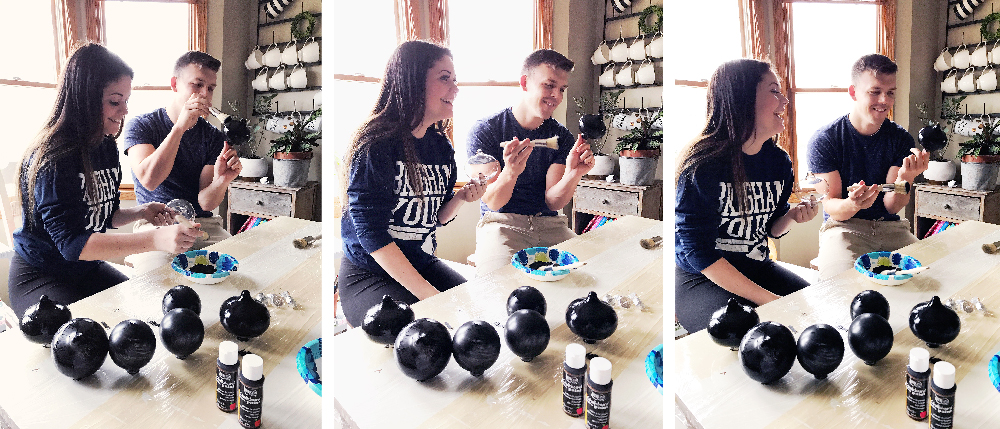
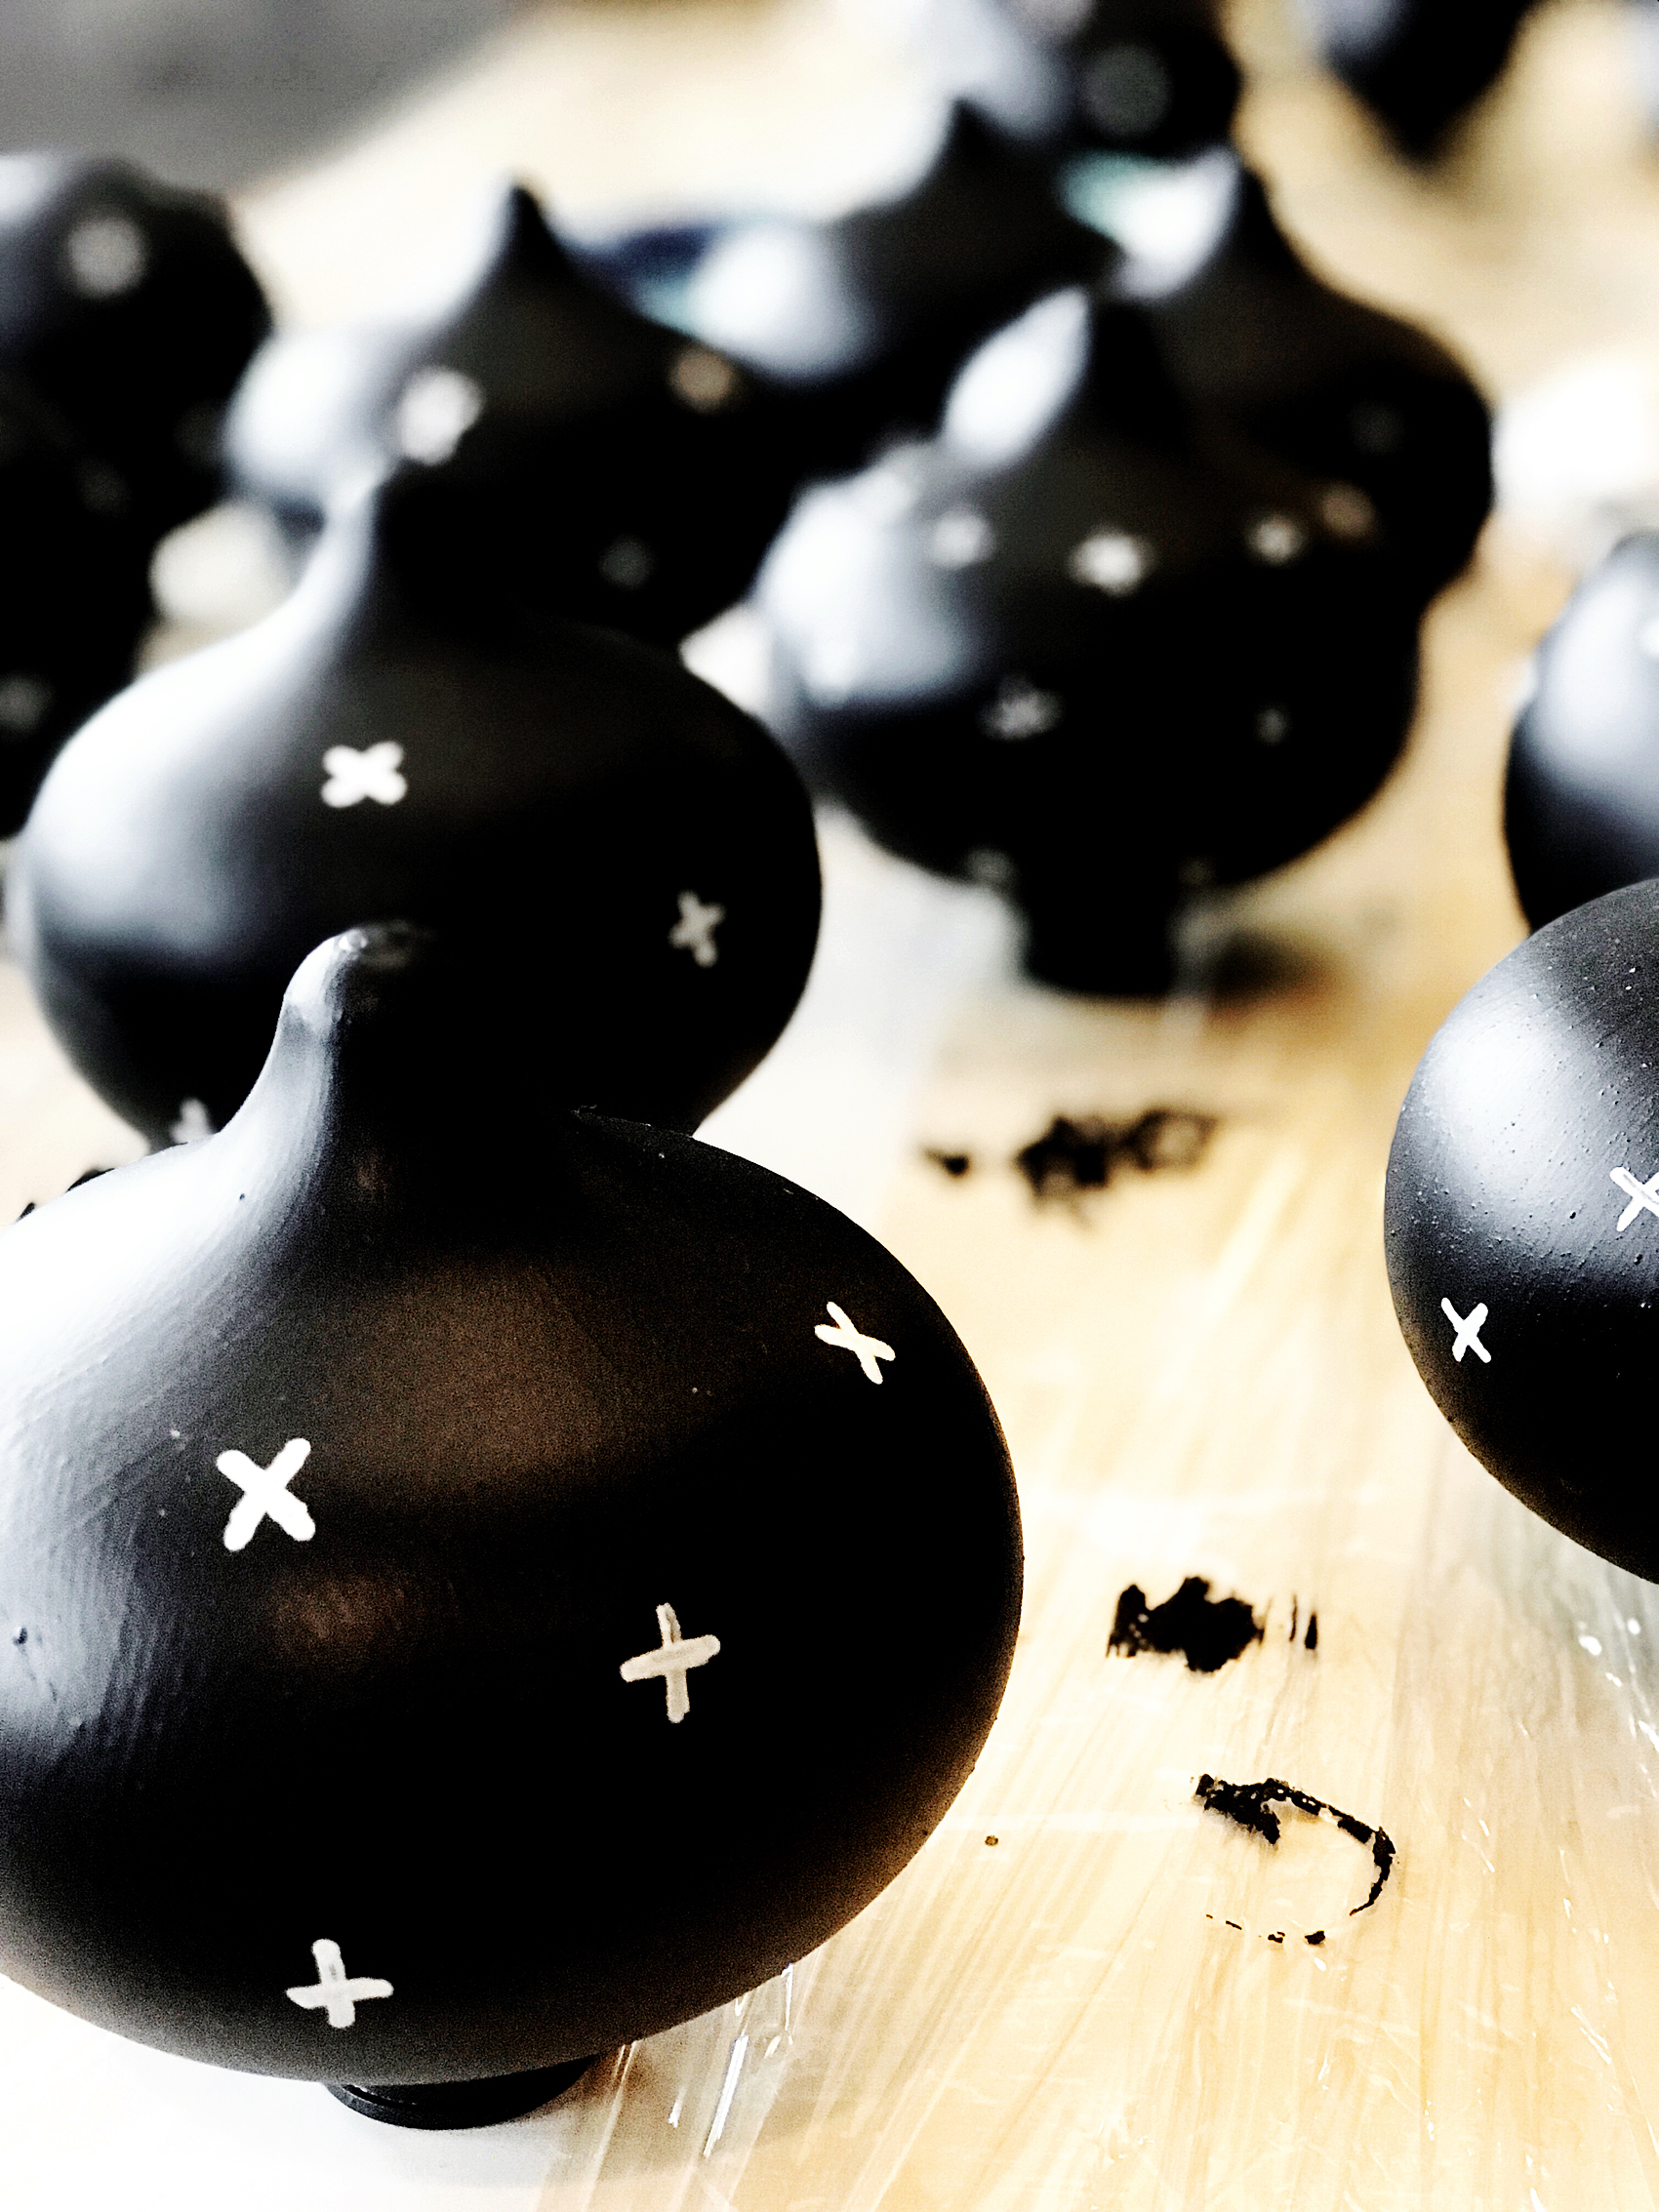
My daughter Haley is home from college with her boyfriend Kyle and we decided to have a paint party. We covered the table with plastic wrap and went to town with the clear ornaments from Michaels.  We painted them all over with the chalkboard paint. Now, the only reason I use chalkboard paint is because I like the matte look. Then we used a white paint marker from Sharpie and created all of the little swiss crosses on the ornaments.

Create DIY Hearth and Home Black Swiss Cross Christmas Ornaments via WhipperBerry

They turned out super cute and we had so much fun making them together!

Create DIY Hearth and Home Black Swiss Cross Christmas Ornaments via WhipperBerry

Create DIY Hearth and Home Black Swiss Cross Christmas Ornaments via WhipperBerry

I think they may be my new favorite Christmas ornaments for our tree.

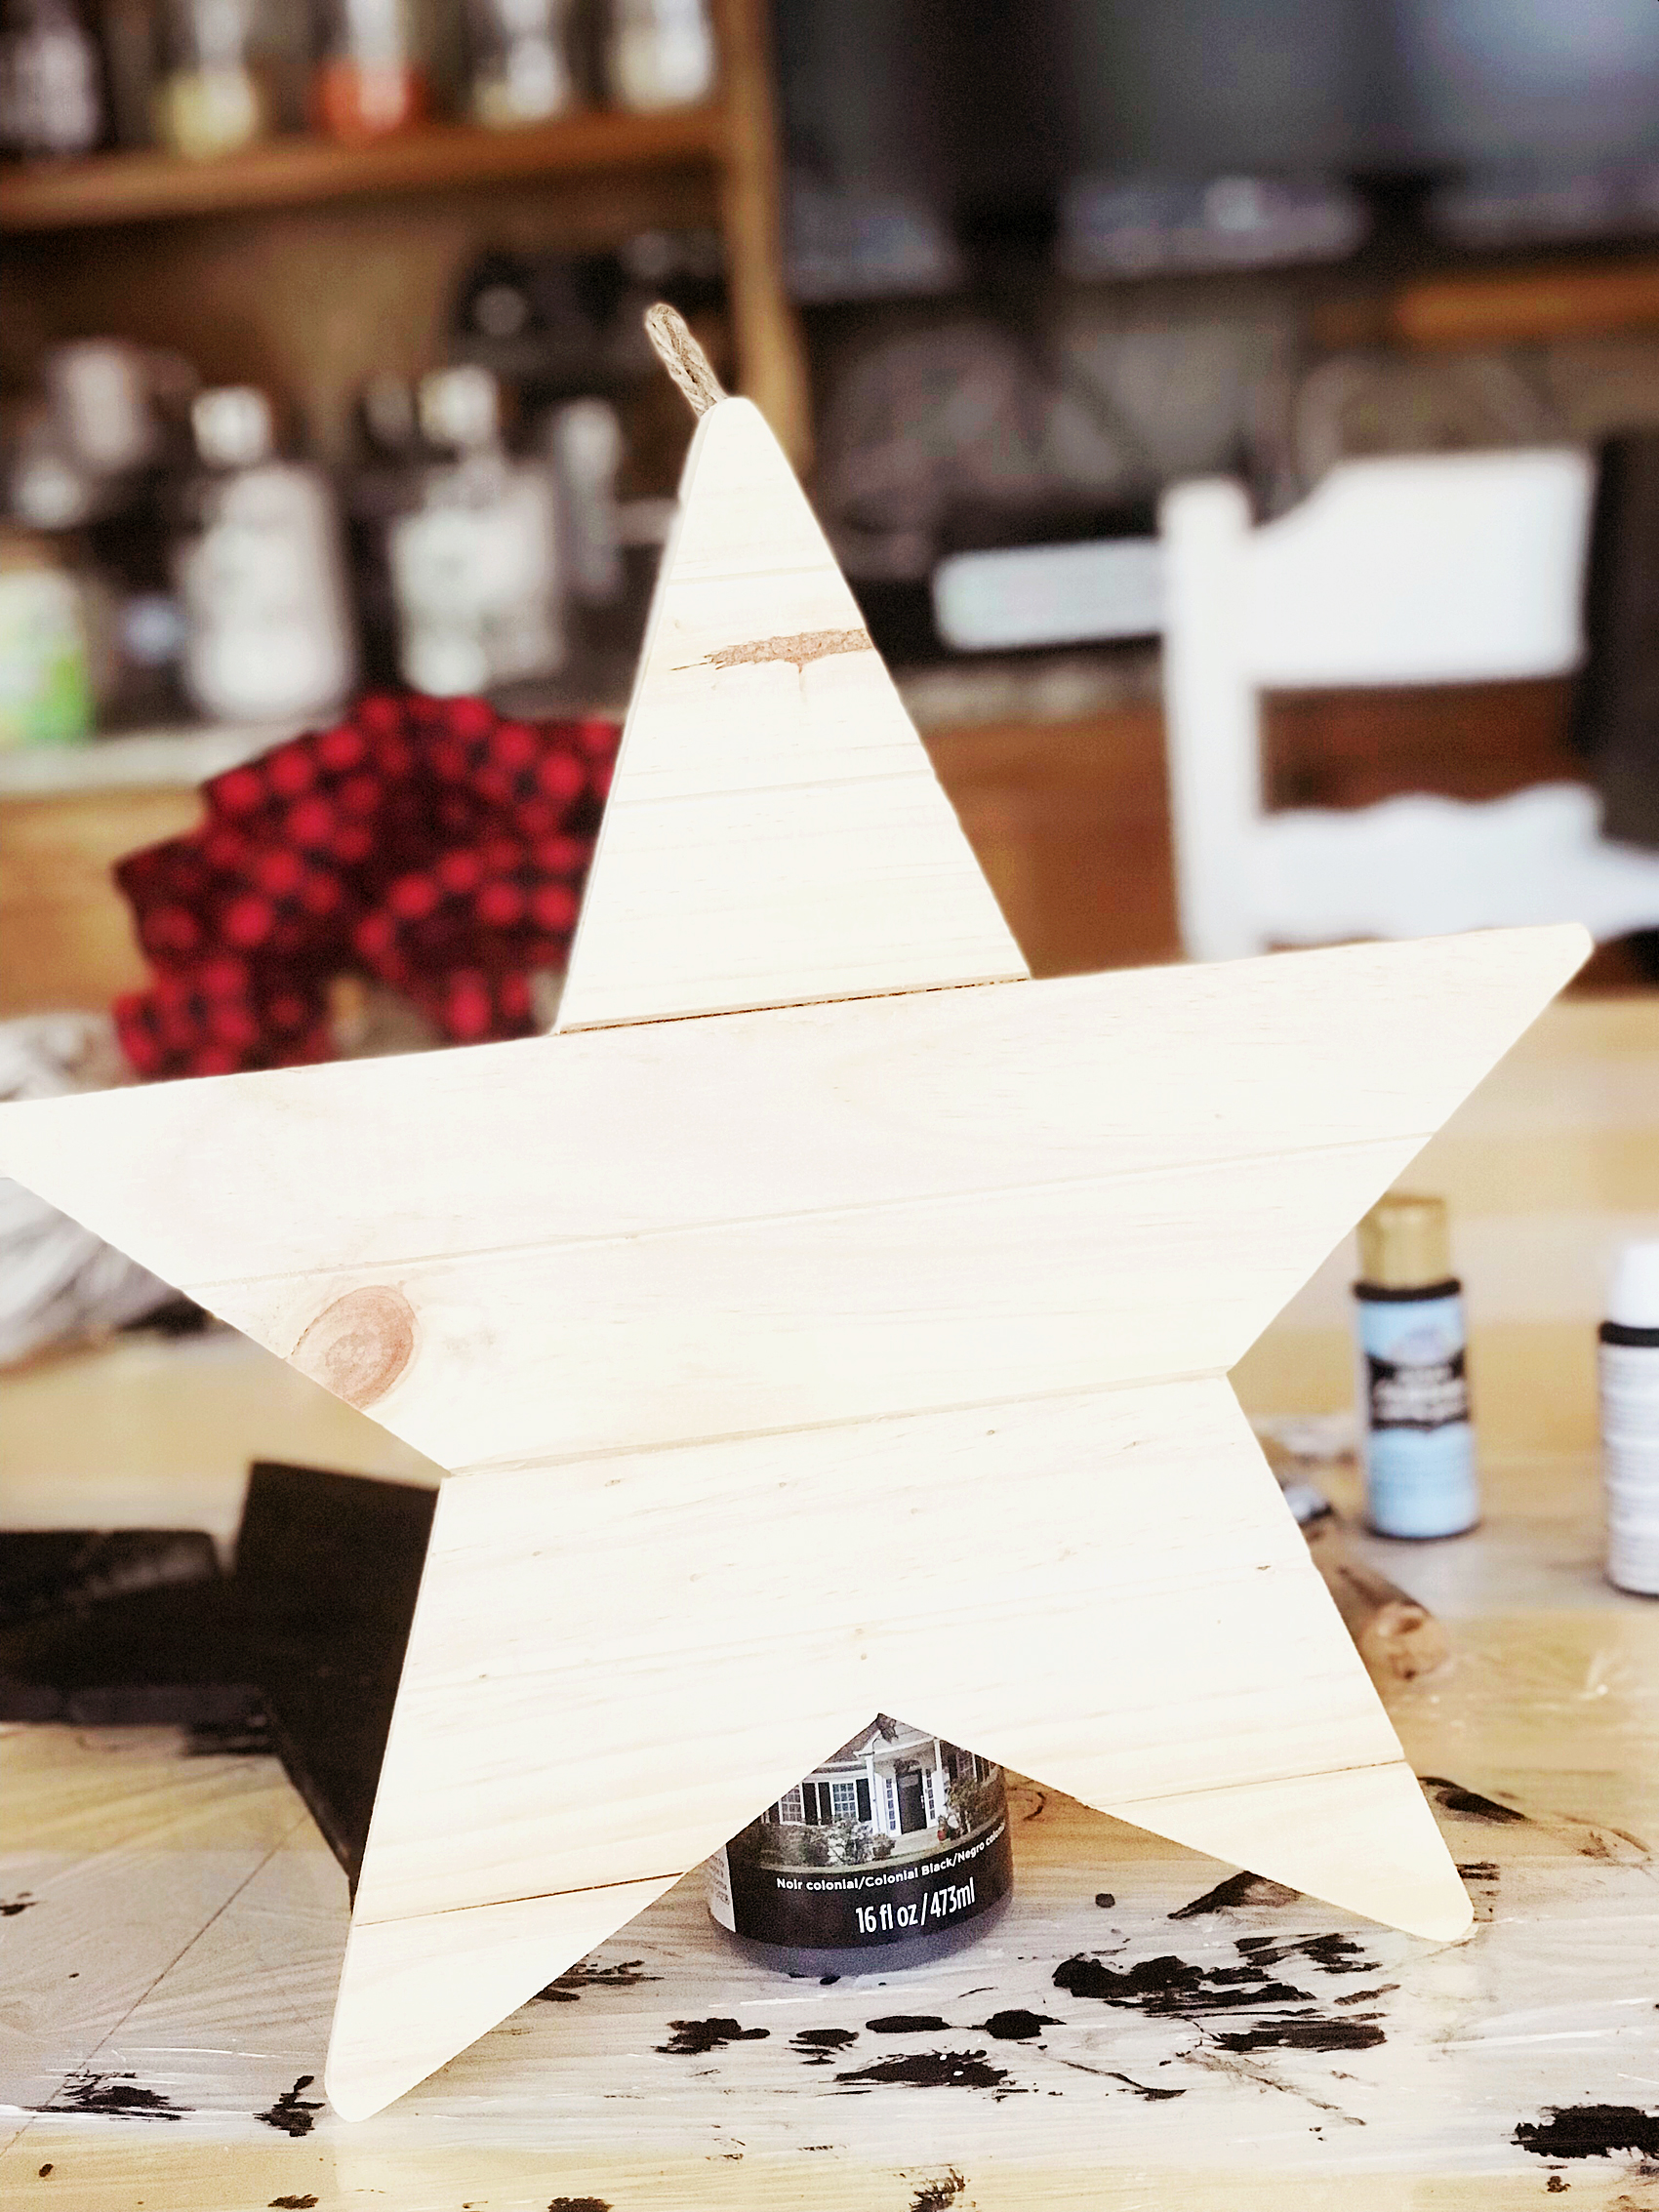
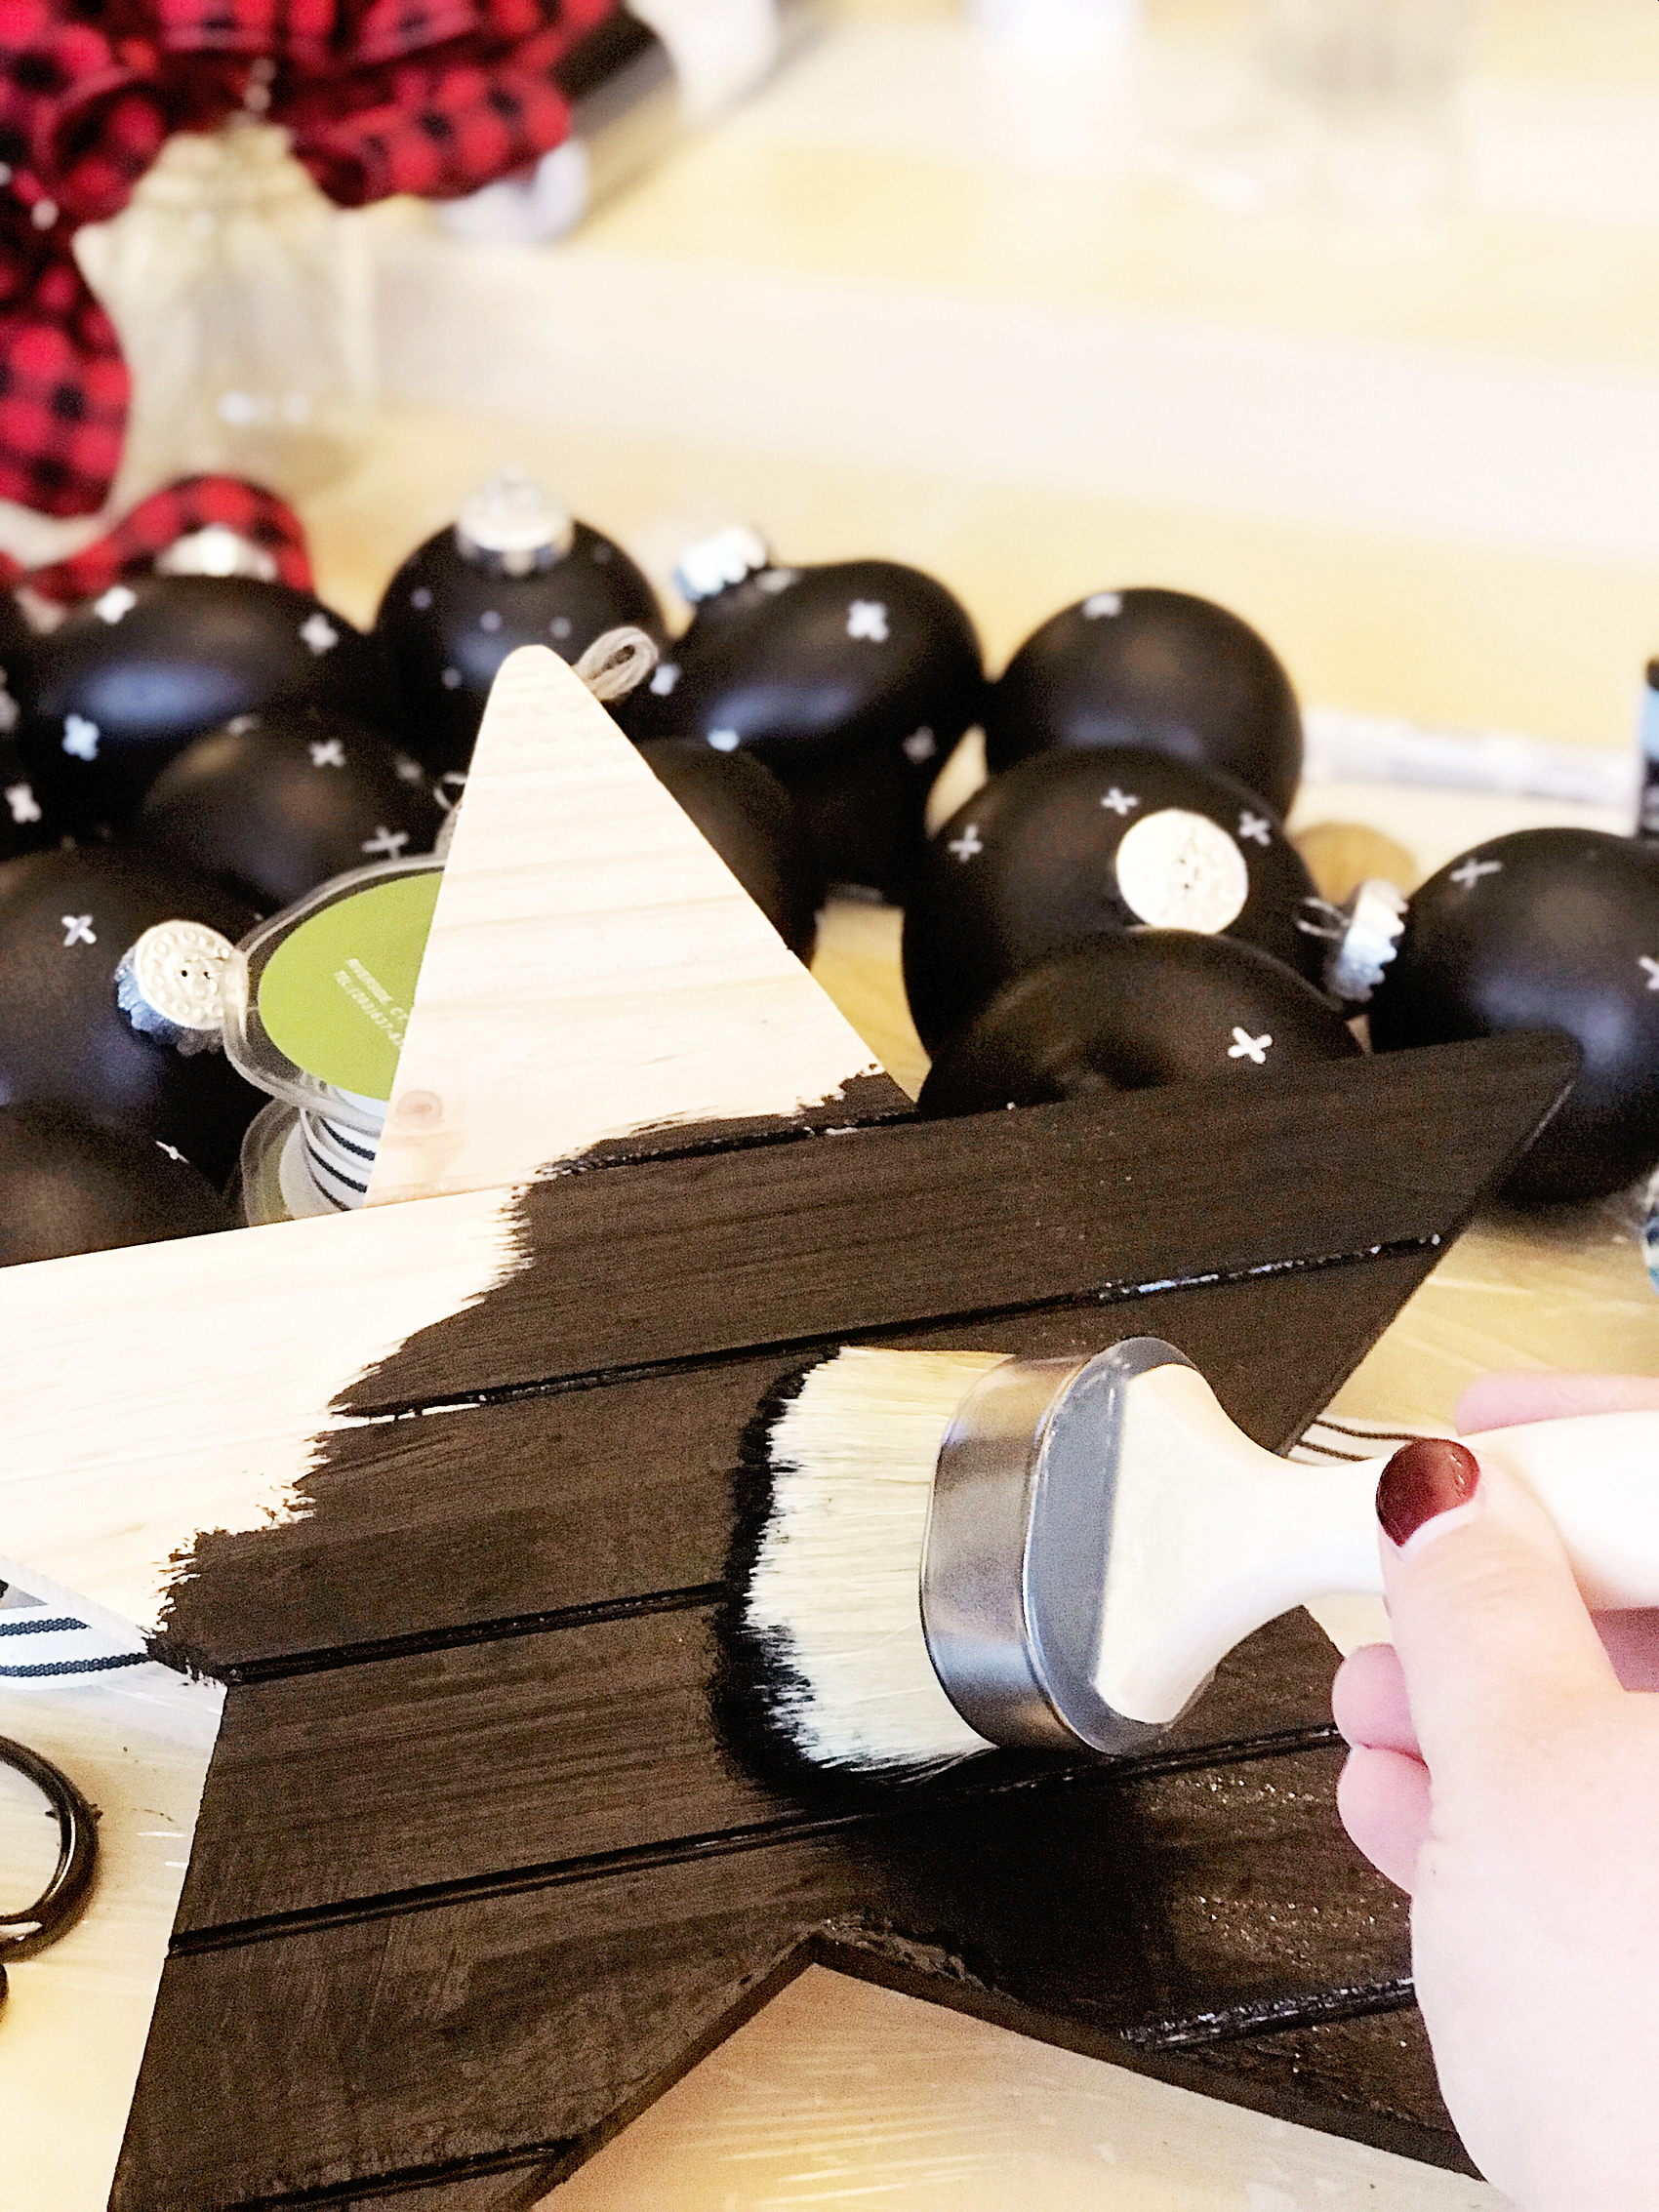
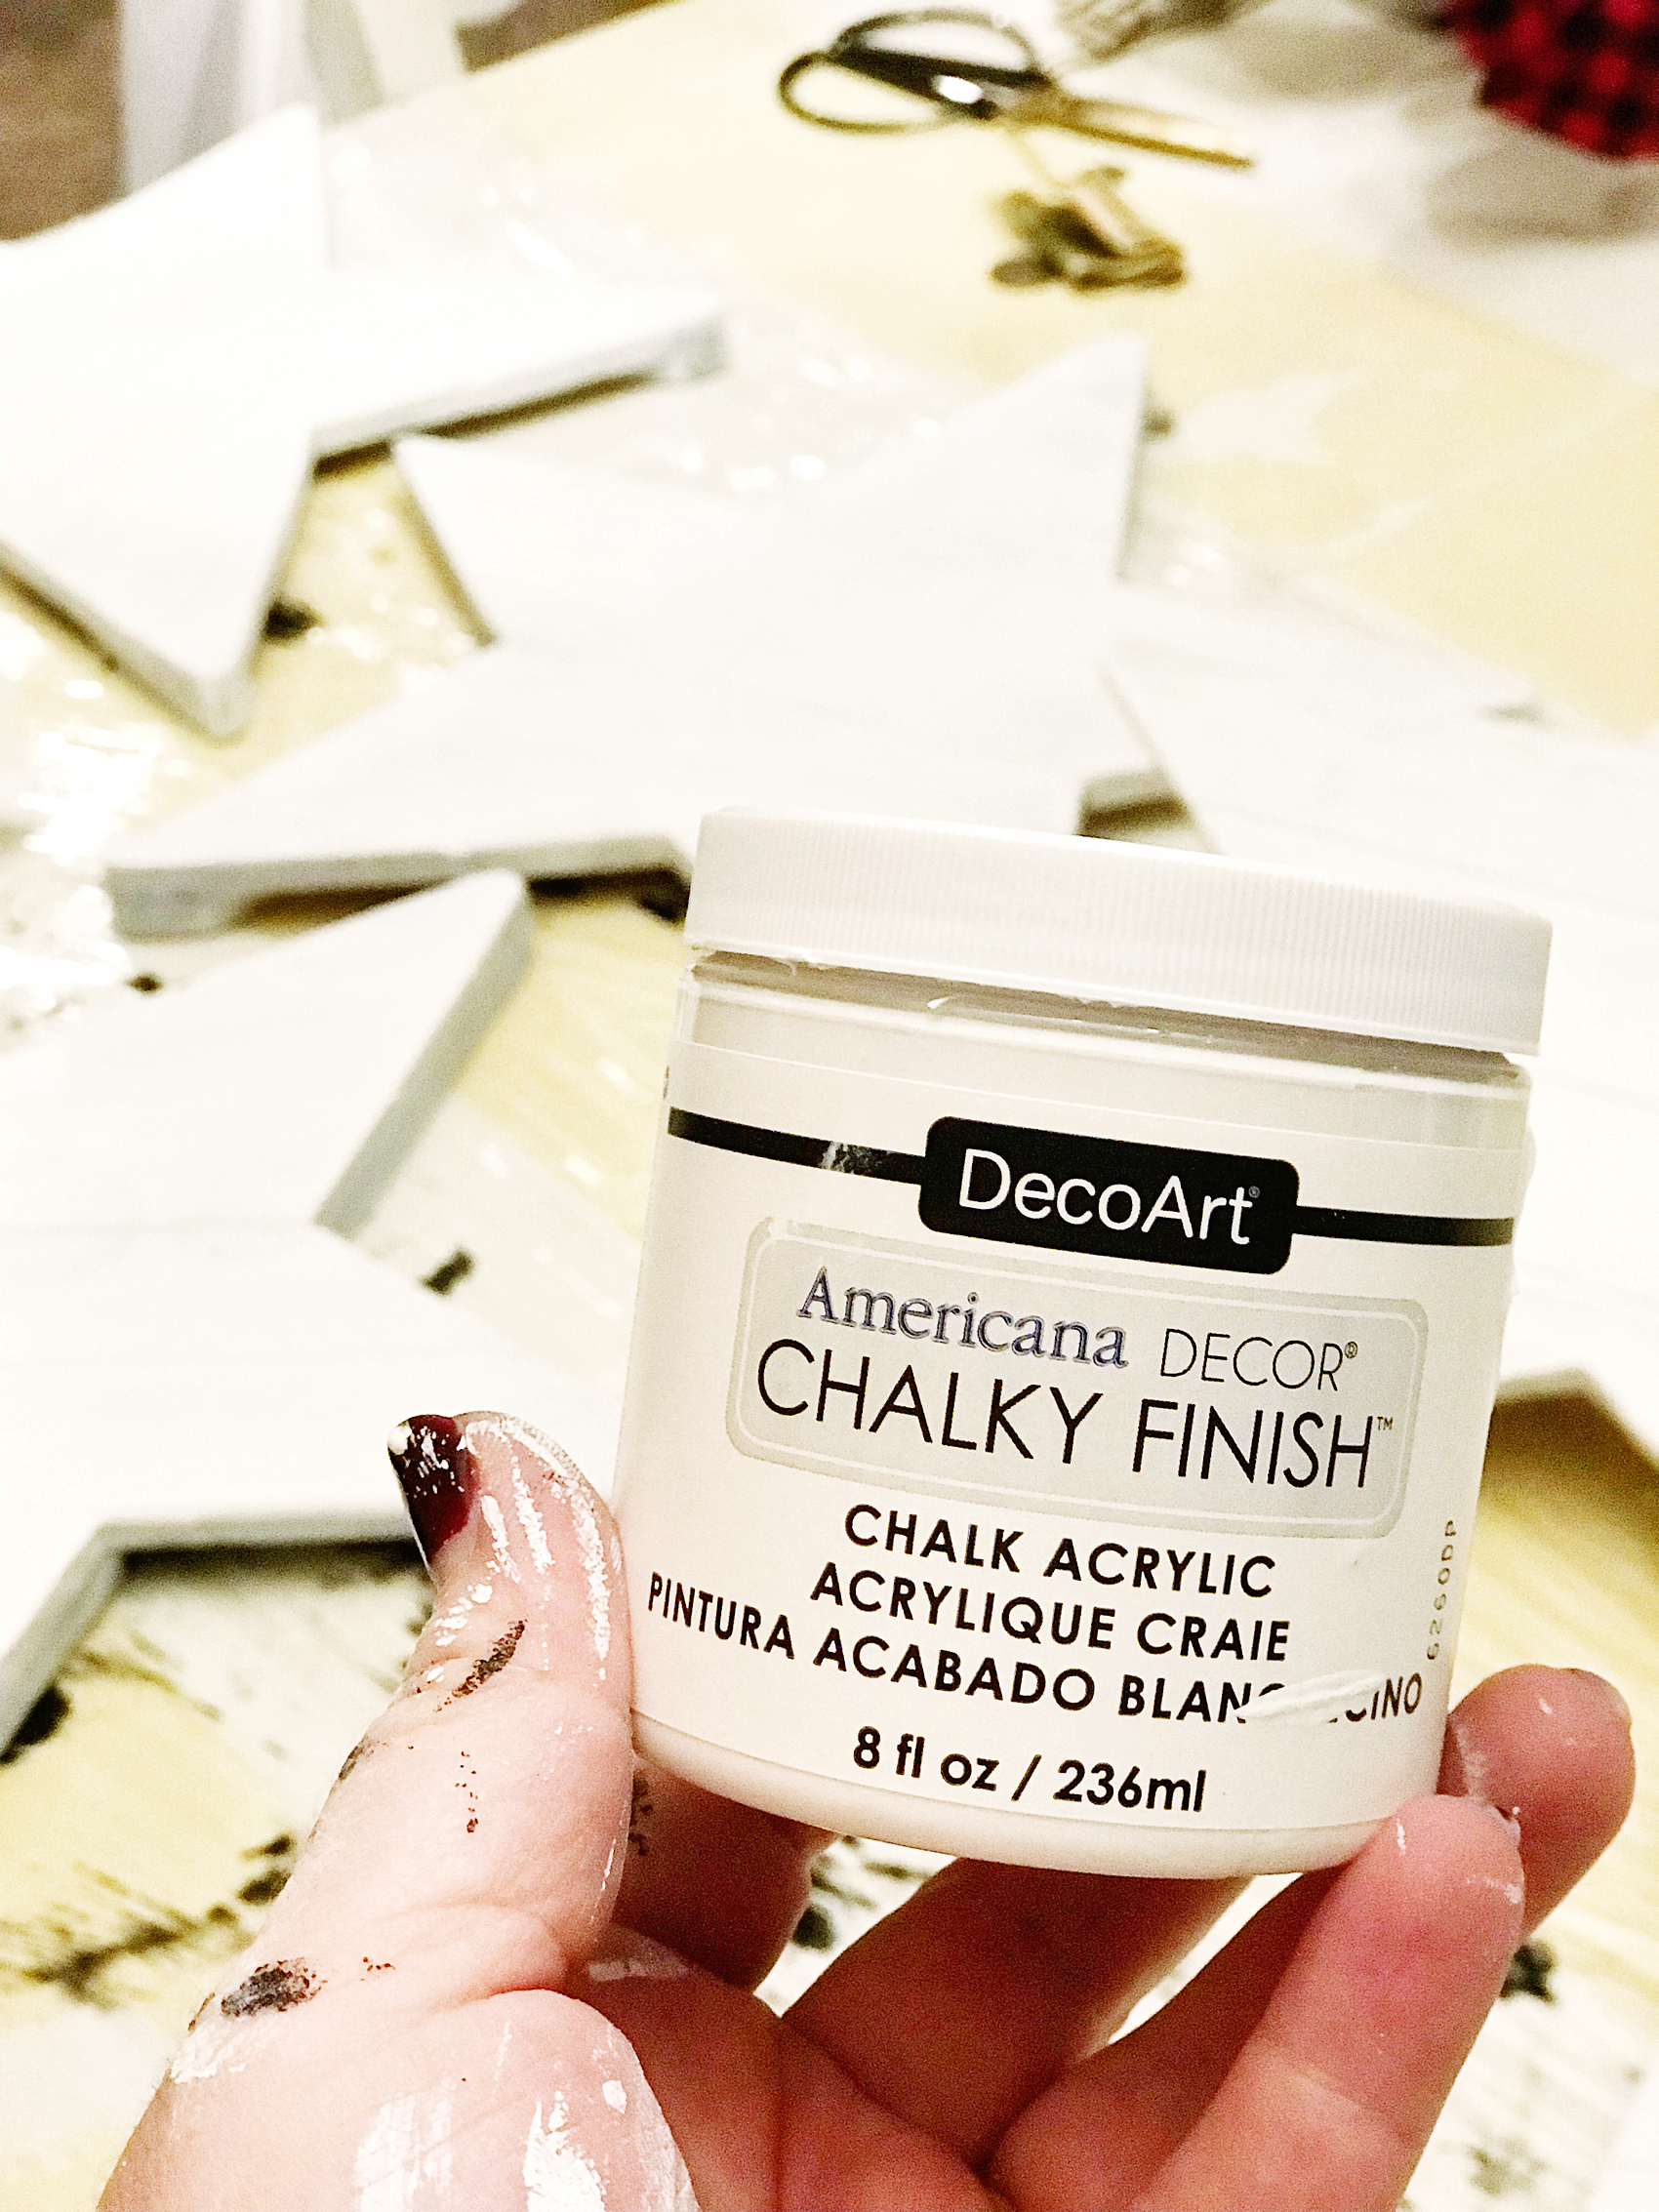
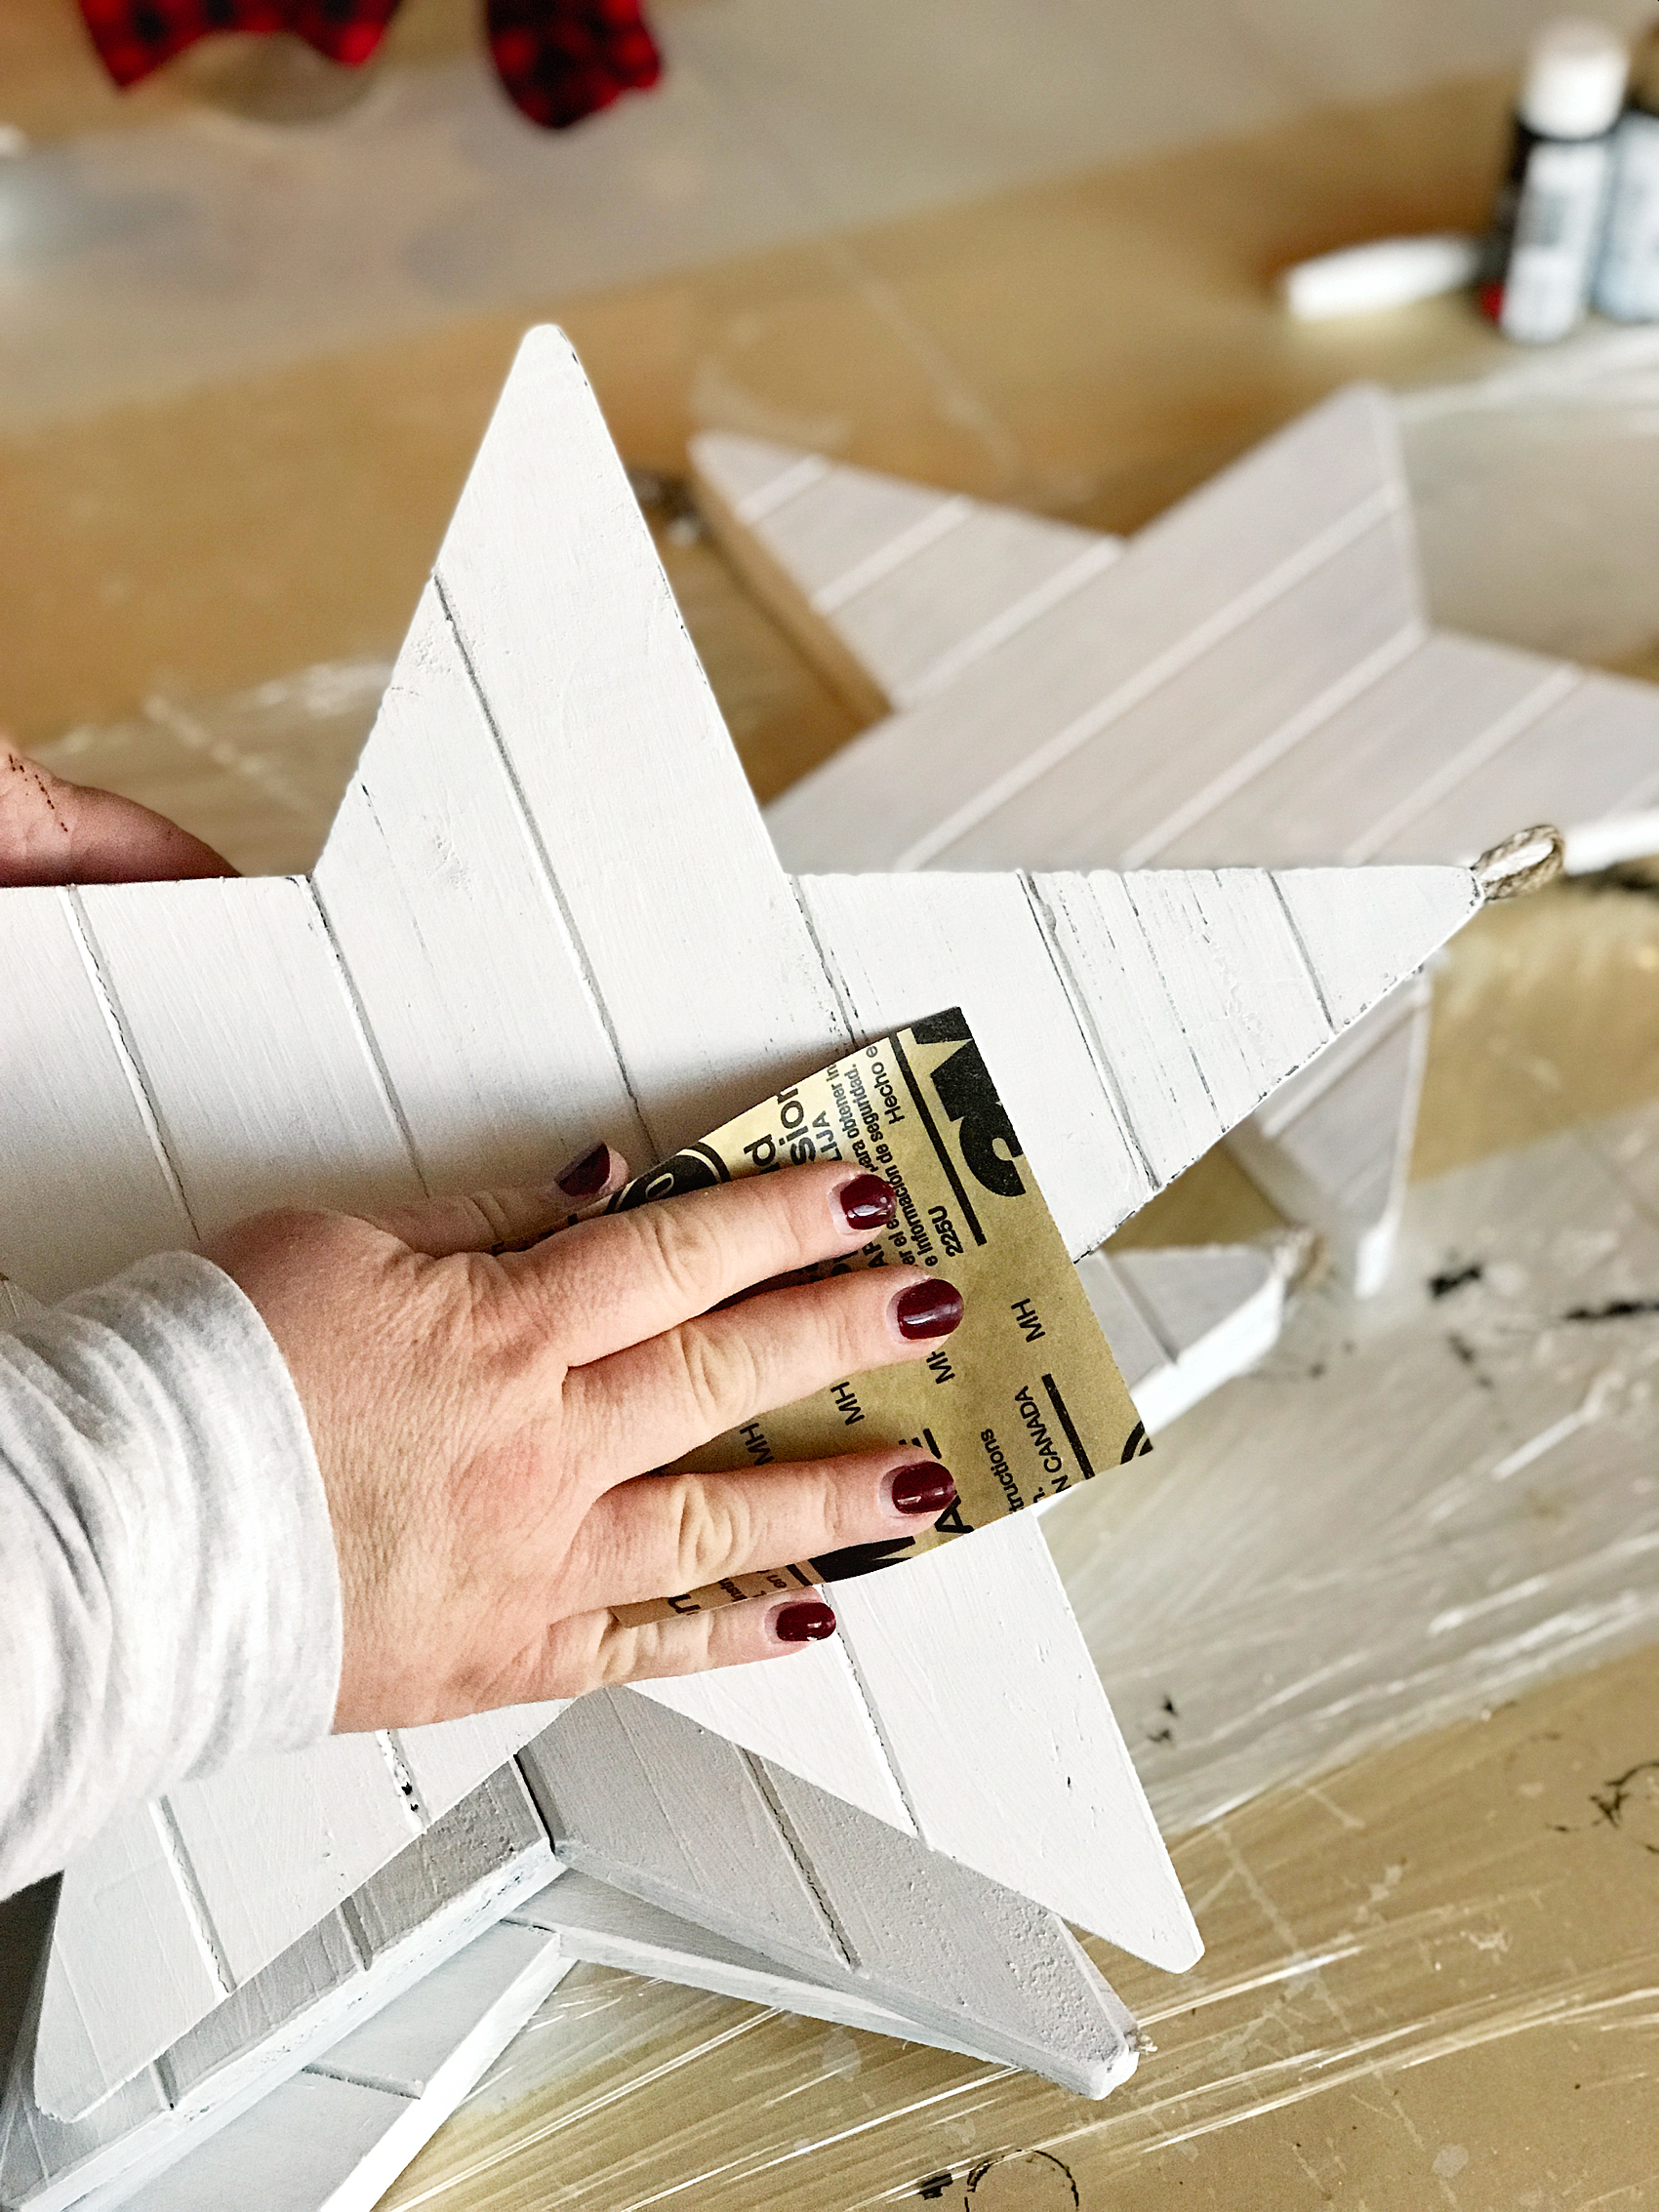
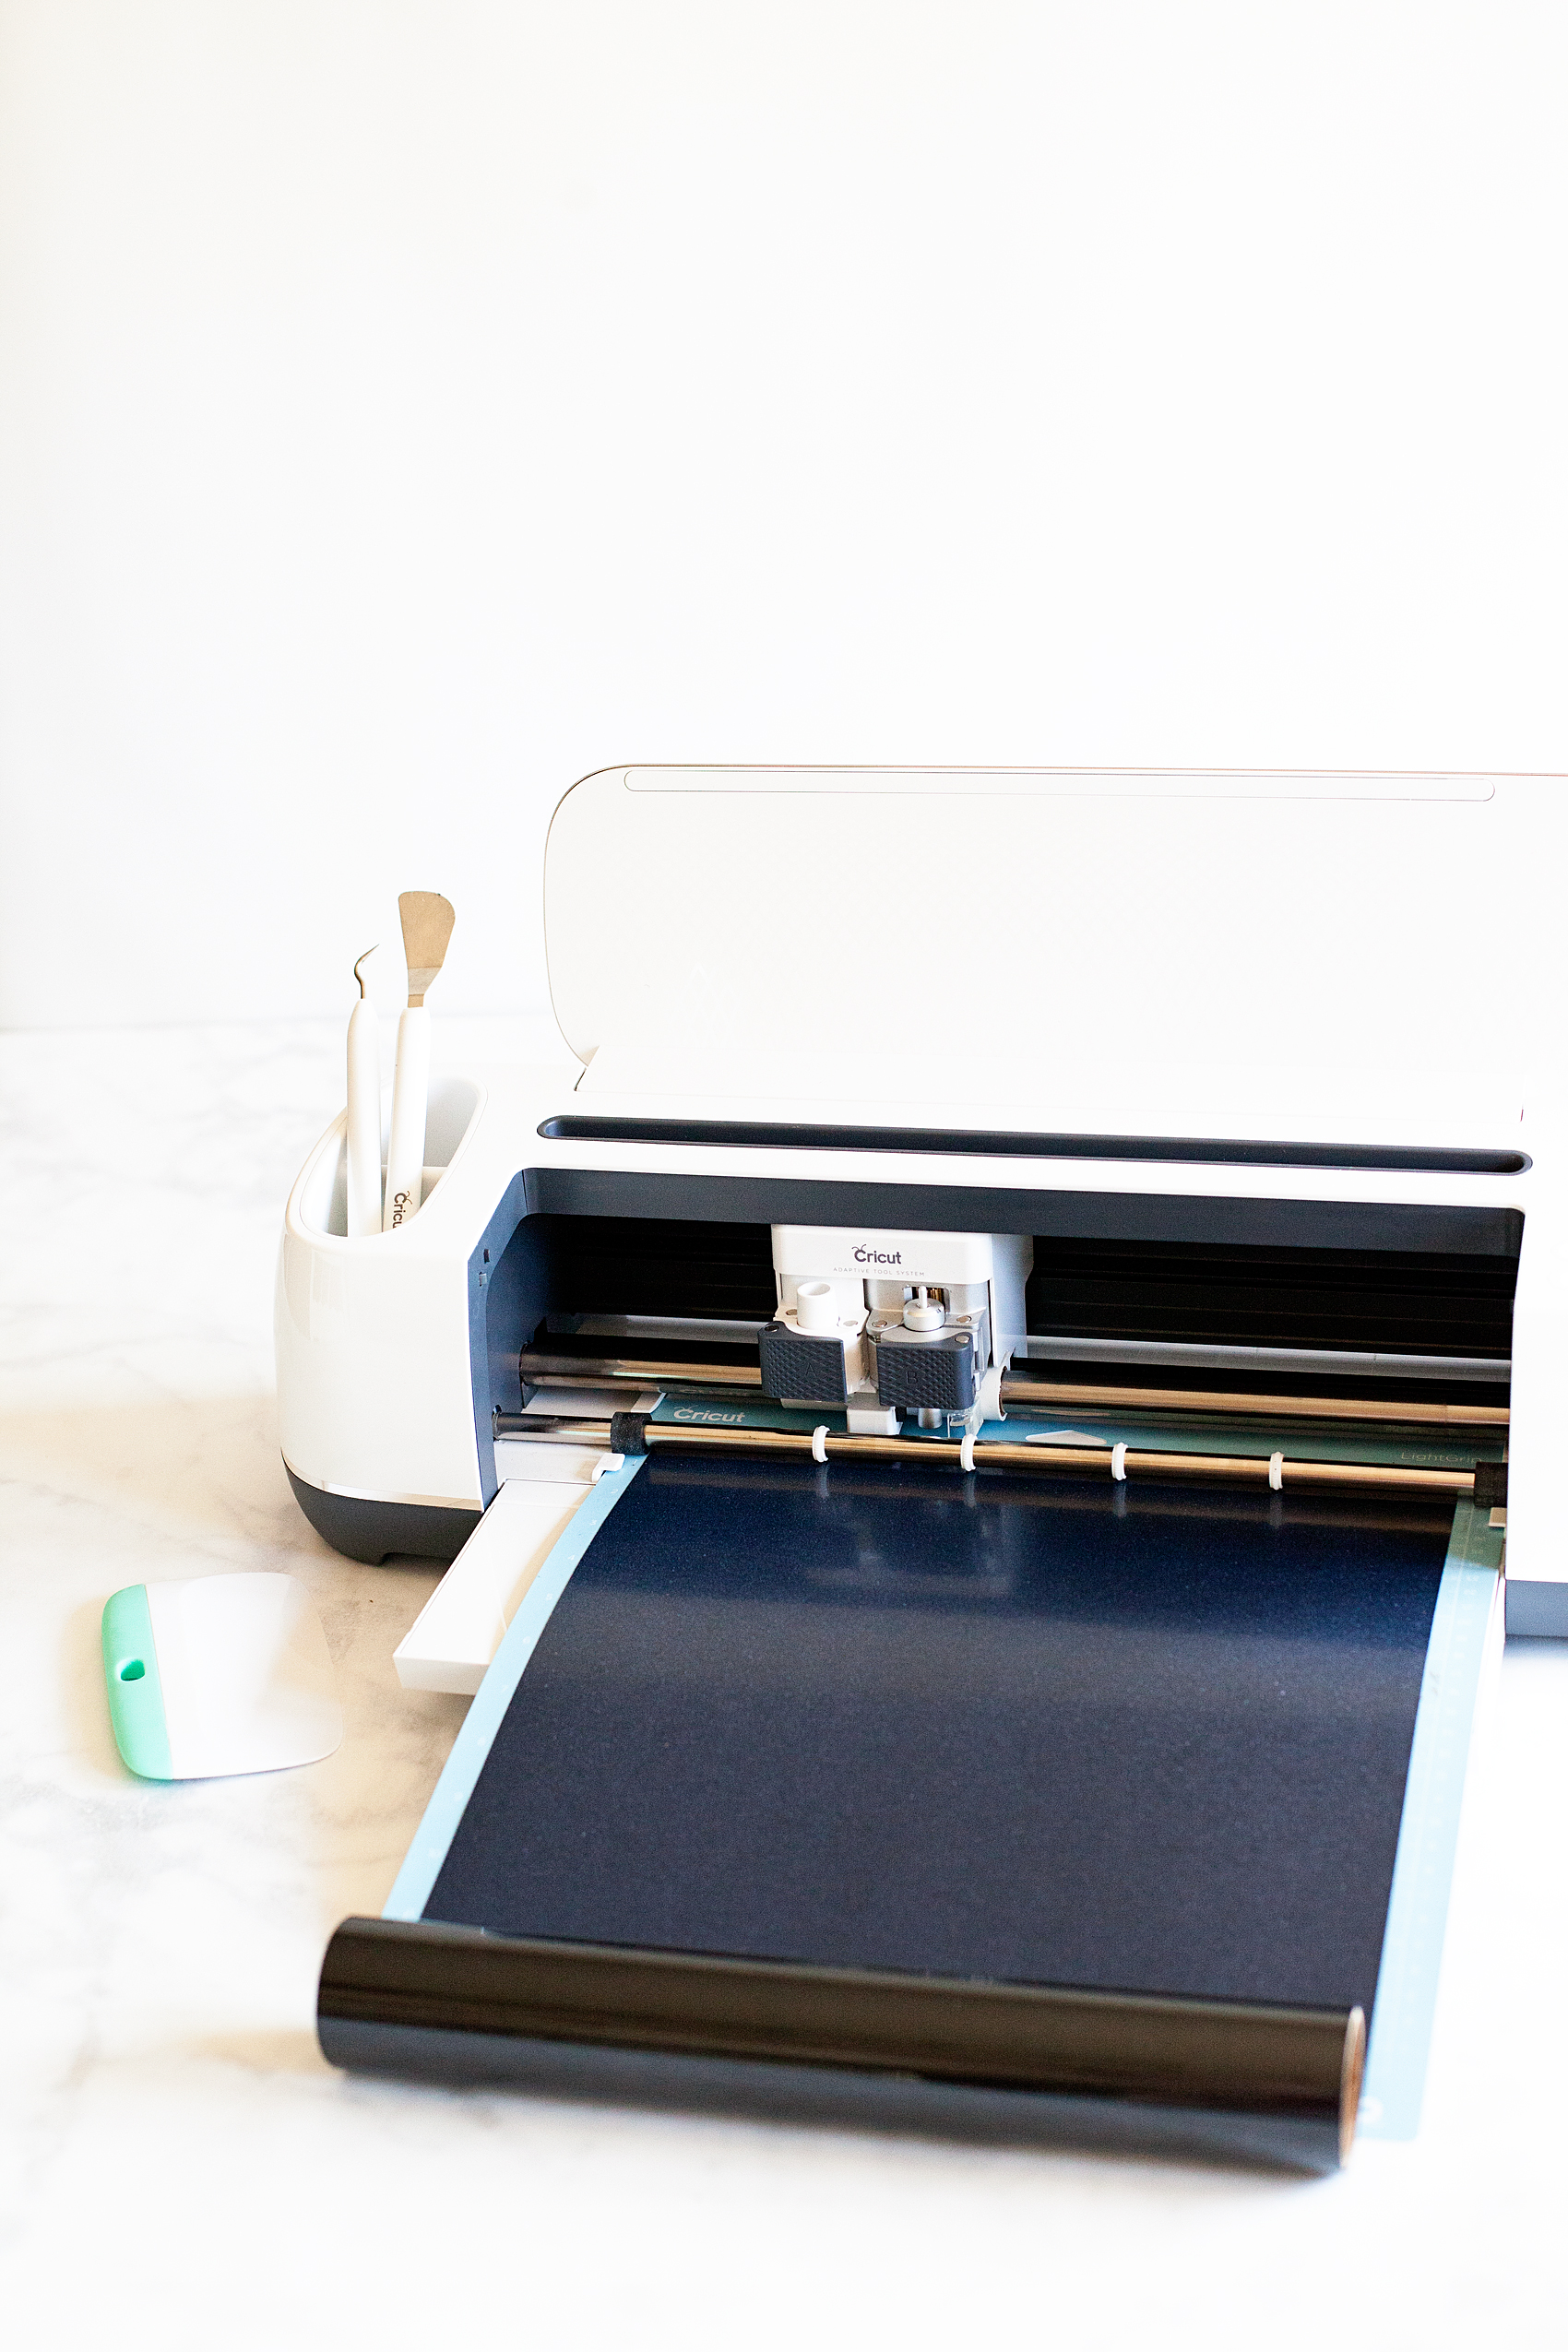
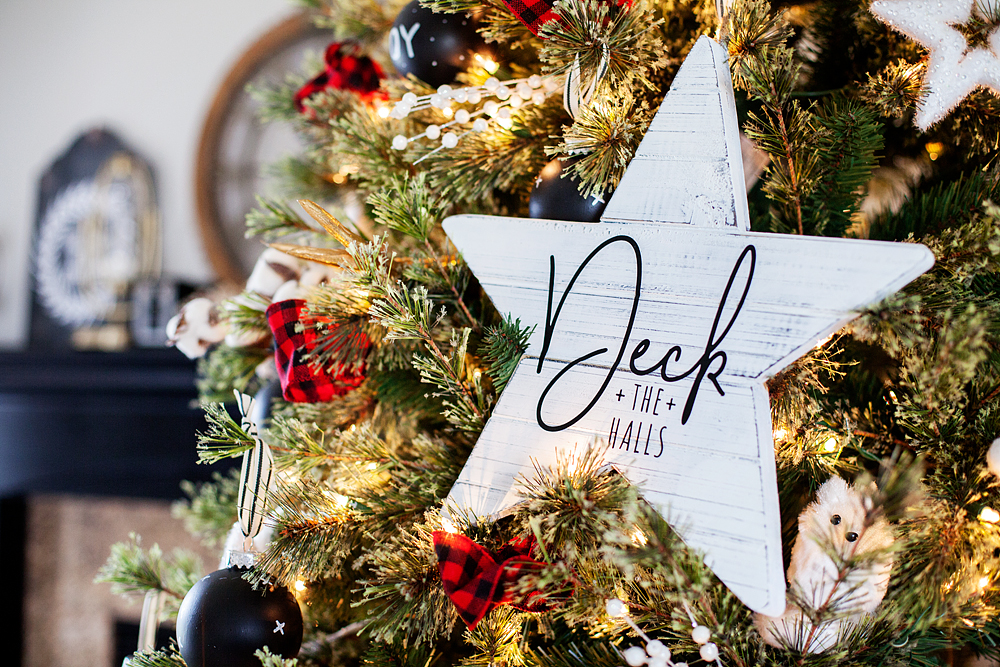
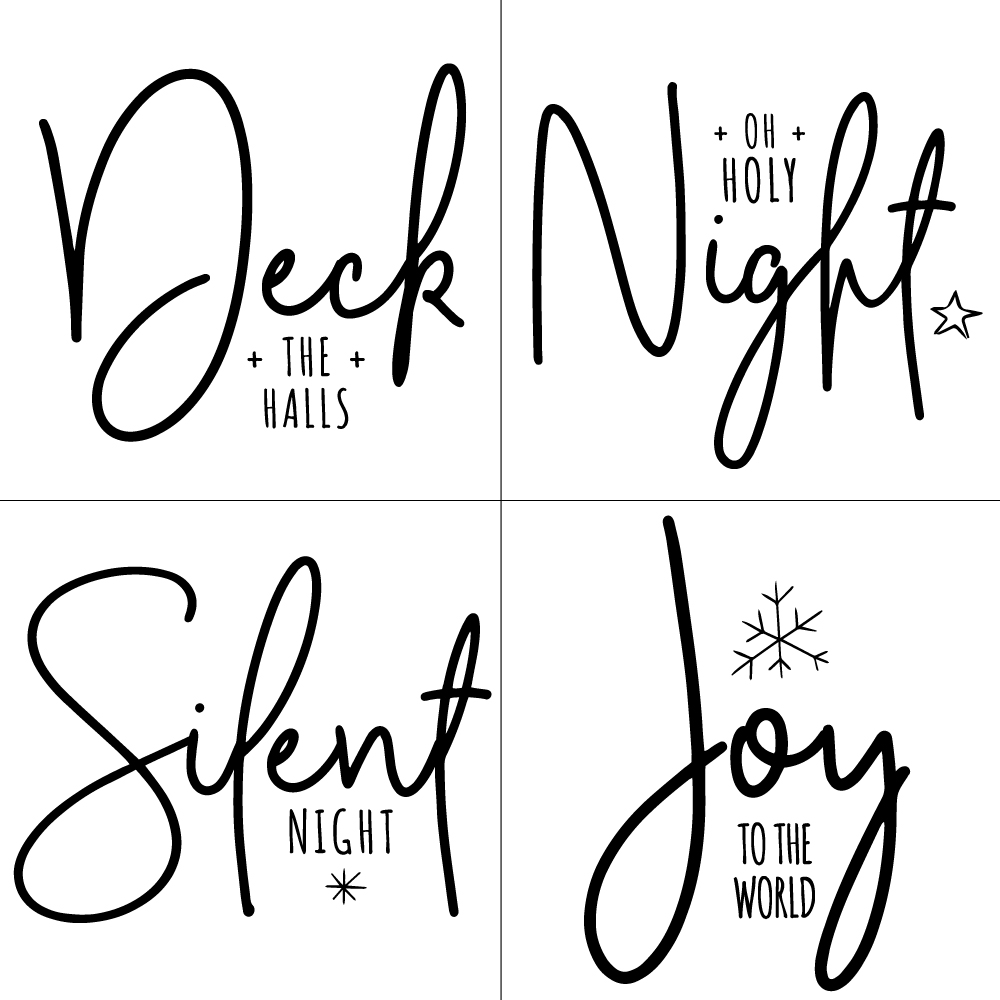
Next, we painted some large wood stars from Michaels with Americana Decor Chalky Finish paint from DecoArt.  Then we used my Cricut Maker to add titles of Christmas Carols onto the stars. You can learn how to make those HERE. You can even download the graphics that I designed for the stars!

DIY Christmas Star from WhipperBerry

Farmhouse Christmas Carol Ornaments from WhipperBerry

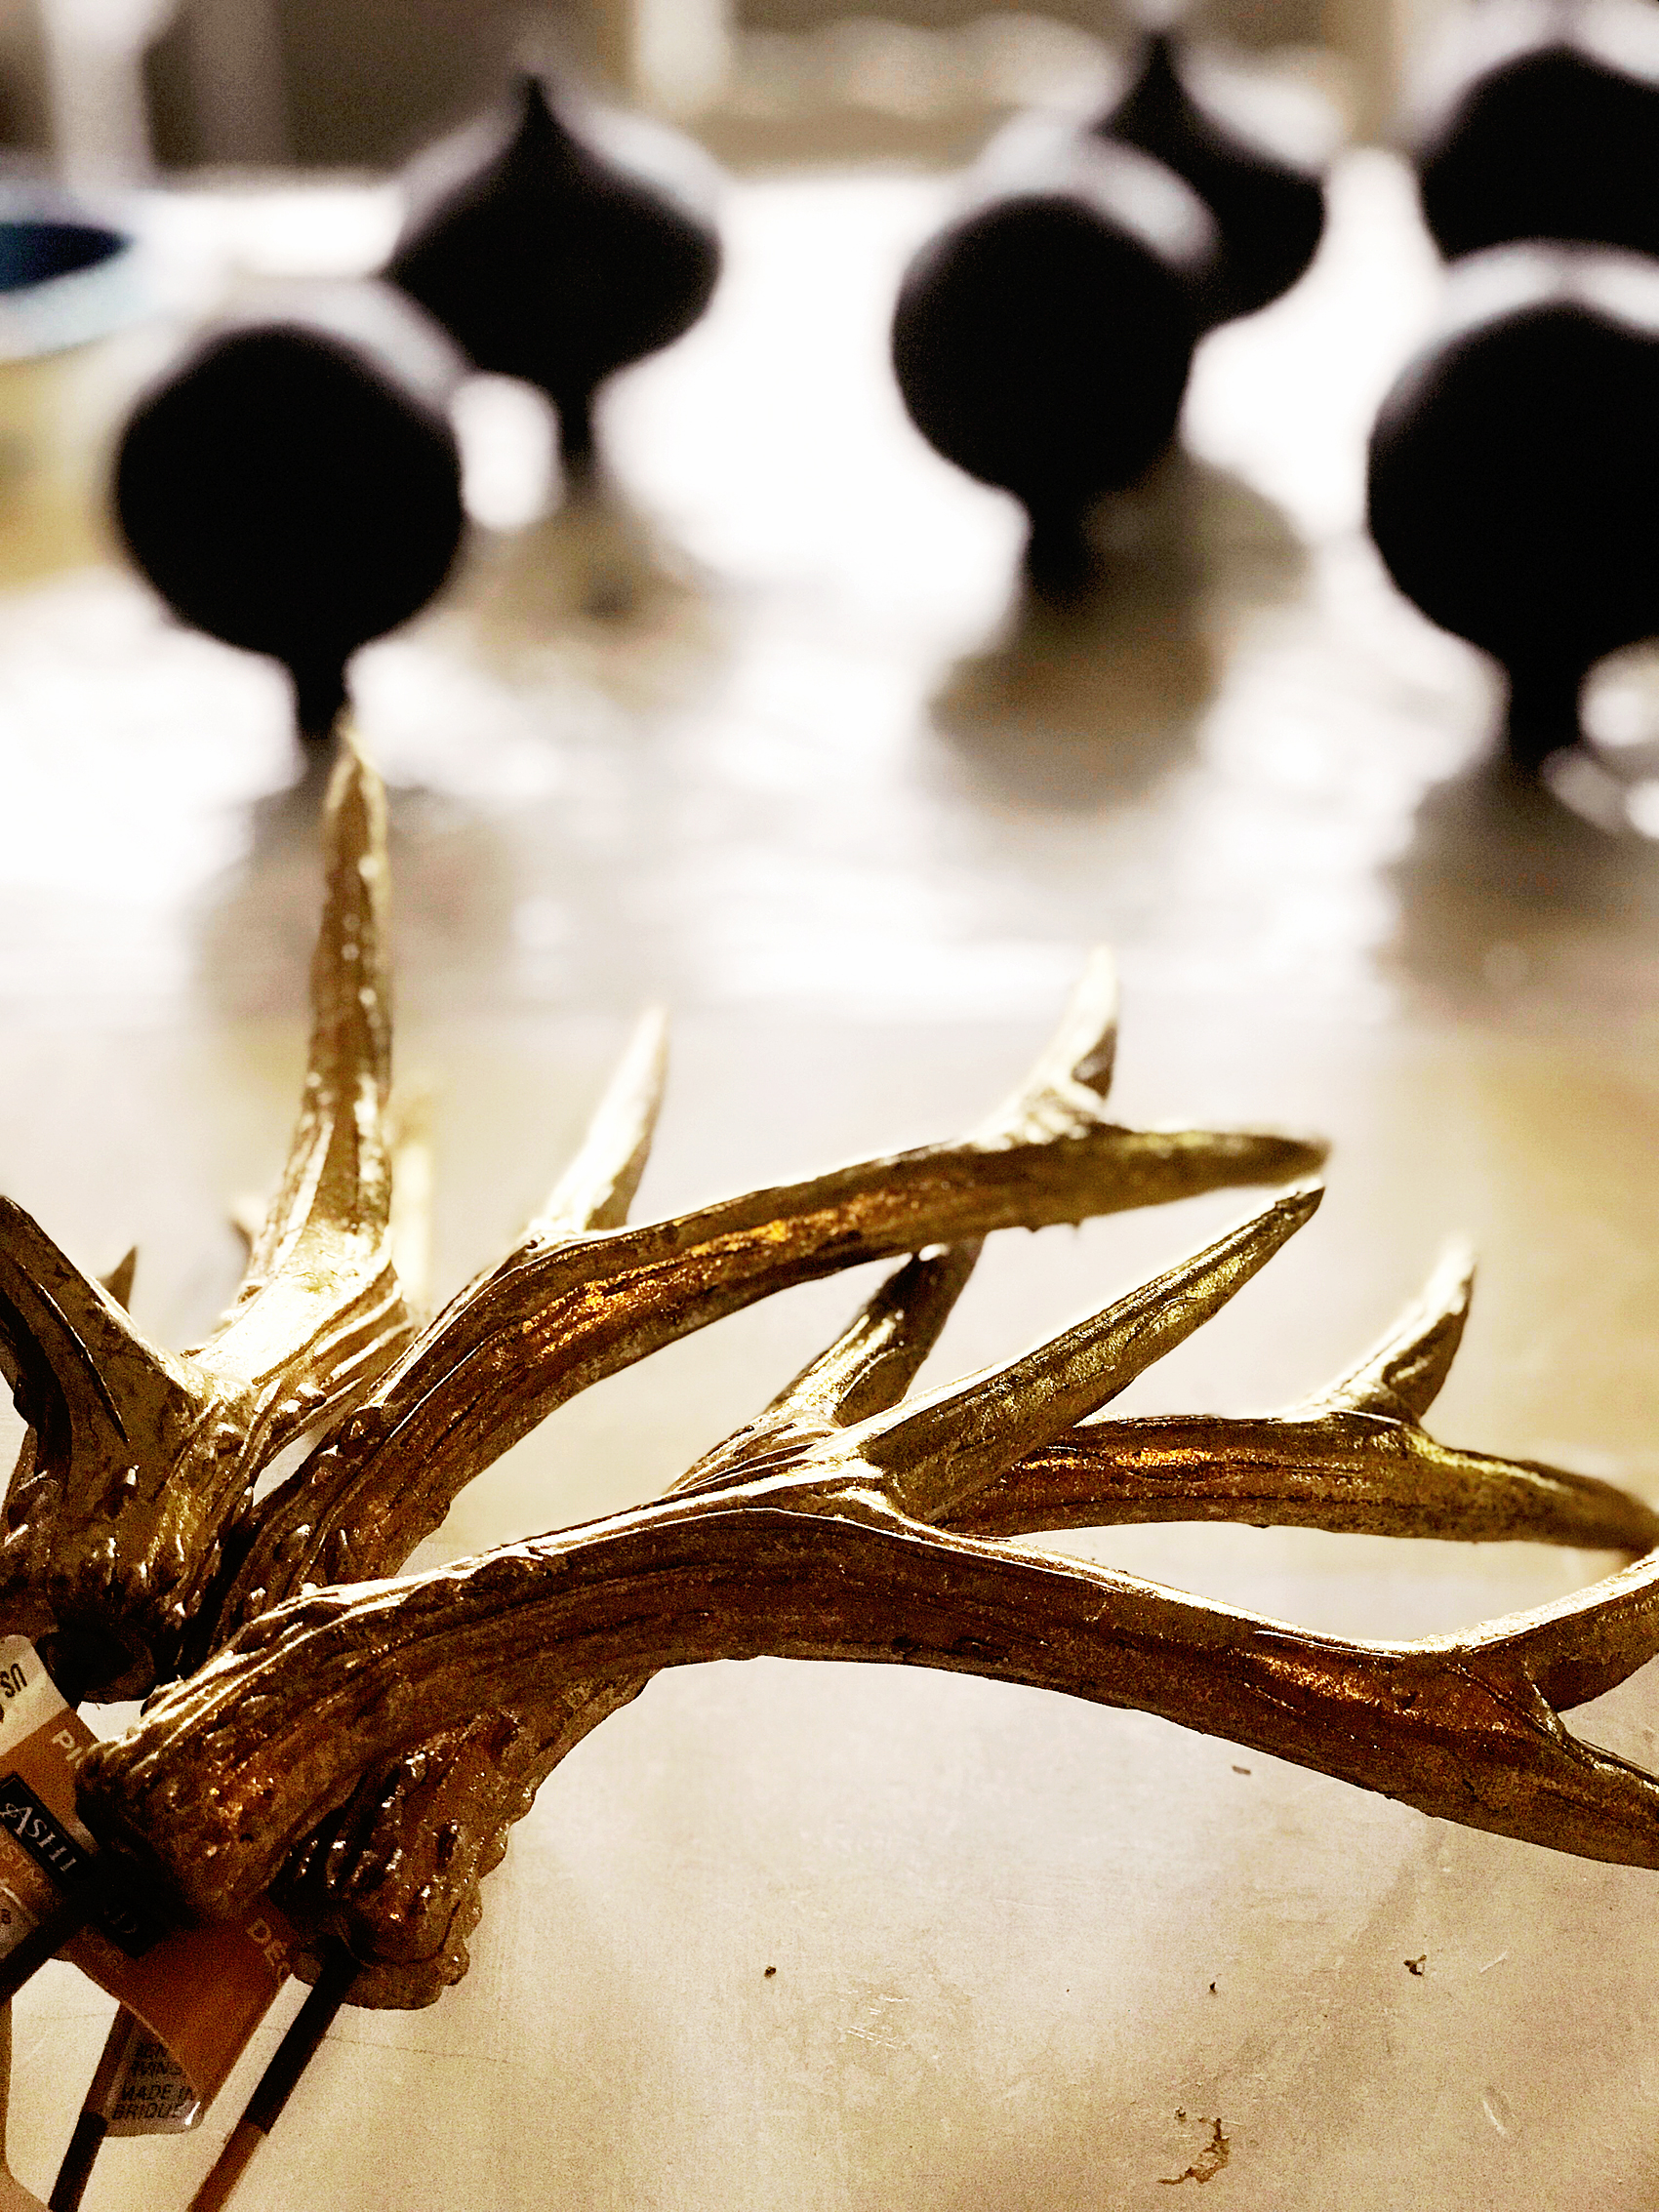
The next element for my tree is a few types of picks that I found in the Christmas pick section of Michaels.

Love FARMHOUSE decor? Then you are going to LOVE this Farmhouse inspired Christmas Carol Star ornament that you can create for your home.

Quite honestly, picks are some of my favorite ways to add personality to my Christmas trees. They really add to the tree and they aren’t very pricey. I LOVE the fuzzy little stars, the gold antlers, and the cotton stems. They look fabulous on the tree!

Love FARMHOUSE decor? Then you are going to LOVE this Farmhouse inspired Christmas Carol Star ornament that you can create for your home.

Love FARMHOUSE decor? Then you are going to LOVE this Farmhouse inspired Christmas Carol Star ornament that you can create for your home.

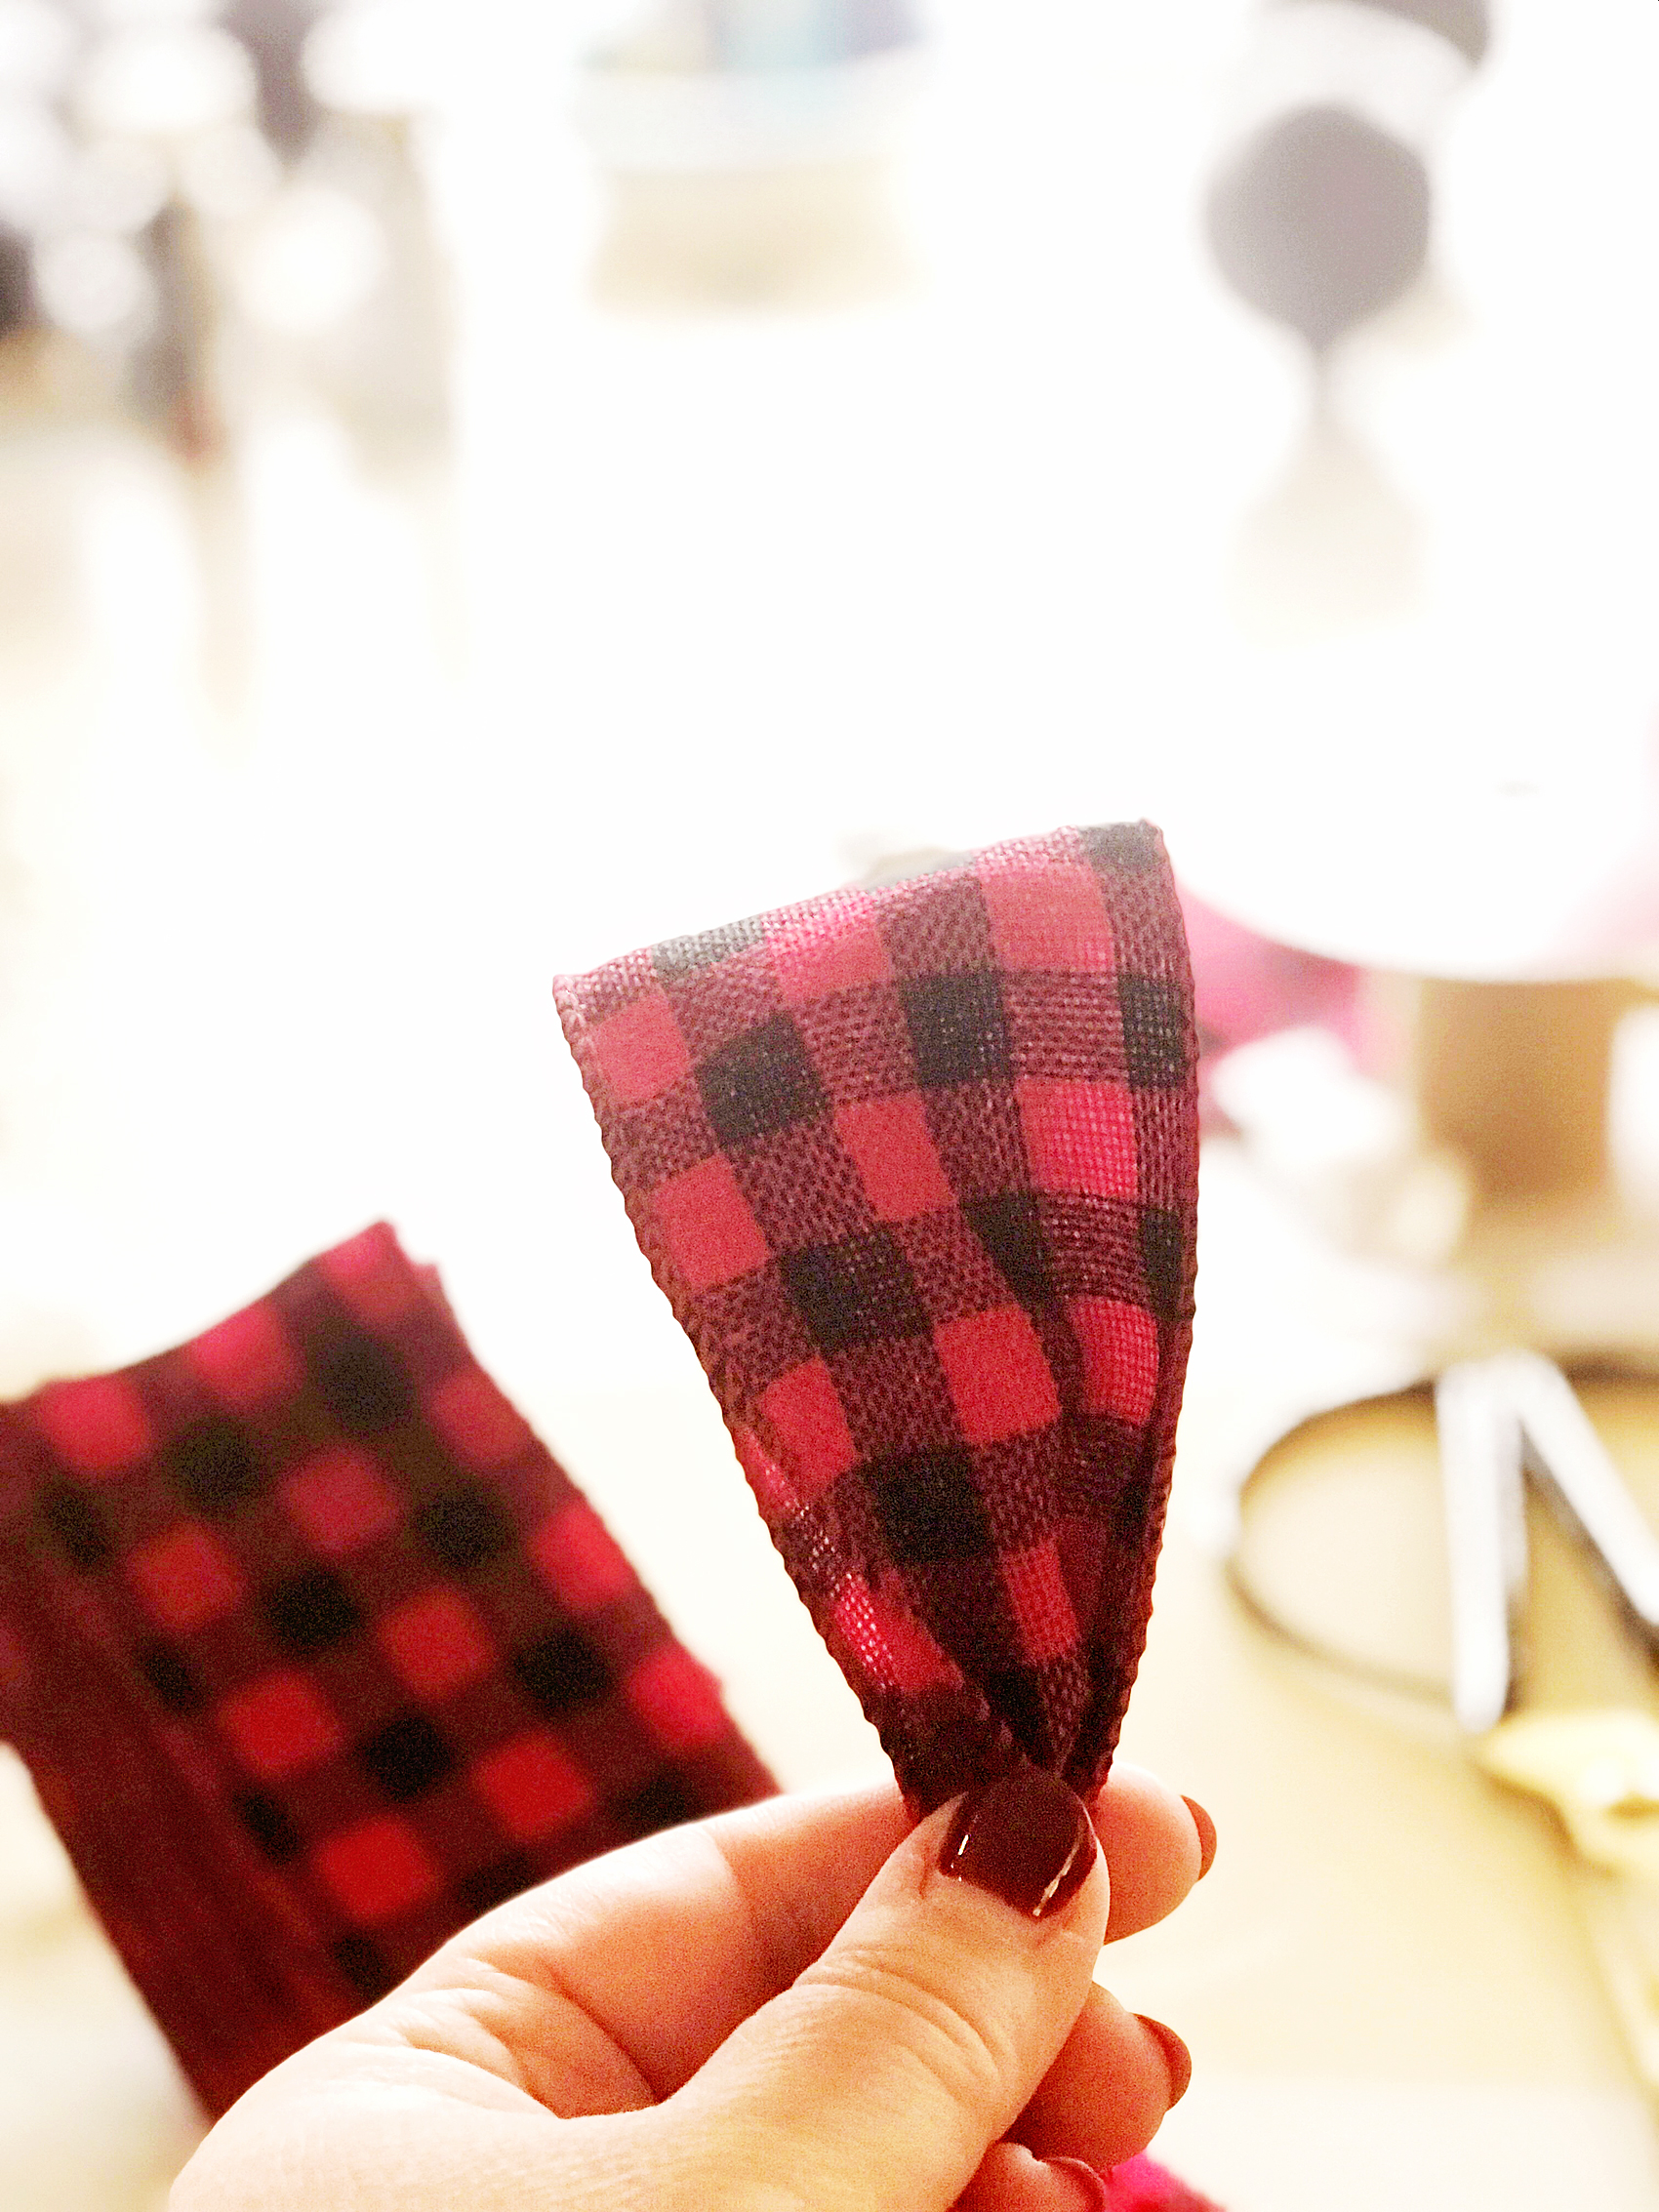
The last element is the ribbon picks.  They couldn’t be easier to make. I found some perfect ribbon at Michaels and cut it into 6 inch sections…

Love FARMHOUSE decor? Then you are going to LOVE this Farmhouse inspired Christmas Carol Star ornament that you can create for your home.

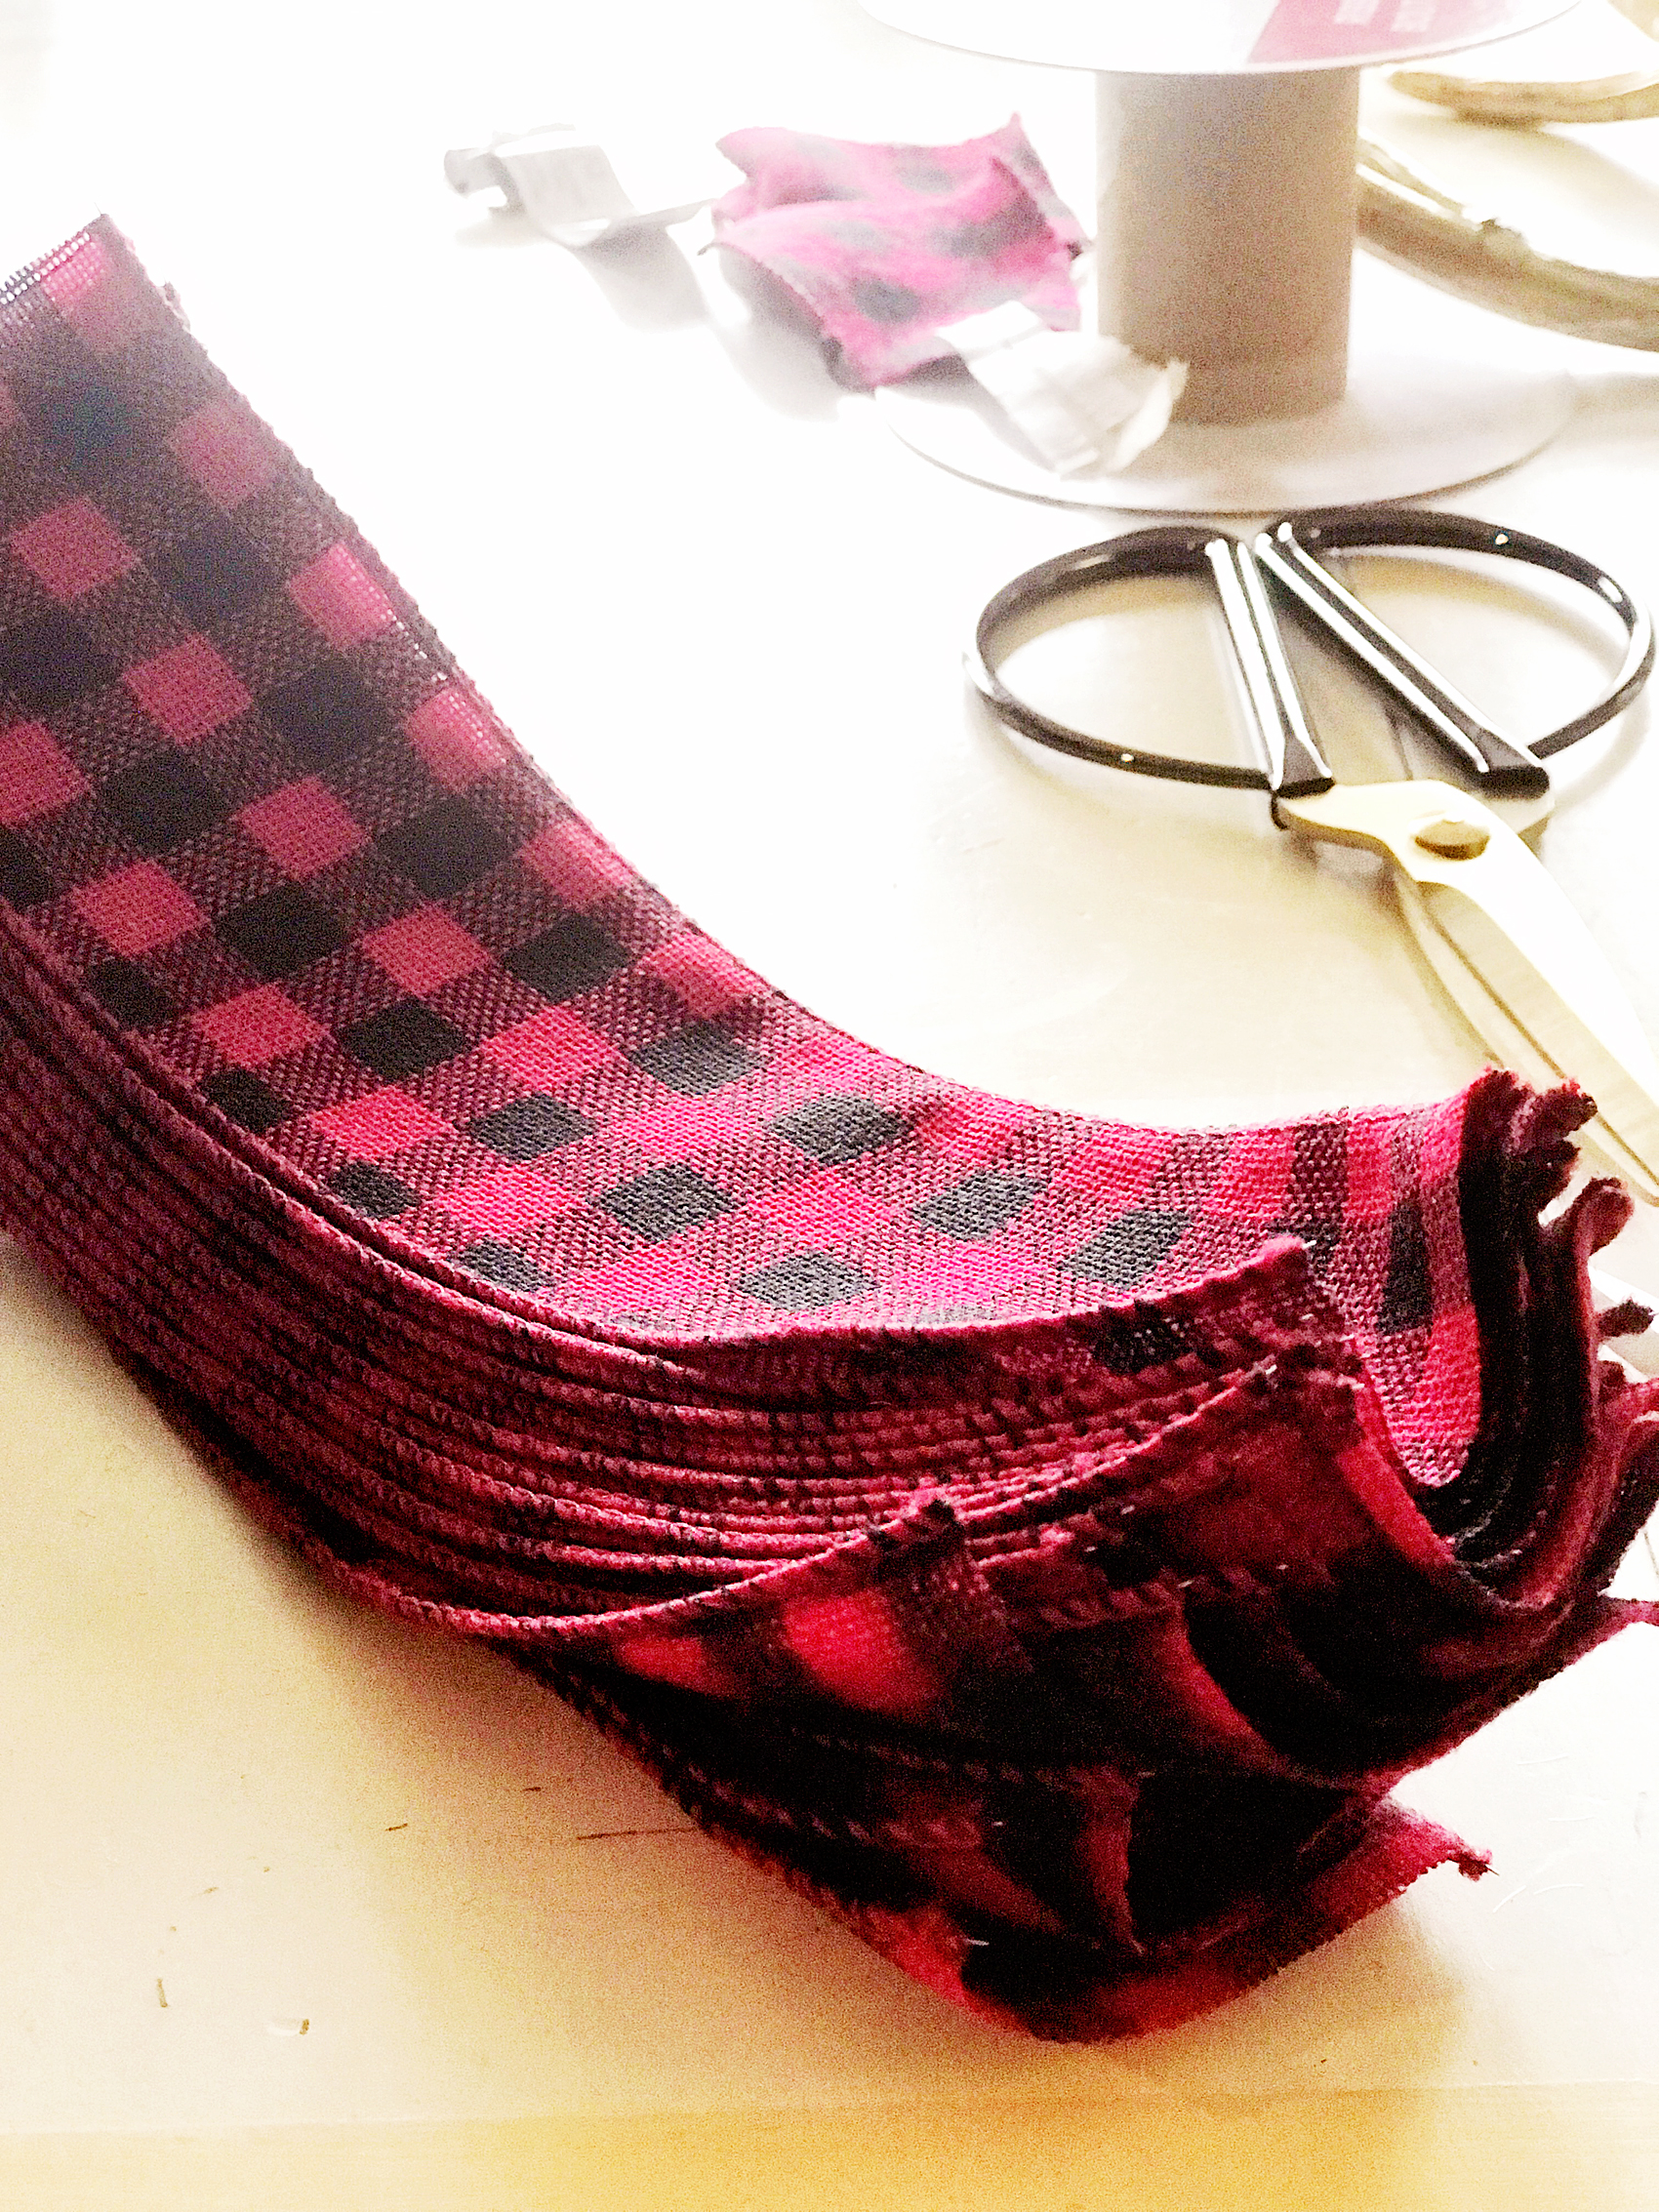
Then I folded it in half and wrapped some floral wire around the bottom leaving a 4-5 inch tail to secure it to the tree. Super simple and the bottom doesn’t need to be pretty.

Love FARMHOUSE decor? Then you are going to LOVE this Farmhouse inspired Christmas Carol Star ornament that you can create for your home.

Love FARMHOUSE decor? Then you are going to LOVE this Farmhouse inspired Christmas Carol Star ornament that you can create for your home.

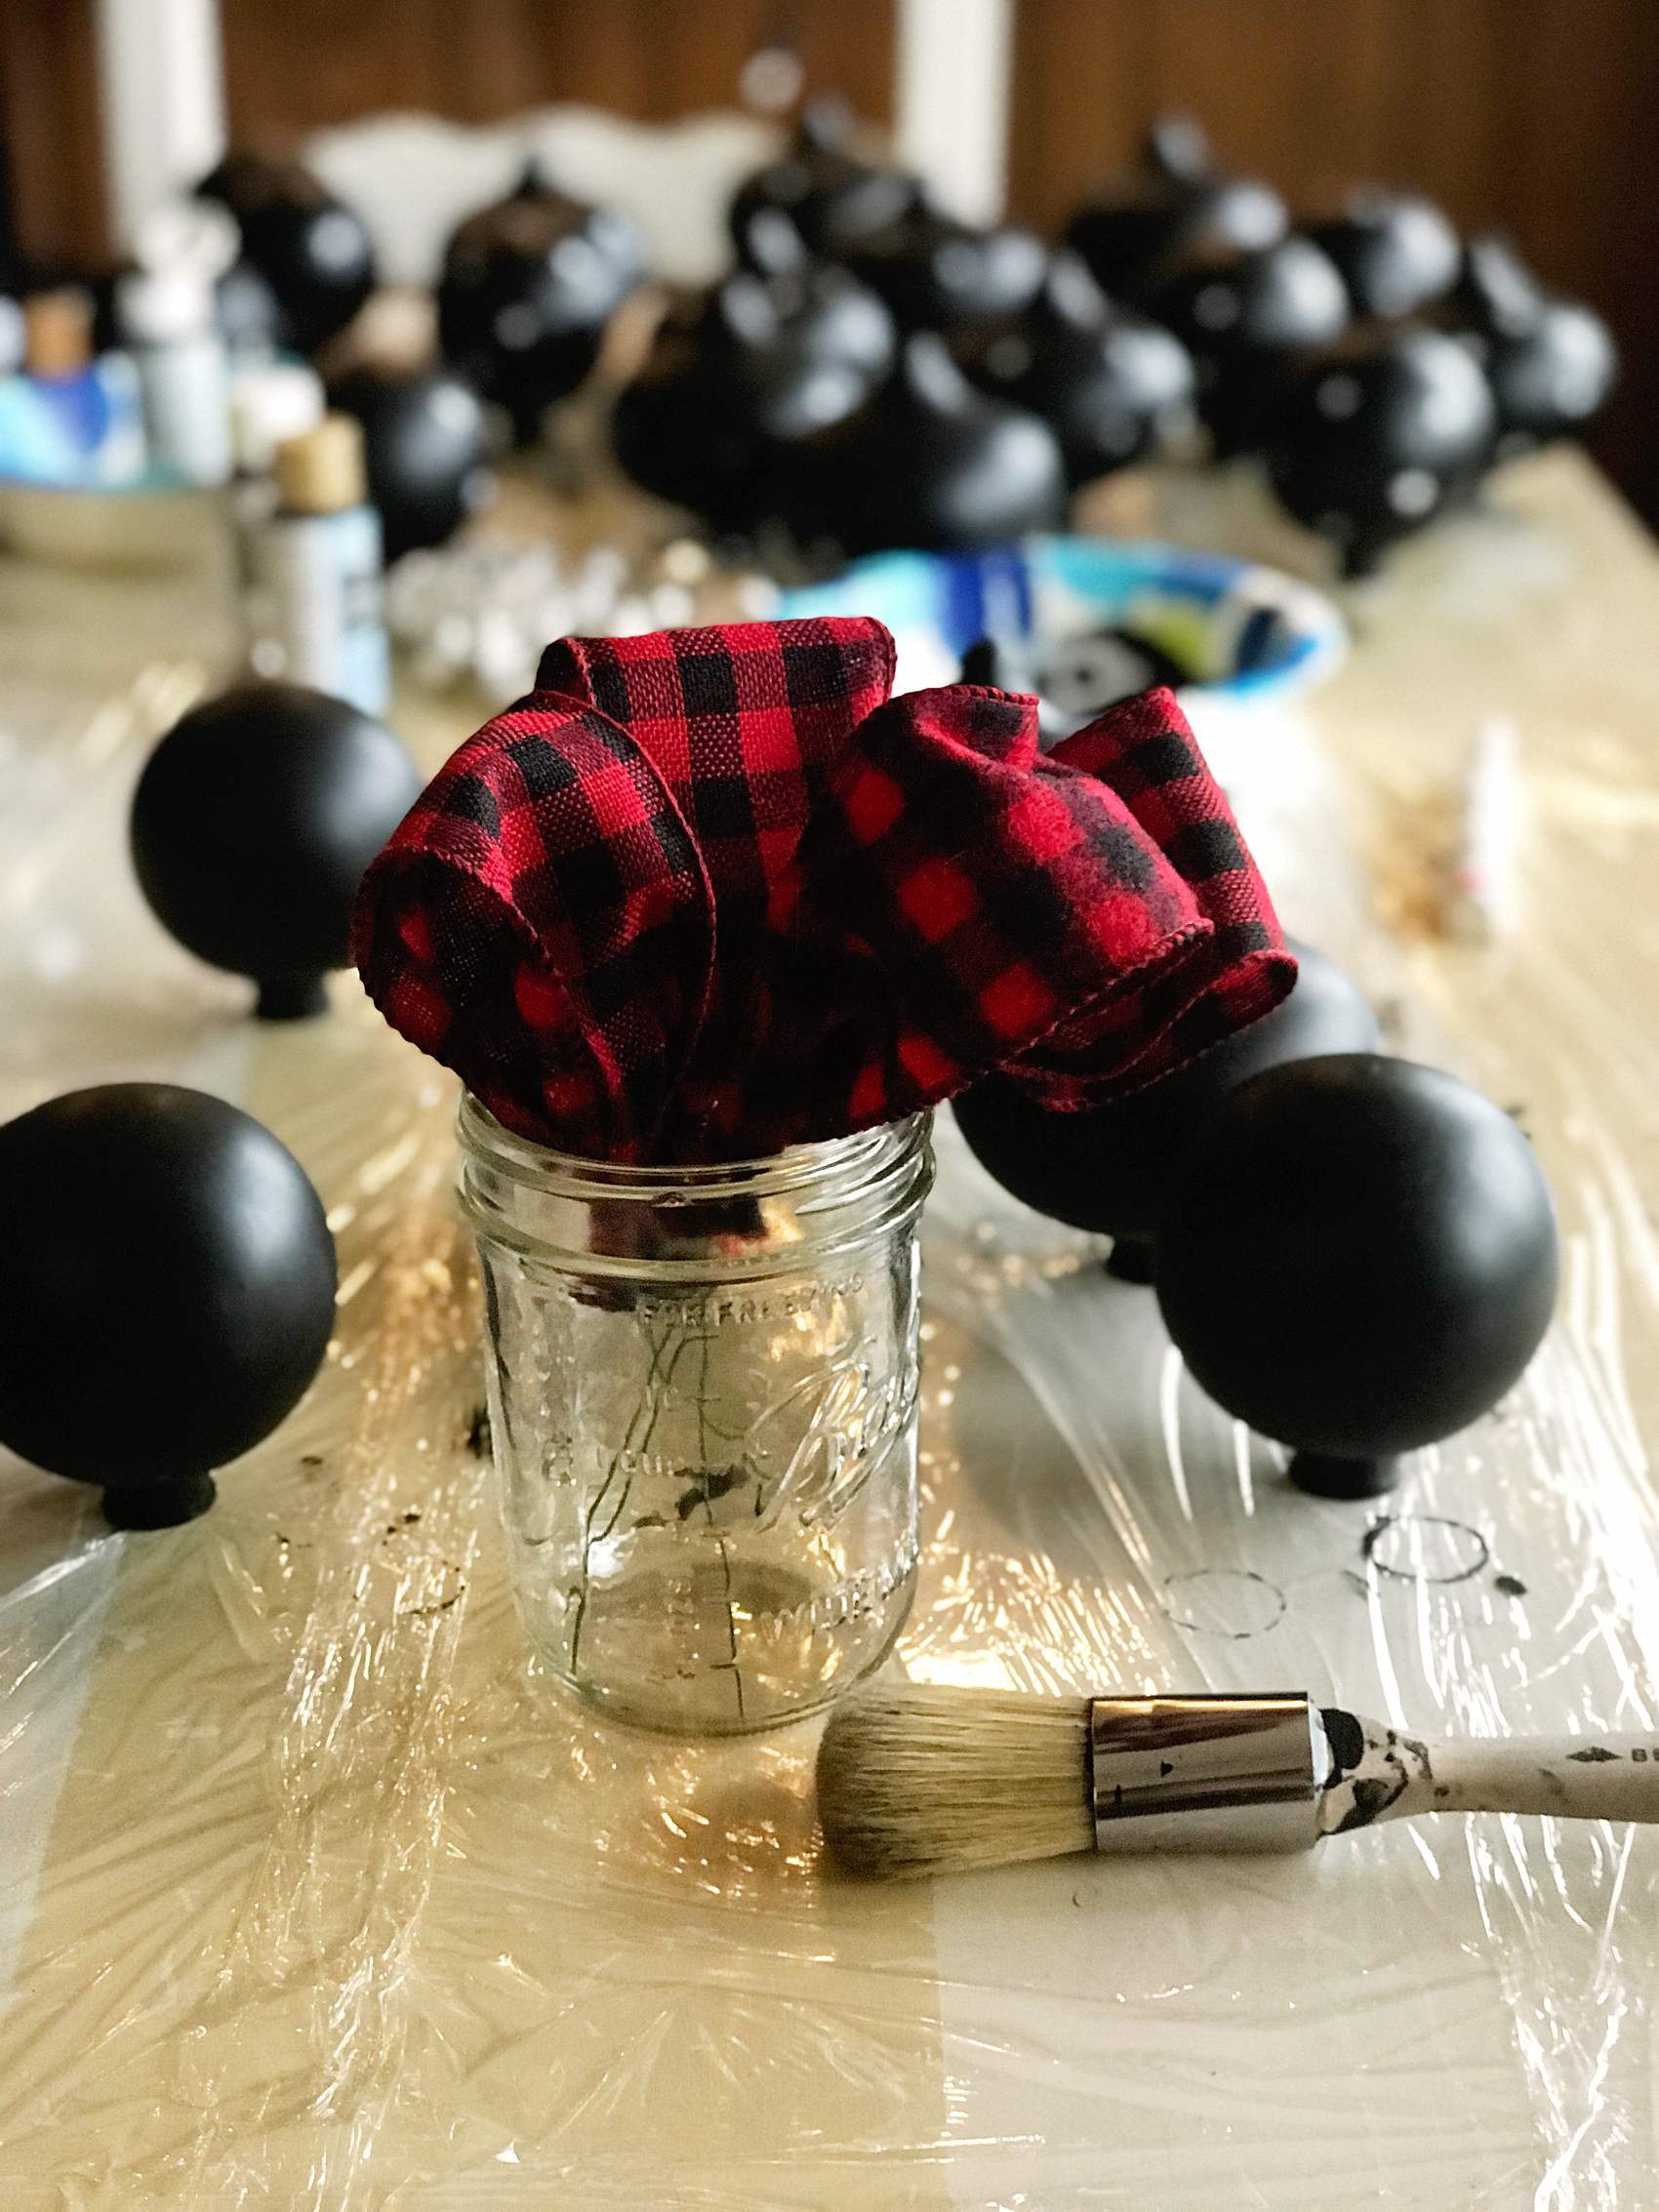
Then you use the wire tail to attach them to the tree. An easy, easy way to fill in those bald spots on the tree or add a pop of color. Again, it’s a very cost friendly way to add color to your tree.

Love FARMHOUSE decor? Then you are going to LOVE this Farmhouse inspired Christmas Carol Star ornament that you can create for your home.

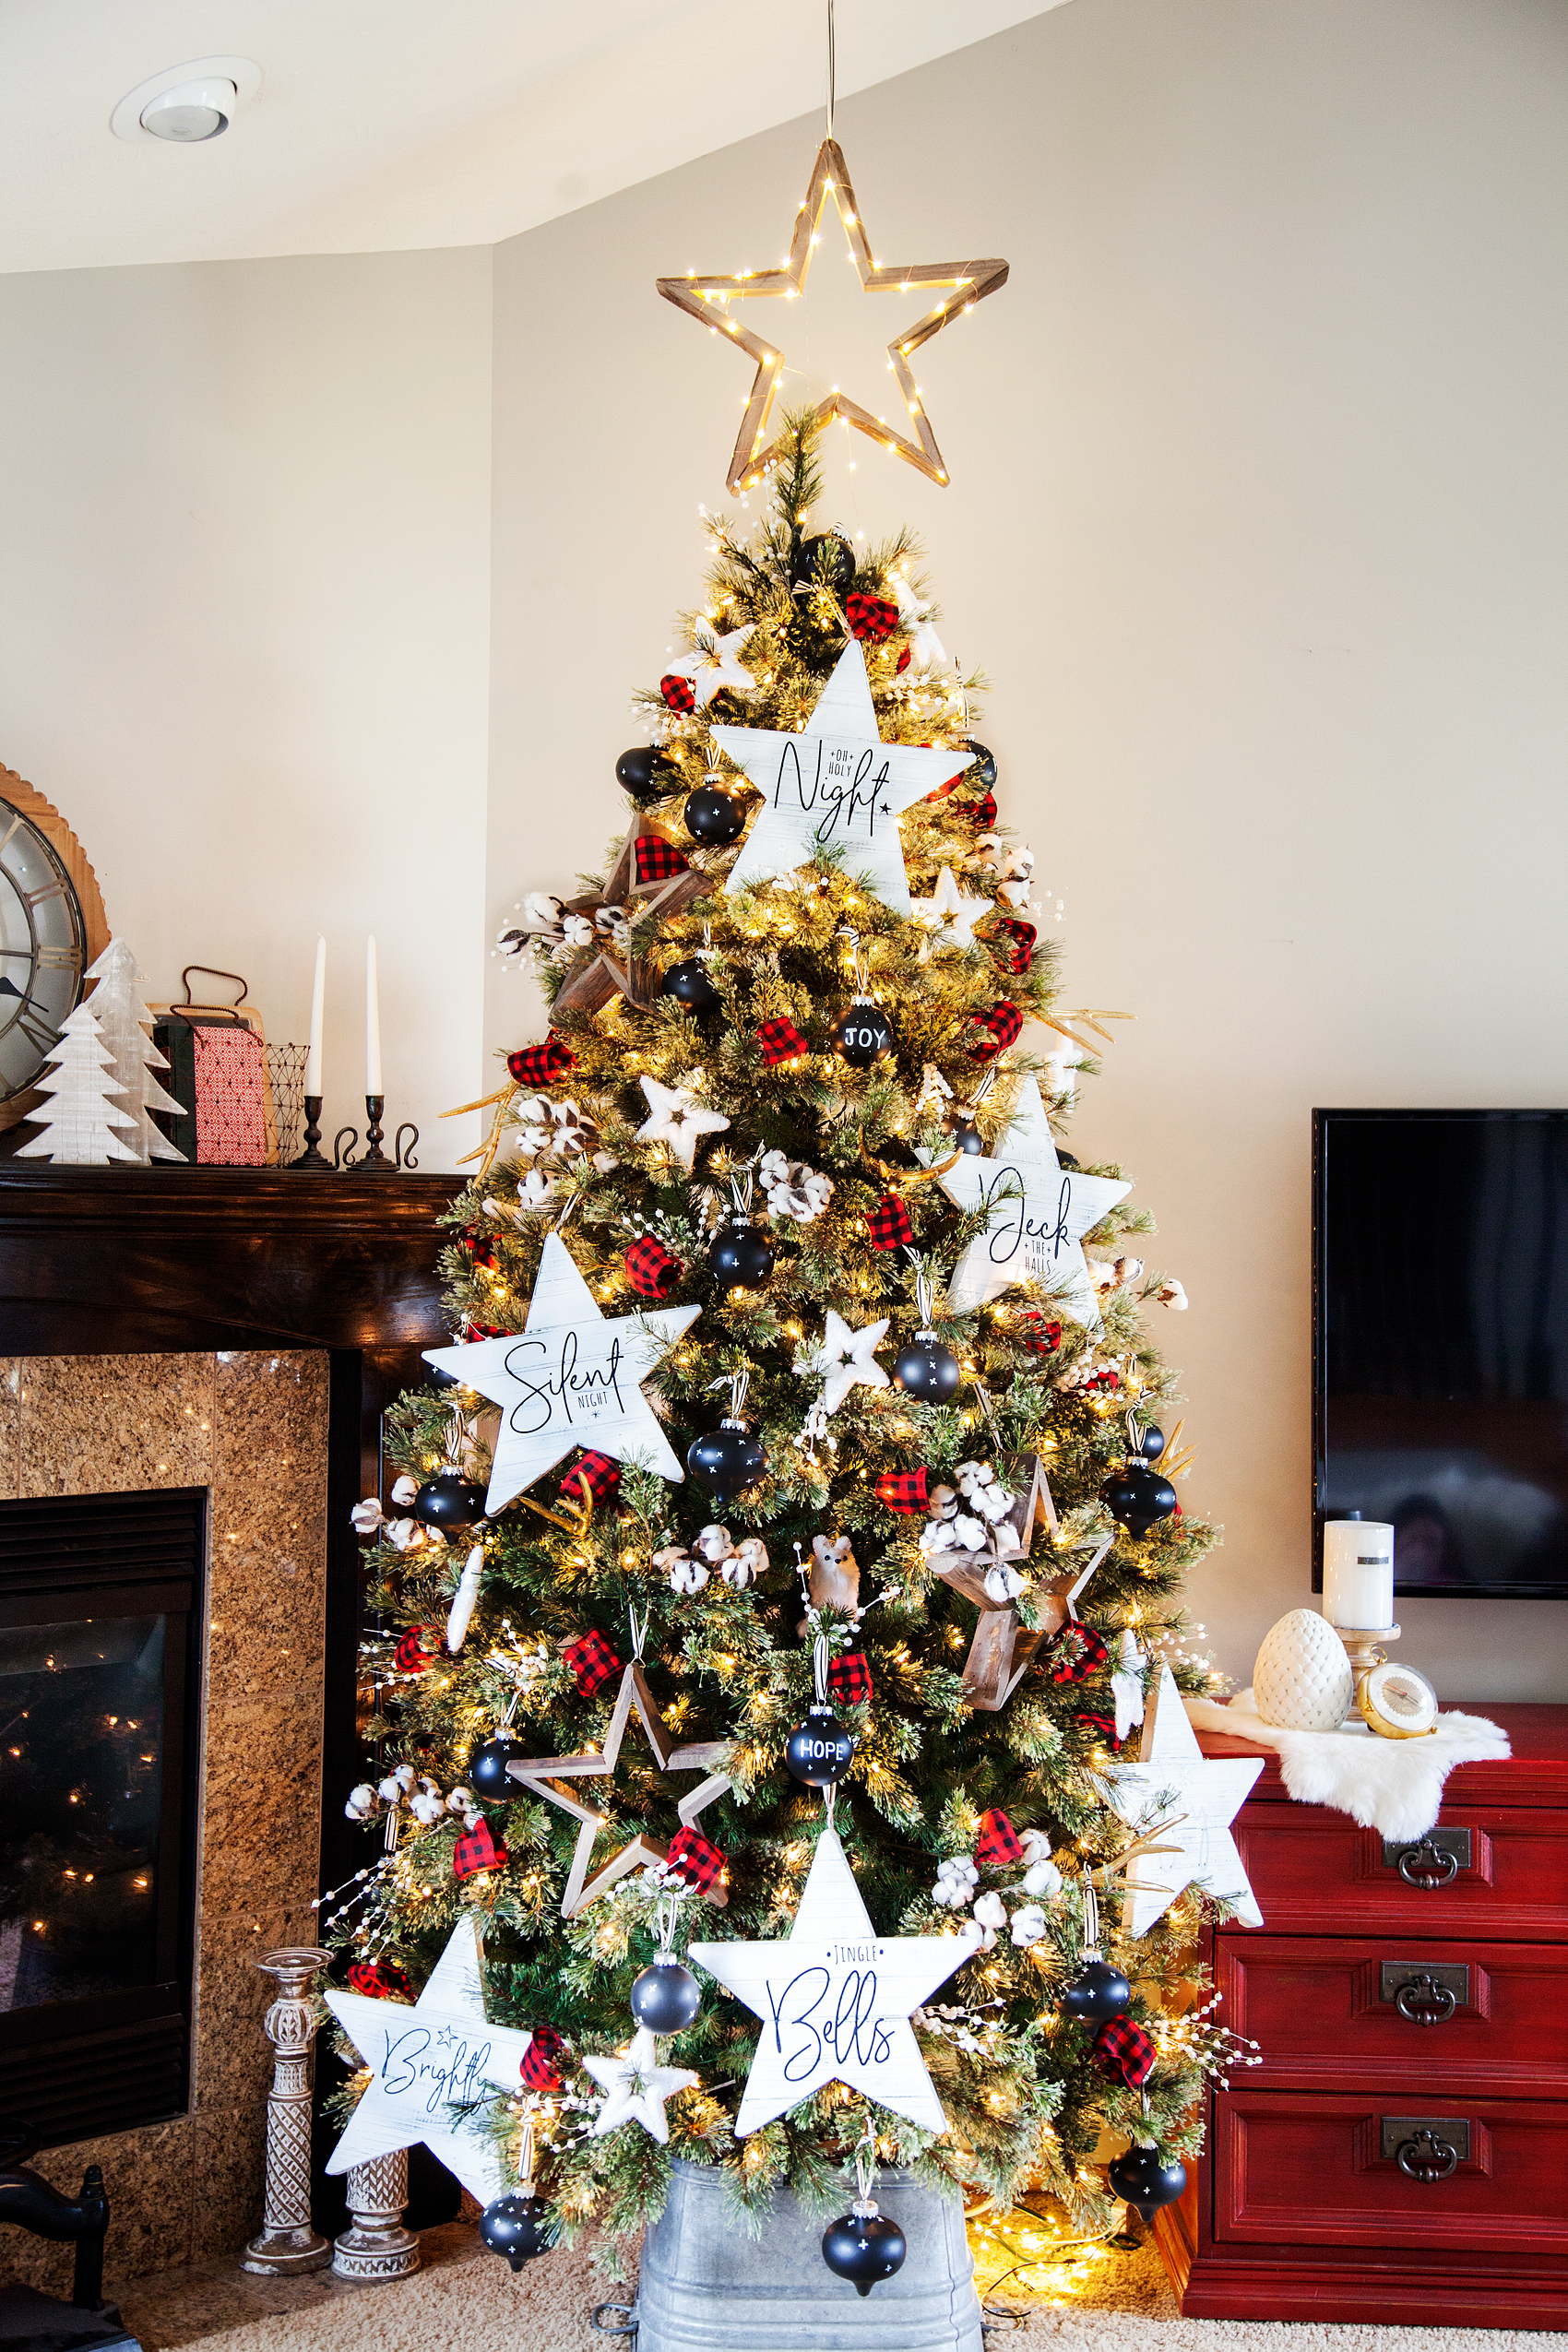
One last thing… I almost forgot! We decided to HANG our star from the ceiling for this tree. I bought a large wood star at Michaels and wrapped it with some wire lights and then hung it from the ceiling. We made sure to place our hook in a stud so that we didn’t have issues with the weight of the star. It’s so simple and tops it with that rustic farmhouse look.

Wow, it’s amazing how some simple elements can come together to create a really stunning tree. All of my kiddos have said this tree is the best we’ve ever had. Make sure to download the Michaels App on your smartphone so you don’t miss any of their amazing holiday deals this season. It really is a great app to have. No more saving receipts! That’s worth it right there.

Don’t forget to tag me in your tree photos… I love to see what you guys are creating!

For more inspiration, visit the Michaels blog and their Pinterest, Facebook and Instagram accounts.

DIY Farmhouse Christmas Carol Star Tree Ornaments

111 · Nov 1, 2017 · 6 Comments


It’s officially Holiday Season! One thing that I LOVE about the Holidays is creating my own custom decor for our home. Love FARMHOUSE decor?

Then you are going to LOVE this Farmhouse-inspired Christmas Carol Star ornament that you can create for your home. This week I’ve teamed-up with DecoArt and Cricut to create some new ornaments for my Christmas tree this year.

We decided to go with the star of Christmas theme, so… I thought it would be fun to chalk paint some large wood stars and then put titles of Christmas Carols on them. They turned out so cute… Come learn how to make them for yourself.Create your own farmhouse Christmas decorations with a little help from WhipperBerry - Christmas Carol Stars

A few years ago, one of my good friends had the most beautiful Christmas trees. She had large stars all over the tree and I just adored it.

I asked her where the stars were from and I was devastated to learn that they were given to her from a friend who found them discarded from a department store after the holidays. DANG! There was no way of finding a set of my own.

This year, I decided it was time to make some large stars of my own. The timing couldn’t be more perfect! DecoArt and Cricut have teamed up this year to create all kinds of fabulous fun this Holiday season…

22520087_10212667444788382_464973044413398504_o

I love it when to amazing companies come together to inspire all of us to bring a little bit of our personalities into our home. These two are perfect for that. I’m sure that this will tickle your fancy… You’ll want to visit the DecoArt Blog to check out the GIVEAWAYS DecoArt & Cricut have up their sleeves this year!

Christmas Carol Stars Supply List

  • raw wood stars from Amazon
  • Americana Decor Curb Appeal – Black
  • Americana Decor Chalky Finish – Everlasting
  • paint brush
  • 250 grit sandpaper
  • Cricut vinyl – midnight
  • Cricut transfer tape
  • Cricut cutting machine like the  Cricut Maker

Instructions for Christmas Carol Stars

raw-star

First, grab your raw wood stars and wipe them down with a damp cloth to make sure they are dust and dirt free. Then paint your base coat with the Americana Decor Curb Appeal paint.

painting-the-star-black-first

The reason why I used the Curb Appeal paint is… One, it’s a durable paint and will stand up to the distressing of the chalk paint. Two, I just happened to have some left over after I painted my front door. I wanted to have a black base because I wanted it to show through when I distressed the white (Everlast) paint.

PRO TIP +  When using chalk paint, you will typically distress your paint to create the look that is typical with chalk paint. You’ll need to keep in mind what color you want to show through once distressed. You’ll need to use that color as your base color then paint your finishing color on top. Then make sure when you are distressing your piece, you don’t use too much pressure. You don’t want to accidentally distress down through your base coat.

Once your base coat is dry, paint your top coat with the Americana Decor Chalky Finish paint in Everlasting.

painting-farmhouse-wood-star

Pro Tip + Don’t worry about making your top coat look PERFECT with multiple layers of paint. You will be distressing them, no need for perfection. The heavier your layer of paint, the harder your piece will be to distress. No need to make extra work for yourself.

To distress, use a 250 grit sandpaper and lightly sand the raised edges of the stars.

how-to-distress-wooden-star-4

Christmas Carol Graphics

Now, it’s time to break out your Cricut machine. I’ve used the Cricut Explore machines and the Cricut Maker and I LOVE them both. For this project, I used my Cricut Maker but, either one is fine.

Athena_shop_hero_no-copy-copy2

Learning how to cut iron on vinyl with the Cricut Maker via WhipperBerry

To begin, I created these designs to put on the chalk painted stars…Farmhouse Christmas Carol Ornaments from WhipperBerry

I love how they help to usher in the spirit of the season. They remind us of seasons past and they also help to remember the true meaning of the season… The birth of our Savior Jesus Christ.

You can download these Christmas Carol designs HERE

Then all you need to do is to upload the SVG files to the Cricut Design Space. You can check out this post on how to upload a design in the Cricut Design Space to learn how to do that.

Then you’ll cut your designs on your Cricut machine and then apply the vinyl to your stars. To learn how to apply vinyl, visit this post… How to Apply Vinyl Tutorial that I created.

It’s really not hard if you follow a few simple steps. It truly is one of my favorite ways to create for my home.

Pro Tip + Make sure you wipe down your stars with a damp cloth to remove any remaining paint dust. It will make applying the vinyl much easier.

Now your stars are ready to add to your tree!

Farmhouse-Star-Christmas-Tree-via-WhipperBerry-3

Farmhouse-Star-Christmas-Tree-via-WhipperBerry-9

I can’t wait to see what you guys create this Holiday Season! Make sure to tag me on your social media posts. You can follow me on Facebook, Instagram & Pinterest.

Halloween Bat Jars

9 · Oct 4, 2017 · Leave a Comment

Chalky Finish Halloween Bat Jars • Have fun creating spooky Halloween decor with these Americana Decor Chalky Finish Ball Jars filled with creepy bats. Decorate your mantle or use them as a table centerpiece. Either way, they will add some stylish fun to your Halloween decoration game.

Chalky Finish Bats in a Jar • Have fun creating spooky Halloween decor with these Americana Decor Chalky Finish Ball Jars filled with creepy bats. Decorate your mantle or use them as a table centerpiece. Either way, they will add some stylish fun to your Halloween decoration game.

+ This post is brought to you by the amazing folks at DecoArt +

I LOVE, love, love creating simple and, (strange as it may seem,) elegant Halloween decor. I’ve said it before, I don’t really go for the macabre but, I do love a good bat or six flying around the room. This year I thought it would be fun to use two of my favorites and create spooky mantle decor OR a centerpiece for our Halloween gatherings.

Not All Jars are Created Equal • What Jars Are Fun to Use

We’ve all seen those classic chalk painted jars used for everything under the sun. They are great but, they can be even better when you use the NEW Ball jars that have a little flair to them. The have a new Spiral Jar, a Giving Jar and a little Mini Ball Jar. All three of these jars have something fun to add to the chalk paint jar scene. The Spiral jar has great spiral lines with a somewhat hour glass shape, PERFECT for a chalky finish. The giving jar has great lines and, can we swoon over the cute mini mason jar! That would be perfect for a place card at a Halloween dinner party.

Chalky Finish Halloween Bat Jars • Have fun creating spooky Halloween decor with these Americana Decor Chalky Finish Ball Jars filled with creepy bats. Decorate your mantle or use them as a table centerpiece. Either way, they will add some stylish fun to your Halloween decoration game.

The Benefits of Chalky Finish Paint vs. Typical Acrylic Paint

These fun new jars are a match made in Heaven when it comes to the DecoArt Americana Decor Chalky Finish paint. The two main benefits to using chalk type paint for this application is:

  1. Dry time– Chalk or mineral type paint has a super speedy dry time which is fabulous when you are wanting to a quick project. Whether big or small, furniture or jars, you want to move quickly and not have to sit around literally watching the paint dry.
  2. Manipulatable – With a chalk based paint like the Americana Decor Chalky Finish paint, once the paint is dry, that’s when the magic happens. You can use sand paper or even a wet cloth to play with the paint giving it a nice worn look. With typically acrylic paint you wouldn’t be able to do that. It would just become a sticky mess. The paint would gum up in your sand paper and the result wouldn’t be consistent.  And really, chalk painted projects are far more interesting than just your basic flat paint job. They have character!

Supplies Needed for the Halloween Bat Jars

Chalky Finish Halloween Bat Jars • Have fun creating spooky Halloween decor with these Americana Decor Chalky Finish Ball Jars filled with creepy bats. Decorate your mantle or use them as a table centerpiece. Either way, they will add some stylish fun to your Halloween decoration game.

  • Ball Jars- Spiral, Giving Jar & Mini Jar –
  • DecoArt Americana Decor Chalky Finish Paint – Everlasting
  • DecoArt Americana Decor Satin Enamels – Classic Black
  • Chalk paint brush
  • FloralCraft Dry Foam Mug Plugs
  • Wire cutters
  • Black Aluminum Floral Wire
  • Hot glue gun – I LOVE my cordless Ryobi Glue Gun
  • 220 grit Sand paper
  • Round pencil or pen
  • Bats
  • lint free cloth to protect your surface

I actually purchased most of my supplies here from Michaels or Target. I’ve found Target has the best selection for the Ball jars at a good price. The bats are a chipboard bat from the Martha Stewart Crafts line at Michaels but, you can totally make your own bats out of black paper as well. If you have a Cricut machine it would be a snap!

Instructions for the Halloween Bat Jars

Chalky Finish Halloween Bat Jars • Have fun creating spooky Halloween decor with these Americana Decor Chalky Finish Ball Jars filled with creepy bats. Decorate your mantle or use them as a table centerpiece. Either way, they will add some stylish fun to your Halloween decoration game.

Place a lint free cloth or paper down on your surface to protect it from the paint.

You will begin by painting your first coat of paint with the Classic Black Americana Decor Satin Enamel. Now, I want these jars to look rough and not polished at all. I don’t mind brush strokes or a rough edge at the top. I actually purposefully created a feathered look at the top with my brush.

Chalky Finish Halloween Bat Jars • Have fun creating spooky Halloween decor with these Americana Decor Chalky Finish Ball Jars filled with creepy bats. Decorate your mantle or use them as a table centerpiece. Either way, they will add some stylish fun to your Halloween decoration game.

Chalky Finish Halloween Bat Jars • Have fun creating spooky Halloween decor with these Americana Decor Chalky Finish Ball Jars filled with creepy bats. Decorate your mantle or use them as a table centerpiece. Either way, they will add some stylish fun to your Halloween decoration game.

I turned them upside down and let them dry for an hour or two. You don’t want the paint to be tacky at all when you move onto the next coat.

Once your black layer is dry after an hour or two, you’ll paint on your white layer with the Americana Decor Chalky Finish in Everlasting (white.) I left about a 1/2 to a 1/4 inch section at the top of the black. That way a little more of the black paint is showing through. Again, I kind of feathered the top with my brush.

Chalky Finish Halloween Bat Jars • Have fun creating spooky Halloween decor with these Americana Decor Chalky Finish Ball Jars filled with creepy bats. Decorate your mantle or use them as a table centerpiece. Either way, they will add some stylish fun to your Halloween decoration game.

PRO TIP: For the white layer, I found a thicker application of the paint is best. I wouldn’t go so far as to do two coats. Just paint it on a little heavy.

Chalky Finish Halloween Bat Jars • Have fun creating spooky Halloween decor with these Americana Decor Chalky Finish Ball Jars filled with creepy bats. Decorate your mantle or use them as a table centerpiece. Either way, they will add some stylish fun to your Halloween decoration game.

Then I set them aside to dry again. This time I didn’t have to wait too long. The Chalky Finish paint dries super quick even if it is layered on rather thick.

Then I took the 220 grit sand paper and LIGHLY swipe the paint on the jar with a flat hand. You don’t want to attack it like a jack hammer. You want to lightly distress the high points of the jar so that it look natural.

Chalky Finish Halloween Bat Jars • Have fun creating spooky Halloween decor with these Americana Decor Chalky Finish Ball Jars filled with creepy bats. Decorate your mantle or use them as a table centerpiece. Either way, they will add some stylish fun to your Halloween decoration game.

If you don’t want to worry about paint dust from the sandpaper, you can distress your jar with a wet cloth. Just make sure not to get the paint too wet. It will pull large areas of paint off the jar if it is not done carefully.

Now, put the floral foam into the jars. You may need to cut down the foam in order for it to fit into the jar.

Chalky Finish Halloween Bat Jars • Have fun creating spooky Halloween decor with these Americana Decor Chalky Finish Ball Jars filled with creepy bats. Decorate your mantle or use them as a table centerpiece. Either way, they will add some stylish fun to your Halloween decoration game.

It’s time to add your bats! You have several different choices for wire. If you are using a lighter, cardstock type paper for your bats, you’ll be able to use a 24 gage wire like the one pictured above. If you are using chipboard bats, you might opt for a heavier wire like the black aluminum decorative wire that I used.

Have fun twisting and curling the wire to create fun lines and swirls just like the swirls on the jar! I used some jewelry making tools along with a circular pen to create the twists and turns in my wire.

I hot glue the wire to the back of the bats and then arrange them in the jars sticking the wire into the floral foam to keep them in place.

Chalky Finish Halloween Bat Jars • Have fun creating spooky Halloween decor with these Americana Decor Chalky Finish Ball Jars filled with creepy bats. Decorate your mantle or use them as a table centerpiece. Either way, they will add some stylish fun to your Halloween decoration game.

Doesn’t the jar look fun with the distressed swirls?!

I love how these turned out and can’t wait to make a few more to dress up our home for Halloween. It would be fun to make some jars with ghosts and such… Ahhh, fun!

Chalky Finish Halloween Bat Jars • Have fun creating spooky Halloween decor with these Americana Decor Chalky Finish Ball Jars filled with creepy bats. Decorate your mantle or use them as a table centerpiece. Either way, they will add some stylish fun to your Halloween decoration game.

Creepy Halloween Taxidermy Plaques

9 · Sep 1, 2017 · Leave a Comment

Add a little flair to your spooky Halloween decorations with taxidermy plaques! I used the DecoArt Metallic Lustre to turn  simple spooky objects into creepy yet classy home decor. Come check it out… If you dare!

Add a little flair to your spooky Halloween decor with DecoArt! I used their Metallic Lustre to turn simple spooky objects into creepy yet classy taxidermy plaques to decorate our entryway for Halloween.

{ disclaimer • I am a DecoArt Ambassador and they have sponsored this post. However, all thoughts, ideas and opinions are my very own.}


 O.K. guys… It’s never too early to start thinking about your Halloween decorations! Over the years I’ve become quite the fan of decorating for this creepy holiday. I used to hate it, but I’ve kind of fallen in love with what you can create for this spooky night. I wanted to create some new pieces to add to my collection for the new home and found myself wandering the isles at Michaels wondering what to make. Then it hit me… I wanted to make some “taxidermy” plaques to add some cringe worthy art to my front entry way. I wanted to keep it simple and still classy so I thought a little Rose Gold Metallic Lustre from DecoArt would do the trick! Here’s how you can make them.

Add a little flair to your spooky Halloween decor with DecoArt! I used their Metallic Lustre to turn simple spooky objects into creepy yet classy taxidermy home decor.

Taxidermy Plaques Supply List

Add a little flair to your spooky Halloween decor with DecoArt! I used their Metallic Lustre to turn simple spooky objects into creepy yet classy taxidermy home decor.

  • wood plaques
  • DecoArt Metallic Lustre – Rose Gold
  • Americana Curb Appeal – Black
  • iron spider
  • iron keys
  • skeleton hand
  • small Staghorn Fern
  • paint brush
  • lint free cloth
  • drill
  • 8 screws
  • floral wire
  • moss
  • large bowl of water
  • baking sheet
  • drop cloth or something to protect your work surface

Instructions for Taxidermy Plaques

To begin, you will need to prep your work surface and cover it with a drop cloth or some type over covering to protect it.

Next, place your moss into a large bowl of water so that it can soak while you are working with the other pieces. Set it aside.

Add a little flair to your spooky Halloween decor with DecoArt! I used their Metallic Lustre to turn simple spooky objects into creepy yet classy taxidermy plaques to decorate our entryway for Halloween.

Then, grab your Americana Curb Appeal paint and paint 2 of your wood plaques. Keep one natural for your Staghorn Fern.

Add a little flair to your spooky Halloween decor with DecoArt! I used their Metallic Lustre to turn simple spooky objects into creepy yet classy taxidermy home decor.

I really like the Americana Curb Appeal paint and traditionally it’s not really used for crafting, it’s used to paint door and shutters typically. I had some on hand and thought it would work just fine for the wood plaques for this project. PLUS… I have used that same paint for my doors, fireplace & banister therefore, my plaques would match the rest of my space. Not only that but, I really like the finish that it create on the wood. You won’t see brush strokes, the coverage is phenomenal and you’ll still see the wood grain through the paint. I really like that! I like to paint wood but, I don’t want it to look plastic… you know?

Add a little flair to your spooky Halloween decor with DecoArt! I used their Metallic Lustre to turn simple spooky objects into creepy yet classy taxidermy home decor.

Once those are both painted, set them aside to dry. Don’t worry, they dry pretty quick.

Next, let’s drill a hole into the skeleton hand before we add the DecoArt Metallic Lustre.

Add a little flair to your spooky Halloween decor with DecoArt! I used their Metallic Lustre to turn simple spooky objects into creepy yet classy taxidermy plaques to decorate our entryway for Halloween.

The hand is made out of a resin so it isn’t a problem to drill a hole into it. It  might be a little hard to start, but once you get the hole stared, it’s not a big deal.

Next, grab the skeleton hand, keys, spider, the rose gold Metallic Lustre and your lint free cloth (or paper towel if you are in a pinch. Just don’t rub too hard.)

Add a little flair to your spooky Halloween decor with DecoArt! I used their Metallic Lustre to turn simple spooky objects into creepy yet classy taxidermy plaques to decorate our entryway for Halloween.

Now, the DecoArt Metallic Lustre is a wax finish, not paint. IT AWESOME!!  I love this stuff! I put a little onto my cloth like so…

Add a little flair to your spooky Halloween decor with DecoArt! I used their Metallic Lustre to turn simple spooky objects into creepy yet classy taxidermy plaques to decorate our entryway for Halloween.

… And then, rub it all over your object that you are wanting to add a little flair to.

Add a little flair to your spooky Halloween decor with DecoArt! I used their Metallic Lustre to turn simple spooky objects into creepy yet classy taxidermy plaques to decorate our entryway for Halloween.

It cures really quick so, if you don’t want to have full coverage, make sure you work in small sections and work quick. With these pieces, I didn’t want full coverage, I still wanted them to look a little rough. As for the keys, I only wanted the rose gold at the top of the keys and then left the bottom black.

Add a little flair to your spooky Halloween decor with DecoArt! I used their Metallic Lustre to turn simple spooky objects into creepy yet classy taxidermy plaques to decorate our entryway for Halloween.

Once the paint on the plaques is dry and the Metallic Lustre has cured (it only takes a few minutes) you are ready to mount them on their plaques.

Add a little flair to your spooky Halloween decor with DecoArt! I used their Metallic Lustre to turn simple spooky objects into creepy yet classy taxidermy plaques to decorate our entryway for Halloween.

I just used a 1 1/2 inch screw to adhere the skeleton hand to the plaque. However, I did drill pilot holes into the hand and the plaque before to ensure a proper fit.

Now… I’m sure you’ve noticed that there is now a unsightly screw in the hand.

Add a little flair to your spooky Halloween decor with DecoArt! I used their Metallic Lustre to turn simple spooky objects into creepy yet classy taxidermy plaques to decorate our entryway for Halloween.

No worries!! I took a stick and roughly added more of the Metallic Lustre to cover the screw head.

Add a little flair to your spooky Halloween decor with DecoArt! I used their Metallic Lustre to turn simple spooky objects into creepy yet classy taxidermy plaques to decorate our entryway for Halloween.

Once it cures, it’s hard and voilá… You can’t see the screw! Nice, huh?

For the spider, I placed a screw on the plaque and hung the spider on it. If you use the same spider that I used, it has a screw hanger on the back so it works perfect. I did add some of the Metallic Lustre to the screw to help it blend in.

Now it’s time to mount your Staghorn Fern. Grab the plaque that you didn’t paint along with your drill and 6 1 1/2 inch screws and some floral wire.

First, I drill pilot holes into the plaque.

Add a little flair to your spooky Halloween decor with DecoArt! I used their Metallic Lustre to turn simple spooky objects into creepy yet classy taxidermy plaques to decorate our entryway for Halloween.

Three on each side about an inch away from the edge of the board. Then I add my screws but keep about an inch sticking up from the board.

Add a little flair to your spooky Halloween decor with DecoArt! I used their Metallic Lustre to turn simple spooky objects into creepy yet classy taxidermy plaques to decorate our entryway for Halloween.

At this point, I lay my plaque in a baking sheet. This part can get a little messy and the baking sheet will help contain the mess. Then I take the floral wire and make a little loop to help start the process and attach it to the top screw.

Add a little flair to your spooky Halloween decor with DecoArt! I used their Metallic Lustre to turn simple spooky objects into creepy yet classy taxidermy plaques to decorate our entryway for Halloween.

Then I wind it around the rest of the screws making sure to keep the wire close to the base of the screw close to the wood.

Add a little flair to your spooky Halloween decor with DecoArt! I used their Metallic Lustre to turn simple spooky objects into creepy yet classy taxidermy plaques to decorate our entryway for Halloween.

Do not cut the floral wire yet. Take some of your moss, gently wring it out a bit and lay it on top of the wire.

Add a little flair to your spooky Halloween decor with DecoArt! I used their Metallic Lustre to turn simple spooky objects into creepy yet classy taxidermy plaques to decorate our entryway for Halloween.

Then take your Staghorn Fern and gently take it out of the pot and remove as much dirt as possible. Staghorn Ferns are air plant so they really don’t need to live in soil. They get their nutrients from the air and the moisture on their frawns. For a really great post on Staghorn Ferns and how to mount and care for them, check out Vintage Revivals. Mandi has a real love for these plants.

HowtoMountandCareforStaghornFernscompletetutorialwithpictures

Once I’ve removed as much of the dirt as I am comfortable with, I lay it down on top of the moss.

Add a little flair to your spooky Halloween decor with DecoArt! I used their Metallic Lustre to turn simple spooky objects into creepy yet classy taxidermy plaques to decorate our entryway for Halloween.

Here’s a funny tip…

Staghorn Ferns love banana peels. Apparently, they provide the kind of nutrition that the plants really like. Before I cover the plant with moss, I add a little bit of banana peel.

Add a little flair to your spooky Halloween decor with DecoArt! I used their Metallic Lustre to turn simple spooky objects into creepy yet classy taxidermy plaques to decorate our entryway for Halloween.

Next, cover it with more moss and then criss cross the wire over the whole mound like before, until it is secure. The wire actually melts right into the moss and you don’t see it at all.

Add a little flair to your spooky Halloween decor with DecoArt! I used their Metallic Lustre to turn simple spooky objects into creepy yet classy taxidermy plaques to decorate our entryway for Halloween.

Check out Mandi’s post for tips on how to care for your new mounted Staghorn Fern. Now you’re all set to hang your macabre little scene on your walls.

Add a little flair to your spooky Halloween decor with DecoArt! I used their Metallic Lustre to turn simple spooky objects into creepy yet classy taxidermy plaques to decorate our entryway for Halloween.

Another little trick… I hung mine with those Command Strip Picture Hanging Strips. LOVE those babies!

Add a little flair to your spooky Halloween decor with DecoArt! I used their Metallic Lustre to turn simple spooky objects into creepy yet classy taxidermy home decor.

I love how these add a little creepy and yet class to my entryway if that’s even possible!

  • « Go to Previous Page
  • Page 1
  • Page 2
  • Page 3
  • Page 4
  • Page 5
  • Page 6
  • Interim pages omitted …
  • Page 9
  • Go to Next Page »

Primary Sidebar

Heather from Whipperberry
Hello... my name is Heather and I'm the creator of WhipperBerry a creative lifestyle blog packed full of great recipes and creative ideas for your home and family. I find I am happiest when I'm living a creative life and I love to share what I've been up to along the way... Come explore, my hope is that you'll leave inspired!

Footer

  • Privacy Policy
  • Crafts
  • Food
  • Gifts
  • Holidays
  • Home
  • Mom Life
  • Recipes
  • Travel

Copyright © 2026 · Seasoned Pro