• Skip to primary navigation
  • Skip to main content
  • Skip to primary sidebar
  • Skip to footer

Whipperberry

WhipperBerry • Your Home For Creative Inspiration

  • Home
  • Recipes
    • Starters
    • Easy Weeknight Dinners
    • Main Dish
    • Salads
    • Side Dish
    • Soups & Stews
    • Desserts
    • Breakfast
    • Miscellaneous
  • Tutorials
    • Creative Crafts
    • DIY Decor
    • Fabric Crafts
    • Food How-To
    • Jewlery
    • Paint Projects
    • Paper Art
    • Party Styling
    • Photography and Graphic Design
    • Silhouette
  • Holidays
    • Easter
    • Mother’s Day
    • Father’s Day
    • 4th of July
    • Halloween
    • Thanksgiving
    • Christmas
    • Valentine’s Day
  • Gift Ideas
    • Gifts For Everyone
    • Gifts for Dad
    • Mother’s day
    • For The Girls
    • For The Kids
    • Teacher Gift Ideas
    • Christmas
  • Printables
    • Holiday
    • Gift Idea
    • LDS Primary
  • Travel
  • About
    • Terms
  • Contact
  • Nav Social Menu

    • Facebook
    • Instagram
    • Pinterest
    • RSS
    • Twitter

Uncategorized

DIY Creative Station for the Family

22 · Jan 2, 2017 · Leave a Comment

It’s a new year and time to organize, organize, organize! Time to take down that lovely tree and pack it up for another year. Time to give away what no longer works in your home and make your space fresh and full of life. I always love this time of year. The time of fresh starts and organizing your home to make it (and yourself) the best it can be! One thing I really want to embrace for the new year is to take time to be creative.  Just sit down, grab a sheet of paper, a few creative supplies and let myself go for a little while. With that in mind, I thought it would be fun to create a DIY Creative Station that will inspire the whole family!

Creative station to inspire the entire family to create. Grab all of your supplies at Michaels Craft Stores and dress it up in a way that will inspire you and your family everyday.

Now, I typically don’t have a problem being creative and playing around with all kinds of fun goodies and gadgets, but… I have a really hard time sharing with others! You would think that at my age I would have learned that simple rule. But I like to keep my stuff nice and organized and if I open that space up the the family, it turns into total chaos! How sad is that? I’ve deprived them of all of the fun tools and creative goodies that I get to play with everyday. Now, I’m not a total troll. They already have a simple station with basic things they need to complete homework projects and stuff, but that’s about it. AND, it sure isn’t dressed-up in an inspiring way.

This months Michaels Makers Fresh Start Challenge is a great way to give my family a bit of a creative fresh start and create a safe space for them to use.

26536_ms_mm_jan_l

What is your family in need of? Do you need an updated homework station? A new calendar to organize activities? Do your kiddo’s rooms need a little organization help? Is your kitchen in need of a FRESH START?  Whether it’s planning the family schedule, cleaning out your pantry or getting the kiddos ready to head back to school, Michaels has everything you need to help you get organized this year.

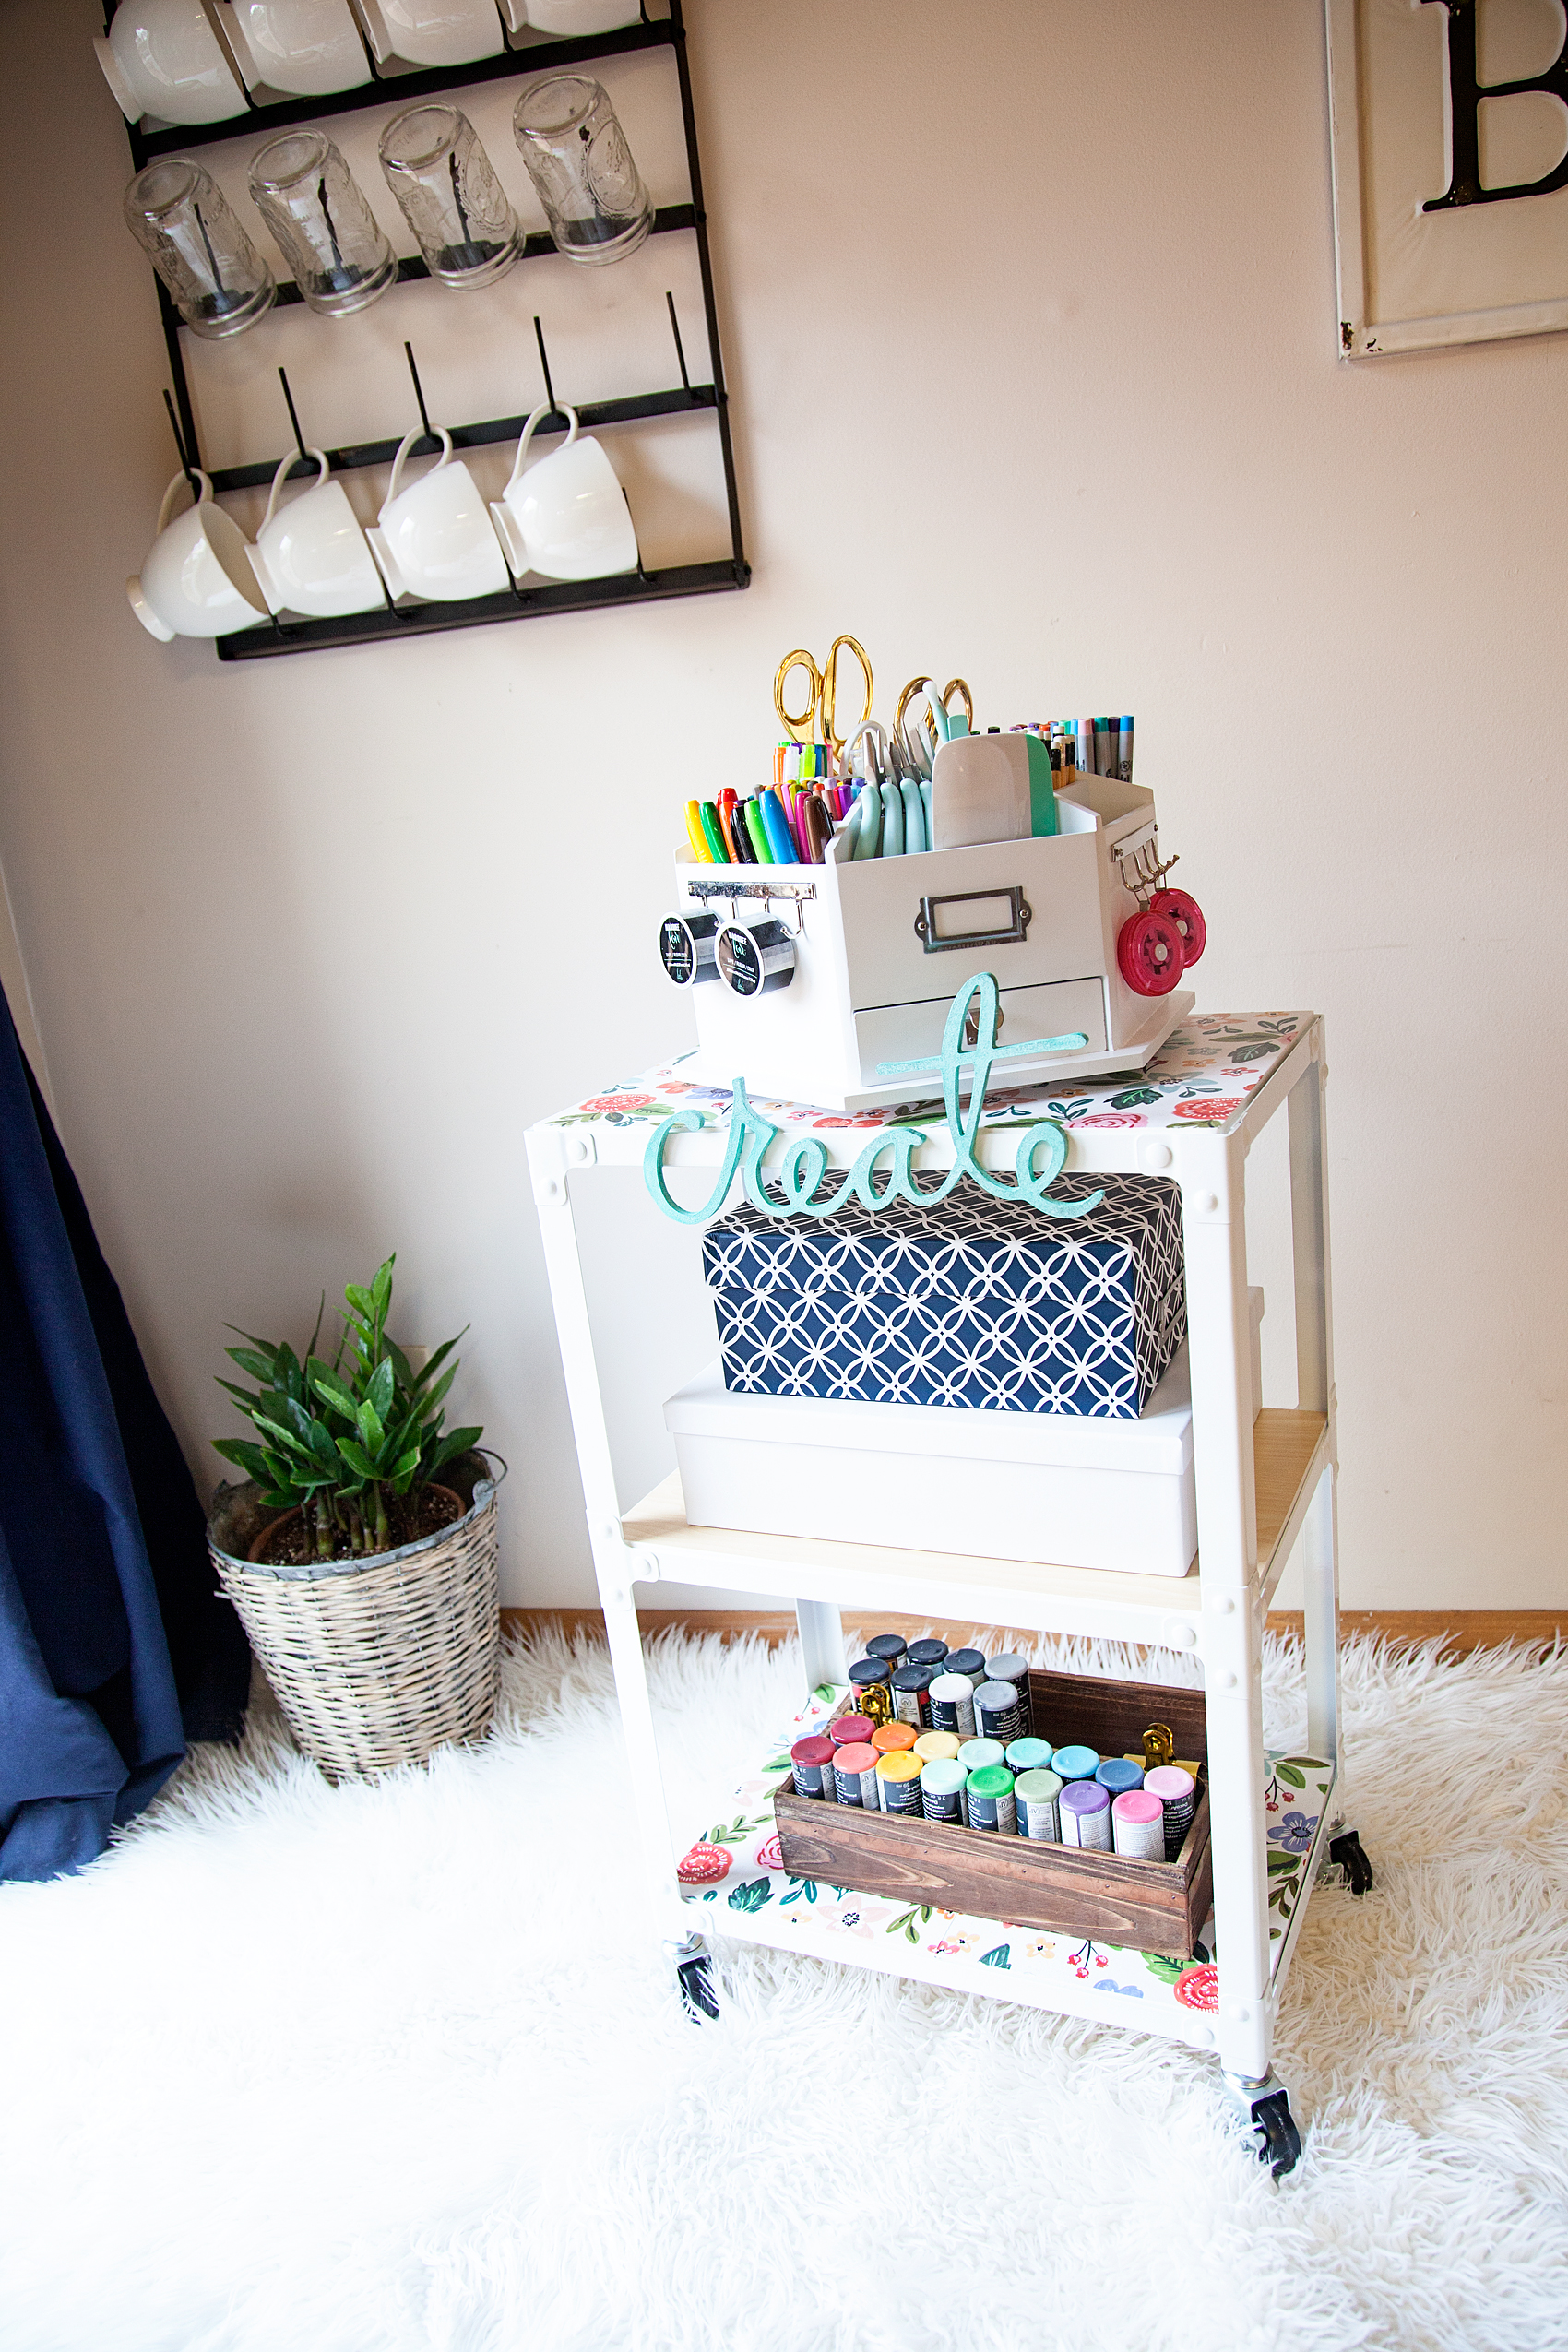
One thing that I love at Michaels is all of the amazing organization tools, I’m kind of a box and basket nerd. I love to find things that can keep you organized and also dress up your space. I especially love the new rolling carts from Cre8ted Space at MichaelsCreative station to inspire the entire family to create. Grab all of your supplies at Michaels Craft Stores and dress it up in a way that will inspire you and your family everyday.

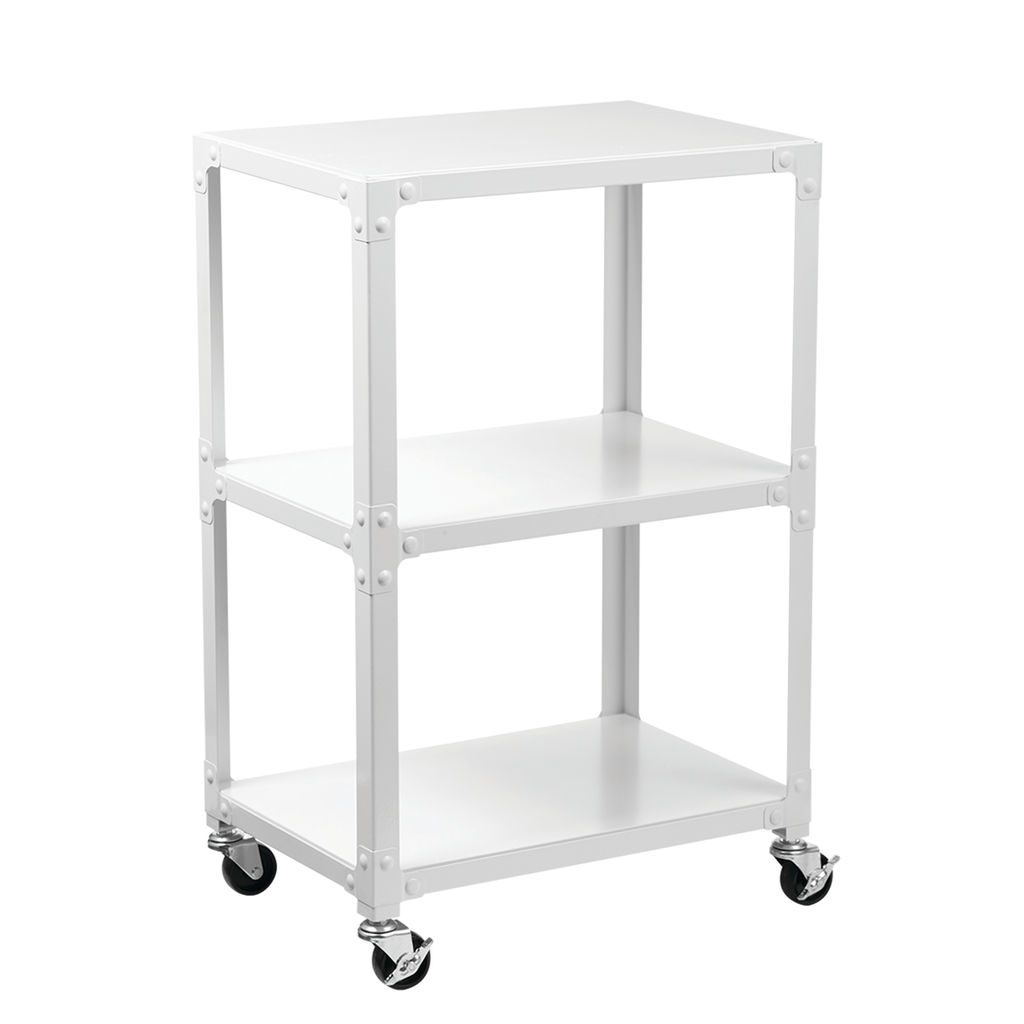
Doesn’t it remind you of school? As a kid I always envied my teacher and her lovely rolling carts. I know, I’m a bit of a nerd that way. This new cart at Michaels kind of had that vibe ( FYI they are on sale this week!) BUT, I wanted to dress it up in my own special way. I grabbed my favorite Mod Podge and some extra large paper from Mambi…

Creative station to inspire the entire family to create. Grab all of your supplies at Michaels Craft Stores and dress it up in a way that will inspire you and your family everyday.

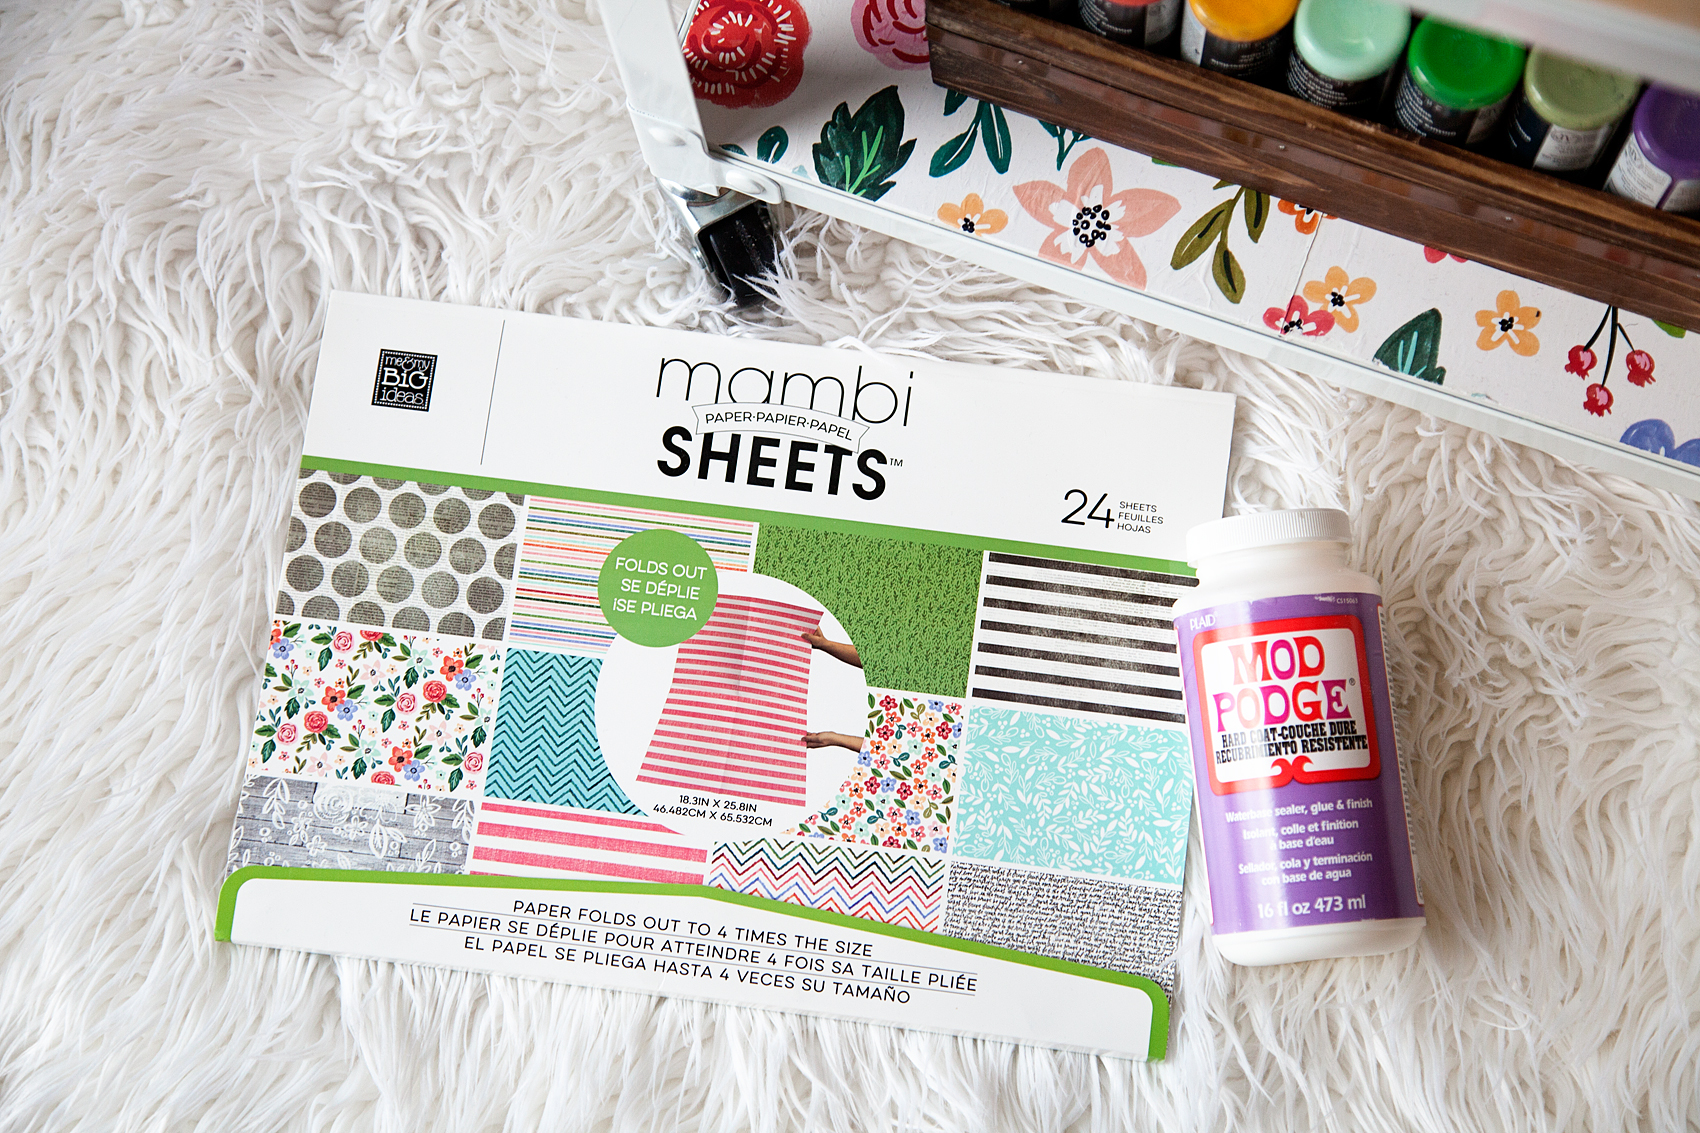
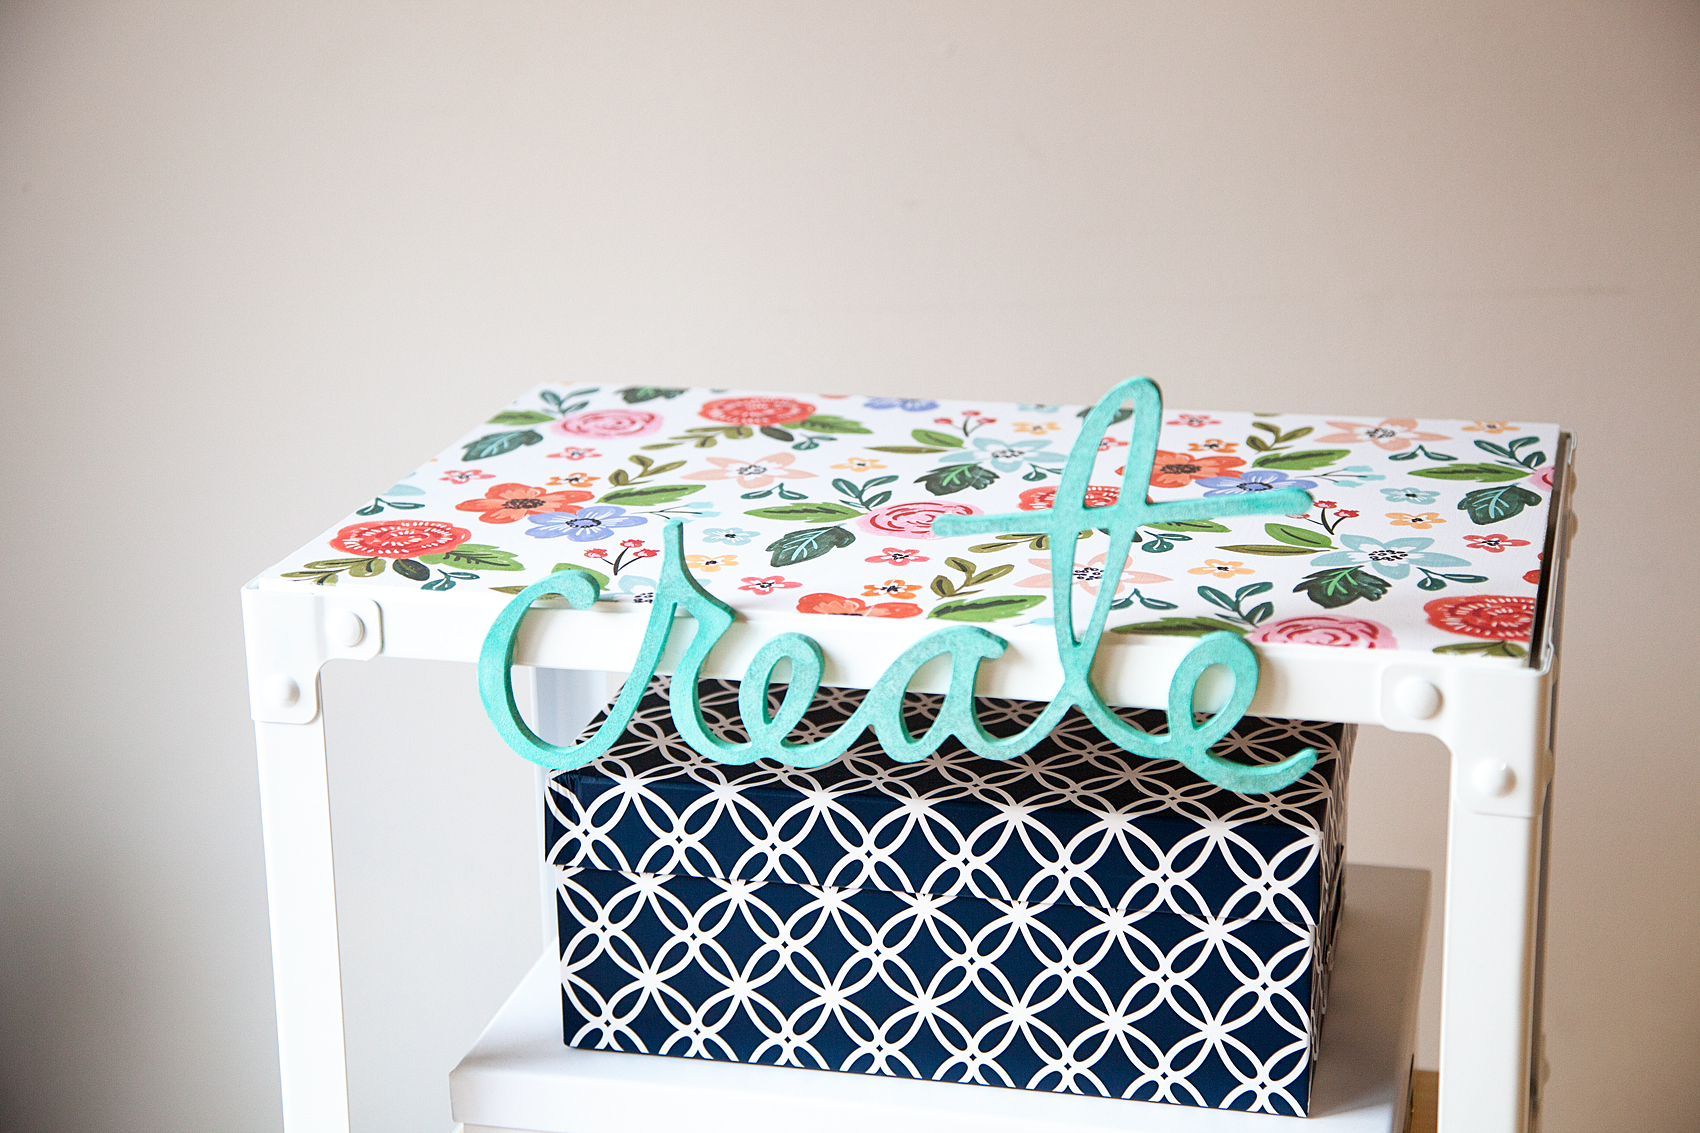
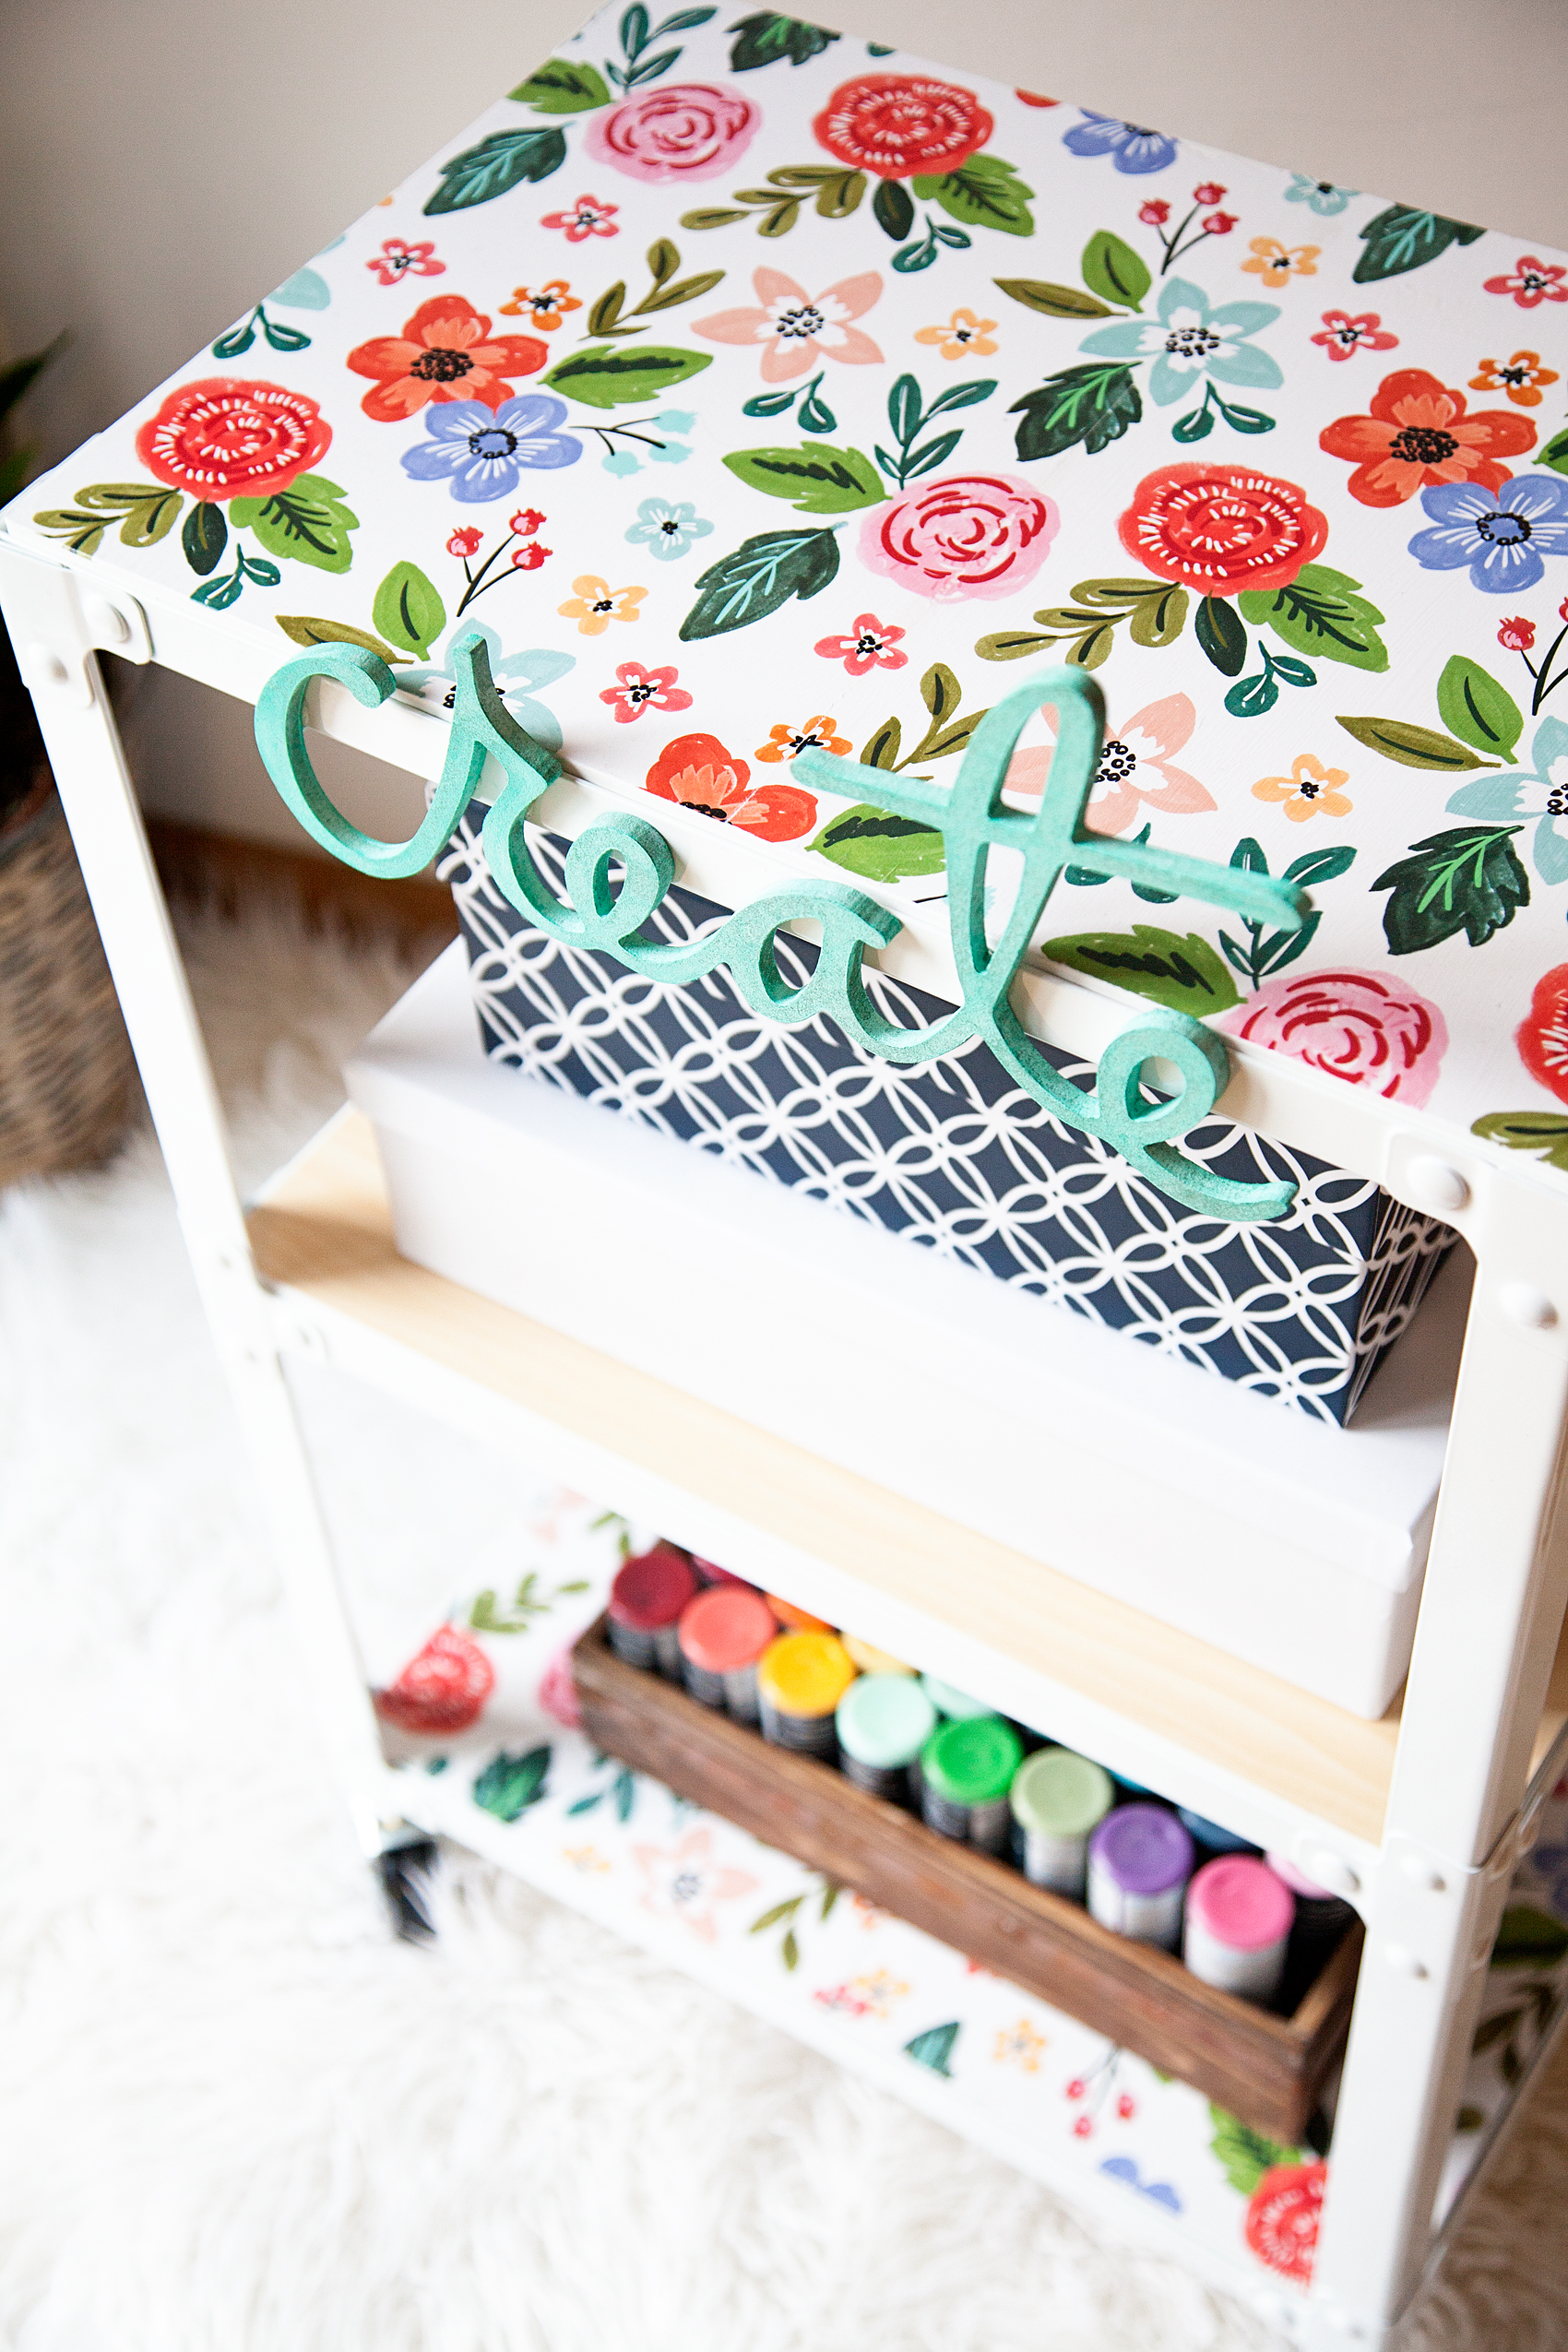
It was a cinch to Mod Podge (or Decoupage) the paper right onto the removable shelve from the cart.

Creative station to inspire the entire family to create. Grab all of your supplies at Michaels Craft Stores and dress it up in a way that will inspire you and your family everyday.

It took no time at all for the Mod Podge to dry and harden to create a lovely surface for my new cart. I LOVE IT!!

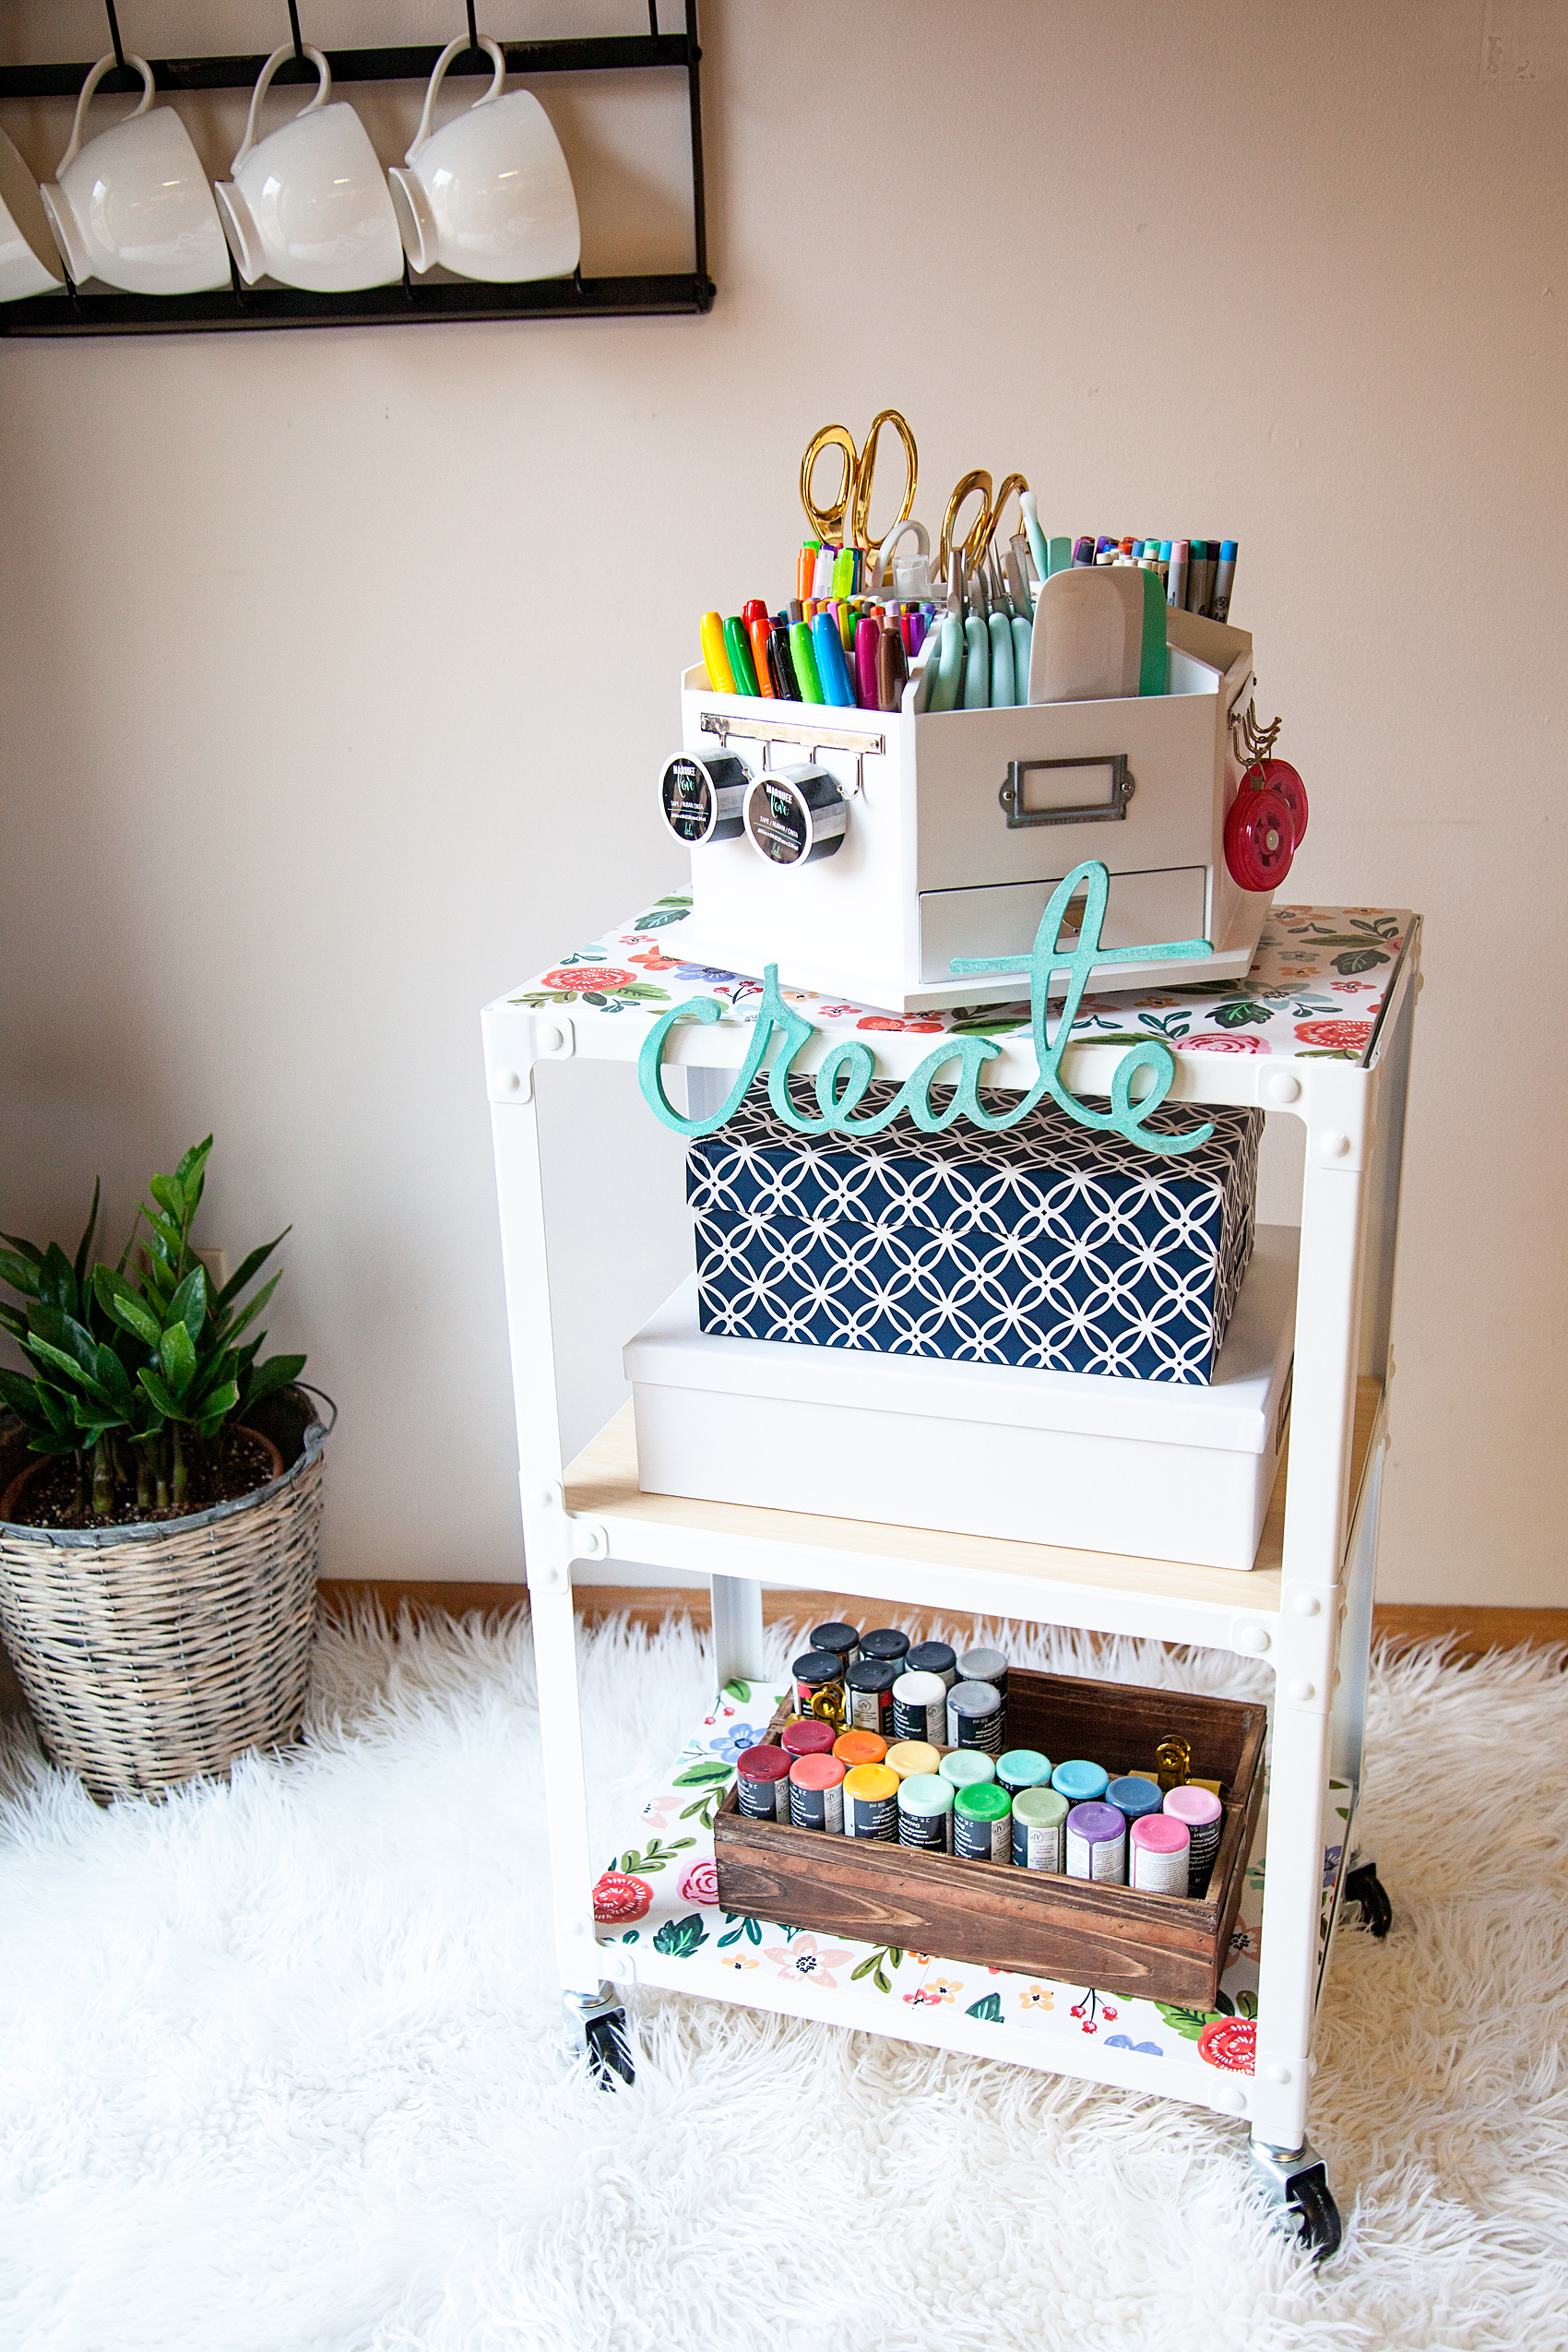
I then grabbed one of my favorite Heidi Swapp® Wall Art Words, (that’s the “Create” you see here) and glued it to the front of the cart.  Actually, I used Heidi’s Color Shine spray to dress-up our “Create” first.

I knew for the top of my cart I wanted one of those amazing Recollections™ Storage Desktop Carousels. I’ve been wanting one of those for years!

diy-creative-art-station-from-whipperberry-11

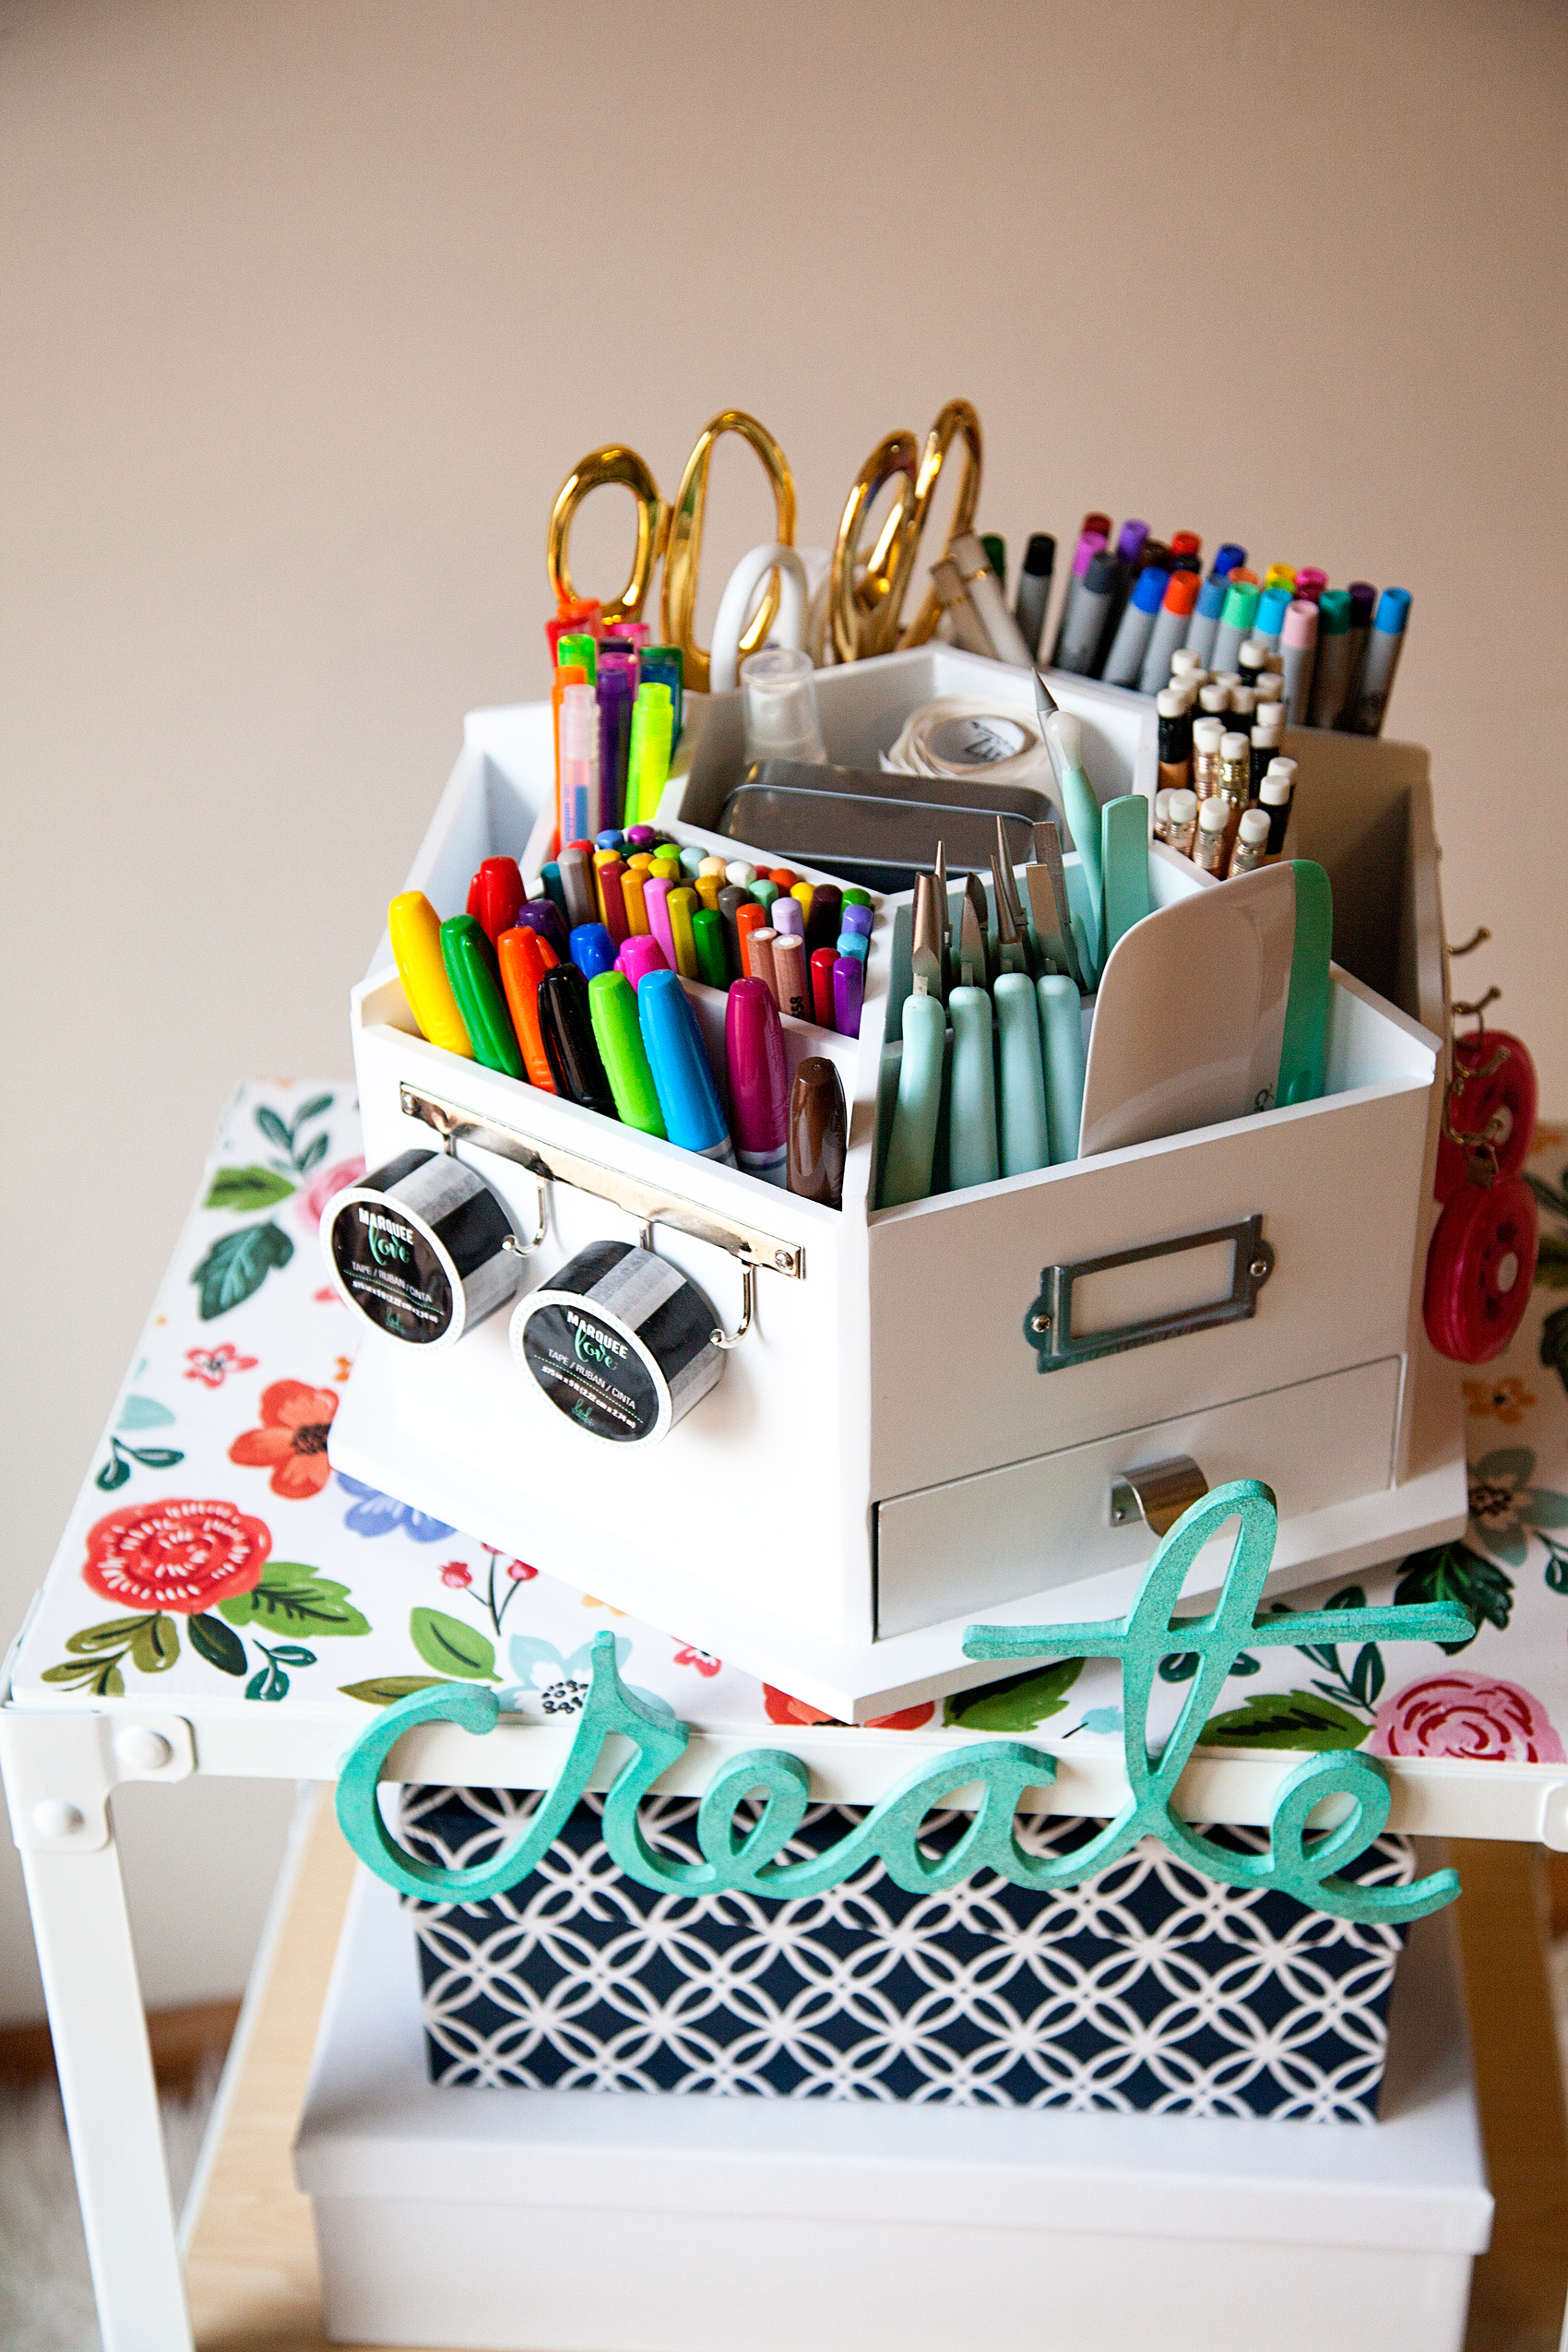
I filled it will all kinds of great creative supplies that the whole family can use. Now, keep in mind… My kiddos are a little older and can handle having Sharpies and scissors out. If your kiddos are younger you should find more age appropriate supplies.

I found some great boxes to store other things like paper and paint to round out the creative cart.

Creative station to inspire the entire family to create. Grab all of your supplies at Michaels Craft Stores and dress it up in a way that will inspire you and your family everyday.

It’s PERFECT!!

This lives right in our kitchen. The place where we spend most of our time and it’s ready to help inspire us to be creative at any time of the day.

diy-creative-art-station-from-whipperberry-3

Looking for more organization inspiration? Make sure you visit the Michaels’ blog, The Glue String, to see the rest of the Michaels Makers’ organization project ideas.

Here are more great ideas from the other amazing Michaels Makers!

An InLinkz Link-up


No-Bake Pumpkin Cheesecake Recipe

12 · Oct 20, 2016 · Leave a Comment

Love it or hate it, pumpkin is the flavor of Fall and no-bake pumpkin cheesecake is the way to enjoy the season. Give your oven a break and make cheesecake!

No-Bake Pumpkin Cheesecake with International Delights Simply Pure Vanilla

The minute the air has a slight chill it time to whip out the boots, scarves and all things pumpkin spice. From lattes to muffins pumpkin has become the official flavor of Fall. Our family is rather ambivalent on the subject. We don’t run out mid August and start stalking the Starbucks guy asking when the PSL (Pumpkin Spice Latte) release date will be, but we do enjoy a good pumpkin muffin or dessert. We especially LOVE pumpkin pie around Thanksgiving.

I have been hosting our family’s Thanksgiving for several years now and yes, we love pumpkin pie but… I don’t love the pies taking up precious oven space on that all important day. I wanted to come up with something just as tasty, but easier to make. Preferably, I would rather not have to bake it at all! That’s when I came up with this SCRUMPTIOUS no-bake pumpkin cheesecake using my favorite International Delight Simply Pure Vanilla Creamer as a base for the cheesecake.

No-Bake Pumpkin Cheesecake with International Delights Simply Pure Vanilla

If you haven’t tried it yet, Simply Pure is just that… Simply milk, cream & sugar. Here are the ingredients.

INGREDIENTS: SKIM MILK, CANE SUGAR, CREAM, CONTAINS 2% OR LESS OF: NATURAL FLAVOR, GUAR GUM.

What’s Guar Gum you ask?  Well, it’s a natural food additive produced from the Guar Beans that helps to make Simply Pure nice and creamy. It stabilizes the other ingredients, acts as a thickening agent and doesn’t allow ice crystals to form. You eat it every time you eat ice cream too.

I chose Simply Pure Vanilla for the no-bake cheese cake but, if you’re head-over-heels for all things pumpkin and want to amp up the pumpkin game, you can always use International Delight Pumpkin Pie Spice Creamer. International Delight has all kinds of fun ideas that you can use their tasty creamers with. You know… Creamer isn’t just for coffee! Follow them on Instagram, Facebook or Pinterest to find all kinds of fun recipes.

This no-bake cheese cake is so easy to whip-up that you might even find yourself whipping it up for an everyday treat, not just a holiday one.  I put together a quick video to show how easy it is to make this tasty dessert.

No-Bake Pumpkin Cheesecake Recipe

No-Bake Pumpkin Cheesecake
 
Save Print
Prep time
20 mins
Cook time
4 hours
Total time
4 hours 20 mins
 
This new take on pumpkin pie will win the day and save the oven! You might even find that you make it for a special treat anytime, not just the holidays.
Author: Heather // WhipperBerry
Recipe type: Dessert
Serves: 6-8
Ingredients
  • 50 ginger snap cookies
  • 5 tablespoons melted butter
  • 2 cups Simply Pure Vanilla Creamer
  • 2 packets unflavored gelatin
  • 2 - 8 oz. packages room temperature cream cheese
  • 15 oz. can pumpkin puree
  • 3-4 tablespoons sugar
  • 1 teaspoon pumpkin pie spice
  • 1 teaspoon vanilla
  • a pinch of salt
  • Whipped cream
Instructions
  1. Place 40 ginger snap cookies into a large Ziplock bag or the food processor. Using a meat mallet or rolling pin, crush the cookies into a sand like consistency. If using a food processor, pulse a few times to get the consistency of sand.
  2. Place crushed cookies into a large bowl and combine with melted butter. If using the food processor, add the butter and pulse to combine the butter.
  3. Spray a spring form pan with cooking spray and pour the cookie mixture into the pan. Using the bottom of a measuring cup, pack the cookie mixture into a nice layer of crust. Set the crust aside.
  4. In a small bowl, pour ½ a cup of Simply Pure Vanilla Creamer and whisk in the gelatin packets. Set aside and allow the gelatin to bloom.
  5. In a medium sauce pan, pour the remainder of the Simply Pure Vanilla Creamer and place over medium heat. Add the room temperature cream cheese and gently stir to combine the two ingredients.
  6. Once the cream cheese has melted into the creamer add the pumpkin, pumpkin pie spice, sugar vanilla and salt. Whisk together and let come just to a light boil and then remove from the heat. Make sure to continue to stir occasionally.
  7. Remove from heat and taste the mixture to make sure you have the right flavors. If you prefer your cheesecake a little sweeter, add more sugar. If you like it with a little more spice, add more pumpkin pie spice.
  8. Pour the cheescake mixture into the spring form pan and place in the refrigerator for at least 4 hours.
  9. When ready to serve, make up some more cookie crumbs with the ginger snap cookies reserving 6-8 for garnish. Sprinkle the crumbs onto of the no-bake cheesecake and then decorate with whipped cream clouds topped with cookies.
  10. No-Bake Pumpkin Cheesecake with International Delights Simply Pure Vanilla
3.4.3177


This is a sponsored conversation written by me on behalf of International Delight. The opinions and text are all mine.

Scrumptious Homemade Chocolate Pudding Recipe

12 · Sep 26, 2016 · 2 Comments

Buttery Homemade Chocolate Pudding from WhipperBerry

As a child my favorite thing on the planet was chocolate pudding. If you wanted to find your way into my heart all you needed to do was gift me a chocolate pudding cup and we were best friends. Even better were those long since forgotten pudding pops, but we’ll save that for another day. My entire childhood I thought the only way to make pudding was to either buy it in cup from the dairy section of the market OR… Make your own from the pudding powder you found in the baking section of the market. My mind was blown when my Mom made homemade chocolate pudding the first time. It was so much better than the store bought options. Who knew it was so easy to make AND… That it tasted so good.

Buttery Homemade Chocolate Pudding from WhipperBerry

I’ve made homemade pudding for awhile now and I’ve been playing around with other ingredients to give it even more deep flavor than the traditional recipe. I headed off to Target to go on a hunt for other options for my homemade chocolate pudding craving. I ended up at the creamer section and started to think, this might be the perfect option.

target

Check out all of the fun options… So Delicious Dairy Free Coconut Milk Creamer would make a fun pudding and we love coconut at our house. The Silk Almond Creamer is another great option. The one that really caught my eye was the new  Horizon Organic Half & Half that has that lovely buttercream flavor! Doesn’t that sound awesome? Chocolate pudding with a hint of butter flavor… Yum! Either way, Target has so many fabulous choices in creamers. Dairy, non-dairy, flavored or not flavored they have all kinds to choose from. They are great to start your day in your hot chocolate or coffee and they are fantastic to play around with for sweet treats like my chocolate pudding. Want a sweet deal? If you download the Target Cartwheel App you can use Cartwheel and the 20% off Cartwheel offer on International Delight Simply Pure, Horizon, Silk and So Delicious creamers from 9/25/2016 – 10/22/2016!

After a little playing around, here is the recipe that the whole family LOVED!

Homemade Chocolate Pudding Recipe

Scrumptious Homemade Chocolate Pudding Recipe
 
Save Print
Prep time
20 mins
Cook time
10 mins
Total time
30 mins
 
This homemade chocolate pudding paired with some made from scratch whipped cream will knock your guests socks off!
Author: Heather // WhipperBerry
Recipe type: Dessert
Serves: 4 servings
Ingredients
  • 1 cup whole milk
  • 1 cup Horizon Organic Buttercream Half & Half
  • ¼ cup sugar
  • ⅓ cup cocoa powder
  • 4 teaspoons corn starch
  • 3 egg yolks
  • 2 teaspoonsvanilla
  • ¼ teaspoon salt
Instructions
  1. Put 1 cup of the milk, ½ cup of the half & half, the sugar, and the cocoa in a nonreactive saucepan. Bring to a simmer, over medium-high heat. Remove from the heat. Make sure it doesn't boil. You are basically wanting to dissolve the sugar and cocoa powder into the milk and half & half mixture.
  2. Whisk the remaining ½ cup of the milk, cornstarch, salt, egg yolks, and vanilla in a bowl.
  3. Talk a half a cup of the warm milk mixture and whisk it into the egg mixture to temper the eggs. If you were to mix it without tempering, that would scramble your eggs.
  4. Gradually whisk the rest of the hot milk into the egg mixture. Return to the saucepan and cook over medium-high heat whisking constantly, until the pudding comes to a full boil. Reduce the heat to maintain a simmer, and continue whisking until thick, about 2 or 3 minutes more.
  5. Pour the pudding into 6 small cups. Cover with plastic wrap and refrigerate for at least 4 hours or ideally overnight until set.
  6. Serve with whipped cream and chocolate shavings.
3.4.3177

Buttery Homemade Chocolate Pudding from WhipperBerry

This is a sponsored conversation written by me on behalf of WhiteWave Foods. The opinions and text are all mine.

DIH Beverage Station

3 · Jun 8, 2016 · Leave a Comment

You guys!! I’m so excited… I’m joining in on a really fun project through Home Depot this month. Have you been following along with their fabulous DIH (Do it Herself) workshops? Aren’t they fabulous?! If you aren’t familiar with the program, Home Depot hosts DIH workshops for women all over the country. It’s typically a great beginner level project that helps you get comfortable with using power tools and such. I think they are fabulous because I’m a beginner builder as well and I’ve become so much more proficient at working with power tools and I LOVE it!! No longer am I stuck waiting around for my sweet husband’s help.

This month’s DIH project is this fun beverage station…

DIH Beverage Station from Home Depot

The DIH workshop in your area will be on Thursday, June 16th at 6:30. Click HERE to register. If you have never been to a DIH workshop, you should go! They are so much fun.

I’ve already been working on my beverage station and can’t wait to show off my interpretation of the project. I’ve teamed up with some other creative friends for a virtual party coming up this coming Monday,  June 13th. I can’t wait to see  what everyone else comes up with!

Don’t forget to register to make one of your very own!

  • « Go to Previous Page
  • Page 1
  • Page 2
  • Page 3
  • Page 4
  • Interim pages omitted …
  • Page 83
  • Go to Next Page »

Primary Sidebar

Heather from Whipperberry
Hello... my name is Heather and I'm the creator of WhipperBerry a creative lifestyle blog packed full of great recipes and creative ideas for your home and family. I find I am happiest when I'm living a creative life and I love to share what I've been up to along the way... Come explore, my hope is that you'll leave inspired!

Footer

  • Privacy Policy
  • Crafts
  • Food
  • Gifts
  • Holidays
  • Home
  • Mom Life
  • Recipes
  • Travel

Copyright © 2026 · Seasoned Pro