• Skip to primary navigation
  • Skip to main content
  • Skip to primary sidebar
  • Skip to footer

Whipperberry

WhipperBerry • Your Home For Creative Inspiration

  • Home
  • Recipes
    • Starters
    • Easy Weeknight Dinners
    • Main Dish
    • Salads
    • Side Dish
    • Soups & Stews
    • Desserts
    • Breakfast
    • Miscellaneous
  • Tutorials
    • Creative Crafts
    • DIY Decor
    • Fabric Crafts
    • Food How-To
    • Jewlery
    • Paint Projects
    • Paper Art
    • Party Styling
    • Photography and Graphic Design
    • Silhouette
  • Holidays
    • Easter
    • Mother’s Day
    • Father’s Day
    • 4th of July
    • Halloween
    • Thanksgiving
    • Christmas
    • Valentine’s Day
  • Gift Ideas
    • Gifts For Everyone
    • Gifts for Dad
    • Mother’s day
    • For The Girls
    • For The Kids
    • Teacher Gift Ideas
    • Christmas
  • Printables
    • Holiday
    • Gift Idea
    • LDS Primary
  • Travel
  • About
    • Terms
  • Contact
  • Nav Social Menu

    • Facebook
    • Instagram
    • Pinterest
    • RSS
    • Twitter
You are here: Home / Crafts / Simple DIY Art

Simple DIY Art

4 · Apr 2, 2014 · 8 Comments

Simple DIY Art // Hey all! It’s Jenn from My Fabuless Life! Last month I shared my embroidery hoop bulletin board I did for my daughter’s big girl bedroom, and since then, I’ve caught the makeover fever, because I’ve moved onto my master bedroom and am here to show you a quick, simple art project you can do for less than $10. Finding large scale art for those bigger walls can get expensive, which is why I love creating my own. You can customize everything about it, for next to nothing!

simple art

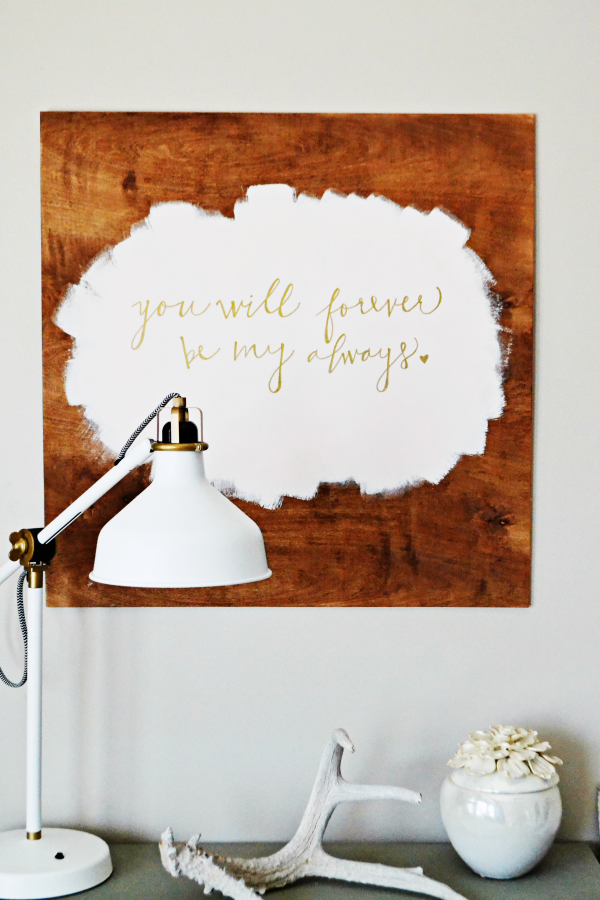
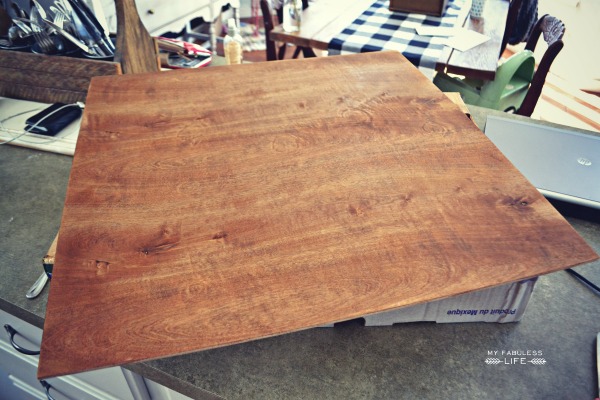
I started with a 4′ x 4′ piece of thin, pine plywood from my home improvement store (in the lumber section with the peg board), and stained the whole thing. If you’re more into the painted look, you can do that too, it’s up to you.

wood art

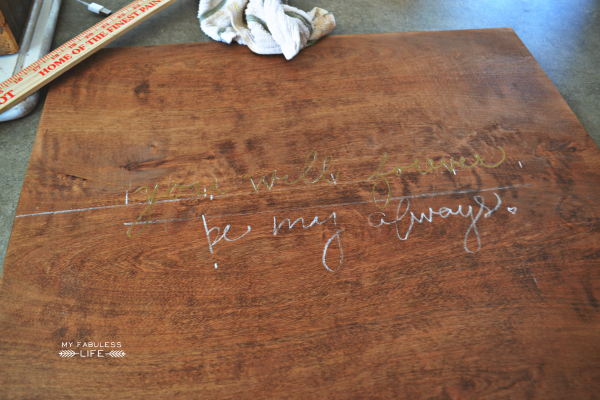
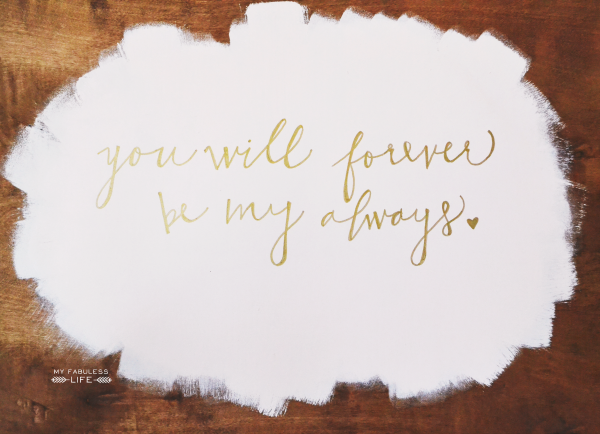
My original plan was just to put the text right on the wood (which you’ll notice below), but after I wrote directly on the wood, it was hard to see, so I got out the paint. I wanted a really unique, sort of “messy” look, so I just grabbed one of my favorite sponge rollers and roughly rolled out the paint in the pattern I wanted. I let that coat dry, added another, and filled in some spots with a paint brush, and then it was time for the writing.

diy art 3

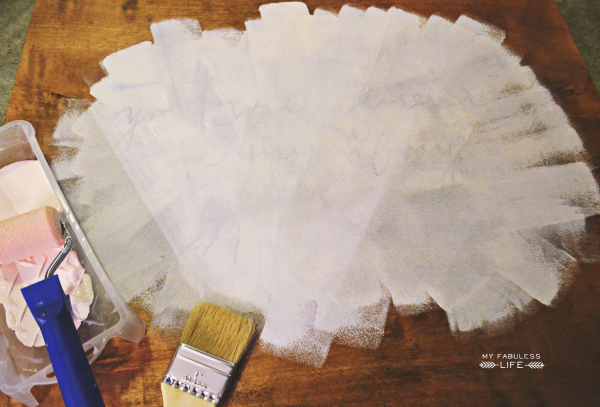
Remember, I tried writing first, so this picture is a little backwards. You’ll notice though, that if you’re writing with white, it would be just fine. Anyway, I measured for where I wanted the writing to go, and then drew a line with chalk so that the text wouldn’t be all over the place.  Then, I wrote out my phrase with chalk and wrote right over it with a gold paint pen. After the gold was dry, I just wiped off the remaining chalk with a damp cloth.

diy art 2

I did mine free hand, but if you’d rather use one of your favorite fonts, this method is AWESOME for transferring the font to your board.

diy art

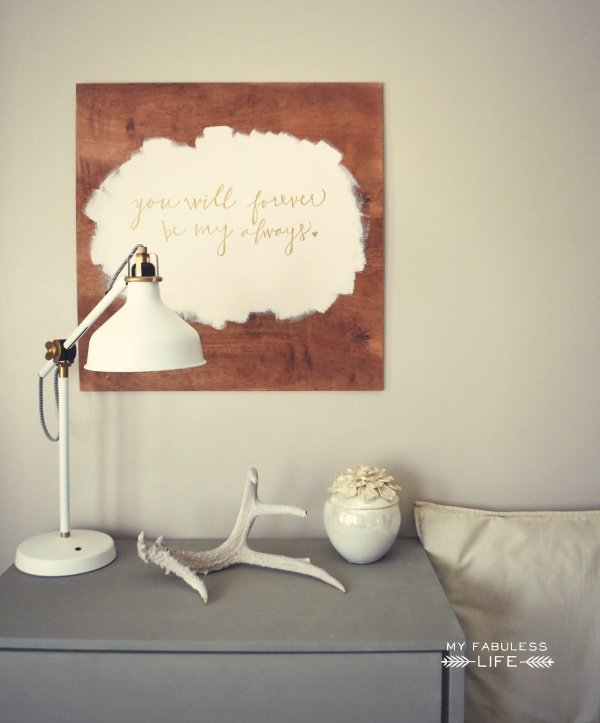
To hang it, I just hot glued a pop tab to the back of the wood like a picture hanger and hung it on a little nail. And that’s it! Super simple art!!

diy calligraphy

You Might Also Enjoy:

girls bedroom ideas

Vintage Modern Girl’s Room / Free Spring Printables / Small Laundry Room Makeover

4
Pin
Share
Tweet

Crafts, Creative Team, Paint, sign, Wood Crafts, Decor, WhipperBerry Creative Team

Reader Interactions

Comments

  1. Desiree @The36thAvenue says

    April 2, 2014 at 8:51 am

    I am loving this… Pinning!

    Reply
  2. Beverly {Flamingo Toes} says

    April 2, 2014 at 9:37 am

    I love this so much!! What a simple but eye-catching piece of artwork. Pinning!

    Reply
  3. Erin says

    April 3, 2014 at 11:41 am

    Love this! Also, gorgeous lamp! Where is it from?

    Reply
    • Jenn says

      April 4, 2014 at 8:15 pm

      Thanks!! The lamp is from Ikea.

      Reply
  4. Jenn says

    April 4, 2014 at 6:09 pm

    So, so pretty!

    Reply
  5. Nancy says

    May 21, 2014 at 5:46 am

    I am not great at handwriting and love the font that you used. I don’t want to use chalk paint, so could you tell me another way to get the font I would like on regular paint?

    Thank you

    Reply

Leave a Reply Cancel reply

Your email address will not be published. Required fields are marked *

Recipe Rating


Primary Sidebar

Heather from Whipperberry
Hello... my name is Heather and I'm the creator of WhipperBerry a creative lifestyle blog packed full of great recipes and creative ideas for your home and family. I find I am happiest when I'm living a creative life and I love to share what I've been up to along the way... Come explore, my hope is that you'll leave inspired!

Footer

  • Privacy Policy
  • Crafts
  • Food
  • Gifts
  • Holidays
  • Home
  • Mom Life
  • Recipes
  • Travel

Copyright © 2026 · Seasoned Pro