• Skip to primary navigation
  • Skip to main content
  • Skip to primary sidebar
  • Skip to footer

Whipperberry

WhipperBerry • Your Home For Creative Inspiration

  • Home
  • Recipes
    • Starters
    • Easy Weeknight Dinners
    • Main Dish
    • Salads
    • Side Dish
    • Soups & Stews
    • Desserts
    • Breakfast
    • Miscellaneous
  • Tutorials
    • Creative Crafts
    • DIY Decor
    • Fabric Crafts
    • Food How-To
    • Jewlery
    • Paint Projects
    • Paper Art
    • Party Styling
    • Photography and Graphic Design
    • Silhouette
  • Holidays
    • Easter
    • Mother’s Day
    • Father’s Day
    • 4th of July
    • Halloween
    • Thanksgiving
    • Christmas
    • Valentine’s Day
  • Gift Ideas
    • Gifts For Everyone
    • Gifts for Dad
    • Mother’s day
    • For The Girls
    • For The Kids
    • Teacher Gift Ideas
    • Christmas
  • Printables
    • Holiday
    • Gift Idea
    • LDS Primary
  • Travel
  • About
    • Terms
  • Contact
  • Nav Social Menu

    • Facebook
    • Instagram
    • Pinterest
    • RSS
    • Twitter

Crafts

Black & White Halloween Pumpkins for The Great Pumpkin Challenge

28 · Sep 4, 2013 · 15 Comments

The Great Pumpkin Challenge brought to you by Michaels Craft Stores // I CAN"T WAIT FOR FALL!! I've thoroughly enjoyed summer, ate it up really but, I'm over the heat and the bugs and I'm ready for those cool crisp fall days. More than anything I'm ready to start decorating for fall and all the fun holidays that come with the cool temperatures. Not too long ago, Michaels sent me some of their famous pumpkins and invited me to participate in The Great Pumpkin Challenge and this is what I came up with…

WhipperBerry Halloween Pumpkins from Michaels

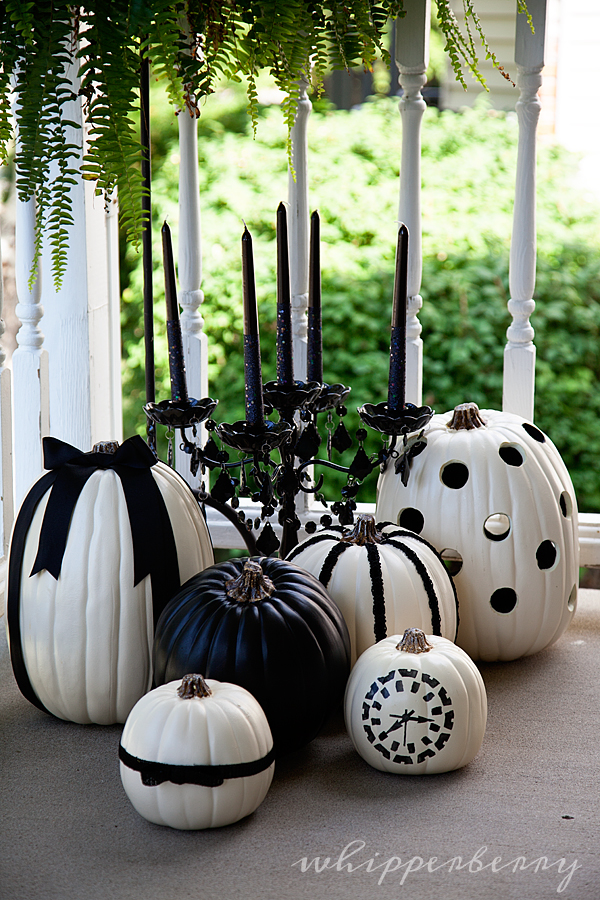
A classic black & white Halloween display. As much as I love color, there is just something stunning about black & white when it comes to Halloween. Here's a breakdown of each pumpkin…

ribbon pumpkin from Michaels

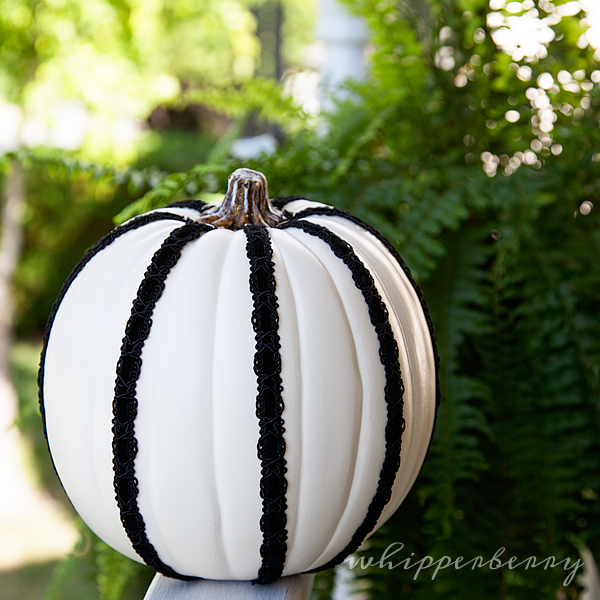
This one is just a simple decorative ribbon that I found at Michaels and wrapped it using small t-pins to secure the ribbon at the top and bottom of the pumpkin. Super easy!!

Clock pumpkin with DecoArt Patio Paint and Mixed Media Stencil

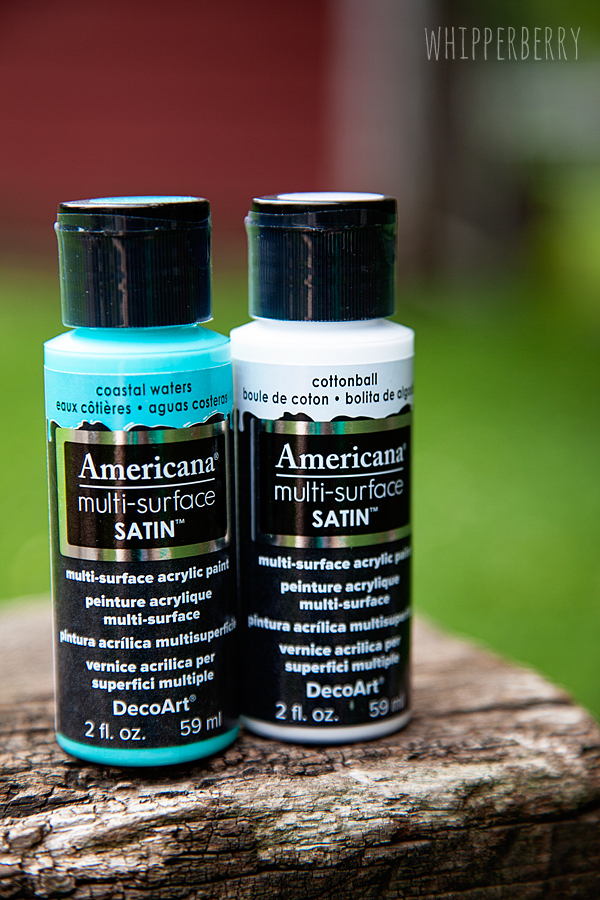
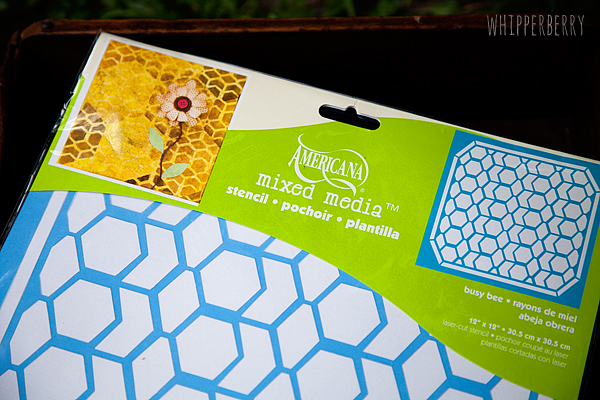
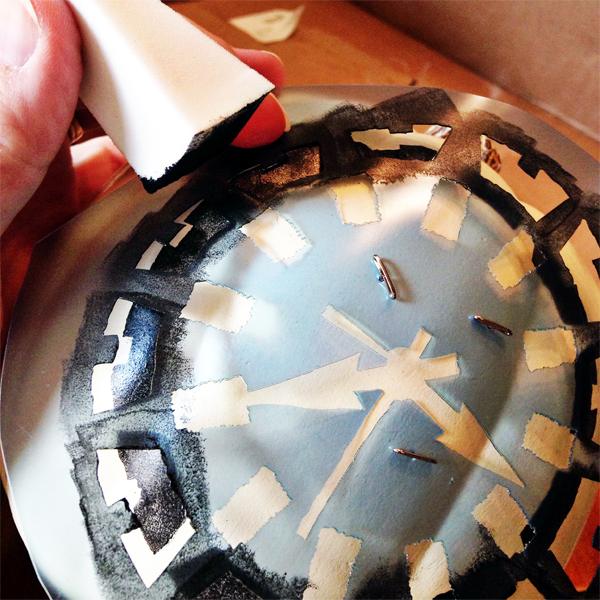
Love, love, love this one that I stenciled using Black DecoArt Patio Paint and their Mixed Media Stencils. This one was a little more challenging. I pinned the stencil to the pumpkin and then carefully laid each section of the stencil down onto the pumpkin using my finger to press each section down.  Going section by section, I used a makeup sponge as a pouncer and carefully went around the clock, making sure not to overload the pouncer and it turned out great.  Slow & steady wins the race on this one.

how to stencil on a pumpkin

I also painted an orange pumpkin black with the Patio Paint. This stuff is amazing!! This was ONE coat…

pumpking with DecoArt Patio Paint

I'm going to be using that paint a whole lot more now that I know how amazing it is.

polka dot pumpkin from Michaels

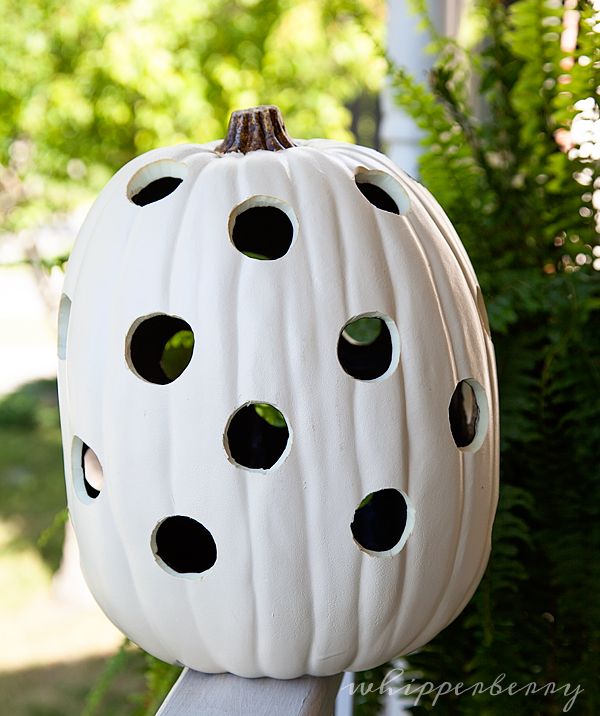
For my polka dot pumpkin I used the DecoArt Patio Paint again, on the inside of the pumpkin and then a Hot Knife from Micheals to cut out the polka dots. That tool is a must when it comes to working with this type of pumpkin. It cuts like butter!!

ribbon pumpkins

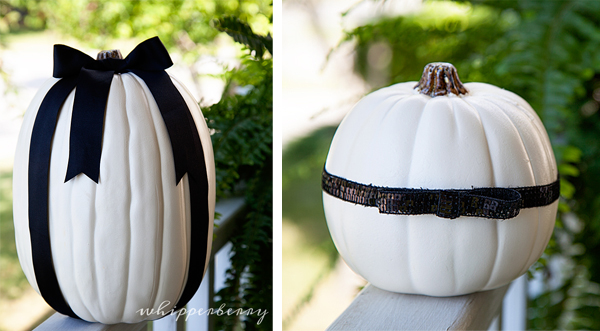
These two are just wrapped in ribbon with a couple of cute bows. For these I used t-pins and a couple of glue dots to secure the ribbon in place. Again, super easy.

What's your favorite way to dress up your pumpkins for Fall or for Halloween? Michaels is hosting a fun Great Pumpkin event on October 5th from 1:00-3:00. For $6 your kiddos can design their very own pumpkin and there will be a face painter on hand for even more festive fun.

A little intimidated to carve you own pumpkin? Not to worry, Michaels is also offering professional carving services at their store. You can choose from 25 designs and then personalize them as well. Prices start at $19.99 and if you want it by Halloween, you need to place your order by October 13th.

So… What are you going to create for The Great Pumpkin challenge this year? Take some photos and tag me on Instagram or Facebook so I can see what you create!

6 Tips for Painting with Stencils

129 · Aug 26, 2013 · 7 Comments

This post brought to you by DecoArt // I am a sucker for a good old wood caddy. Even better, is an old caddy that I have dressed up with some paint and maybe a stencil or two. I have a fabulous picnic caddy that I dressed up not too long ago and I have recently found another rustic old caddy to dress up. When it comes to adding some graphic elements to anything, I turn to the Americana Multi Surface Satin Paint and the Americana Mixed Media Stencils for sure. But… I also have a few tricks up my sleeve when it comes to using those stencils. Below you will find 6 tips on painting with stencils.

6 tips for successful stenciling from whipperberry

I found another great caddy from Antique Farmhouse (they also have a sister site called Decor Steals)…

Dress-up and old wood caddy with DecoArt Americana Multisurface Paint and Stencil

… And I thought it would look fabulous with a fun geometric design on the floor of the caddy using the new Americana Multi Surface Satin Paint.

DecoArt Americana Multisurface Paint

This paint is fabulous for all kinds of surfaces. Wood, glass, metal, plastic… You name it, it will look wonderful. I recently had a chance to travel to Kentucky to the home of DecoArt and learned all kinds of goodies about all of their different paints. It’s amazing how so many of us just grab a bottle of craft paint at the store without really thinking about what surface we are going to use as our canvas. Sometimes… the paint we pick just won’t work with our desired surface. With the Multi-Surface Satin, you won’t have to worry about that!

For this project, I used a mixture of Coastal Waters and Cottonball. I wanted the blue to be a little lighter, that’s why I added a little white. I used one of the new Americana Mixed-Media Stencils called Busy Bee and some painter’s tape as well.

DecoArt Americana Mixed Media Stencil

I taped down the stencil on the surface of the caddy, just so I didn’t have to worry about it moving around.

Americana Stencil

How to Paint with Stencils

Next, using a Dual-Sided Paint Pouncer, I carefully paint the surface of the caddy. Now, here are a few tips when it comes to getting good stencil lines. It’s important that you know how to use stencils if you’re doing this for the first time.

  1. Load your stencil pouncer or brush carefully,  A little paint goes a long way. Never just dip your brush into the paint and then go directly to your surface. Always dip your brush into the paint and then have another surface like a paper plate to work out all the paint kinks before you start working on your surface.
  2. Light, up and down movements are best when it comes to working with stencils. Never brush side to side or press down firmly. This is just asking the paint to slide right under that stencil and create muddy, unattractive lines.
  3. Work in layers. If you want a light weathered look, you may only need one coat. But, If you want a strong vibrant stenciled image, work in light layers. This way you are slowly building your image and will have cleaner lines and a professional-looking finish.
  4. Secure your stencil with painter’s tape so that you don’t have it moving around while you are trying to work with it.
  5. Don’t let the stencil dry for long before you remove the stencil. This will help keep the lines sharp. More on this below.
  6. Use a good brush and stencil cleaner to clean and preserve your brush and stencil for future use.

Should You Remove The Stencil When The Paint is Wet or Dry?

You should actually remove the stencil it’s wet. This may seem backwards but it always turns out better in my experience. When you do it this this way, the paint cannot bleed underneath and ruin the crisp lines. It can be a bit more difficult if the paint dries to the stencil too. This is how you keep the paint from peeling when removing vinyl stencil

For this project, I wanted a light weathered look so I carefully loaded just a tiny bit of paint, prepped my brush on a paper plate, and then with careful up and down strokes started covering my surface.

Stenciling with Americana Multisurface Paint and Stencils

Because I was only going to do one light coat, the paint dried within just a few minutes. I removed the stencil and then waited for a couple of hours before I distressed the paint. The paint needs time to cure and ideally, I should have waited overnight but, it turned out fine this time. You just gotta love painting with stencils!

I used some sandpaper to lightly distress the paint so that the graphic design matched the patina of the piece itself. When you are distressing, think about how you want the finished product to look. Do you want to work in circles, up and down, side to side, or criss-cross, there are so many ways to create 100 different looks for your finished product. I chose a simple side-to-side motion to match the grain of the wood.

Here is how the caddy looks finished…

stenciled wood caddy with Decoart Multisurface Paint

Isn’t it fun?! A perfect addition to my picnic caddy collection. You bet we are going to be picnicking in style here at the WhipperBerry house!

You can find all of the products that I used for this project at Michaels, A.C. Moore, Hobby Lobby, and other fine craft retailers. To sweeten the deal, DecoArt has even offered a fabulous rebate offer to each of you!!

Americana Multi Surface Satin Rebate from DecoArtDisclaimer // This is a post sponsored by DecoArt. I have received payment along with the product to create this project and post. However, all thoughts, ideas, and opinions are my very own!

Instagram Photo Frame

0 · Aug 22, 2013 · 4 Comments

Hey Whipperberry fans, it's Jenn from My Fabuless Life and today I'm going to show you a super simple way to actually take those beautiful life moments sitting in your Instagram feed and put them to good use!
 
I get some grief about what an Instagram addict I am, buuutttt…this is why!  It's such an easy way to capture those day to day moments, when you wouldn't normally be carrying your camera or you just don't want to mess with getting it out.  Basically, for me, Instagram is a photo journal, and I don't have to mess with editing all of those pictures at once, because I've already done it, easily, before the pictures are posted, which also makes them perfect for displaying.  This is one of the ways I decided to display mine and it's super easy.
 
 
I picked up a large frame at a local home decor store (it was on crazy clearance because it was missing the glass) and spray painted it with Krylon's Gold (I also love Valspar's gold spray paint).  Then, I actually picked up the "chicken wire" from the trash pile at a house being built in my neighborhood–it's the wire mesh they put under stucco.  I'm pretty sure my neighbors think I'm nuts, because I can be seen on a regular basis pushing a stroller and carrying handfuls of scrap wood, tree branches, and other treasures.  Am I embarrassed about it?  A little (my husband a lot), but I can suck up a lot of pride for free stuff ; ).  Anyway, if you don't have a local construction site to borrow from, I think you can buy chicken wire at any local farm supply.  And it probably goes without saying, but don't go stealing the stuff.  I pulled this out of a pile that was clearly trash–no one wants to see you on an episode of Cops.  Now that the legal stuff is out of the way back to our regularly scheduled project:  Lay the mesh over the back of the frame.  Don't cut it down to size yet!  It's much easier if you do it after it's attached.  
 
With a staple gun, just staple the mesh on around the back of the frame.  If you don't have a staple gun (it's totally worth the $10 purchase) you can use brass thumb tacks and some hot glue.  Put some glue on the back of the tack and then press it into the frame to hold the mesh (the glue will keep the tack from popping out).  Then go around and cut all of the excess off with some wire cutters.  BE CAREFUL!  This stuff is sharp!  And that's about it.  Time for hanging.
 
 
I hung my pictures with some embellished paper clips, and some Basic Grey cards I scored at SNAP!.    
 
 
Then to add a little more variety and color, I added some free Project Life-sized printables I found here & here, and a miniature version of one of my own prints.


I know Instagram printing can be pretty pricey, so as a bonus, I've created a few templates and a tutorial on how to print your own at home, or wherever you normally have your photos printed.  You can find the free downloads and tutorial over at My Fabuless Life.  
 
My Fabuless Life
Embellished Picture Clips // Repurposed Kitchen Cabinet

Striped Straw Jar with DecoArt Glass Paint Markers and Diet Coke

0 · Aug 14, 2013 · 5 Comments

This post brought to you by DecoArt Glass Paint // For the 2nd time in 10 months we are MOVING!! Needless to say, I am excited to finally be in a home that fits our family better, but the idea of packing up and moving again is not very appealing AT ALL! We knew this move was going to happen soon, so we didn't unpack a ton, so this move should be easier than last time. 

One thing I did learn last time, is that you need to create a system that really works for you. A system that is productive, smart and provides yourself and your helpers with LOTS of rewards. For me, one of my favorite treats is a Diet Coke. I just LOVE the stuff! I would drink it like water if I could get away with it. I love the flavor, I love the bubbles and quite frankly there are times when there is nothing better on this planet than a good, cold Diet Coke. Because of that, it is a great motivating treat for me. More than almost any little treat. If I know that a Diet Coke is at the end of the chore, my git-up, gets a going. 

That's why for this move I created a Diet Coke Station with a few fun little items to dress-up the station to motivate myself and all of my helpers during the drudgery of packing…

Diet Coke drink station from WhipperBerry

I used my handy chalkboard clipboard and then dressed-up a Ball jar with some red stripes for my straw jar with DecoArt Glass Paint Markers and then set-out to move mountains. The striped jar was super simple to make, here is what you will need to do…

Supplies for the Striped Straw Jar

  • Ball wide mouths 1 1/2 pt. jar
  • DecoArt Glass Paint Markers – Americana Glass Paints are available at Michaels, JoAnn Fabric and Craft Stores, Pat Catan's Craft Centers, A.C. Moore, Beverly's, and other fine craft retailers. Click HERE for more information on Americana Glass Paints.
  • Tape – I used a thin washi tape but any type of washi or painters tape will do.

​Instructions for Striped Straw Jar

Before you begin, you need to prepare your glass jar by cleaning it with alcohol and let dry. Then apply the tape to the jar to create your desired stripe look…

Use tape to create stripes on your mason jar

I wanted nice thick stripes but you may like a different style, so don't tie yourself down to my look. Next, the super easy part… Color on your paint using the DecoArt Glass Paint Markers. No mess, no fuss, they are perfect for this kind of project!! 

how to paint stripes on a mason jar with DecoArt Glass Paint Markers

Carefully remove the tape once you are finished and let dry for a few hours. Add your stylish straws to the jar (I found mine though Pick Your Plum) and voilá… Grabbing a Diet Coke has just been kicked up a few notches!

DecoArt Glass Paint Markers

Looking for a great deal on Glass Paint? DecoArt has a rebate just for you guys!!

gloss-rebate_zps9f635690// Click on image to find full rebate offer // 

Looking for some more inspiration? We have a whole slew of talented bloggers who have also come up with some fun DecoArt Glass Paint projects. Click through to find all kinds of Glass Paint love…

Disclaimer // I am part of the DecoArt Core Bloggers and have received payment for this post along with free product. I am also a Brand Ambassador for Diet Coke and have received free product. However, all thoughts, ideas and opinions are my very own!

  • « Go to Previous Page
  • Page 1
  • Interim pages omitted …
  • Page 23
  • Page 24
  • Page 25
  • Page 26
  • Page 27
  • Interim pages omitted …
  • Page 43
  • Go to Next Page »

Primary Sidebar

Heather from Whipperberry
Hello... my name is Heather and I'm the creator of WhipperBerry a creative lifestyle blog packed full of great recipes and creative ideas for your home and family. I find I am happiest when I'm living a creative life and I love to share what I've been up to along the way... Come explore, my hope is that you'll leave inspired!

Footer

  • Privacy Policy
  • Crafts
  • Food
  • Gifts
  • Holidays
  • Home
  • Mom Life
  • Recipes
  • Travel

Copyright © 2026 · Seasoned Pro