• Skip to primary navigation
  • Skip to main content
  • Skip to primary sidebar
  • Skip to footer

Whipperberry

WhipperBerry • Your Home For Creative Inspiration

  • Home
  • Recipes
    • Starters
    • Easy Weeknight Dinners
    • Main Dish
    • Salads
    • Side Dish
    • Soups & Stews
    • Desserts
    • Breakfast
    • Miscellaneous
  • Tutorials
    • Creative Crafts
    • DIY Decor
    • Fabric Crafts
    • Food How-To
    • Jewlery
    • Paint Projects
    • Paper Art
    • Party Styling
    • Photography and Graphic Design
    • Silhouette
  • Holidays
    • Easter
    • Mother’s Day
    • Father’s Day
    • 4th of July
    • Halloween
    • Thanksgiving
    • Christmas
    • Valentine’s Day
  • Gift Ideas
    • Gifts For Everyone
    • Gifts for Dad
    • Mother’s day
    • For The Girls
    • For The Kids
    • Teacher Gift Ideas
    • Christmas
  • Printables
    • Holiday
    • Gift Idea
    • LDS Primary
  • Travel
  • About
    • Terms
  • Contact
  • Nav Social Menu

    • Facebook
    • Instagram
    • Pinterest
    • RSS
    • Twitter

Crafts

DIY Polka Dot Notebook for Back to School

2 · Jul 31, 2013 · 10 Comments

This post brought to you by DecoArt // Back to school is right around the corner for my kiddos and it's time to start working on dressing up our school supplies. I am Target's biggest fan and have been since birth, so… A few trips to Target  is a must before school starts. I've been loving the Greenroom line of school supplies and found a fun notebook that I thought would look extra special with some gold polka dots!

Poka Dot Notebook for Back to School with DecoArt and WhipperBerry

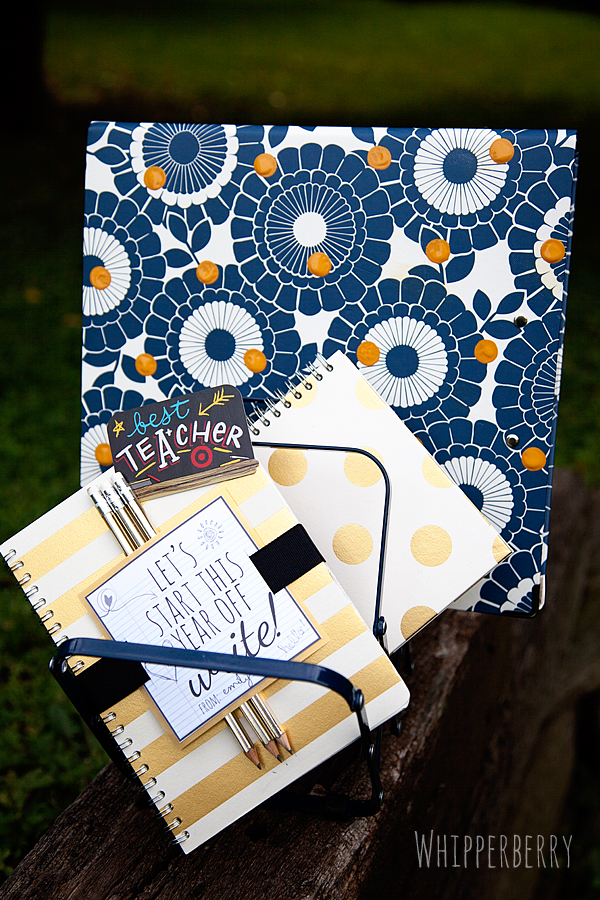
Doesn't it look extra special now? This is a perfect project for your kiddos to create some fun notebooks for themselves or to create a fun teacher gift for their new teacher. It's super easy, here is what you will need…

Polka Dot Notebook Supplies

  • Find a fun notebook.

Beautiful Notebook from Target #targetstyle #backtoschool #teachergift #backtoschoolfashion

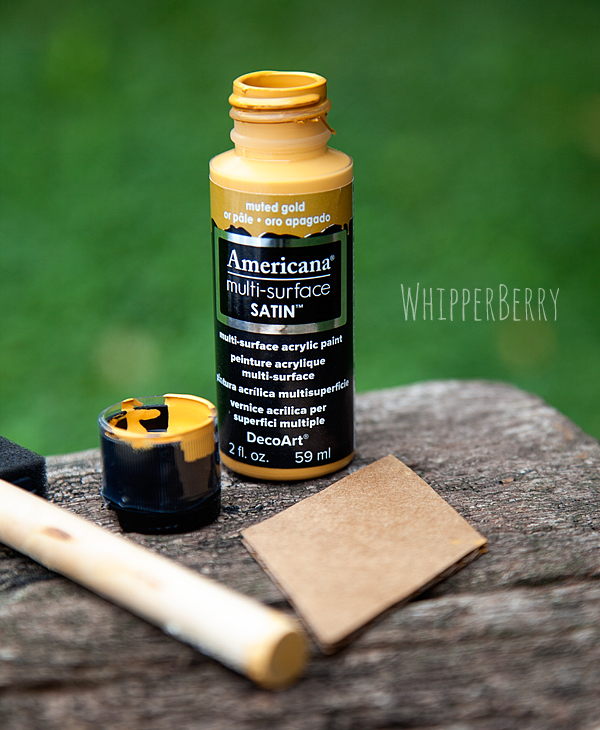
  • Select a coordinating paint color from the full line of DecoArt paints. I used Americana Multi-Surface Satin in Muted Gold. These paints are available at Michaels, Hobby Lobby, A.C Moore and other fine craft retailers.
  • Large Foam Paint Brush.
  • Cardboard diamond that I cut out myself.

Polka Dot Notebook Supplies #backtoschool #teachergift #backtoschoolfashion

Polka Dot Notebook Instructions

  1. Open up your notebook and lay as flat as possible on a protected table.
  2. Use your paint cap a your paint supply, this way you don't have to create any waste. Just pour little bits of paint in the cap and when you are finished, just rinse it out, dry completely and replace on the paint bottle. 
  3. Take your large foam paint brush and dip the tip of the handle into the paint lid and load with a small amount of paint. Then using your cardboard diamond as a guide (a trick I learned from one of my contributors Haley from Life is Sweet) carefully place your polka dots.Use the bottom of a large foam brush for your dots
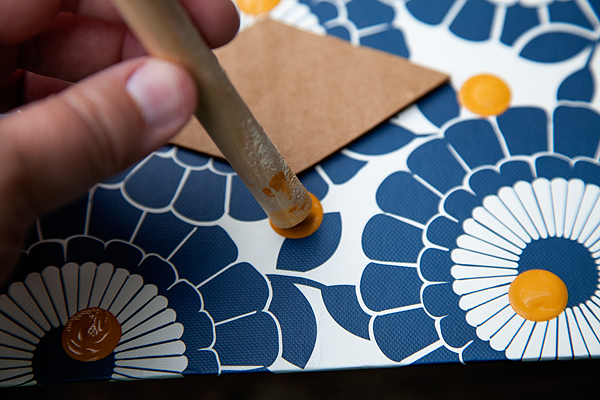
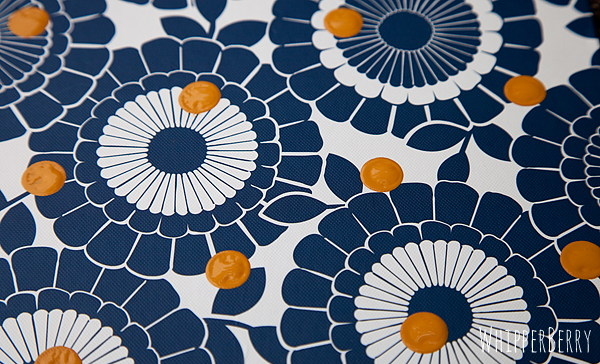
  4. Let dry over night to ensure that the paint has completely dried. My polka dots were pretty thick so that couldn't see the notebook through the paint so it took a bit for it to dry.

perfect gold dots #decoartpaint #backtoschool

Like I said before, this would be fun for your kiddos or for a teacher gift for the first day of school. 

Teacher Gifts with DecoArt and WhipperBerry #backtoschool #teachergifts

On August 14th I will be sharing this fun printable tag with the Printable Club that you can use to create a super fun teacher gift for your kiddos new teacher.

Teacher Gift #backtoschool #teachergift

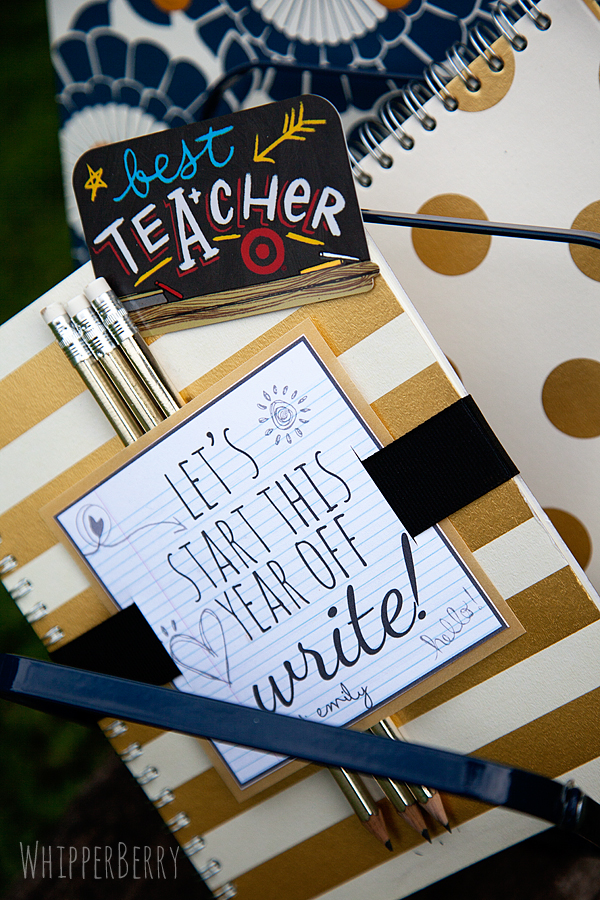
Pair your polka dot notebook with a coordinating spiral notebook, some fun pencils and a Target gift card and you'll have one happy teacher!!

Disclaimer // This post brought to you by DecoArt. I am a member of the DecoArt Core Blogger Team and did receive product and payment for this post. However, all thoughts, ideas and opinions are my very own!

$2.00 DIY Beach Bag

0 · Jul 25, 2013 · 3 Comments

Hi Whipperberry readers!  It's Jenn from My Fabuless Life back this month to show you a super simple, super affordable little beach bag I threw together for a recent family vacation.  Literally, if you have five minutes and a five dollar bill, you can make this–you don't even need a personal cutter!  And what's extra awesome about this project is that you can use this method to "screen print" just about anything that's fabric!  


Our family recently went on vacation to the beautiful Oregon Coast and this trip meant two things for us: LOTS of time in the car (we drove from Utah to Oregon) and LOTS of time at the beach.  I always pack my 3 year old daughter a road trip bag and a brand new bag to hold all of the goodies is part of the fun.  For this trip, my $2.00 bag pulled double-duty by holding all of her stuff during the car ride and then all of our treasures and toys once we got there and were ready to spend our days on the beach.

To make your own bag you'll need:
Freezer paper
Craft paint + Fabric Medium
A cloth bag (I got mine for $1.99 at Hobby Lobby without the 40% coupon)
Iron

Find the image you want to use: for this one, I just Googled "Whale Silhouette" and found one that I liked.  Click on the image so it shows up on your screen like this (in Google, you can also click "view original image"):


Zoom in or out on the image until it's the size you want and then just lay your freezer paper right over the computer screen and trace GENTLY!  Let's not go ruining any computer screens here, since that would sort of negate this whole $2.00 project thing.  You should be tracing on the freezer paper shiny side down (pencil marks will be on the dull side).

Next, just cut out the image with an Exacto knife.  Make sure to leave plenty of room around your shape to "slop" your paint so it stays on the paper and doesn't smudge all over your fabric.  Make sense?  If not, you'll see what I mean below.


I wanted this to be sort of "kid chic" so I left the cute little face off of the whale–not to mention, it makes it that much easier to cut and paint.  Next, iron your freezer paper onto your fabric shiny side down.  Make sure to iron it down good and tight so your paint doesn't bleed underneath (I do it with my iron on the highest setting).  Also be sure to iron your bag or shirt or whatever you're using prior to painting it.  Painting on wrinkled fabric will not give you pretty results.

Next comes paint: mix the paint and medium according to the instructions on the bottle of fabric medium (which can be found with the craft paints).  I used gold paint (like I said, I was going "kid chic" here and it glitters in the sun–BONUS!) and my fabric medium ratio was 2 parts paint to 1 part medium.  This gives you a softer finish on the fabric once the paint dries.  You can do this without the medium, but your paint will be stiff and won't soften as much in the wash.  YES–you CAN wash it!!

Apply your paint (you can use a brush or a dobber), let the paint dry a little and then pull the freezer paper off and let the paint dry overnight.  DONE & DONE!!
 

This is such a fun easy way to personalize gifts.  Onesies for baby showers, book bags for kids, team t-shirts for little ones…the possibilities are really endless.  Later this week over at MFL, I'll be showing you what I filled this bag with for my little one and my favorite tips for LONG road trips with kids so make sure to stop by!

My Fabuless Life

diy screen printed team shirts // summer printable // memories in a jar 

jenn from my fabuless life

Beeswax Candle and a Wood Burned Bowl

9 · Jul 17, 2013 · 10 Comments

 
Hi Whipperberrians!I am so excited to be back for month #2 on the Creative Team here at Whipperberry.  What an amazing bunch of girls they are!!  You can find me and my sis-in-law Jen posting over at Eat.Sleep.Make.  
 
Today I'm sharing with you how to make a scented beeswax candle and as the container, I'm using a wooden salad bowl that I bought at an estate sale for 25 cents.  
 
What you will need:
A wooden bowl
Wood burner
Block of beeswax (got mine at Hobby Lobby)
Wooden wick (Hobby Lobby)
Pasta Pot
Pyrex 4 cup measuring cup (or something similar)
 
 
Start by customizing your bowl by burning a design into it.  If you don't have a wood burner, you could always paint a design.


Next is the hardest part.  You need to guesstimate how much wax you will need to fill your bowl.  You want this to be in smaller chunks so it will melt properly. I just stabbed the block with a knife and plied chunks off of it.  
 
You need to use a double boiler to get the wax to melt without burning.  I kept my stove set on medium.  I found that if I turned it up higher than that the boiling water would jump into the wax (which, like I discovered, causes issues in the drying process).  
 
Use a cooking thermometer to monitor the heat of the wax.  It should get up to about 160-165 degrees and never go over 185 degrees.  


Once the wax was completely melted, I used some perfume oil I had from The Body Shop to scent the wax.  Essential oils can be used as well.  (If you want a candle that will relax you, use Eucalyptus Essential Oil and burn it while you are taking a bath.. so relaxing!)


Now, pour the wax in your container!  You can place the wick in first or after it is poured. It doesn't really matter.  I had some wax leftover, so I used a vintage baking tin for the rest.
 
The drying part can be quite tricky.  If it dries too fast, you will have cracking (like you can see in the photos of mine below).  Upon doing some research, it is best to place the containers on a cookie cooling stand so that the wax can dry from the bottom up.  This will also help prevent cracking.
 
Once my wax was completely cooled and hardened, I saw some separation from the side of the bowl and discovered all the water that had jumped into the melting wax had caused the wax to pull away from the container.  The water all dumped out, but it's definitely good to try and avoid this.
 
Fortunately, after burning for a little while, the crack will fill itself in, so no worries!


 I'm definitely over-the-moon pleased with how this turned out!  This was my first run at making candles and I think I'm hooked.  Would this not be an awesome house-warming gift, too?  
 
I'll see you all next month!
In the meantime, come visit me here:  Facebook / Pinterest / Blog


Check out some of our favorite projects!


DIY Arrow Bouquet // Plywood Inspire Boards // Gem Earrings

Hanging Succulent Garden with International Delight

7 · Jul 10, 2013 · 28 Comments

This post brought to you by International Delight // I have to admit… I love my sweet drinks. There is nothing better than starting the day with a cup of iced Choffy or my favorite herbal tea with a splash of  International Delight creamer. Currently MY ID is the Cold Stone Sweet Cream… YUM!!!  Or, if I’m in a bolder mood, the Caramel Macchiato.

With this being part of my morning routine, I tend to go through a bit of creamer and therefore, I have quite a few bottles that are destined for the trash.  Recently, International Delight issued a challenge… Make something out of my used bottles. I really thought that was kind of a fun idea. Well… to be completely honest, I was a little befuddled. Using old containers as a craft muse hasn’t really been part of my M.O. when it comes to creating for WhipperBerry.  I had to step back and think for a bit and then inspiration hit! I could make a hanging succulent garden with a few of the ID bottles and it would look fantastic.

hanging succulent garden with International Delights #whatsyourid

I can’t even tell you how tickled I was when I finished this project. Not only that but I came up with a few more that I may try. I mean seriously, what can you really do with an old plastic bottle? Who knew that it could be the perfect vehicle for such a fun idea. It’s so simple, here is how you can make a hanging succulent garden of your very own…

transform your International Delights Creamer container into a hanging succulent garden

I used the large International Delight Bottle, removed the label and the lid and cut the top portion off with a craft knife.

Use a craft knife to create your garden container

Next, I cut openings into the side of the bottle as a fun way to add more succulents into my little garden container.

Dress-up your succulent container with DecoArt Americana Acrylic Paint

I used DecoArt Americana acrylic craft paint to add color to the plant containers. I used Sea Glass, and Sizzling Pink from the Neon Collection. The design was a little free form. I added some little stripes and some splashes of color on each container leaving some open areas to add more contrast.

succulent containers

Then, I added some small succulents that I found at Lowes with some pea gravel and soil designed for succulents. I even layered the soil and pea gravel to add a fun effect in the container that you see above, on the right. Once you have everything painted and planted then you have to decide… Will you leave them as is… or hang them?

I think they look great either way, and they add a fun pop of color to any room. Here is how they would look dressing up a table…

succulent garden with international delights #whatsyourid

… Or, you can carefully poke some holes in the side and add some black and gold twine from Knot & Bow and hang them for a totally different look.

hanging succulent garden with International Delights #whatsyourid

Isn’t it FUN?!

So, what’s YOUR ID? What would you make out of your empty ID bottles? Does your flavor inspire your creation?

Come follow the all the fun and share your ID with International Delight on any of their social media platforms…

Find ID on Facebook here: https://www.facebook.com/InternationalDelight

Find ID on Twitter here: https://twitter.com/indelight

Find ID on Pinterest here: https://pinterest.com/indelight/

Find ID on Instagram here: https://instagram.com/indelight

Find ID on YouTube here: https://www.youtube.com/indelightchannel

What’s Your ID? International Delight is looking for their most passionate flavor fans. Put your ID on the map to enter to win a Magical Trip, play games and discover more unexpected delight. Share your ID flavor at https://whatsyourid.com.

This is a sponsored conversation written by me on behalf of International Delight. The opinions and text are all mine.

  • « Go to Previous Page
  • Page 1
  • Interim pages omitted …
  • Page 24
  • Page 25
  • Page 26
  • Page 27
  • Page 28
  • Interim pages omitted …
  • Page 43
  • Go to Next Page »

Primary Sidebar

Heather from Whipperberry
Hello... my name is Heather and I'm the creator of WhipperBerry a creative lifestyle blog packed full of great recipes and creative ideas for your home and family. I find I am happiest when I'm living a creative life and I love to share what I've been up to along the way... Come explore, my hope is that you'll leave inspired!

Footer

  • Privacy Policy
  • Crafts
  • Food
  • Gifts
  • Holidays
  • Home
  • Mom Life
  • Recipes
  • Travel

Copyright © 2026 · Seasoned Pro