• Skip to primary navigation
  • Skip to main content
  • Skip to primary sidebar
  • Skip to footer

Whipperberry

WhipperBerry • Your Home For Creative Inspiration

  • Home
  • Recipes
    • Starters
    • Easy Weeknight Dinners
    • Main Dish
    • Salads
    • Side Dish
    • Soups & Stews
    • Desserts
    • Breakfast
    • Miscellaneous
  • Tutorials
    • Creative Crafts
    • DIY Decor
    • Fabric Crafts
    • Food How-To
    • Jewlery
    • Paint Projects
    • Paper Art
    • Party Styling
    • Photography and Graphic Design
    • Silhouette
  • Holidays
    • Easter
    • Mother’s Day
    • Father’s Day
    • 4th of July
    • Halloween
    • Thanksgiving
    • Christmas
    • Valentine’s Day
  • Gift Ideas
    • Gifts For Everyone
    • Gifts for Dad
    • Mother’s day
    • For The Girls
    • For The Kids
    • Teacher Gift Ideas
    • Christmas
  • Printables
    • Holiday
    • Gift Idea
    • LDS Primary
  • Travel
  • About
    • Terms
  • Contact
  • Nav Social Menu

    • Facebook
    • Instagram
    • Pinterest
    • RSS
    • Twitter

Crafts

Fabric Wrapped Mason Jar Vases

5 · Jul 8, 2013 · 4 Comments

This fabric wrapped mason jar vases post, brought to you by Michaels Craft Stores // How many times have you been shopping in Michaels Crafts and gathered up everything thing that you need for a project and then sent up this wish to the craft fairy… "I wish Michaels had FABRIC!" I know I have about a MILLION times. To have such a lovely craft store without fabric was just sooooo sad. Well, my 1,000,001 wish was granted! Michaels now has a simple fabric section!! They have a fun selections of several types of fabric from your basic cotton all the way up to your fancy burlap…

Michaels New Fabric Section

Each fabric comes in different lengths from 18 inches up to 2 Yards and has a comparable price point to other fabric stores. This is perfect for simple projects like my fabric wrapped Mason jars, or even a stunning cotton quilt, depending on your skill level. Michaels sent me some fabric to try out and I fell in love with the canvas key print fabric…

Michaels Fabric

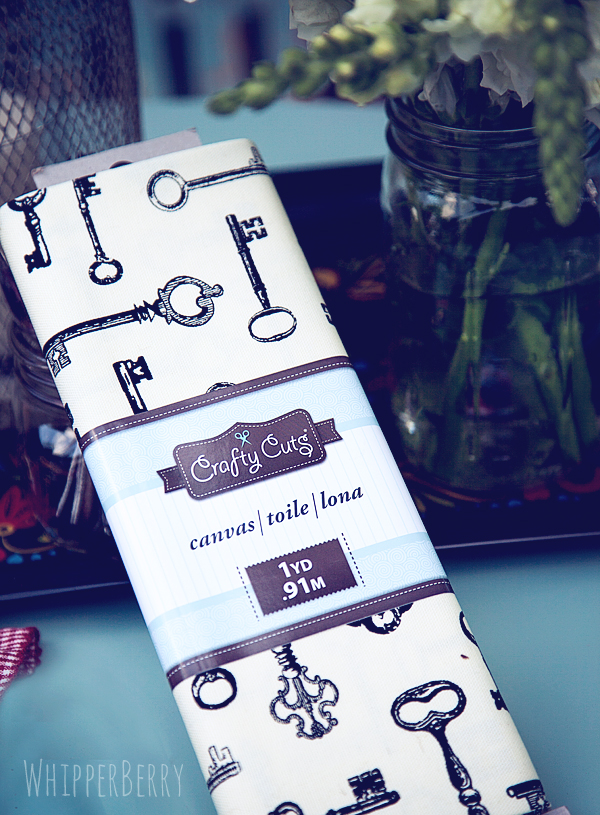
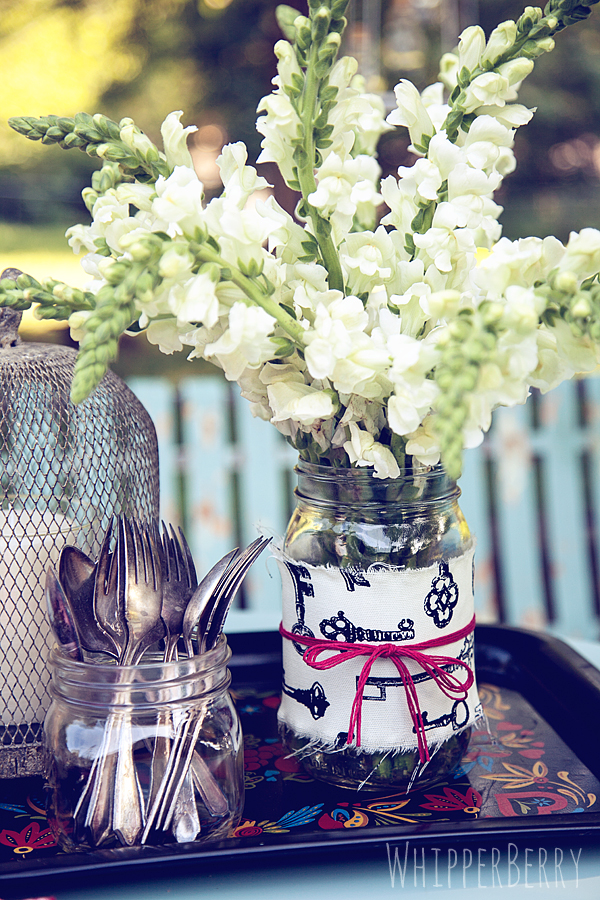
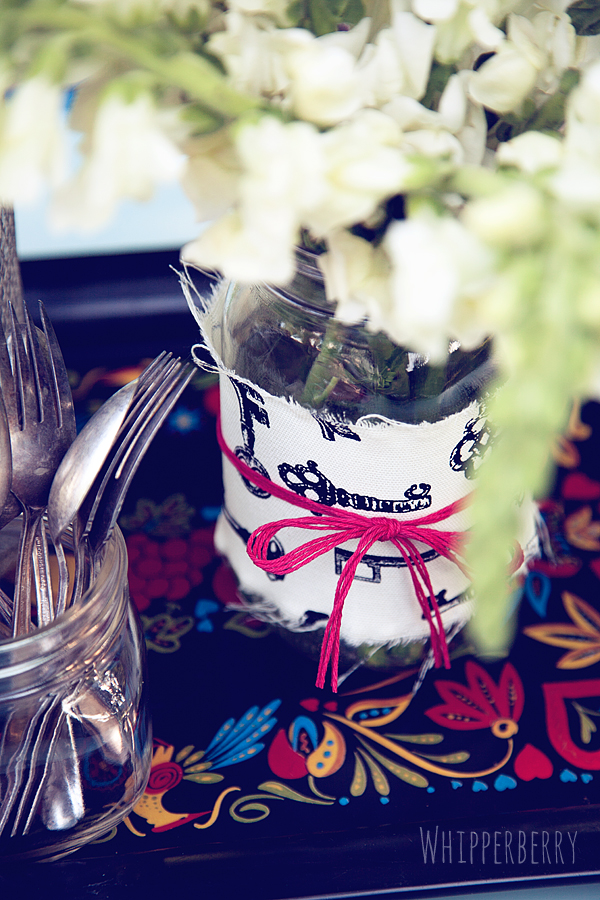
Aren't those keys just divine? The feel and the weight of the fabric is just perfect as well. I have to say, Michaels didn't compromise on quality at all. I used this fabric to wrap a Mason jar that I was using as a vase for a table center piece. It's so simple, I'm almost embarrassed to share…

wrap your jar with Michaels fabric for a fun designer look

Fabric Wrapped Mason Jar Vases Supply List

  • Mason Jar
  • Michaels canvas – key print
  • Divine Twine – red
  • Scissors

Instructions

Take your fabric and measure how wide you need your fabric strip to be. Mine is about 3 inches, but it will be different based on what jar you select. Make a little snip one inch in from the edge of the fabric, and rip the fabric all the way down. This will give you a rough edge on both sides of your strip. Then measure in three inches (or whatever your measurement will be) make another snip and rip all the way down again. You will then have a lovely fabric strip with rough edges on both sides. 

Next, wrap it around your jar and measure how much fabric you will need to wrap the jar completely and then trim the excess fabric. With this canvas I was pleasantly surprised at how I didn't need anything other than the twine to secure the fabric. The fabric has kind of a velcro type quality, so I wrapped the jar and then just secured the fabric with some Divine Twine and that was it! No hot glue or glue of any type needed at all. 

Just rip your fabric to get a lovely rough edge

This is a great way to dress up any table from a simple dinner to a large scale event like a wedding or such. The best part… you can get all the fabric you need at Michaels… YAY!!

What else would you make with some of this fun fabric from one of our favorite craft stores?

Disclaimer // I received free product from Michaels Craft Stores for this post. However, all thoughts, ideas and opinions are my very own.

Designer Marquee Letters with Lights

13 · Jul 3, 2013 · 32 Comments

DIY Marquee Letters // Today is the BEST DAY OF MY LIFE!! I'm guest posting over at Today's Creative Blog and I've created something rather fun. It's a two part post on how to make your very own Designer Marquee Letters. Part One, Designer Letters is over with Kim at TCB and Part Two, how to create Designer Marquee Letters with Lights is here on WhipperBerry. 

designer marquee letters by whipperberry

I have been in love with old marquee letters forever. I've collected several fabulous can lights over the years, but I really wanted some Broadway style marquee letters. To purchase a Broadway style sign would cost a fortune so, I thought I would create a sign of my own with parts that you can find at a couple of local stores. First, I needed to create my letters…

Designer Letter by WhipperBerry

For this tutorial head on over to Today's Creative Blog, while you're there say hello to Kim for me. She's one of my favorite blog friends!! The cool thing about making your own letters, is that YOU get to pick what your sign says. You can do just one letter or and entire word, heck… write a whole paragraph if you want. the sky's the limit!!

Now that I've created my letters, it's time to add some lights to these babies!!

designer marquee letters

Supply List

  • designer letters
  • hole punch
  • self-healing cutting mat
  • globe string lights

Instructions

First you need to punch some holes into your letters…

cut holes into the cardboard letters

Now, this proved to be a bit of a challenge for me. I started the sign using my Martha Stewart Screw Punch which worked great. I just had to make several punches to create the circle that I needed for the light bulb to fit through. Which was fine, but later I decided to use a grommet punch and a mallet. It worked a little better. It was nosier, but did the job a little quicker. It's up to you how you decide to make your holes. 

Space your holes carefully. I'm not going to give you specific measurements because it will depend on what type of lights you select. Basically, work slow and careful. Punch a hole and place a light bulb in the hole and then eye ball where the next hole should go.

place your light bulbs in your marquee letter

Once you've created all your holes, it's time to add the lights…

How to add lights to your marquee letters

Unscrew the light bulbs and place them through the holes and screw the bulb back in the socket with the cord on the back of the letter… Keep in mind, before you start to place the cords, think about the most logical way to wire the letter. Where do you want the cord to start and end? Just think things through a bit and you won't have to go back and start over.

how to manage your cords for your marquee letters

The lights that I used from Target had nice little clips on the light sockets that made it really easy to tuck the cords in so that they didn't peak out from behind the letters. They were perfect!!

WhipperBerry Amour Sign

Once everything is wired up all you have to do it light it up!

WhipperBerry's Amour Marquee Letter Sign

Isn't it fun?! I plan on using it as part of a gallery wall in the near future. It will also be a fun way to dress up an event or dessert table. I can dream up all kinds of fun ways to use this sign.

Now keep in mind… the sign is made out of paper. DO NOT leave the lights on for a long period of time or leave unattended. I've turned mine on for quite awhile and nothing has happened, but the lights do warm up and I don't want any fires started with this fun sign. 

Soooo, now that you know how to make your own Marquee Letter Sign… What word would you light up?

Hello I Love You Wood Sign // Silhouette Promotion and GIVEAWAY

0 · Jul 1, 2013 · 308 Comments

Silhouette Promotion Affiliate Team Member  // Can you believe it? It's JULY already!! The fire flies are a blaze here in Lincoln and I am LOVING the summer so far. It's so green and lush here and did I mention the fire flies? For a girl who has never lived in an area with the luminescent bugs… this is just magical!  

Well, with a new month we have a new Silhouette promotion… and I've created a new sign with the help of Rhonna Designs mad design skillz and the Silhouette Designer Edition Software…

Hello I love you Sign from WhipperBerry

Before I dive right on into the project I want to let you know about his month promotion… You know, just in case you are like me and have the attention span of a gnat. This way if you are dying to get a new CAMEO, Portrait or just the Designer Edition Software you don't have to muddle through my boring old tutorial on how to make this aaaaamazing sign. So, here are the details…

July Silhouette Promotion

SMOKIN' WHITE HOT DEAL, right?

Click here to visit the Silhouette Shop to check out all of July's special deals!

Now, before we get to the GIVEAWAY… Let me tell you a little bit about the sign I made this afternoon. It is a super slick, super easy sign to make. I bought the wood at Lowes and it was already cut in the 6×24 length with is perfect for making signs. Then I grabbed a couple of wood shims to secure the wood planks together and that was it…

WhipperBerry wood sign

I laid the boards out and placed the wood shims on the back and secured the boards with come short nails and I was good to go.

how to build a wood sign

I primed the wood with some Kilz Spray Primer and then painted a few coats of Krylon Catalina Mist. Then while it was drying I prepared my stencil with my Silhouette Designer Edition Software. 

Hello I love you design from Rhonna Designs

The Designer Edition Software is a must have addition when you have a Silhouette machine. It just gives you greater design options that with the basic software that comes with your machine. With this image above, I was able to convert a PNG file from Rhonna Designs into a cuttable file. That means that your design options are limitless with the CAMEO or Portrait! 

Once my design was complete I cut the vinyl and used it as a stencil to then paint my sign with Krylon Sun Yellow. I also made a sign where I just added the vinyl to the sign rather than using the vinyl as a stencil. They both look great!

painted hello i love you sign

Here's a post that I created awhile ago with a video on how to convert a PNG file in the Silhouette Designer Edition Software.

Want to compare the Design Studio options? Here is a breakdown…

Silhouette Studio OptionsThe best part… You can grab the Designer Edition from now until July 10th for only $24.99! Not to mention some smokin' deals when you bundle that with a CAMEO or Portrait! 

Wait, you want more? 

How about I give away one Silhouette Portrait with the Designer Edition Software to one of you!!

Whipperberry Silhouette Giveaway Instagram image

All you have to do is follow the directions in the Rafflecopter box below and you will be entered to win. 

// This giveaway is open from July 1-8 and only for residence of the United States. A winner will be announced on July 9th. //

a Rafflecopter giveaway

Children’s DIY Chalkboard

0 · Jun 28, 2013 · 2 Comments

This post brought to you by Michaels // This summer has been a blast so far. I’ve been having a ball coming up with fun projects and activities for the kiddos while they are home. Emily has been going to Michaels Passport to Imagination Craft Camp for the last couple of weeks, and she has been having a ball. She’s made some fun new friends and has really enjoyed learning about North & South America through some fabulous hands on activities.

In the next couple of weeks, they will be traveling to several other parts of the world. Don’t worry if you haven’t had a chance to head over to your local Michaels stores, The Passport to Imagination runs for several more weeks and is only $2 for each class. Come on over your kiddos will love it!

9daf66c2d75f11e29dd822000a1ddafb_7

Emily enjoying Michael’s Passport to Imagination Craft Camp

Emily decided we wanted to come up with a project that would be perfect for your kiddos over the summer. After class we went and wandered Michaels and she decided that we needed to make a DIY Children’s Chalkboard. She has been around for all of my chalkboard projects and has developed a love for the slate & chalk just like her Mom.

We decided that kiddos need to have a chalkboard of their very own that they can play around with, but if it’s loved a little too much, it won’t be a big deal. Here is what we came up with…

DIY Children's Chalkboard from WhipperBerry

Here are the supplies that we gathered…

Supplies for child's chalkboard

  • Stylish wood frame
  • Krylon Cherry Red spray paint
  • Ultra black mounting board
  • Chalk
  • Water bottle

This DIY is so easy and fun to do with your kiddos. First, you need to spray paint your frame, let it dry completely. Cut your ultra black mounting board down to size and then hot glue onto the back of the frame. You should probably take care of the hot glue part, rather than the kiddos. But, this is a great beginners spray paint project. Take them outside and teach them the finer points of spray paint.

Next, all you have to do is rub white chalk all over the board and rub it off with a paper towel. Your chalkboard seasoned and ready to go!!

Emily thought it would be cool to have a special spot for her chalk as well, so we found and inexpensive water bottle at Michaels and used it as a chalk keeper.

Sidewalk Chalk Storage

We just dressed it up with some ribbon and yarn that we had laying around and voila… You have a fun chalk keeper for your kiddos to go along with their chalkboard! Now they can make all kinds of lists or play games on their board and after it’s loved a little too much you can replace the mounting board and it’s as good as new!! Total Rock Star Mom Move!!

Come on over to Michael’s this week and check out the Passport to Inspiration along with Emily. After class you can grab some chalkboard supplies and go home and make your very own children’s chalkboard.

pti

Disclaimer // This is a post sponsored by Michaels Crafts. I received free product for this post, however… all thoughts, ideas and opinions are my very own.

  • « Go to Previous Page
  • Page 1
  • Interim pages omitted …
  • Page 25
  • Page 26
  • Page 27
  • Page 28
  • Page 29
  • Interim pages omitted …
  • Page 43
  • Go to Next Page »

Primary Sidebar

Heather from Whipperberry
Hello... my name is Heather and I'm the creator of WhipperBerry a creative lifestyle blog packed full of great recipes and creative ideas for your home and family. I find I am happiest when I'm living a creative life and I love to share what I've been up to along the way... Come explore, my hope is that you'll leave inspired!

Footer

  • Privacy Policy
  • Crafts
  • Food
  • Gifts
  • Holidays
  • Home
  • Mom Life
  • Recipes
  • Travel

Copyright © 2026 · Seasoned Pro