• Skip to primary navigation
  • Skip to main content
  • Skip to primary sidebar
  • Skip to footer

Whipperberry

WhipperBerry • Your Home For Creative Inspiration

  • Home
  • Recipes
    • Starters
    • Easy Weeknight Dinners
    • Main Dish
    • Salads
    • Side Dish
    • Soups & Stews
    • Desserts
    • Breakfast
    • Miscellaneous
  • Tutorials
    • Creative Crafts
    • DIY Decor
    • Fabric Crafts
    • Food How-To
    • Jewlery
    • Paint Projects
    • Paper Art
    • Party Styling
    • Photography and Graphic Design
    • Silhouette
  • Holidays
    • Easter
    • Mother’s Day
    • Father’s Day
    • 4th of July
    • Halloween
    • Thanksgiving
    • Christmas
    • Valentine’s Day
  • Gift Ideas
    • Gifts For Everyone
    • Gifts for Dad
    • Mother’s day
    • For The Girls
    • For The Kids
    • Teacher Gift Ideas
    • Christmas
  • Printables
    • Holiday
    • Gift Idea
    • LDS Primary
  • Travel
  • About
    • Terms
  • Contact
  • Nav Social Menu

    • Facebook
    • Instagram
    • Pinterest
    • RSS
    • Twitter

Crafts

Michaels Passport to Imagination 2013 Crafting Adventure

0 · Jun 8, 2013 · Leave a Comment

This post brought to you by Michaels // Hey guys… I just wanted to give you a quick heads up on something pretty fun for the kiddos this summer! Michaels Craft Stores are hosting a 7 week crafting voyage around the globe called Michaels Passport to Imagination 2013,  for kiddos age 5 & up…

pti

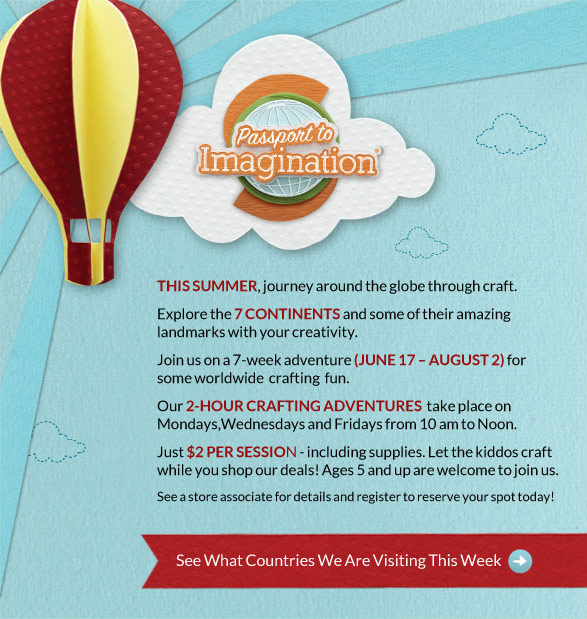
My Emily is going to participate in the Passport to Imagination here in Lincoln and she can't wait. What a fun way to meet new friends, learn about the world, have fun crafting and create fun goodies to share with your family and friends.

Check out your local Michaels store to register and reserve a spot for your kiddos this summer!! It's only $2 per session and that includes the supplies. Can't beat that!!

Lazy Susan Art

53 · May 28, 2013 · 24 Comments

This post brought to you by DecoArt // I have become obsessed with the Lazy Susan! My Grandmother’s table had a large lazy susan that I was enamored with as a child. I was fascinated by the inner workings and the fact that it could double as a steering wheel in a pinch. Just in the last few months I’ve been on the hunt for the perfect lazy susan and then it hit me… It would look fabulous with a little artistic touch.

Ampersand Lazy Susan with DecoArt White Wash Paint

I am a part of the DecoArt Core Bloggers and did receive compensation for this post. However, all thoughts, ideas and opinions are my very own.

I found this great bamboo lazy susan at a local store and I just loved the wood grain. I thought it would look great with a negative graphic stenciled onto the surface. Meaning… You use a negative stencil thus showing the wood grain in the graphic while the rest of the surface is covered in paint. I’ve loved this look for quite some time now.  Here is what you will need…

Supplies

  • Lazy Susan
  • DecoArt Americana White Wash

Americana White Wash craft paint for some lazy susan art

  • Vinyl Stencil (I created mine using my Silhouette CAMEO)
  • Transfer tape
  • Sandpaper
  • Foam brush

Instructions

This project is so easy, it really only takes a half an hour at the most, a little more if you count drying time.  Yet, it creates a stunning piece for your table or for a gift. First you need to decide what graphic you would like to put on the surface of your lazy susan. I have always loved ampersands (&) and I thought it would look fabulous as a graphic on the table. I scrolled though a bunch of fonts until I found the perfect ampersand, it was in the Baskerville font. Isn’t it just lovely? For those of you who love ampersnads, you know just what I’m talking about.

I used my Silhouette CAMEO to cut the ampersand out in vinyl. I wanted the ampersand to be large, but not to take over the entire wood surface and I knew I wanted it to be a little off set. I used transfer tape to help me position the vinyl just right…

Using transfer tape place your vinyl onto your lazy susan

Notice how I left part of the vinyl hanging off the side of the lazy susan…

Use vinyl to create a stencil for your lazy susan

I just love that off set look. After the stencil was in place, I use some fine grit sand paper to carefully rough up the surface of the wood. That helps the paint adhere better. Then, I added 3 or 4 coats of the Americana White Wash so that it had a nice clean surface and that was it. I carefully removed the stencil and voila, I now have a fun lazy susan for the center of my table…

WhipperBerry Ampersand Lazy Susan

I have another lazy susan that I created for the brand new DecoArt Blog that will debut soon…

the-decoart-matallics-looks-like-brushed-metal

I am one of DecoArt’s Core Bloggers and will be sharing posts over there, (when the site launches) twice a month. As soon as this one goes live I will let you know, and you can learn how to make this beauty as well.

That’s it… I’m on a mission!  Every house needs to have a fabulous lazy susan!! Run out and grab one of your own, dress it up and then show off your photos on Facebook or Instagram and tag me so I can check them all out!!

Creating With Martha Stewart Jewelry

4 · May 21, 2013 · 8 Comments

Brought to you by Plaid Crafts // I ADORE finding fun new products to play with. I'm even happier when the product lives up to the hype. Yesterday, I had the fun opportunity to play with some new Martha Stewart products from Plaid Crafts… They've launched a new line of Martha Stewart DIY Jewelry that is available exclusively at Michaels Craft Stores. I had a BALL playing with a box full of goodies from the line…

Martha Stewart Jewelry #marthajewelry

The new jewelry line is very well thought out. It's what we've come to expect from the Martha Stewart line of products. You know when you decide to use a Martha product, that you will have the highest quality materials along with fabulous design, synonymous with the Martha Stewart name.

To begin, the line has a fabulous tool box full of all kinds of tools you will need when creating your very own jewelry…

Martha Stewart Jewelry Tools #marthajewelry

These are just a few of the tools in the line that really make jewelry crafting fun. You have a silicon mat to work with, silicon molds, several types of pliers and metal working tools, you even have fabulous brushes.

What makes this line really fun are all the amazing options you have. You can use an element from the line as is, or you can use  a glaze or enamel to totally change the look and feel of the element. Here's a look at four of the mediums you have to work with…

Creating with Martha Stewart Jewelry #marthajewelry

Creating with Martha Stewart Epoxy Clay #marthajewelry

Using the fun Epoxy Clay you can create your very own cabochons to add to a necklace like this one that I created with several of the elements from the Martha line. The line has chains, rhinestones, beautiful statement pieces and when combined with your creativity can turn into something amazing.

Martha Stewart Jewelry Enamel #marthajewelry

Using the jewelry enamel you can add little pops of color to a piece that can transform it into something really special like this pendant necklace. It's so easy, you just combine the enamel with an activator and apply to the piece with a toothpick. It's super slick. The only issue is that you have to wait 24 hours for it to dry before you can wear it. Patients… I know, I'm not very good at waiting either. It's totally worth it though. I LOVE this new pendant necklace. All you have to do it attach it to a chain that comes in the new line with connectors that are super easy to use as well.

Martha Stewart Jewelry Glaze #marthajewelry

Do you want to add a little pizzaz to your new accessory? All you need to so is paint on some Jewelry Glaze. Leave it as is with a full burst of color, or use a cloth to wipe off a bit to give it an antique look. Either way, they are going to transform your creation into something spectacular. Next, all you have to do is decide what else you want to add on to your necklace. For the one above, I added rhinestones to add a little bling to the piece.

Above and beyond the different mediums that you can use transform your design, Martha Stewart has create some amazing elements that take your creating to the next level…

Martha Stewart Jewelry Necklace #marthajewelry

These two pieces were super easy, I just added a little color pop with some Jewelry Glaze and once that dried, which was super quick, I glued on a fabulous graphic element to create a stunning statement necklace.

All in all, I love this new line of DIY jewelry. There is something here for beginner jewelry designers all the way up to advanced designers, so there's fun for everyone!! It's so fun to create one of a kind pieces for you or for gifts for your family and friends. I know a few of these pieces that I've created are heading to school for end of the year teach gifts. 

You can visit Plaid Crafts on Facebook, Pinterest & Twitter for more inspiration. And… for even more inspiration you should visit all of these posts below to see some of the other fun creations from all the bloggers who had a chance to take Martha Stewart Jewelry line for a test drive!

Color Block // Bicycle Wheel Sneak Peek

5 · May 16, 2013 · 8 Comments

Color Block Bicycle Wheel // I have always loved finding quirky little treasures to add some character to my home. I seem to always have my eyes peeled looking for fun goodies to get my hands on.  A few years ago I was junking at a fabulous junk shop called Patina close to my Mom's house in Denver and found a wonderful old bicycle wheel. It made it's WhipperBerry debut in this post and was an instant hit!  For the last little while I thought it could work as a fabulous photo display, but it needed something a little extra to dress it up a bit.  So, I decided to give it a little color block treatment and I LOVE how it turned out!!

WhipperBerry Bicycle Wheel Photo Display

I have been obsessed with color blocking along with gold accents. You may have noticed… I've created several posts lately with all kinds of gold goodies. I have Dressed-up Dinnerware, Gold Accented Picture Frame & a Bowl Refashion to name a few. I've been going to town with Krylon's Metallic spray Paint and it's been getting a lot of use around my home as of late.

For this project, I used Krylon's Premium Metallic Gold Paint and their Indoor/Outdoor paint in Catalina Mist. The only other thing I used was some painters tape to create a clean line. I took the wheel which was already painted off white and distressed and hung it up in my back yard to paint.

Bicycle Wheel Before

Then I added one strip of painters tape  at two different spots on the wheel. For some reason I didn't get any photos of this, but you get the idea. No need to tape like crazy. As long as you spray carefully you won't really have any issues with it. The tape is really just to create a guide for where you want to spray. I sprayed two-thirds of the wheel with the Catalina Mist and then the bottom third, gold. 

Color Blocked Bicycle Wheel

Now, this is just a sneak peek, you'll have to wait until next week to see the finished project and how I use it to display my Instagram photos from Origrami. I can't wait to show it off… It's going to look sooooo cool!!

Have you found some cool and unusual ways to display photos? Leave a comment and share your fun ideas!

  • « Go to Previous Page
  • Page 1
  • Interim pages omitted …
  • Page 27
  • Page 28
  • Page 29
  • Page 30
  • Page 31
  • Interim pages omitted …
  • Page 43
  • Go to Next Page »

Primary Sidebar

Heather from Whipperberry
Hello... my name is Heather and I'm the creator of WhipperBerry a creative lifestyle blog packed full of great recipes and creative ideas for your home and family. I find I am happiest when I'm living a creative life and I love to share what I've been up to along the way... Come explore, my hope is that you'll leave inspired!

Footer

  • Privacy Policy
  • Crafts
  • Food
  • Gifts
  • Holidays
  • Home
  • Mom Life
  • Recipes
  • Travel

Copyright © 2026 · Seasoned Pro