• Skip to primary navigation
  • Skip to main content
  • Skip to primary sidebar
  • Skip to footer

Whipperberry

WhipperBerry • Your Home For Creative Inspiration

  • Home
  • Recipes
    • Starters
    • Easy Weeknight Dinners
    • Main Dish
    • Salads
    • Side Dish
    • Soups & Stews
    • Desserts
    • Breakfast
    • Miscellaneous
  • Tutorials
    • Creative Crafts
    • DIY Decor
    • Fabric Crafts
    • Food How-To
    • Jewlery
    • Paint Projects
    • Paper Art
    • Party Styling
    • Photography and Graphic Design
    • Silhouette
  • Holidays
    • Easter
    • Mother’s Day
    • Father’s Day
    • 4th of July
    • Halloween
    • Thanksgiving
    • Christmas
    • Valentine’s Day
  • Gift Ideas
    • Gifts For Everyone
    • Gifts for Dad
    • Mother’s day
    • For The Girls
    • For The Kids
    • Teacher Gift Ideas
    • Christmas
  • Printables
    • Holiday
    • Gift Idea
    • LDS Primary
  • Travel
  • About
    • Terms
  • Contact
  • Nav Social Menu

    • Facebook
    • Instagram
    • Pinterest
    • RSS
    • Twitter

Crafts

How to Paint Stripes for a Pop of Color

0 · Apr 16, 2013 · Leave a Comment

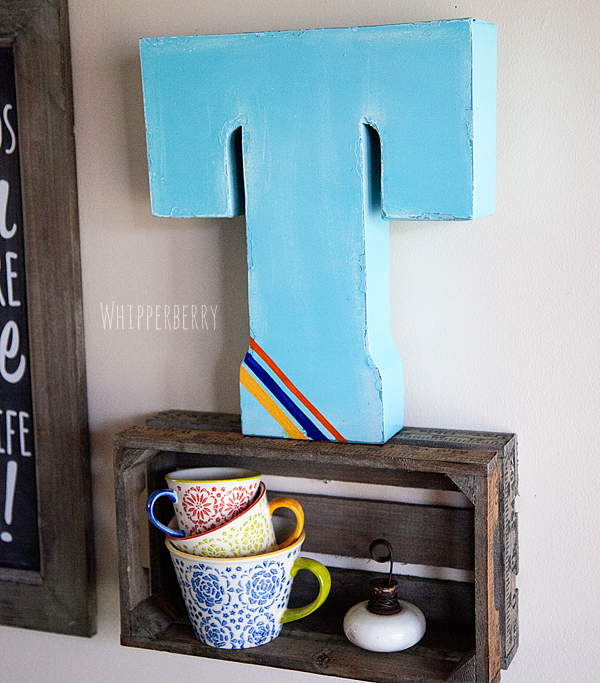
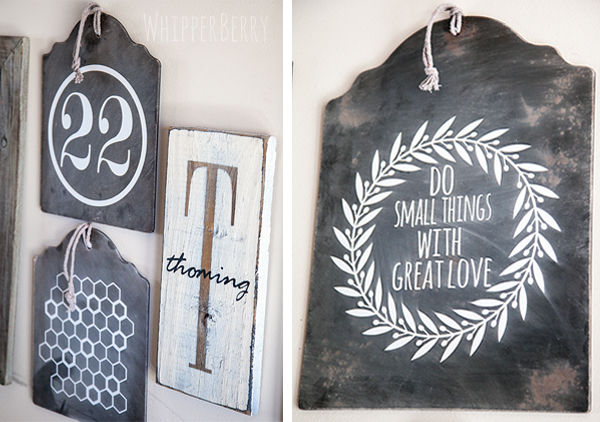
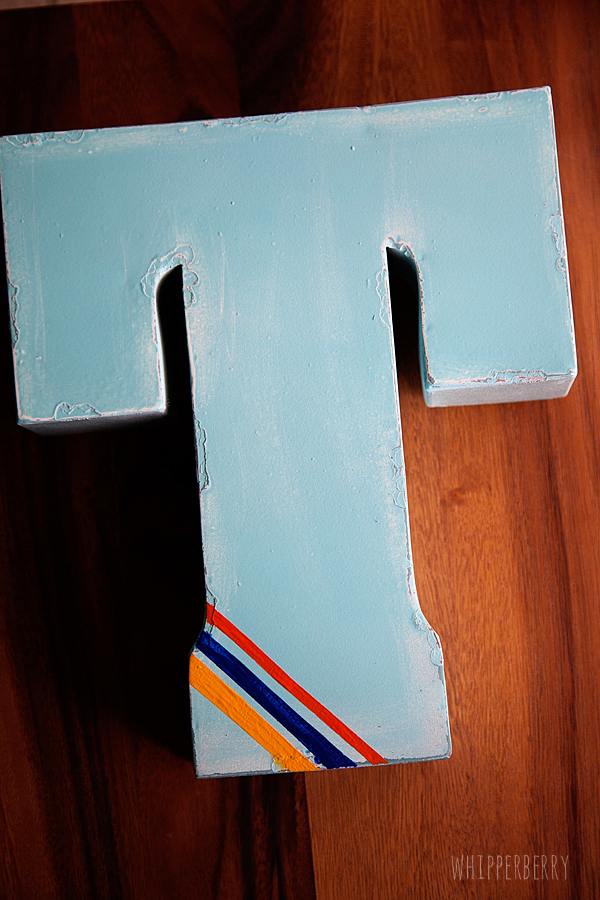
How to paint stripes // Sometimes a project just isn't complete with a little pop of color to really make it stand out. Sometimes all that project needs are a few little stripes to make that project pop. I've added a few stripes to my letter T, in my Vinyl Chalkboard Inspiration Wall…

color pop with DecoArt

Last week, I showed off my Vinyl Chalkboard Inspiration Wall that I created for my kitchen wall…

WhipperBerry's Chalkboard Inspiration Wall

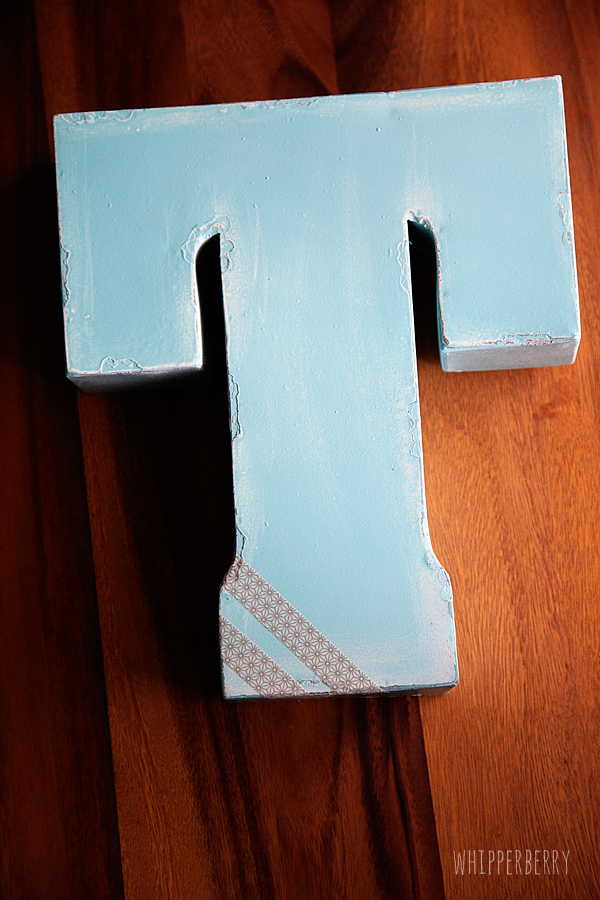
The lion share of the project is finished, but I'm still planning on adding a few more design elements to give it a little color pop. I was inspired by a recent trip to Anthropologie and thought it would be fun to add an Anthro vibe to the whole project. I started with my letter T. First, I selected my colors for the project…

decoart paint

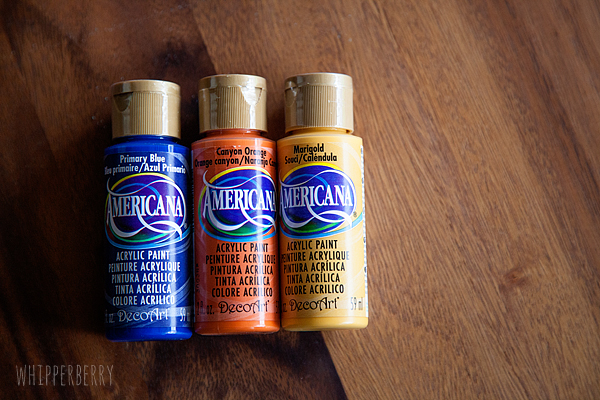
Primary Blue, Canyon Orange & Marigold via the Americana paint line from DecoArt. The Americana line is a fabulous all-purpose paint that worked well for my metal letter. I used some washi tape to create some random stripes on the bottom corner of the T…

use washi tape to mask stripes

Using a small sponge brush I painted the stripes…

painting stripes

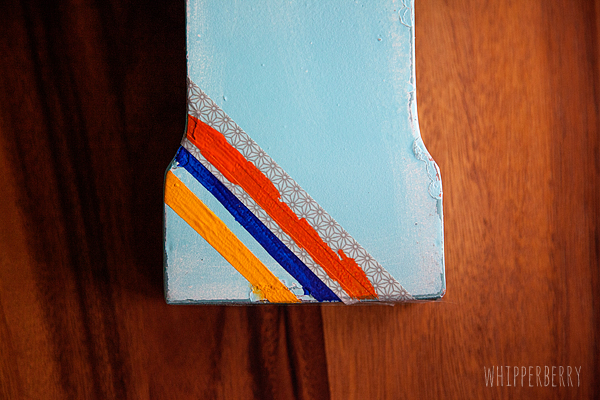
And finished up with these fun, not too perfect, stripes at the bottom of the letter T… Its a good start to my Anthro color pop additions for the inspiration wall. I have a few more graphic elements that I'm going to add and then the wall will be finished!

WhipperBerry Color Pop

Gold Accented Bowl Refashion // Project ReLove

2 · Apr 13, 2013 · 1 Comment

Gold Accented Bowl Refashion // We all have them… Little spots in our garages and basements with little odds and ends that used to be treasures, but have since lost their flair. Whether they are old and out of date, or just need a little sprucing up… These goodies still have a place!! When my friends at Michaels craft stores contacted me about Project ReLove I easily jumped onboard. Project ReLove is in honor of Earth Day and a fabulous movement to inspire all of us to create something new, out of something we already have. No need to run out and find new supplies, just go shopping in your lost treasures. You'll be amazed what a little paint, glue, Mod Podge or a little bling can do for an tired old treasure. 

I went shopping in my garage and found an old wood bowl that I bought a while ago and thought I could breath new life into with a little gold paint. 

Gold Accented Bowl

The other day I was shopping at Target and found this amazing gold accented bowl in the Nate Berkas collection…

14316920_130119055414I knew with a little gold spray paint from Krylon I could transform my old wood bowl into somthing like Nate's creation. All I needed was the spray paint, some painters tape and some plastic wrap and I was in business…

spray paint supplies

I taped off the sections that I didn't want to paint. Make sure you watch your lines to make sure that's the way you want your final piece to look. Sometimes you need to tape in small sections in order to achieve the desired look. I then carefully painted the bowl with slow even movements to create a smooth unblemished surface. Two coats of paint was perfect…

Mask the part of the bowl you don't want to paint with painters tape

Once the paint dried, I removed the tape, the plastic wrap and voila, I now have a perfect new accent piece for a new display I'm working on. I just LOVE it!! 

Gold Accented Bowl

So, what do you have that you can repurpose or refashion? What's living in the deep dark corners of your garage that can become something fabulous again? You can join Michaels for Project ReLove too!

Michaels ReLove

Need some more inspiration? You can visit Michael's Lookbook for all kinds of fun ideas.

How to Create Vinyl Chalkboard Art

147 · Apr 3, 2013 · 36 Comments

Chalkboard Art Inspiration Wall // Have you ever had a GREAT idea and then just couldn’t find the time to make it happen? I had this idea to create a chalkboard wall filled with inspirational quotes for my kitchen wall, about a million years ago… ok, well maybe five months ago when we first moved into our house here in Lincoln. I’ve been collecting chalkboards from Decor Steals for a bit, and had all the supplies, just none of the time to make it happen. Sadly we’ve lived with a naked wall for 5 months and last week I finally decided it was time, time to make this idea into a reality!

WhipperBerry's Chalkboard Inspiration Wall


Will Vinyl Stick to a Chalkboard or Chalkboard Paint?

Yes! You have to get the right kind of vinyl so it will stick. You will also need to prep the chalkboard first. More on this later though. Just know that yes, vinyl will definitely stick.

Now here’s the deal… As much as I love chalkboard art like the fabulous pieces created by my friend Rhonna Farrer, I have NO talent when it comes to hand-lettered art, like none. I wish that I did! I can however design stuff on my computer, so I thought I would create my chalkboard signs with white vinyl and make it look like chalkboard art. Easy fix!

Well, not so fast… You need a few tips before you can make a successful vinyl chalkboard sign.

  1. You need to prime your chalkboard. Here is a tutorial on how to prime your chalkboard.
  2. You need to clean your chalkboard with a wet cloth to remove any chalk dust, you need to work with a clean slate. Any dust or chalk on the board will make it difficult for the vinyl to adhere to your board.
  3. Cut your vinyl with whatever method or machine you like,  I have a Silhouette CAMEO so that’s what I used. I also used Silhouette Premium White Vinyl for this project as well. Affix your vinyl to your board using the transfer tape method.
  4. To make your chalkboard look like a chalkboard sign, you need to add some chalk to the board. You would think that drawing on the board with chalk would do the trick, it won’t. You risk compromising the vinyl. Here’s my super easy trick to solve this problem… Take a piece of chalk and place it in a Ziplock bag and crush with a hammer. Take a paper towel and load it with some chalk dust by placing it in the bag. Next, rub the chalk carefully all over the sign. Gently tap off the extra chalk and volia, you have a fabulous chalkboard sign. That’s all there is to it!

What Supplies Do You Need to Create Vinyl Chalkboard Art?

There are only a few things you’ll need and I’ve covered a little so far already. I’ll list them here so you can get your supplies!

  • Silhouette CAMEO (This is the bundle pack which is a really good deal!)
  • The right kind of vinyl so it sticks to the chalkboard
  • A chalkboard (if you don’t have it already)

That’s really all you need.

Chalkboard Quotes I Like

Here are the different quotes that I’ve been collecting for a while. Now that my girls are getting older {15,11 & almost 9} I wanted them to see something inspiring and uplifting each day before they head off into the world. Here are the quotes that I settled on…

WhipperBerry Quote Wall

“Choose your friends with caution. Plan your future with purpose and frame your life with faith.” This quote is from Thomas S. Monson the President of our Church, The Church of Jesus Christ of Latter-Day Saints. “Always be kinder than necessary.” – J.M.Barrie

Chalkboard Inspiration Wall with Silhouette

“You can change your future simply by changing your attitude.” This quote was suggested by Lil’Whip my 15 year old daughter Hales. I thought it was VERY appropriate. She’s not totally sure where she found the quote, so unfortunately I can’t give proper credit. “Let your smile change the world, but don’t let the world change your smile.” Again, this was from Lil’Whip’s Pinterest board, but we couldn’t find the person to give credit to, bummer!

Chalkboard Inspiration board

If you follow me on Instagram, you’ll know why the number 22 is my favorite number. Both my husband and I are born on the 22nd of two different months so of course, we also had to get married on the 22nd as well. It’s our number, so I had to add it to the board. The Thoming sign is from Signs by Andrea and I just adore it! I added the honeycomb graphic to go with the bee on one of the top boards. It’s to symbolize that, to have a successful family we ALL need to work together to create a successful home. I found the “Do small things with great love” quote from Lena Henzel.

I’m not totally finished with the project, I’m planning on adding some pops of color today for “Project Add Color” and I can’t wait to see how it turns out. I’ll show it off again when I’m totally finished. I may also have the svg files for you to download as well for the quotes that I used. Soooo, stay tuned!

Project Life on HSN

7 · Mar 20, 2013 · 5 Comments

Project Life // I used to be a CRAZY scrapbooker! I spent a fortune on all kinds of scrapbooking supplies and then subsequent storage containers for said supplies. I've spent many a weekend with my house looking like a scrapbooking store exploded in my house. As much as I loved the creativity of documenting my families life this way, I started to feel bogged down by the process. As the styles changed, it became popular to have just one photo per 12×12 page. Holy smoke… it would take over an hour to work on one page and cost upwards of $10 per page some times. It was CRAZY!! Several years ago, it just became too much and… I quit. I gave away my fortune in supplies to a friend and turned my back on the art form. In turn, I have not documented my families milestones or day to day life since then. Sad, I know! 

I've been a Becky Higgins fan for YEARS. I have all of her early books and have followed her career for sometime. Successful women have always intrigued me, and she has always been such an inspiration. Even with that, I was not ready to jump back on the scrapbooking bandwagon with her new adventure, Project Life. I didn't even look into the whole concept. The idea of a whole new scrapbooking system, made me break out in hives just thinking about it. Yea, I'm an all or nothing kind of girl. As thrilled as I was for Becky, I just couldn't jump on board. Then I started to see all of the fun projects cropping up on Instagram and Facebook. Everyone it seemed was using Project Life. Good friends of mine, Catherine from Design Editor and Rebecca from Simple as That… Busy ladies, were making these super cute layouts and documenting all of their fun memories with Becky's new system. Maybe, just maybe, I could tackle the years that have stacked up, unorganized with this system. Maybe, just maybe I could organize my families memories without heart palpitations, without spending a fortune on supplies, without taking over an entire room of my house with supplies, without alienating my husband with the mess and the time it took away from our family. Maybe I could DO THIS!

Project Life on HSN

Right about the time I was ready to jump on the bandwagon, American Crafts contacted me to see if I would be will to review the new Blush Edition of Project Life. Little did they know I had just spent about a month preparing myself to enter the world of memory keeping once again. It was PERFECT timing. I had also just ordered some of my Instagram feed from Origrami and was SUPER excited to find that my prints would work perfect with the Project Life format. I set to work, and had a ball working on my family's memories stress free, mess free and super quick. Here is a video on how to use Project Life…

How fun is that? You can put as much time and effort into your book as you want. Here's how my first few pages turned out…

WhipperBerry with Blush Edition of Project Life

You can play around with designs if you like. I did add a few little elements with stamps and some washi tape, but I'm going to leave it at that. There is really no need to make this a complicated process…

Lil'Whip and Project life

I had so much fun yesterday working on this project and I can't wait to continue catching up on my family history. You can too, with Project Life. There are some pretty cool things coming up for Becky and her crew this spring. One of those fun events is that Becky Higgins is bringing two of her Project Life kits to the Home Shopping Network on March 25th!! Both of the kits will be at a fabulous value price, so you don't want to miss out. 

Stay tuned to American Crafts and Becky Higgins this spring, there will be more amazing announcements that you won't want to miss!

This is a sponsored post by American Crafts

  • « Go to Previous Page
  • Page 1
  • Interim pages omitted …
  • Page 29
  • Page 30
  • Page 31
  • Page 32
  • Page 33
  • Interim pages omitted …
  • Page 43
  • Go to Next Page »

Primary Sidebar

Heather from Whipperberry
Hello... my name is Heather and I'm the creator of WhipperBerry a creative lifestyle blog packed full of great recipes and creative ideas for your home and family. I find I am happiest when I'm living a creative life and I love to share what I've been up to along the way... Come explore, my hope is that you'll leave inspired!

Footer

  • Privacy Policy
  • Crafts
  • Food
  • Gifts
  • Holidays
  • Home
  • Mom Life
  • Recipes
  • Travel

Copyright © 2026 · Seasoned Pro