• Skip to primary navigation
  • Skip to main content
  • Skip to primary sidebar
  • Skip to footer

Whipperberry

WhipperBerry • Your Home For Creative Inspiration

  • Home
  • Recipes
    • Starters
    • Easy Weeknight Dinners
    • Main Dish
    • Salads
    • Side Dish
    • Soups & Stews
    • Desserts
    • Breakfast
    • Miscellaneous
  • Tutorials
    • Creative Crafts
    • DIY Decor
    • Fabric Crafts
    • Food How-To
    • Jewlery
    • Paint Projects
    • Paper Art
    • Party Styling
    • Photography and Graphic Design
    • Silhouette
  • Holidays
    • Easter
    • Mother’s Day
    • Father’s Day
    • 4th of July
    • Halloween
    • Thanksgiving
    • Christmas
    • Valentine’s Day
  • Gift Ideas
    • Gifts For Everyone
    • Gifts for Dad
    • Mother’s day
    • For The Girls
    • For The Kids
    • Teacher Gift Ideas
    • Christmas
  • Printables
    • Holiday
    • Gift Idea
    • LDS Primary
  • Travel
  • About
    • Terms
  • Contact
  • Nav Social Menu

    • Facebook
    • Instagram
    • Pinterest
    • RSS
    • Twitter

Michaels Maker

DIY Farmhouse Felt Christmas Ornaments

56 · Nov 14, 2018 · Leave a Comment

I am going to label this season at WhipperBerry the felt season. I LOVE all things felt and I love being able to cut and customize my felt designs using my Cricut Maker & my cute little Cricut EasyPress 2. I have been wanting to create a farmhouse style tree that is all black & white so I thought some simple and elegant felt ornaments are a perfect addition to the tree. Farmhouse felt Christmas ornaments are sure to be a classic staple for years to come as you decorate for the holidays, plus they are super easy to store and won’t break! I love it!! Here’s how you can make a set of your own.

+ This post is sponsored by my favorite folks at Cricut +Farmhouse felt Christmas ornaments are sure to be a classic staple for years to come as you decorate for the holidays, plus they are super easy to store and won't break! I love it!! Here's how you can make a set of your own.

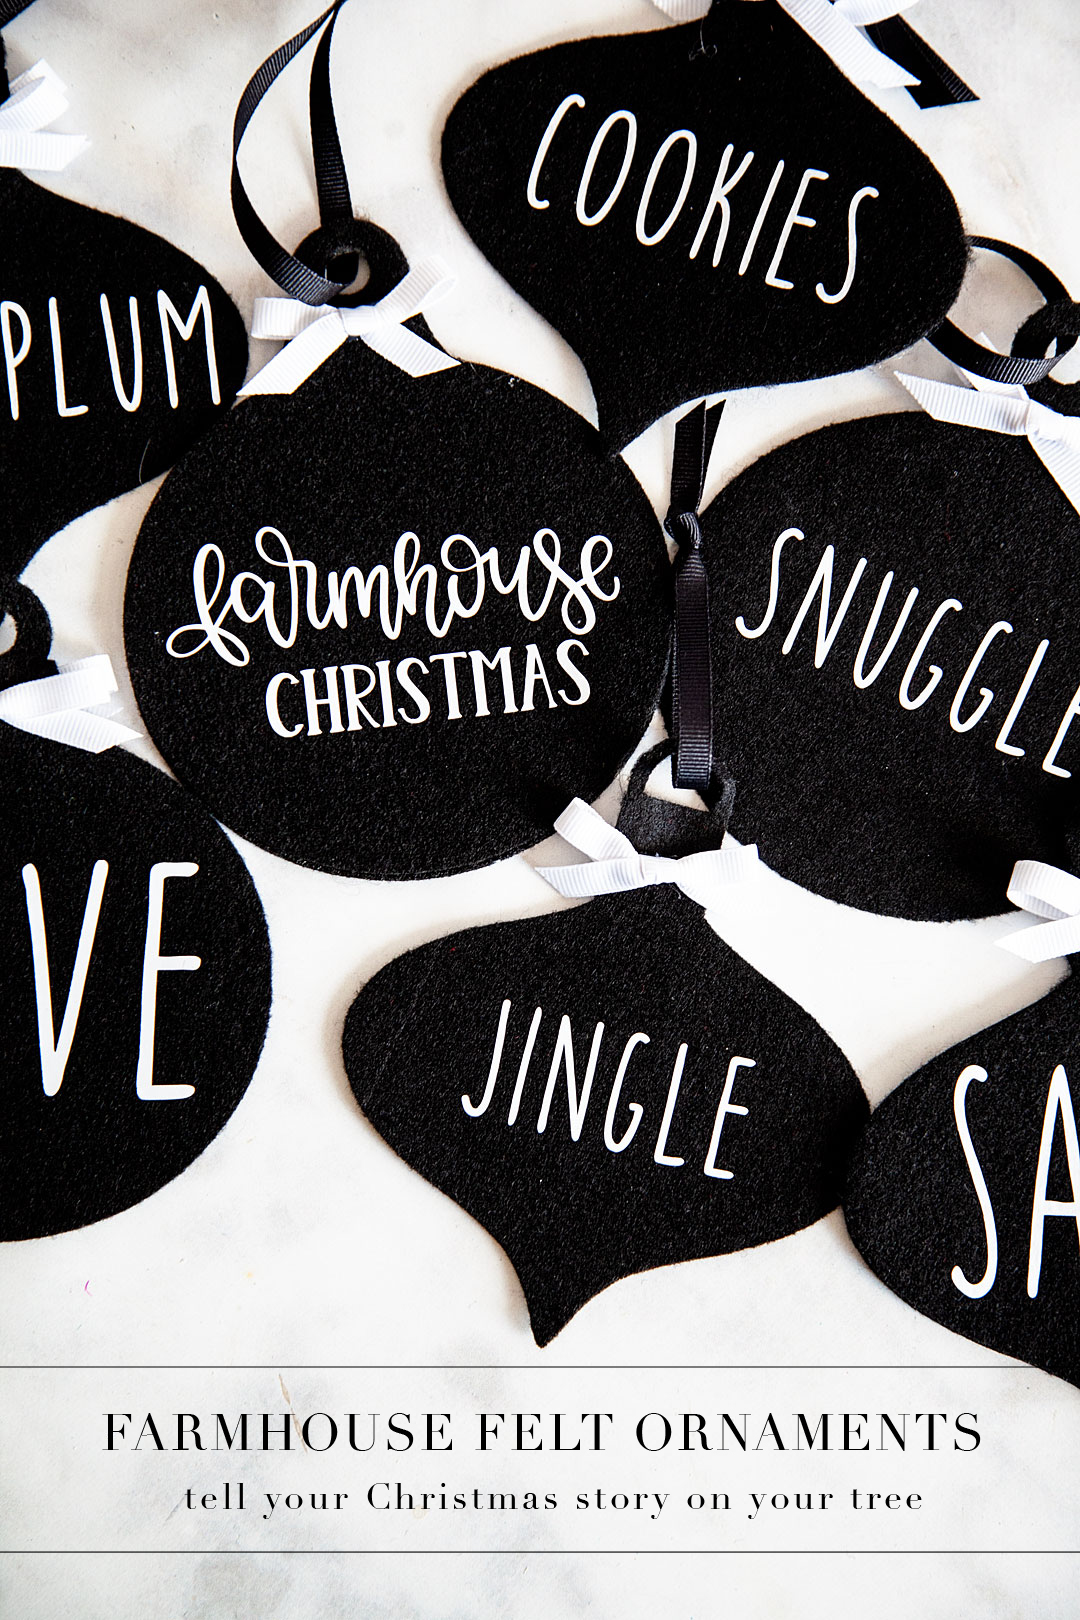
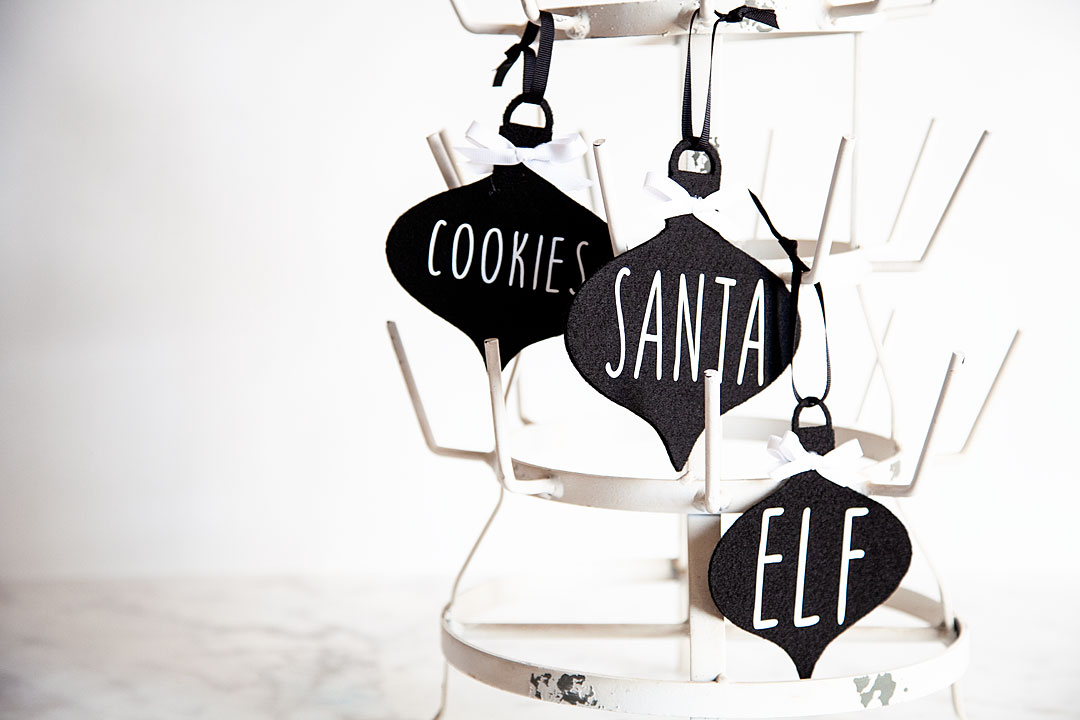
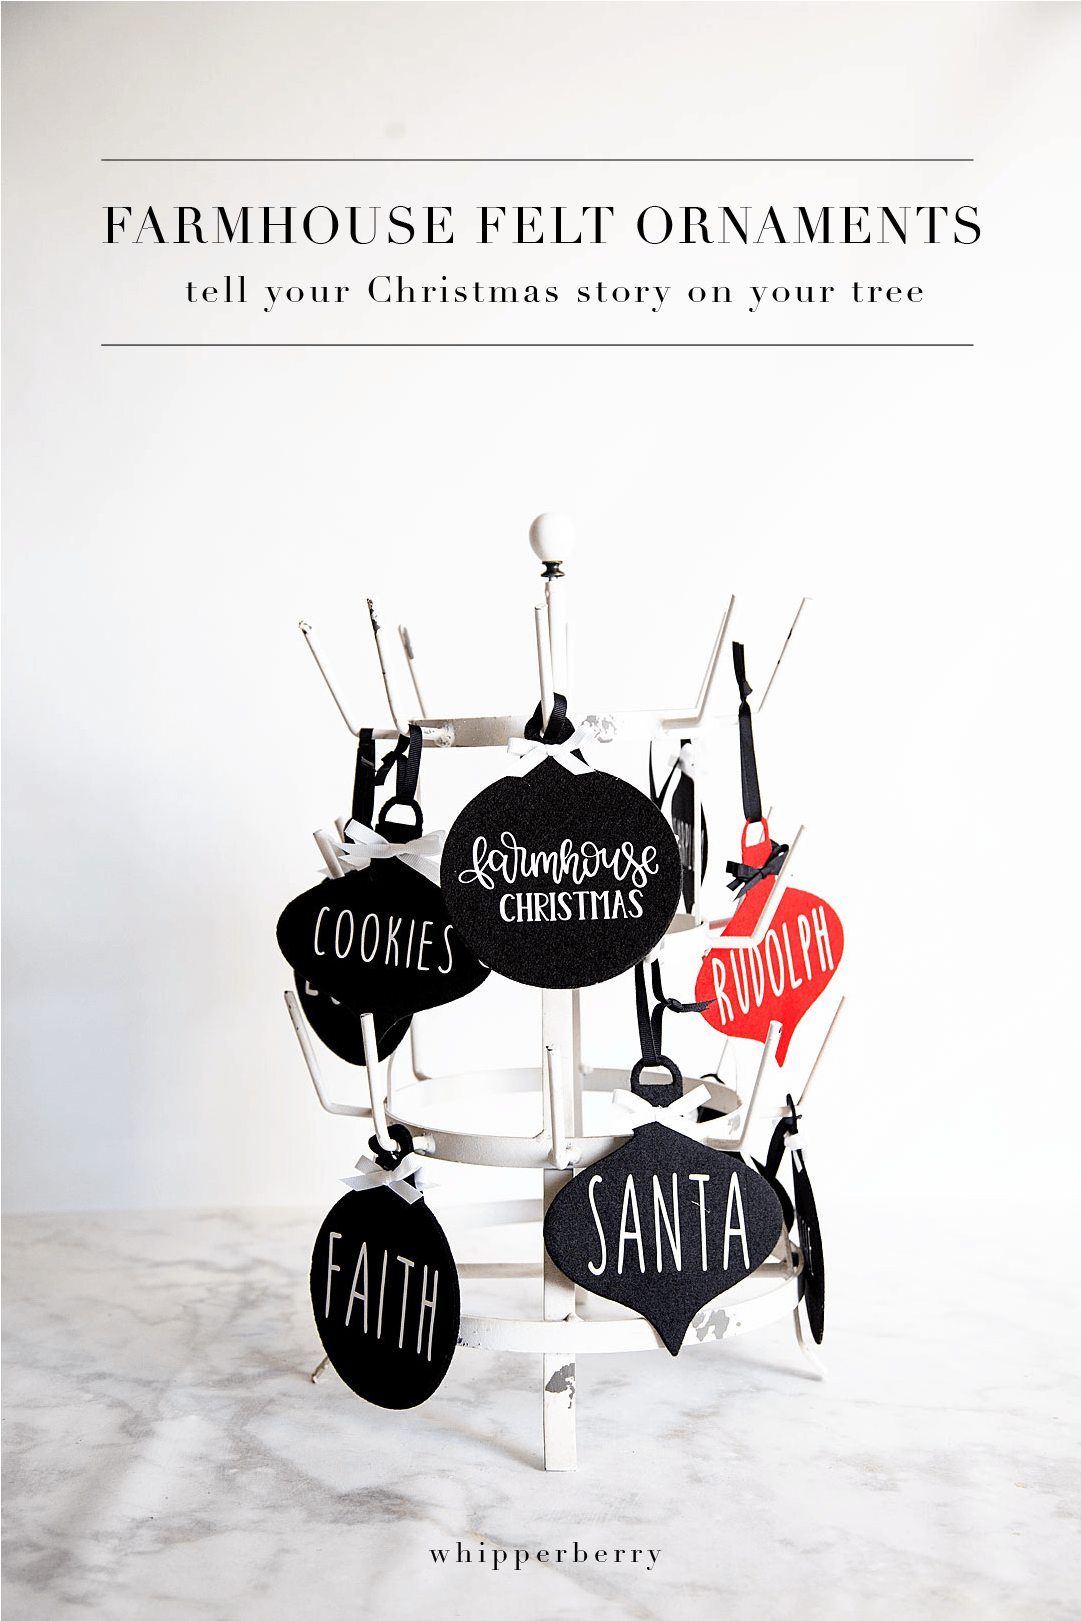
What I love about these ornaments is that you can tell your Christmas story right on your tree with these simple word ornaments. If you love Santa and would like to have a tree dedicated to words that evoke fond memories of all things Santa, you can create that!

Farmhouse felt Christmas ornaments are sure to be a classic staple for years to come as you decorate for the holidays, plus they are super easy to store and won't break! I love it!! Here's how you can make a set of your own.

If you would like to tell the story about the birth of our Savior, Jesus Christ you can do that as well. I know that each family is different but that’s what’s beautiful about these simple ornaments. You create your own story.

Farmhouse felt Christmas ornaments are sure to be a classic staple for years to come as you decorate for the holidays, plus they are super easy to store and won't break! I love it!! Here's how you can make a set of your own.

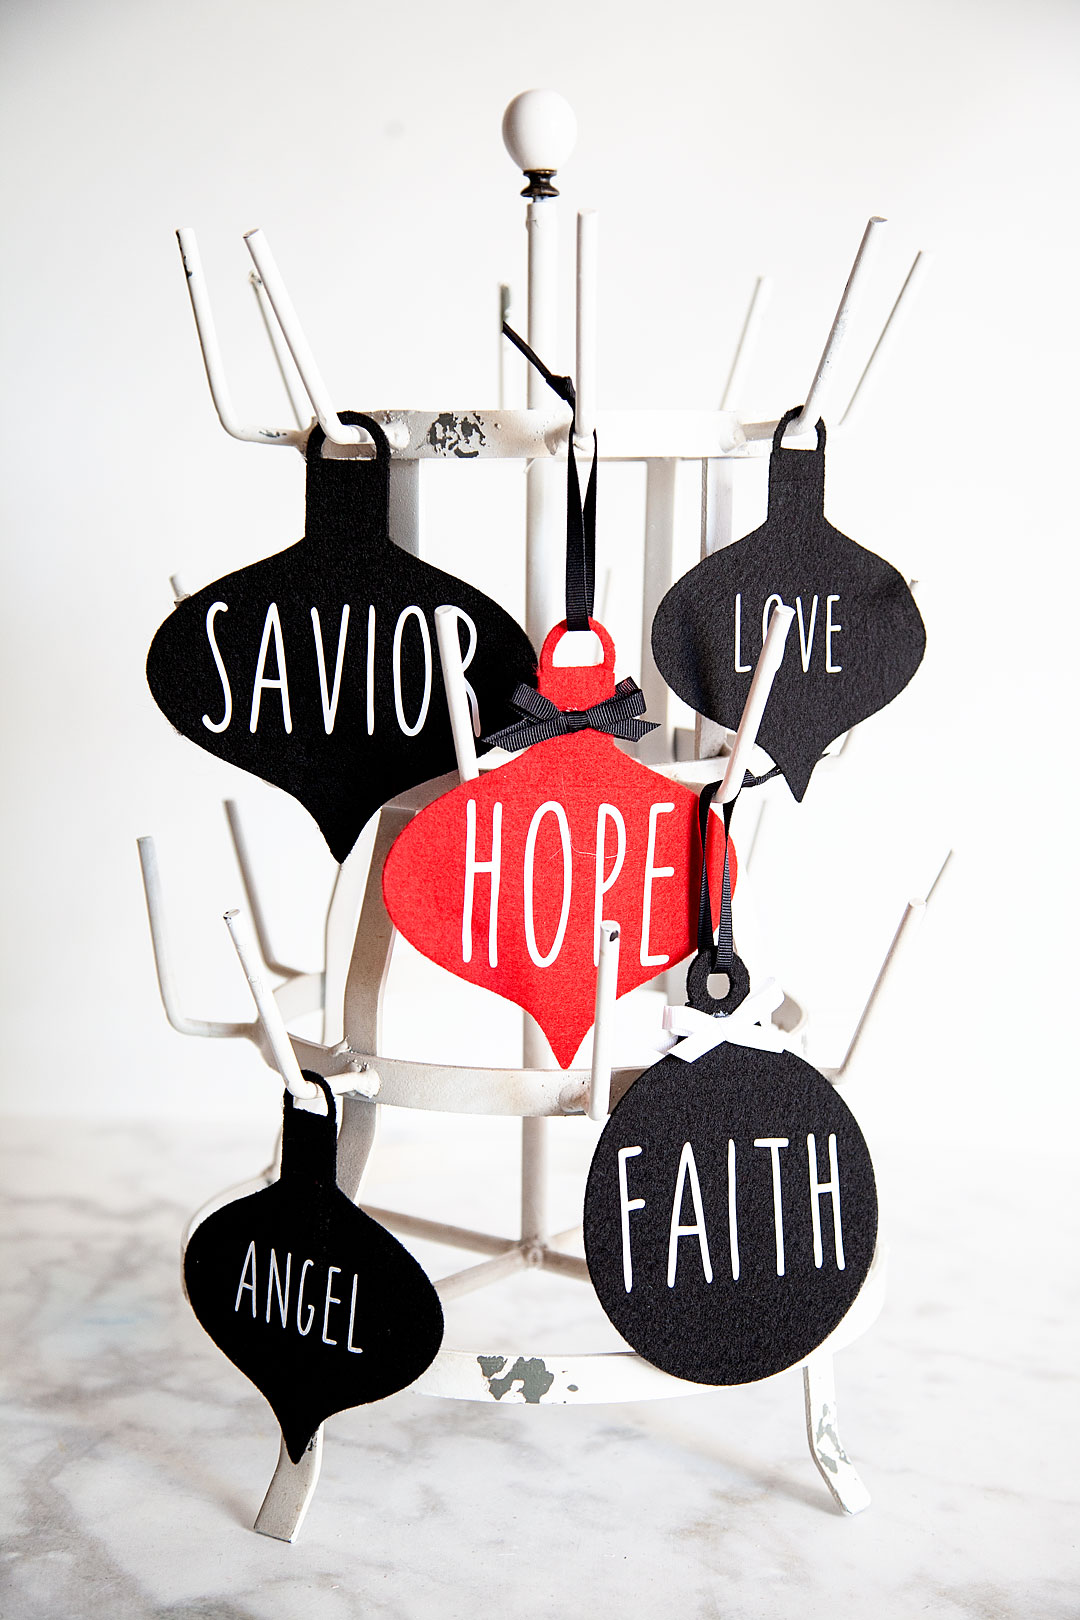
Not to mention the fact that YOU can select the colors. If you are like me and would like to stick with black & white, great. If you want to have a rainbow tree, awesome! It’s all up to you and I LOVE that. Here, let me show you what you need and how to make these simple but elegant ornaments for your tree.

Farmhouse Felt Christmas Ornaments Supplies

Farmhouse felt Christmas ornaments are sure to be a classic staple for years to come as you decorate for the holidays, plus they are super easy to store and won't break! I love it!! Here's how you can make a set of your own.

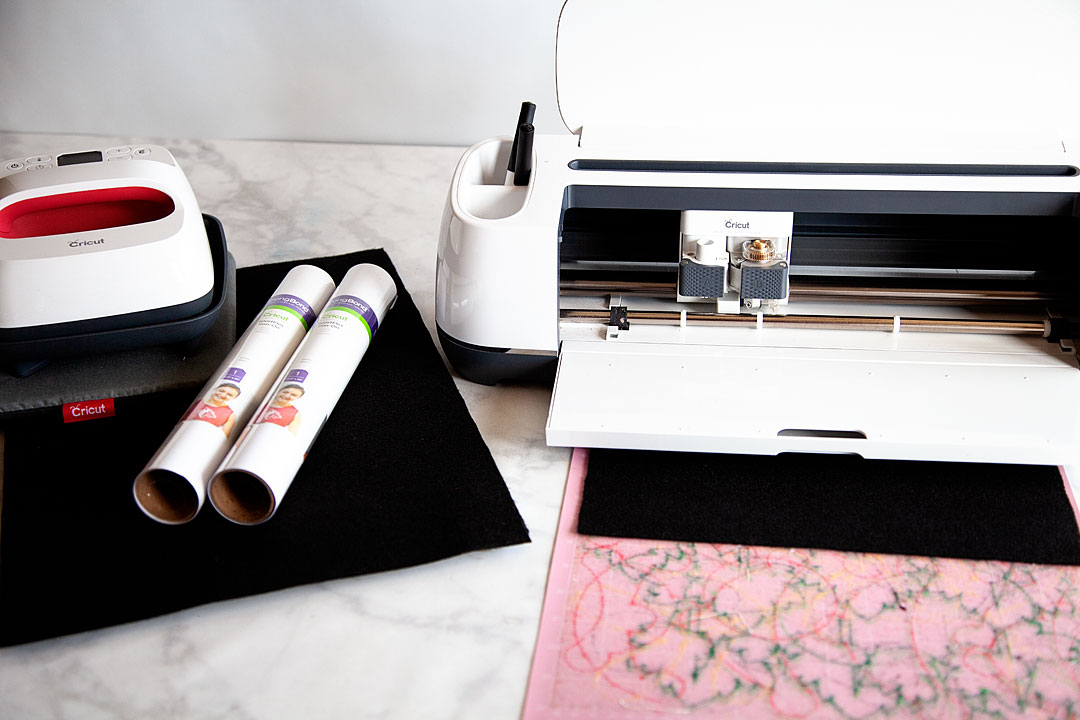
  • Cricut Maker with Rotary Blade
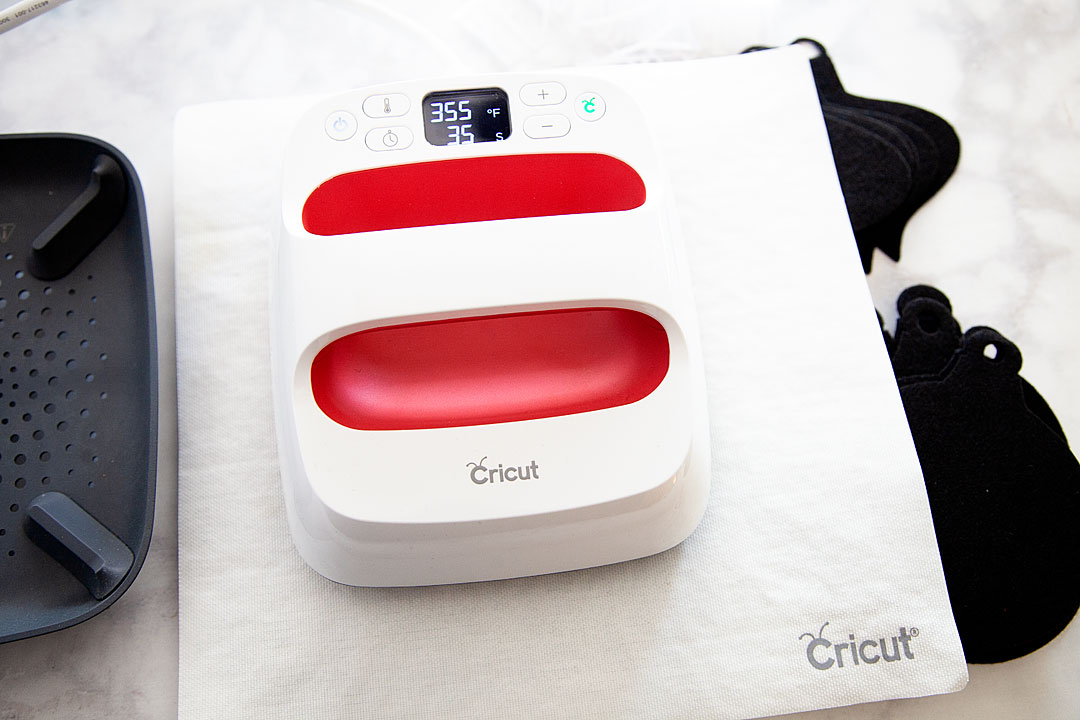
  • Cricut EasyPress 2  –  6×7 
  • Cricut EasyPress Mat – small
  • Cricut Protective Mat
  • Cricut Fabric Cutting Mat
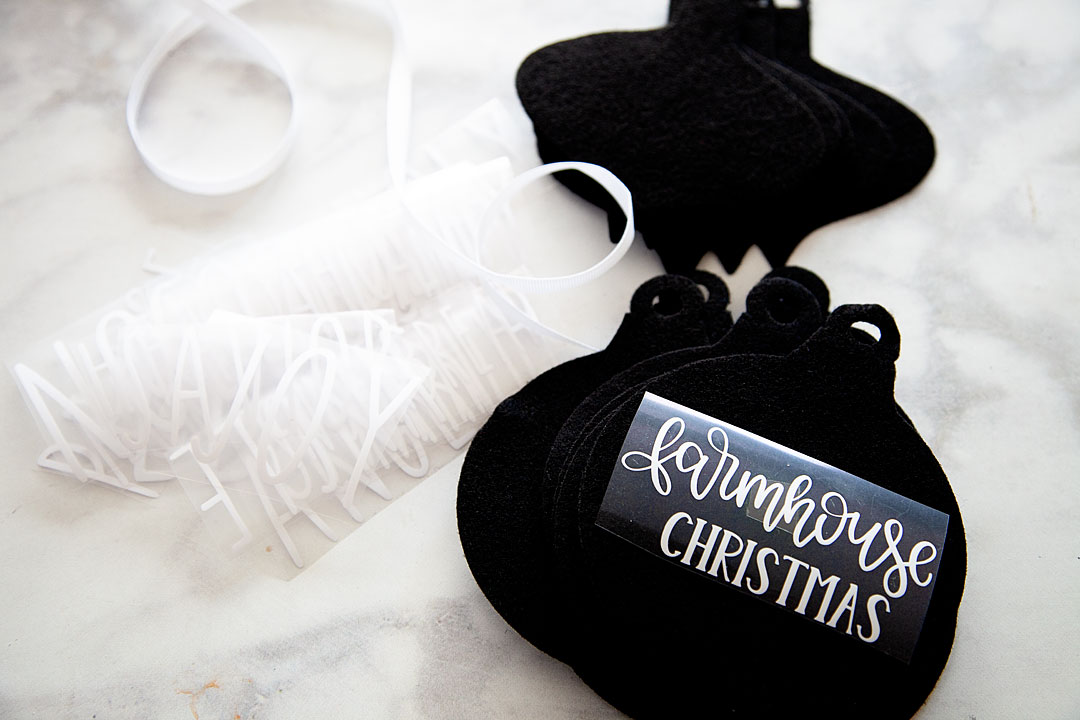
  • Cricut Everyday Iron-on – white
  • Felt
  • ribbon
  • scissors
  • hot glue gun
  • hot glue

Instructions

First, what you’ll need to do is to click on this LINK to my project in Cricut Design Space.  My design will let you add your own words and customize it how you would like OR, open Design Space and create some ornament designs of your own.

Farmhouse felt Christmas ornaments are sure to be a classic staple for years to come as you decorate for the holidays, plus they are super easy to store and won't break! I love it!! Here's how you can make a set of your own.

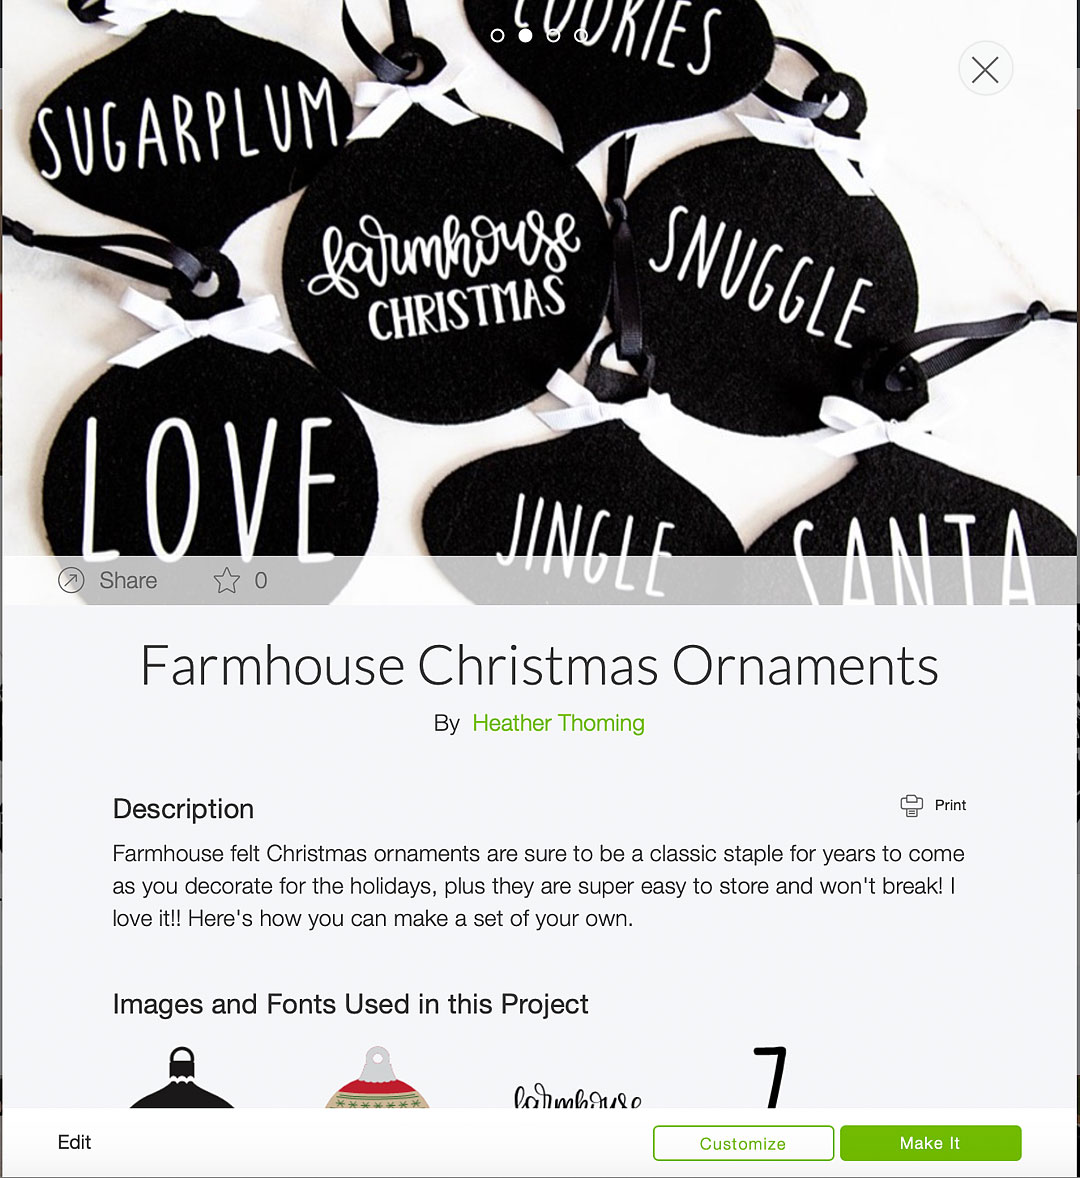
Now, if you are using my design, everything is sized and ready to go for you. If you are creating some ornaments of your own design, double check the sizes and make sure everything is prepped and ready to cut. If you don’t know how to do that you can visit this post that has a full video tutorial on how to prep your design for cutting in design space.

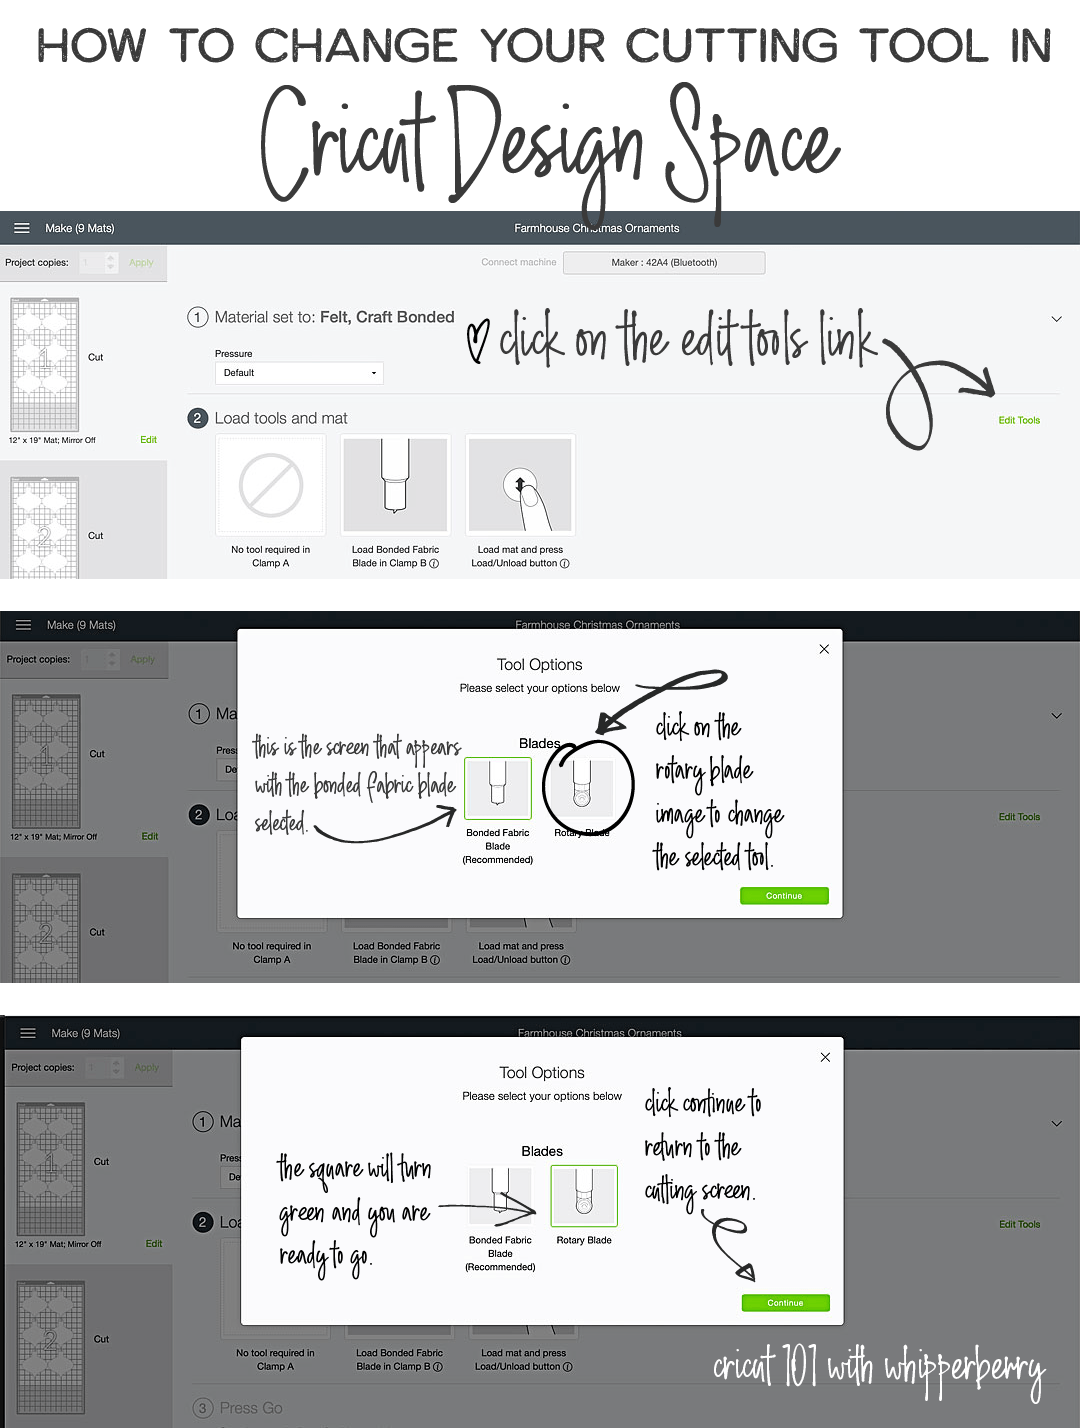
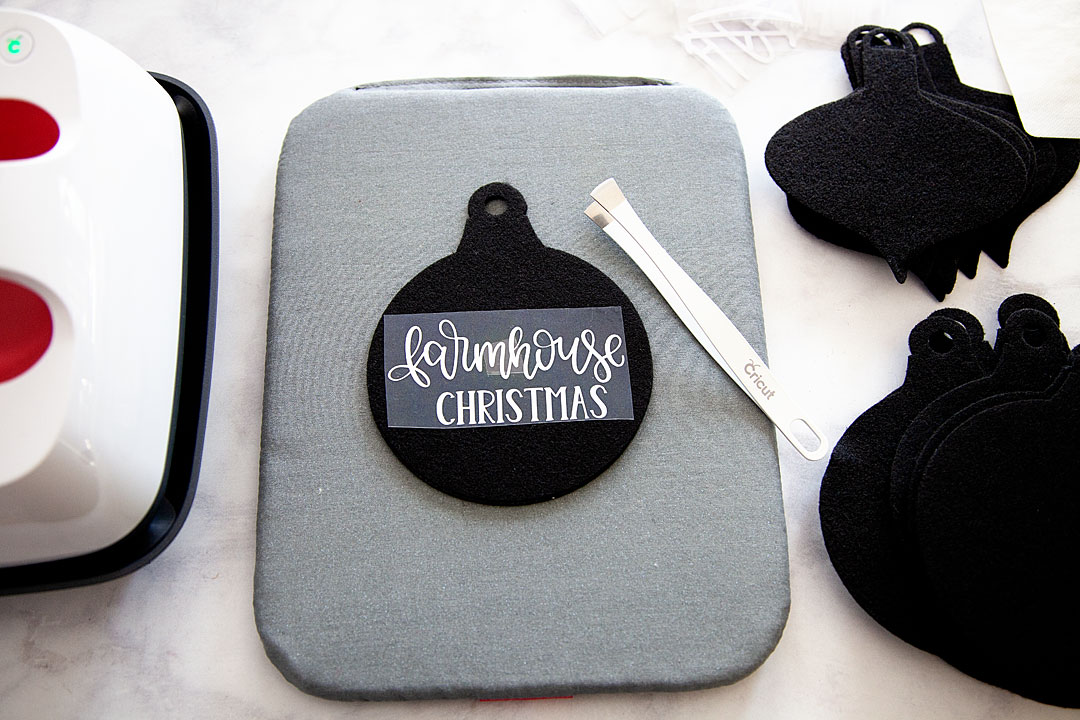
Once you are ready to cut, all you need to do is load your felt onto your Fabric cutting mat and follow the directions on the Design Space screen.

Now for cutting the felt, I have been more successful using the rotary blade than the deep cut blade so, you’ll have to manually change that when you’re ready to cut.

How to change the cutting tool in Cricut Design Space • Cricut 101 with WhipperBerry

Here are a couple of VERY IMPORTANT RULES…

  • When cutting felt on the Fabric Cutting Mat, DON’T worry about the fuzz that is left behind. I have been cutting all kinds of felt on just one cutting mat with fuzz and all and it’s not a problem. The more you play around with the cutting mat and try to scrape or wash that felt fuzz off, the more you are damaging your mat. Just keep going and ignore the fuzz. Of course, test to make sure that your felt is secure on the mat. It will after quite a few cuts become difficult to use and at that point, it’s a better idea to dispose of that mat and start using another one.
  • DON’T FORGET TO MIRROR YOUR IMAGES! I’ve done it more than I would like to admit which drives me CRAZY! When you are cutting your designs when using the iron-on vinyl, make sure to mirror your images. Remember, the design is cut on the back side of the Everyday Iron-On. You will flip it over and iron on your design onto the surface of your project.

Farmhouse felt Christmas ornaments are sure to be a classic staple for years to come as you decorate for the holidays, plus they are super easy to store and won't break! I love it!! Here's how you can make a set of your own.

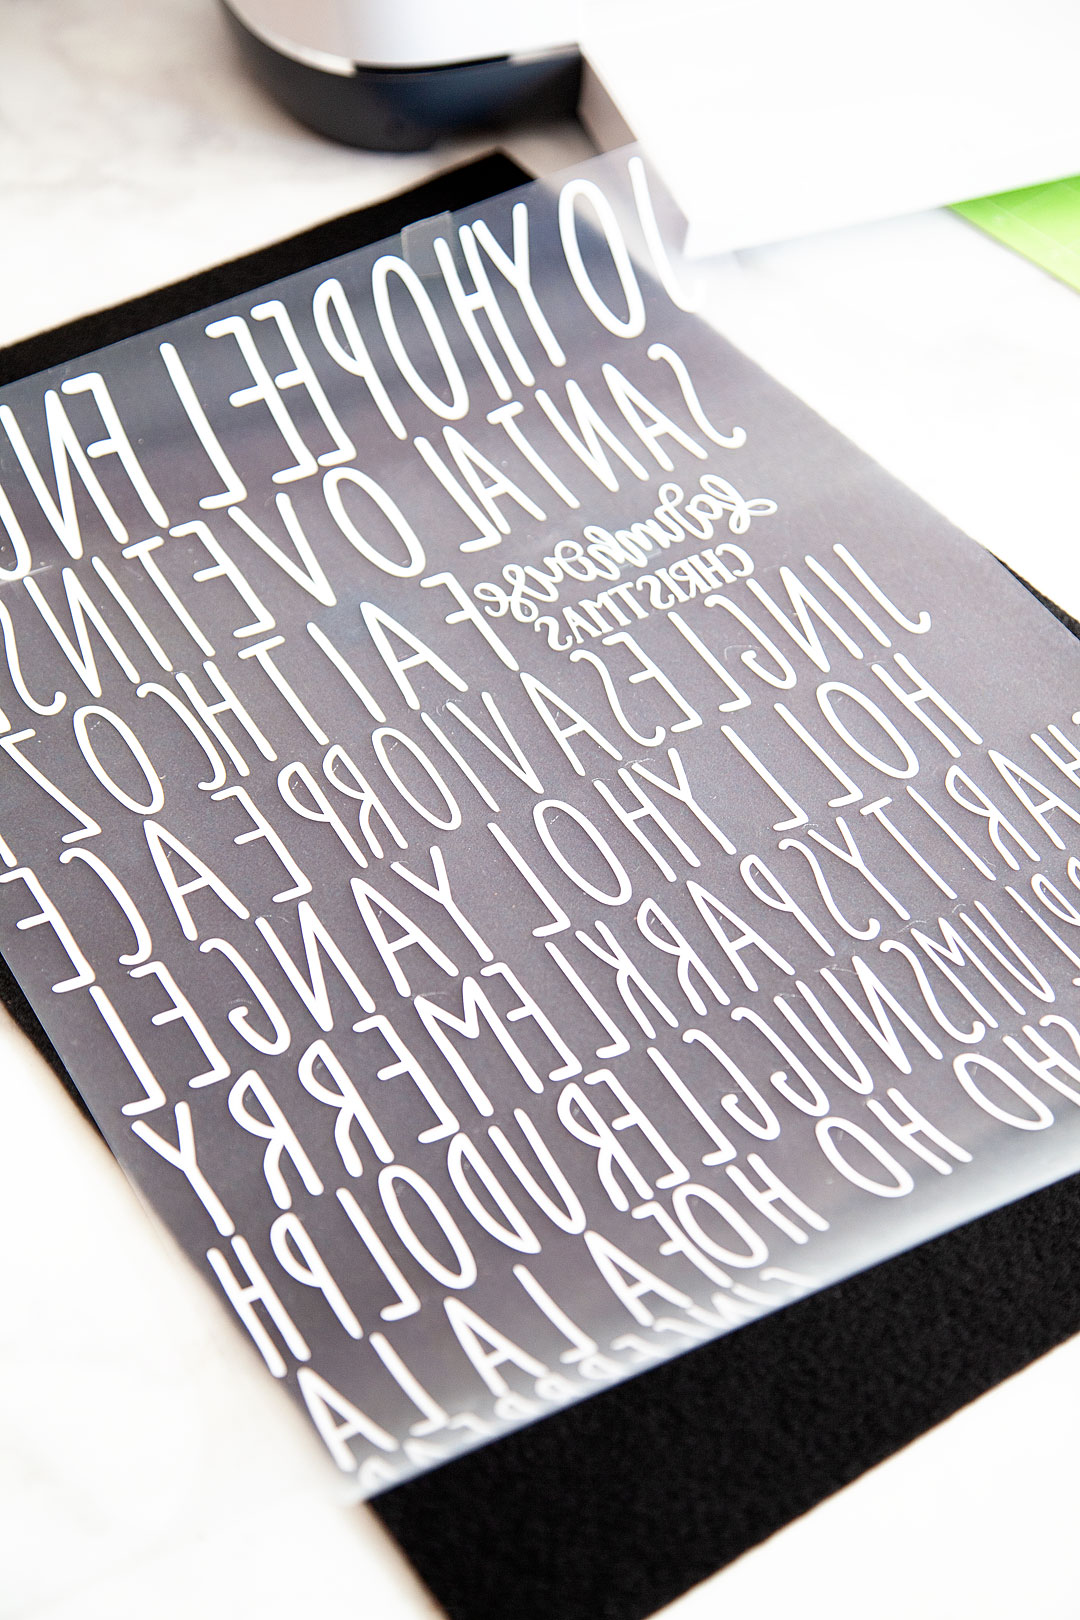
It looks like a crazy bunch of backward letters but, flip it over and cut out your words and it looks just fine.

Farmhouse felt Christmas ornaments are sure to be a classic staple for years to come as you decorate for the holidays, plus they are super easy to store and won't break! I love it!! Here's how you can make a set of your own.

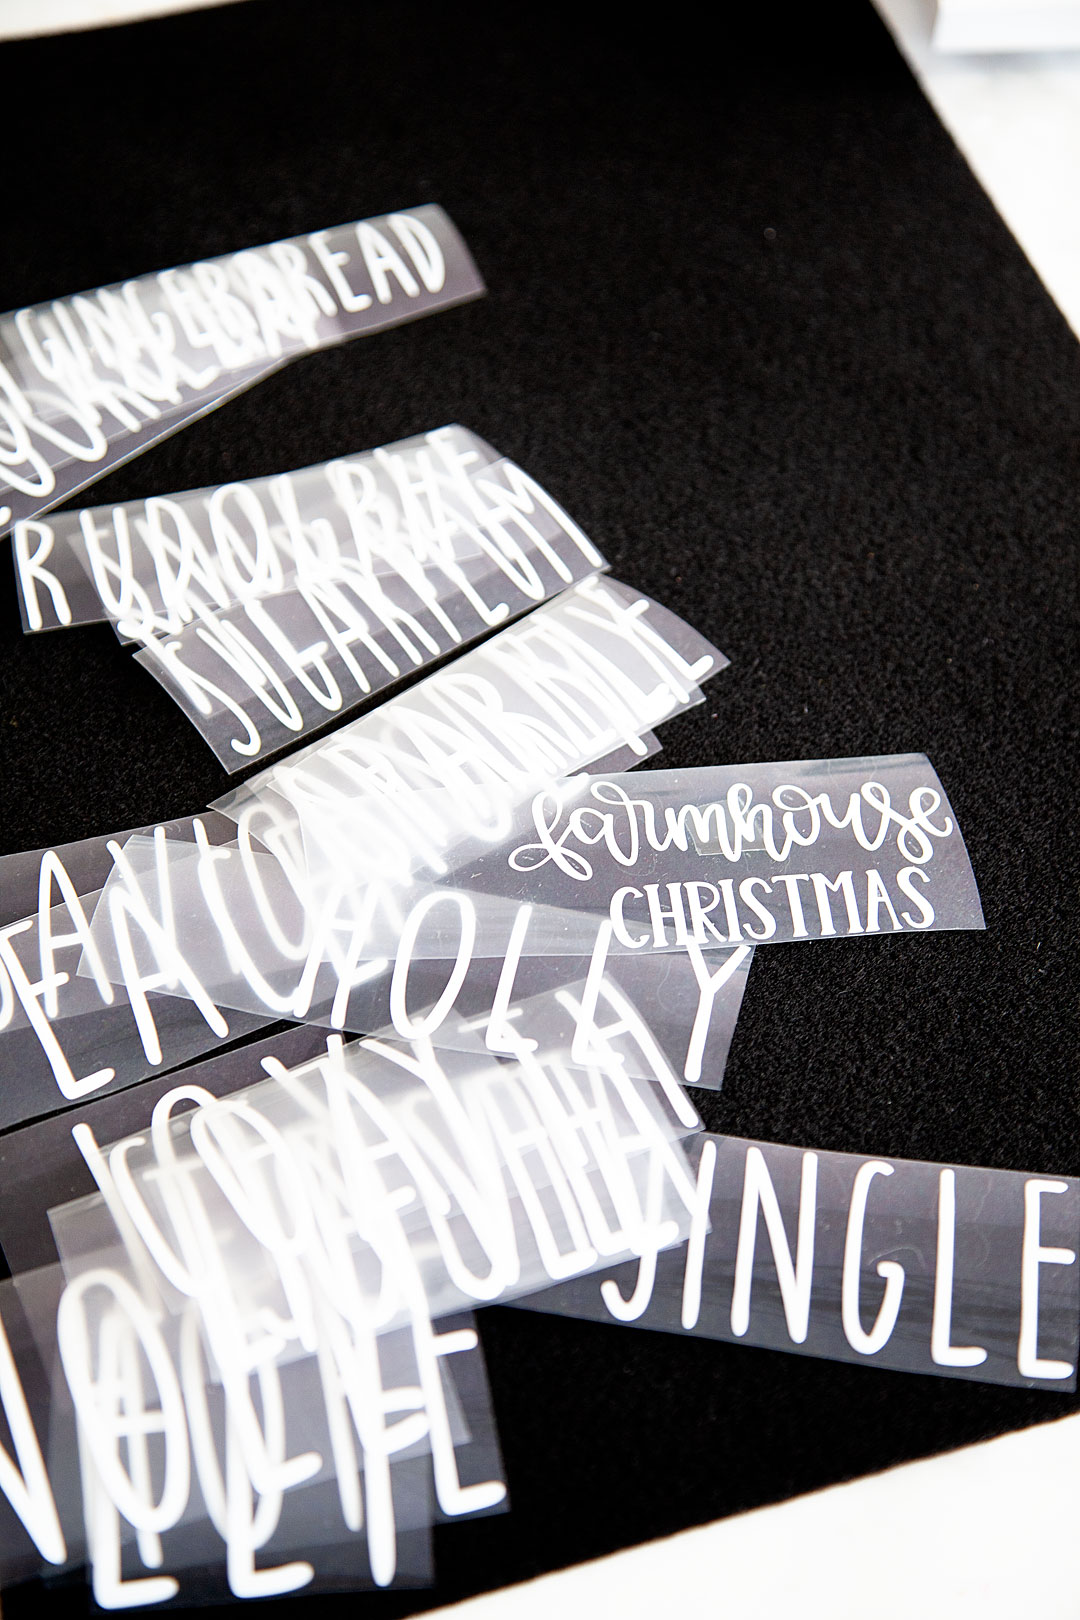
Now that your words are all cut along with your felt ornaments now, it’s time to press the EveryDay Iron-on onto the felt.

Farmhouse felt Christmas ornaments are sure to be a classic staple for years to come as you decorate for the holidays, plus they are super easy to store and won't break! I love it!! Here's how you can make a set of your own.

HANDS-DOWN the best tool to press any type of iron-on material is any of the Cricut EasyPress tools. I love these gems and don’t know what I would do without them in my crafting arsenal. The EasyPress and the EasyPress 2 machines are far superior to a regular iron. If you love to create anything with an iron-on element you need to invest in one or more of these great machines. The heat plate holds a consistent temperature all throughout the plate. With irons, you will have hot and cool spots. Also, the EasyPress 2 heats up super quick! I LOVE all three of the EasyPress 2 sizes. For this project, I’m using the small 6×7 size. CUTEST LITTLE EASYPRESS EVER!!

Farmhouse felt Christmas ornaments are sure to be a classic staple for years to come as you decorate for the holidays, plus they are super easy to store and won't break! I love it!! Here's how you can make a set of your own.

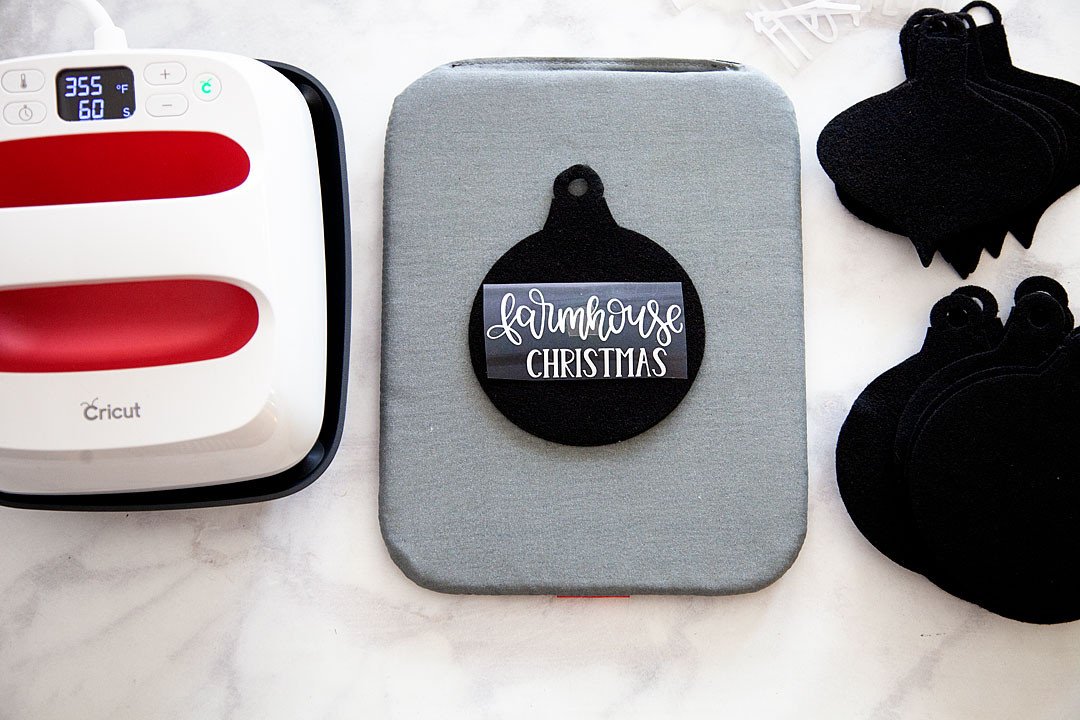
Now, all you need to do is to lay your felt down on your EasyPress Mat, place your words on the felt in the proper place, cover your ornament with the Cricut Protective Mat or a cotton tea towel and press with the small Easypress 2 set to 35o˚ for 60 seconds.

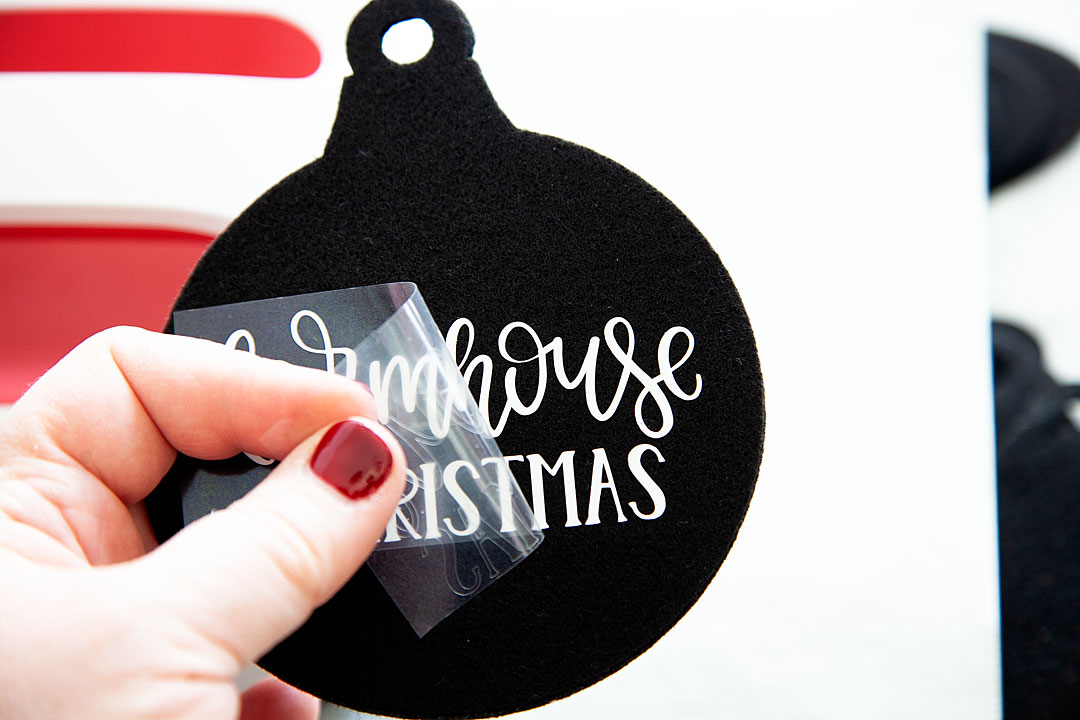
I use the remover tool to save my heat sensitive fingers from the Easy Press Mat and let it cool for about 1 minute.

Then I carefully pull the protective sheet from the top of the Everyday Iron-on material. Always start slow and pull carefully. If you see any lifting, stop and give it another run under the EasyPress 2.

Now, all you need to do is add some ribbon bows if you’d like and some ribbon for the ornament to hang from.


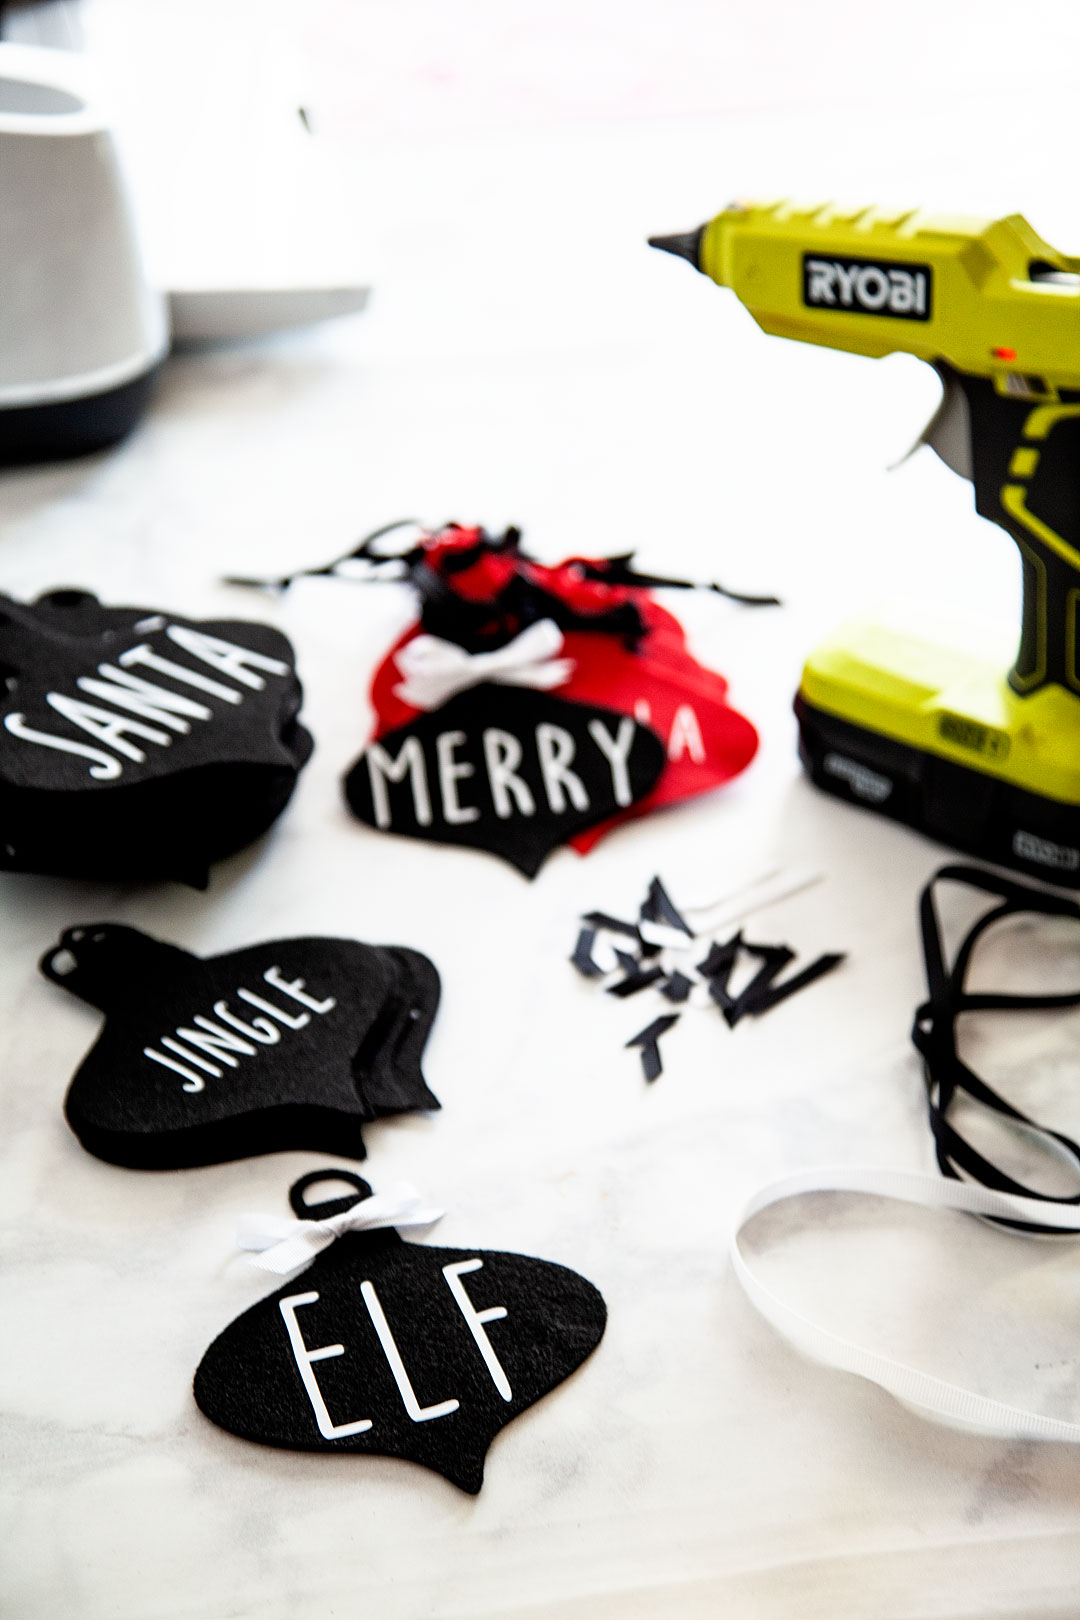
And, that’s it! You have some great non-breakable ornaments for your tree or to use as gift tags or even for a simple gift for neighbors!

Farmhouse felt Christmas ornaments are sure to be a classic staple for years to come as you decorate for the holidays, plus they are super easy to store and won't break! I love it!! Here's how you can make a set of your own.

Farmhouse felt Christmas ornaments are sure to be a classic staple for years to come as you decorate for the holidays, plus they are super easy to store and won't break! I love it!! Here's how you can make a set of your own.

This is a sponsored conversation written by me on behalf of Cricut. The opinions and text are all mine.

Macrame Autumn Door Hanging

7 · Sep 17, 2018 · Leave a Comment

We’ve kind of fallen in love with the macrame trend at our house lately. We made a HUGE macrame celebration arch for my daughter Haley’s wedding a few weeks ago and I then felt inspired to make a macrame Autumn door hanging for my front entry for the impending season change. Oh, Autumn… You truly are my favorite!!

• This post is brought to you by Michaels Craft Stores •

We've kind of fallen in love with the macrame trend at our house lately. We made a HUGE macrame celebration arch for my daughter Haley's wedding a few weeks ago and I then felt inspired to make a macrame Autumn door hanging for my front entry for the impending season change. Oh, Autumn... You truly are my favorite!!

I’m going to date myself here, I’m not old enough to remember the first macrame trend in the 1970’s. However, I do remember the aftermath of that trend. Garage sales full of macrame goods looking desperately for a new home. Needless to say, when the Boho trend started a new a few years ago, I kind of chuckled a bit when macrame returned in fashion. Then my little side chuckles disappeared and I kind of fell in love with the look. Like fell hard… I want to macrame all the things now. My Macrame pinboard has gone nuts with all of the fun macrame projects I would like to tackle.

Macrame Autumn Door Hanging Supplies

Of course, when it came time to stock up on supplies I ran to Michaels my go-to supply store. They have everything you need to make all things macrame, fall decor & blank surfaces for signs. I especially love that you can order online and pick-up easily at the store. I save so much time just placing my order online and then my husband or daughter can run over and grab my supplies when they are out and about. We no longer have frustrating phone calls with my husband trying to find something at Michaels only to have him come home with the wrong item or not enough for what I need. I have the isles memorized but he sure doesn’t! It’s also nice to tack a pick-up to another errand without having to spend too much time walking through the store. Yep, I’m a big fan!

  • Cotton Rope
  • a branch from your yard or, wood dowel
  • square 9×9 galvanized metal sign
  • 1-2 Fall floral picks
  • scissors
  • wire cutters
  • hot glue gun and hot glue
  • Cricut Premium Vinyl
  • Cricut cutting machine

Instructions

For this project, I’m not going to share a tutorial for the macrame. Now don’t worry, I have you covered. I’m going to send you over to A Beautiful Mess to share the tutorial that I used to learn how to macrame. Seems only fair, right?

My neighbors were trimming their trees and I found a fun branch that would be perfect for a macrame door hanging and asked if I could snag it. I scaled down the macrame project from the curtain with 15 sections to 5 sections and set to work.

We've kind of fallen in love with the macrame trend at our house lately. We made a HUGE macrame celebration arch for my daughter Haley's wedding a few weeks ago and I then felt inspired to make a macrame Autumn door hanging for my front entry for the impending season change. Oh, Autumn... You truly are my favorite!!

Next, I cut the vinyl for the sign part of the door hanging with my Cricut Maker. You can even use my design if you’d like in Cricut Design Space. I then affixed the vinyl to the galvanized metal sign base.

I originally started with white vinyl and it didn’t stand out as I had hoped on the galvanized metal. So, I switched to some black vinyl to go with my door. You may want to try a different color that fits the color of your entryway.

Then I used my wire cutters and cut sections of the Fall floral picks of the pick and hot glued them onto the galvanized metal. Then I hot glued the metal sign onto the macrame and that was it. I had a perfect door hanger to use in Autumn.

For more Fall inspiration, visit Michaels. They have all kinds of fabulous Fall finds!

Soda Shop Wood Sign • The BEST 10 Tips for Working with the Cricut Knife Blade

39 · Jun 21, 2018 · 3 Comments

This my friends is one of the most exciting days of my crafting life! I have cut WOOD with my Cricut Maker using their new Cricut Knife Blade. All be it, thin wood but, it’s wood! My daughter Hannah graduated from High School and we made a simple soda bar for one of the elements of her Grad Party. Of course, our soda bar needed a soda shop sign and I thought it would be fun to create a retro style sign out of wood. Here’s how it turned out PLUS, the best 10 tips for working with the Cricut Knife Blade.

+ This post brought to you by the folks at Cricut +Come learn how to make this retro style soda shop sign made out of wood using the @cricut knife blade • whipperberry

When Hannah and I started working on her grad party one of the things she really wanted to have was a mini “soda shop.

Nothing too crazy or too expensive but, cute. I thought it would be fun to test out the Cricut Knife Blade and make a large scale sign out of Birchwood. Now Birch isn’t one of the officially approved woods that can be used with the Cricut Maker. However, I thought I would give it a go and see how it turned out.  It turned out beautiful! It took a little time so, I wouldn’t take on a project of this nature if you were in a hurry. Here is a quick little video along with my best 10 tips for working with the Cricut Knife Blade…

The Soda Shop Sign Design

The inspiration for the design was classic retro style soda shop signs. Hannah is a bit of a retro type girl herself so I thought this was fitting. I found a retro looking soda bottle design in Cricut Design Space and thought it would be perfect to use as the base for my project.

Come learn how to make this retro style soda shop sign made out of wood using the @cricut knife blade • whipperberry

I used some of the elements of this design and then made a few tweaks here and there and this is what I eventually came up with…

Come learn how to make this retro style soda shop sign made out of wood using the @cricut knife blade • whipperberry

That’s what’s so cool about Cricut Design Space, you can play around with almost anything and make it your own. Do feel like you are stuck with whatever they have. Be creative and learn how to use the tools that Cricut provides for you to make your own style.

For this sign, I wanted it to be a rather large scale and knowing that with my Cricut Maker, I’m limited to 12 x24 inches I did a little creative troubleshooting. I used the slice tool to slice up my sign so that I could make it as big as I wanted it to be.

Come learn how to make this retro style soda shop sign made out of wood using the @cricut knife blade • whipperberry

I sized the sign to the desired size and then broke it down into thirds by creatively using the square tool along with the Slice Tool. With that, each section of the yellow part of the sign would fit on a 12 x 24 cutting mat and would allow for a much larger sign. Here is how I did that.

How to Create Sections Using the Slice Tool in Cricut Design Space

Cutting the Wood Sign on the Cricut Maker

Like I alluded to in the tips video, working with the knife blade takes more time and patience. However, it is soooo fun to work with (if you know how to use it right) so, don’t let that discourage you from using it. It is WELL WORTH IT!

I did have some frustration when making my sign at times because it wasn’t cutting through my wood at the beginning. After a little grumbling, I figured out that you really do need to calibrate your machine EACH TIME you start a cut with the knife blade. I cut the first section with the basic settings for Basswood and then had to hit the continue cut several more times to get it fully through the Birchwood. You just check each time the Maker finishes a pass (DO NOT REMOVE THE MAT FROM THE MAKER), lift up on the wood to see if it has completely cut through the wood. If it hasn’t, press the cut button and it will take another pass at the design, each time adding more pressure to go deeper through your material. Therefore, you need to keep an eye on things so that you don’t accidentally cut through your mat.

Make sure you watch my 10 tips video above for the rest of my tips for working with the knife blade. They’re pretty handy! You may also want to visit the Cricut blog to learn even more great tips for working with the new Cricut Knife Blade.

Painting and Hanging The Soda Shop Sign

Once the sign was cut, it was time to paint it and get it all dolled up for the party. I wanted to make sure that the wood grain could still be seen through the paint so, I created a wash with some DecoArt Americana Acrylics. All you have to do is add a little water to the paint to create a color wash. You may want to have a rag on hand to wipe off the color wash, almost like you are staining the wood instead of painting it. With this technique, the sign will dry pretty fast and be ready to hang soon after painting.

Come learn how to make this retro style soda shop sign made out of wood using the @cricut knife blade • whipperberry

Hanging the Sign

I wanted the sign to have a bit of a 3D effect and not lay flat on the wall. Typically I use Command Strips but they get pretty pricey so, I opted for some removable mounting putty from 3M to mount the sign on the wall. I could use the putty to create the 3D effects by using more putty to build up the layers. It worked like a charm!

Come learn how to make this retro style soda shop sign made out of wood using the @cricut knife blade • whipperberry

One word of advice… If you have small little pieces of a wood sign, like the center of an “O” for example. Use some painters tape to tape them to the back of the sign so that you don’t lose them in transit. Becuase, that would be a crying shame!

The party turned out great. We had a ball celebrating Hannah and all of her accomplishments. Mom brag time, she graduated a year early! Yea, high school in 3 years! Nice job Hannah.

I’m holding onto the sign to use for her sister Haley’s wedding coming up in September. It just so happens that she is going to have a soda bar as well! Stay tuned… I’m going to have all kinds of Cricut projects coming up this summer for the wedding. You won’t want to miss out!

What do you want to make with a Cricut Maker and the new Cricut knife blade?


SaveSave

SaveSave

SaveSave

SaveSave

SaveSave

SaveSave

SaveSave

SaveSave

SaveSave

This is a sponsored conversation written by me on behalf of Cricut. The opinions and text are all mine.

SaveSave

SaveSave

America The Beautiful Porch Sign

9 · Jun 8, 2018 · 3 Comments

Dressing-up the front porch at my house has become one of my favorite things to do each season. Summer is always my time to show a little love for the good ol’e USA. I host a huge 4th of July party each year and I always try to dress things up extra special for that event. This year I created a new America The Beautiful porch sign to the mix and I jazzed it up with some great stars from Michaels!

+ This post is brought to you by the fine folks at Michaels +Patriotic front porch design for the 4th of July • Let's Flamingle Sign • Sign Making 101 • WhipperBerry

Shopping at Michaels Online

Michaels has all your red, white & blue needs this summer! And it’s now easier than ever to get all your supplies with Michael’s new buy online and pick up in store feature! Simply place your order online, select your store and your items will be ready and waiting for you there! I saved a ton of time by shopping online and then running in to my local michaels store to pick-up my order. I’m LOVING this option. No more wandering the isles with kiddos in tow. I can virtually wander the isles with my kiddos happy at home. So much less stress. Then I run in and grab my order when it’s ready… Super Slick! Have you tried this out at Michaels yet?

Supplies for the America the Beautiful Porch Sign Look

Here is what I ordered for this fun patriotic look…

  • Red Stars
  • Blue Stars
  • White Stars
  • Red Star Pillow
  • Blue Star Pillow
  • 24×48 canvas
  • red spray paint
  • 3M Command Strips
  • Cricut SportFlex – Midnight Blue • This one I did have to order online via Michaels
  • Cricut Iron-On Glitter – Red
  • Cricut Foil Iron-On – Gold
  • Cricut Easy Press or personal iron
  • Cricut Design Space File
  • Let’s Flamingal Sign

How to Put This Look Together

America the Beautiful Porch Sign • WhipperBerry

Now, this look has several different elements. We have the sign and the stars on the garden wall. This was using my new tried and tested method of using the Cricut Maker to cut Iron-On Vinyl and then affixing it to a canvas using the Cricut Easy Press. This is my new favorite sign making technique. You can learn how to do everything from start-to-finish in my Sign Making 101 post.

Then all you need to do is visit Cricut Design Space with the link above in the supply list and you’ll have access to my cut files that you can re-size to your desired sign size then, cut on your Cricut Machine for your sign.

America the Beautiful Porch Sign • WhipperBerry

Once your sign is finished then it’s time to hang everything. I’ve found that the 3M Strips are BRILLIANT even on outdoor walls.

Patriotic front porch design for the 4th of July • Let's Flamingle Sign • Sign Making 101 • WhipperBerry

I hand new signs each season on my brick wall with my Command Strips. They have withstood strong winter storms without a problem at all and, let me tell you… Nebraska is no joke when it comes to strong winds and crazy storms. I have yet to have a sign fall using my Command Strips on Brick.

Hygge Canvas Sign • Sign Making 101 • WhipperBerry

I used the Command Strips to hang the large 24×48 America The Beautiful porch sign on the garden wall. With the size of the sign, I did need to use a fair number of the Command Strips to make sure the sign was secure. Then I used the command strips to hang the stars as well.

America the Beautiful Porch Sign • WhipperBerry

I kind of have a love affair with Command Strips if you can’t tell! Patriotic front porch design for the 4th of July • Let's Flamingle Sign • Sign Making 101 • WhipperBerry

I also hung one of the stars on the front door to tie the two areas together and added the great star pillows from Michaels on my old chair. Add a few plants and the look is complete. It’s perfect for your 4th of July gatherings for sure!

What are you going to order from Michaels and pick-up at your local store this week? They have some amazing sales going on right now!!


SaveSave

SaveSave

SaveSave

SaveSave

SaveSave

SaveSave

  • « Go to Previous Page
  • Page 1
  • Page 2
  • Page 3
  • Page 4
  • Interim pages omitted …
  • Page 7
  • Go to Next Page »

Primary Sidebar

Heather from Whipperberry
Hello... my name is Heather and I'm the creator of WhipperBerry a creative lifestyle blog packed full of great recipes and creative ideas for your home and family. I find I am happiest when I'm living a creative life and I love to share what I've been up to along the way... Come explore, my hope is that you'll leave inspired!

Footer

  • Privacy Policy
  • Crafts
  • Food
  • Gifts
  • Holidays
  • Home
  • Mom Life
  • Recipes
  • Travel

Copyright © 2026 · Seasoned Pro