• Skip to primary navigation
  • Skip to main content
  • Skip to primary sidebar
  • Skip to footer

Whipperberry

WhipperBerry • Your Home For Creative Inspiration

  • Home
  • Recipes
    • Starters
    • Easy Weeknight Dinners
    • Main Dish
    • Salads
    • Side Dish
    • Soups & Stews
    • Desserts
    • Breakfast
    • Miscellaneous
  • Tutorials
    • Creative Crafts
    • DIY Decor
    • Fabric Crafts
    • Food How-To
    • Jewlery
    • Paint Projects
    • Paper Art
    • Party Styling
    • Photography and Graphic Design
    • Silhouette
  • Holidays
    • Easter
    • Mother’s Day
    • Father’s Day
    • 4th of July
    • Halloween
    • Thanksgiving
    • Christmas
    • Valentine’s Day
  • Gift Ideas
    • Gifts For Everyone
    • Gifts for Dad
    • Mother’s day
    • For The Girls
    • For The Kids
    • Teacher Gift Ideas
    • Christmas
  • Printables
    • Holiday
    • Gift Idea
    • LDS Primary
  • Travel
  • About
    • Terms
  • Contact
  • Nav Social Menu

    • Facebook
    • Instagram
    • Pinterest
    • RSS
    • Twitter

Michaels Maker

Boho Spring Wreath • Say Hello with Style

6 · Apr 26, 2018 · Leave a Comment

I have always been a wreath girl at heart. After years of watching Martha Stewart on her old shows in the 1990’s (the best ones, if you ask me) I have always wanted to push myself to either find or create the best wreaths for my front door. For me, it’s a must… You MUST always greet every visitor at your door with a cheerful hello in the form of a beautiful wreath. With the beginning of the new season, I thought a DIY Boho Spring Wreath was definitely in order. Come learn how to make one of your own!

+ This Boho Spring Wreath post brought to you by the folks at Michaels +

Boho Spring Wreath created with greenery from Michaels and created by WhipperBerry

What is a Boho Spring Wreath

Spring is all about new beginnings. After the hustle and bustle of the holidays and getting gifts for everyone else, it’s time to treat yourself (and your space!) With bright florals and fresh projects, Michaels helps you MAKE all things spring!

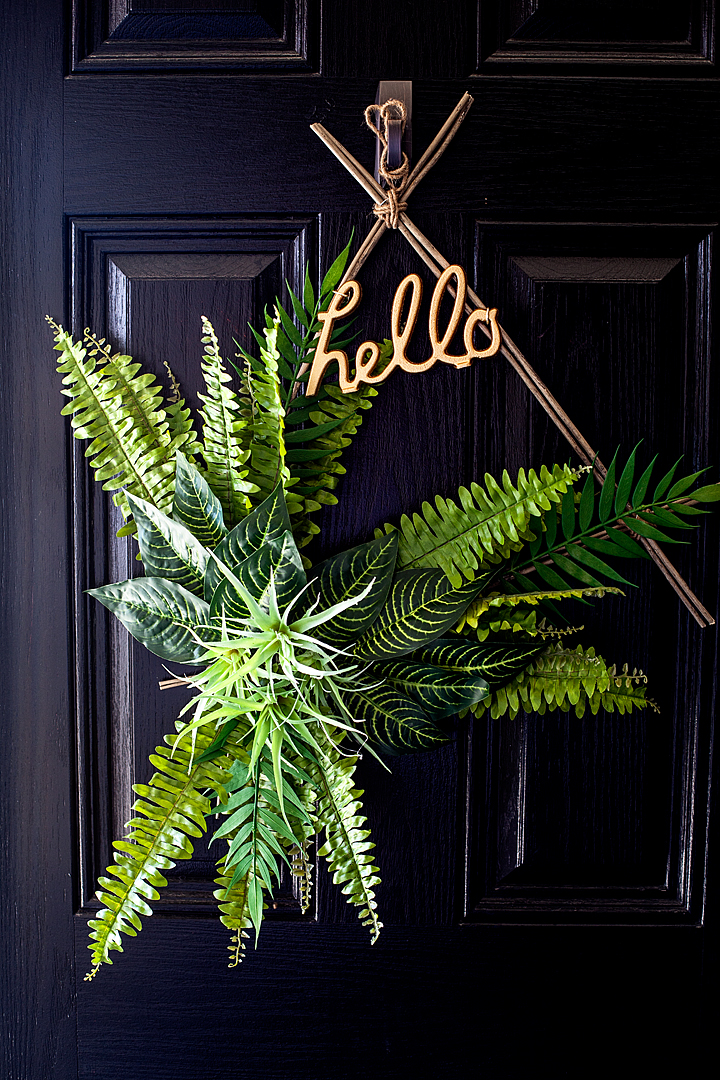
What is Boho really? Short for “bohemian,” boho as a style is most closely associated with the hippies of the ‘60s and ‘70s, but the truth is it borrows from so many fashion subcultures and time periods that almost any outfit or decor can be “boho” if you style it right. To me, this wreath is a little mother earth paired with a hint of glam and that’s why it qualifies as Boho to me. I love the elements of nature, the sticks tied together with jute and then dressed with greenery that will last throughout the whole year. All topped with a cheerful HELLO in gold that adds that hint of glam like the cherry on top.

Supplies

Boho spring wreath supplies

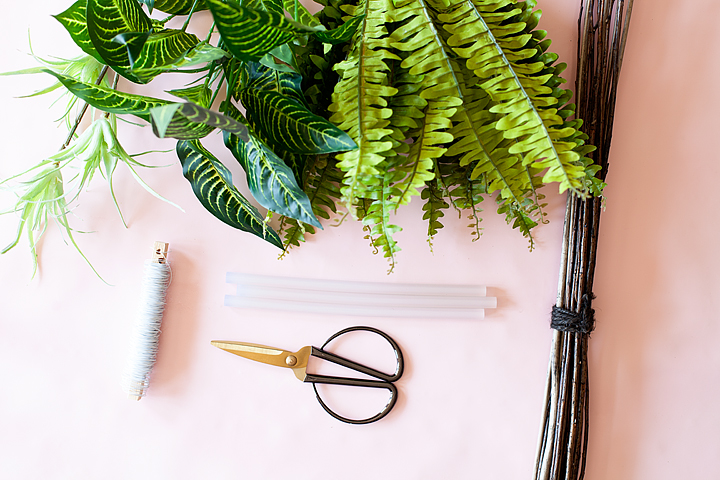
The supplies are rather simple which goes along with the theme of simplicity for this wreath. I found everything at Michaels which makes gathering supplies super easy.

  • Birch Twigs
  • Spring Greenery at Michaels
    • BOSTON FERN LEAVES
    • AIR PLANTS
    • ZEBRA BUSH
  • hot glue gun
  • hot glue sticks
  • 22 gauge floral wire
  • gold aluminum decorative wire
  • natural wired twine 
  • scissors
  • wire cutters
  • hello – This isn’t the exact hello that I used for mine. They unfortunatley, don’t have that one listed online. If you can’t find the metal one at Michaels, you can use this one and it will look GREAT too. It’s larger scale which will also look fabulous with this wreath. Plus, you can paint it whatever color you would like.

Boho Spring Wreath Instructions

Here is a quick video tutorial showing you how to make this easy spring wreath…

  1. Trim the twigs to your desired length.
  2. Place in a triangle and wire all three sides together. Trim ends if needed.
  3. Cut the fern leaves from the stem and wire them to the twigs in the left-hand corner.
  4. Cut the Zebra Bush leaves from the stem and hot glue them to the fern leaves.
  5. Cut the air plants from the stem and glue them in place.
  6. Wrap the two bottom corners with wired twine.
  7. Create hanger with wired twine at the top of the triangle then, wrap the tip of the triangle with the wired twine to hold the hanger in place.
  8. Use the gold wire to wire the hello to the wreath.
  9. Hang your wreath on your door or wall and test to see if any adjustments need to be made.
  10. Enjoy!

Boho Spring Wreath created with greenery from Michaels and created by WhipperBerry

+ Disclaimer • This is a post that has been sponsored by Michaels. I am a Michaels Maker for 2018 and will receive product and payment to share my creative ideas with you all.  Please remember, I will only share those things that I truly find exeptional and something that I will use in my every day life +

DIY Farmhouse Tiered Bowls

7 · Jan 22, 2018 · Leave a Comment

Normally a costly buy, these farmhouse tiered bowls are a stylish storage option for either the kitchen, office or craft room. Rather than breaking the bank, you can grab a few items at Michaels to make one of your own.

+ This DIY Farmhouse Tiered Bowls post brought to you by Michaels +DIY Farmhouse Tiered Bowls are easy as pie to make thanks to @michaels. Normally a costly buy, these tiered bowls won’t break the bank and they are super easy to make. A great storage option for either the kitchen or the office! Come on over to WhipperBerry to learn how to make one for your home.

I will fully admit, I love the farmhouse trend. I’ve slowly been gathering home decor pieces that help to transform my spaces into cute little farmhouse nooks.

One piece that everyone loves right now is tiered trays or tiered bowls, you see them everywhere. I’ve looked and sometimes these gems have a hefty price tag which stinks because they are great for organizing in the home. They are handy in the office to organize office supplies, pens, pencils, scissors. You can even add in some decor to dress up your office. The same is true for the craft room. Tiered bowls are great for story craft supplies; paints, brushes, markers, your Cricut tools and so much more. In the kitchen they are super handy as well. You can use them to keep healthy fruits and vegetables on the counter so that your kiddos reach for the healthy snacks that are close at hand.In need of a set of tiered bowls for the kitchen, I thought rather than purchasing one, maybe I could make one of my own.

Of course, I ran over to Michaels to see what I could find. Their isles are packed full of great storage and organization goodies this time of year. Well, all year, but this time of year especially. The cool thing about looking for storage solutions at Michaels, you can think “outside of the box” and CREATE your own storage solution from the isles there.

DIY Farmhouse Tiered Bowls Supplies

Rustic clay pots have always been a favorite of mine. I found these beautiful clay pots in the floral section at Michaels. They have that farmhouse or even old world look that I just love and, they are large… Perfect for tiered bowls.

DIY Farmhouse Tiered Bowls are easy as pie to make thanks to @michaels. Normally a costly buy, these tiered bowls won’t break the bank and they are super easy to make. A great storage option for either the kitchen or the office! Come on over to WhipperBerry to learn how to make one for your home.

• large clay pots in the floral section at Michaels (I would provide a link however, they aren’t listed online yet)

• ArtMinds™ Wood Decorative Candle Holder, 6 3/4″

• Wood Doll Head by ArtMinds®, 2.5″

• E6000® Permanent Craft Adhesive, 2.0 oz.

• Americana® Decor™ Chalky Finish Paint, 8oz. – white

Instructions

Now, this part couldn’t get any easier. To begin, I painted the candle stick with a light coat of the chalky finish paint.

DIY Farmhouse Tiered Bowls are easy as pie to make thanks to @michaels. Normally a costly buy, these tiered bowls won’t break the bank and they are super easy to make. A great storage option for either the kitchen or the office! Come on over to WhipperBerry to learn how to make one for your home.

DIY Farmhouse Tiered Bowls are easy as pie to make thanks to @michaels. Normally a costly buy, these tiered bowls won’t break the bank and they are super easy to make. A great storage option for either the kitchen or the office! Come on over to WhipperBerry to learn how to make one for your home.

That will dry in just a few minutes. While you’re waiting for that to dry, check the center point of your bowls. The bowl on that will be on the bottom may need to be sanded down a bit in order for your candle holder to sit straight.

DIY Farmhouse Tiered Bowls are easy as pie to make thanks to @michaels. Normally a costly buy, these tiered bowls won’t break the bank and they are super easy to make. A great storage option for either the kitchen or the office! Come on over to WhipperBerry to learn how to make one for your home.

Once your candle holder is dry, add your E-600 to the top and follow the package directions for adhering it to the center of the clay pot. Keep in mind, you’re going to glue the TOP of the candle holder to the bottom bowl so that the the wider BOTTOM of the candle holder will hold-up the top bowl.

DIY Farmhouse Tiered Bowls are easy as pie to make thanks to @michaels. Normally a costly buy, these tiered bowls won’t break the bank and they are super easy to make. A great storage option for either the kitchen or the office! Come on over to WhipperBerry to learn how to make one for your home.

DIY Farmhouse Tiered Bowls are easy as pie to make thanks to @michaels. Normally a costly buy, these tiered bowls won’t break the bank and they are super easy to make. A great storage option for either the kitchen or the office! Come on over to WhipperBerry to learn how to make one for your home.

I placed a paper towel underneath to protect my surface from any glue drips. Once that is nice and secure, you can glue the wood feet i.e. doll heads, to the bottom of the bowl again, with the E-6000.

DIY Farmhouse Tiered Bowls are easy as pie to make thanks to @michaels. Normally a costly buy, these tiered bowls won’t break the bank and they are super easy to make. A great storage option for either the kitchen or the office! Come on over to WhipperBerry to learn how to make one for your home.

Let those cure according to package directions and then do the same with the top bowl.

DIY Farmhouse Tiered Bowls are easy as pie to make thanks to @michaels. Normally a costly buy, these tiered bowls won’t break the bank and they are super easy to make. A great storage option for either the kitchen or the office! Come on over to WhipperBerry to learn how to make one for your home.

Once that has properly cured, you’re all finished! You now have farmhouse tiered bowls!

I’m using mine to hold fruit in my kitchen. It fits perfect on my counter tops right under my cabinets.

DIY Farmhouse Tiered Bowls are easy as pie to make thanks to @michaels. Normally a costly buy, these tiered bowls won’t break the bank and they are super easy to make. A great storage option for either the kitchen or the office! Come on over to WhipperBerry to learn how to make one for your home.

I love the look of these pots so much, I stocked up on some smaller ones for all of my plants this spring.

What are you looking to organize? Do you need a creative storage solution? Michaels has everything you need to get organized for the new year! From washi storage to lexington carts, you can MAKE your year the most organized one yet!

What to keep this project idea close at hand? Feel free to pin the image below to your favorite DIY board so that you can find it later.

DIY Farmhouse Tiered Bowls are easy as pie to make thanks to @michaels. Normally a costly buy, these tiered bowls won’t break the bank and they are super easy to make. A great storage option for either the kitchen or the office! Come on over to WhipperBerry to learn how to make one for your home.

SaveSave

SaveSave

SaveSave

SaveSave

SaveSave

SaveSave

SaveSave

SaveSave

SaveSave

SaveSave

SaveSave

SaveSave

Farmhouse Inspired Christmas Tree – Dream Tree Challenge

75 · Nov 1, 2017 · 1 Comment

It’s getting close to my favorite time of year… Christmas!! Every year it’s so fun to participate in the Michaels Dream Tree Challenge and this year has been EXTRA FUN!  We gathered together as a family and crafted our Christmas tree together and it was so fun. From trees to ornaments and holiday décor, Michaels has everything you need to MAKE this holiday your own! You can even shop over 100 Christmas Trees at Michaels.com. Crafting your tree together is a  great way to bring the family together at the beginning of the Holiday season. Here is what we created to make our 2017 tree magical for our home and family.

Farmhouse Inspired Christmas Tree -WhipperBerry-100

The Christmas Tree

This year, I picked the 7.5 Ft. Pre-Lit Jasper Cashmere Artificial Christmas Tree, Clear Lights by Ashland™.  At first it was a little wide for our space. BUT… We placed it on top of an old bucket I had and then bent the lower branches down to give it a slimmer figure. I wish ‘slimming-down’ was that easy for all of us! 😉 That also raised the tree up a bit, which makes it look better in a room with vaulted ceilings.

Regardless of what this photo looks like below (someone was being a bit dramatic…) The Jasper tree is super easy to set-up. It’s literally plug and play. The electricity runs through the poll of the tree so you don’t have to go hunting around for all of the connections. Then all you have to do is fluff the branches.

setting-up-the-tree

Farmhouse Inspired Christmas Ornaments

Part of the fun when decorating for the Holidays is actually making some of your own decor. This year I was inspired by some ornaments that Joanna Gains has created for another store. I LOVE them and thought we could make some of our own with supplies from Michaels.

I grabbed some of the shatter proof ornaments at Michaels along with some of the Americana Chalkboard Paint from DecoArt…

Shatter proof ornaments from @Michaels

  • Plastic Onion Ornaments By Artminds™

  • Clear Plastic Ornaments By Artminds™

  • Americana Chalkboard Paint

Americana Chalkboard Paint for Christmas Ornaments

paining ornaments-100

My daughter Haley is home from college with her boyfriend Kyle and we decided to have a paint party. We covered the table with plastic wrap and went to town with the clear ornaments from Michaels.  We painted them all over with the chalkboard paint. Now, the only reason I use chalkboard paint is because I like the matte look. Then we used a white paint marker from Sharpie and created all of the little swiss crosses on the ornaments.

Create DIY Hearth and Home Black Swiss Cross Christmas Ornaments via WhipperBerry

They turned out super cute and we had so much fun making them together!

Create DIY Hearth and Home Black Swiss Cross Christmas Ornaments via WhipperBerry

Create DIY Hearth and Home Black Swiss Cross Christmas Ornaments via WhipperBerry

I think they may be my new favorite Christmas ornaments for our tree.

Next, we painted some large wood stars from Michaels with Americana Decor Chalky Finish paint from DecoArt.  Then we used my Cricut Maker to add titles of Christmas Carols onto the stars. You can learn how to make those HERE. You can even download the graphics that I designed for the stars!

DIY Christmas Star from WhipperBerry

Farmhouse Christmas Carol Ornaments from WhipperBerry

The next element for my tree is a few types of picks that I found in the Christmas pick section of Michaels.

Love FARMHOUSE decor? Then you are going to LOVE this Farmhouse inspired Christmas Carol Star ornament that you can create for your home.

Quite honestly, picks are some of my favorite ways to add personality to my Christmas trees. They really add to the tree and they aren’t very pricey. I LOVE the fuzzy little stars, the gold antlers, and the cotton stems. They look fabulous on the tree!

Love FARMHOUSE decor? Then you are going to LOVE this Farmhouse inspired Christmas Carol Star ornament that you can create for your home.

Love FARMHOUSE decor? Then you are going to LOVE this Farmhouse inspired Christmas Carol Star ornament that you can create for your home.

The last element is the ribbon picks.  They couldn’t be easier to make. I found some perfect ribbon at Michaels and cut it into 6 inch sections…

Love FARMHOUSE decor? Then you are going to LOVE this Farmhouse inspired Christmas Carol Star ornament that you can create for your home.

Then I folded it in half and wrapped some floral wire around the bottom leaving a 4-5 inch tail to secure it to the tree. Super simple and the bottom doesn’t need to be pretty.

Love FARMHOUSE decor? Then you are going to LOVE this Farmhouse inspired Christmas Carol Star ornament that you can create for your home.

Love FARMHOUSE decor? Then you are going to LOVE this Farmhouse inspired Christmas Carol Star ornament that you can create for your home.

Then you use the wire tail to attach them to the tree. An easy, easy way to fill in those bald spots on the tree or add a pop of color. Again, it’s a very cost friendly way to add color to your tree.

Love FARMHOUSE decor? Then you are going to LOVE this Farmhouse inspired Christmas Carol Star ornament that you can create for your home.

One last thing… I almost forgot! We decided to HANG our star from the ceiling for this tree. I bought a large wood star at Michaels and wrapped it with some wire lights and then hung it from the ceiling. We made sure to place our hook in a stud so that we didn’t have issues with the weight of the star. It’s so simple and tops it with that rustic farmhouse look.

Wow, it’s amazing how some simple elements can come together to create a really stunning tree. All of my kiddos have said this tree is the best we’ve ever had. Make sure to download the Michaels App on your smartphone so you don’t miss any of their amazing holiday deals this season. It really is a great app to have. No more saving receipts! That’s worth it right there.

Don’t forget to tag me in your tree photos… I love to see what you guys are creating!

For more inspiration, visit the Michaels blog and their Pinterest, Facebook and Instagram accounts.

Welcome to Our Patch • Fall Porch Ideas

2 · Sep 15, 2017 · Leave a Comment

Easily dress-up your front porch for Fall with gorgeous white Autumn pumpkins from Michaels and a few DIY projects created with a little help from Cricut that will turn your drab porch into something the neighbors will truly envy! Easily dress-up your front porch for Fall with gorgeous white Autumn pumpkins from Michaels and a few DIY projects created with a little help from Cricut that will turn your drab porch into some the neighbors will truly envy • Created by WhipperBerry

You guys!! I’m so excited to share my new front porch. If you’ve been following along in our home journey, you will know that back in March we purchase a new home here in Lincoln, Nebraska. I’ve been slowing getting the house up to snuff and I’m finally ready to show off our front porch with the fun Autumn decor that I’ve created. I’m calling it, Welcome to Our Patch.

I’ve been working on some fun design elements with my Cricut Maker and playing around with different types of Cricut vinyl. Plus, I found these amazing PUMPKINS from Michaels. I LOVE how Michaels has really stepped up the pumpkin game. From playful pumpkins to spooky sights, Michaels has everything you need to MAKE it fun or beautiful this fall!

Easily dress-up your front porch for Fall with gorgeous white Autumn pumpkins from Michaels and a few DIY projects created with a little help from Cricut that will turn your drab porch into some the neighbors will truly envy • Created by WhipperBerry

Fall Porch Ideas

I tend to stick with the more classic and neutral white pumpkins when it comes to fall decorating. I found these BEAUTIFUL white pumpkins at Michaels in various shapes and sizes. They are all in that heirloom, pumpkin carriage type of pumpkin and they are just so pretty. I also LOVE that they won’t ever go bad and I can keep them year to year. Here are some ideas on how to use them in your decorating.

  • Grab a fabulous basket at Michaels and fill it with the smaller white pumpkins like the photo above.
  • Use pillows as part of your outdoor decor. I created this “Oh, Delicious Fall” pillow using my Cricut Maker and some of the Cricut Iron-On Lite along with the NEW Cricut Easy Press.
  • Invest in some of the large vintage style pumpkins to add to your beautiful “pumpkin patch.”
  • Fill a lantern with some of the smaller white pumpkins.

Easily dress-up your front porch for Fall with gorgeous white Autumn pumpkins from Michaels and a few DIY projects created with a little help from Cricut that will turn your drab porch into some the neighbors will truly envy • Created by WhipperBerry

  • Create some wall art with a black canvas and some of the Cricut Iron-On Lite again. This works well for a front porch, indoor wall art or a mantel piece. I actually attached it to the brick with my FAVORITE Command Strips that I stock-up on at Michaels. I have been amazed at how well they work on the brick. It’s really cool! I see a whole bunch of outdoor wall art in my future.

Easily dress-up your front porch for Fall with gorgeous white Autumn pumpkins from Michaels and a few DIY projects created with a little help from Cricut that will turn your drab porch into some the neighbors will truly envy • Created by WhipperBerry

  • Grab an A-frame chalkboard sign from Michaels and add the “Welcome to Our Patch” design that I created for another great typography element. You know I love my word art!
  • Add a watering can, another pillow in a rustic crate, some plants… Anything you have around that could make this grouping look fall like. And of course… Pumpkins, more pumpkins for sure! It is a patch you know.

Easily dress-up your front porch for Fall with gorgeous white Autumn pumpkins from Michaels and a few DIY projects created with a little help from Cricut that will turn your drab porch into some the neighbors will truly envy • Created by WhipperBerryEasily dress-up your front porch for Fall with gorgeous white Autumn pumpkins from Michaels and a few DIY projects created with a little help from Cricut that will turn your drab porch into some the neighbors will truly envy • Created by WhipperBerry

You can download all of the SVG files for each element HERE

Let’s get busy and start our Fall crafting! Visit Michaels TODAY for all kinds of FABULOUS DEALS! For more inspiration, visit the Michaels Blog, Facebook, Instagram or Pinterest. They for sure have you covered.

Easily dress-up your front porch for Fall with gorgeous white Autumn pumpkins from Michaels and a few DIY projects created with a little help from Cricut that will turn your drab porch into some the neighbors will truly envy • Created by WhipperBerry

  • « Go to Previous Page
  • Page 1
  • Page 2
  • Page 3
  • Page 4
  • Page 5
  • Interim pages omitted …
  • Page 7
  • Go to Next Page »

Primary Sidebar

Heather from Whipperberry
Hello... my name is Heather and I'm the creator of WhipperBerry a creative lifestyle blog packed full of great recipes and creative ideas for your home and family. I find I am happiest when I'm living a creative life and I love to share what I've been up to along the way... Come explore, my hope is that you'll leave inspired!

Footer

  • Privacy Policy
  • Crafts
  • Food
  • Gifts
  • Holidays
  • Home
  • Mom Life
  • Recipes
  • Travel

Copyright © 2026 · Seasoned Pro