• Skip to primary navigation
  • Skip to main content
  • Skip to primary sidebar
  • Skip to footer

Whipperberry

WhipperBerry • Your Home For Creative Inspiration

  • Home
  • Recipes
    • Starters
    • Easy Weeknight Dinners
    • Main Dish
    • Salads
    • Side Dish
    • Soups & Stews
    • Desserts
    • Breakfast
    • Miscellaneous
  • Tutorials
    • Creative Crafts
    • DIY Decor
    • Fabric Crafts
    • Food How-To
    • Jewlery
    • Paint Projects
    • Paper Art
    • Party Styling
    • Photography and Graphic Design
    • Silhouette
  • Holidays
    • Easter
    • Mother’s Day
    • Father’s Day
    • 4th of July
    • Halloween
    • Thanksgiving
    • Christmas
    • Valentine’s Day
  • Gift Ideas
    • Gifts For Everyone
    • Gifts for Dad
    • Mother’s day
    • For The Girls
    • For The Kids
    • Teacher Gift Ideas
    • Christmas
  • Printables
    • Holiday
    • Gift Idea
    • LDS Primary
  • Travel
  • About
    • Terms
  • Contact
  • Nav Social Menu

    • Facebook
    • Instagram
    • Pinterest
    • RSS
    • Twitter

Tutorial

How to Use the Cricut Slice Tool • Cricut 101 Video Tutorial

10 · May 10, 2018 · Leave a Comment

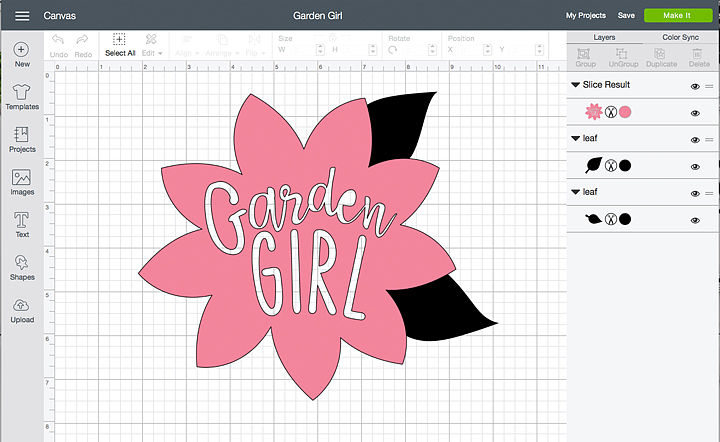
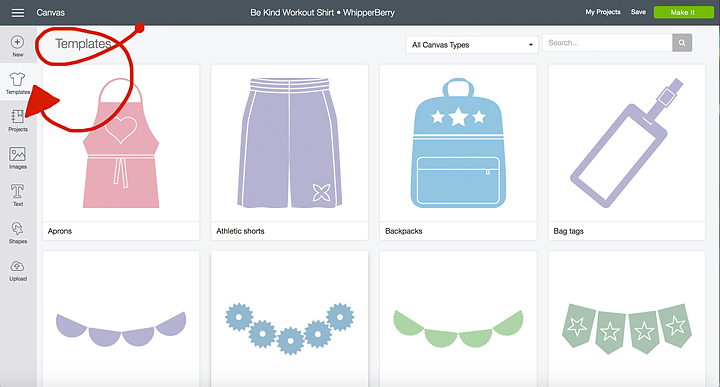
Have you been looking to have a little more flexibility with your design work in Cricut Design Space? Frustrated that you can’t erase parts of images that you would like to not include in your design? I’ve got you covered today!! Have you noticed that little icon on the bottom right of the Cricut Design Space platform? It looks like this…How to use the Cricut Slice Tool Graphic VIDEO TUTORIAL - WhipperBerry

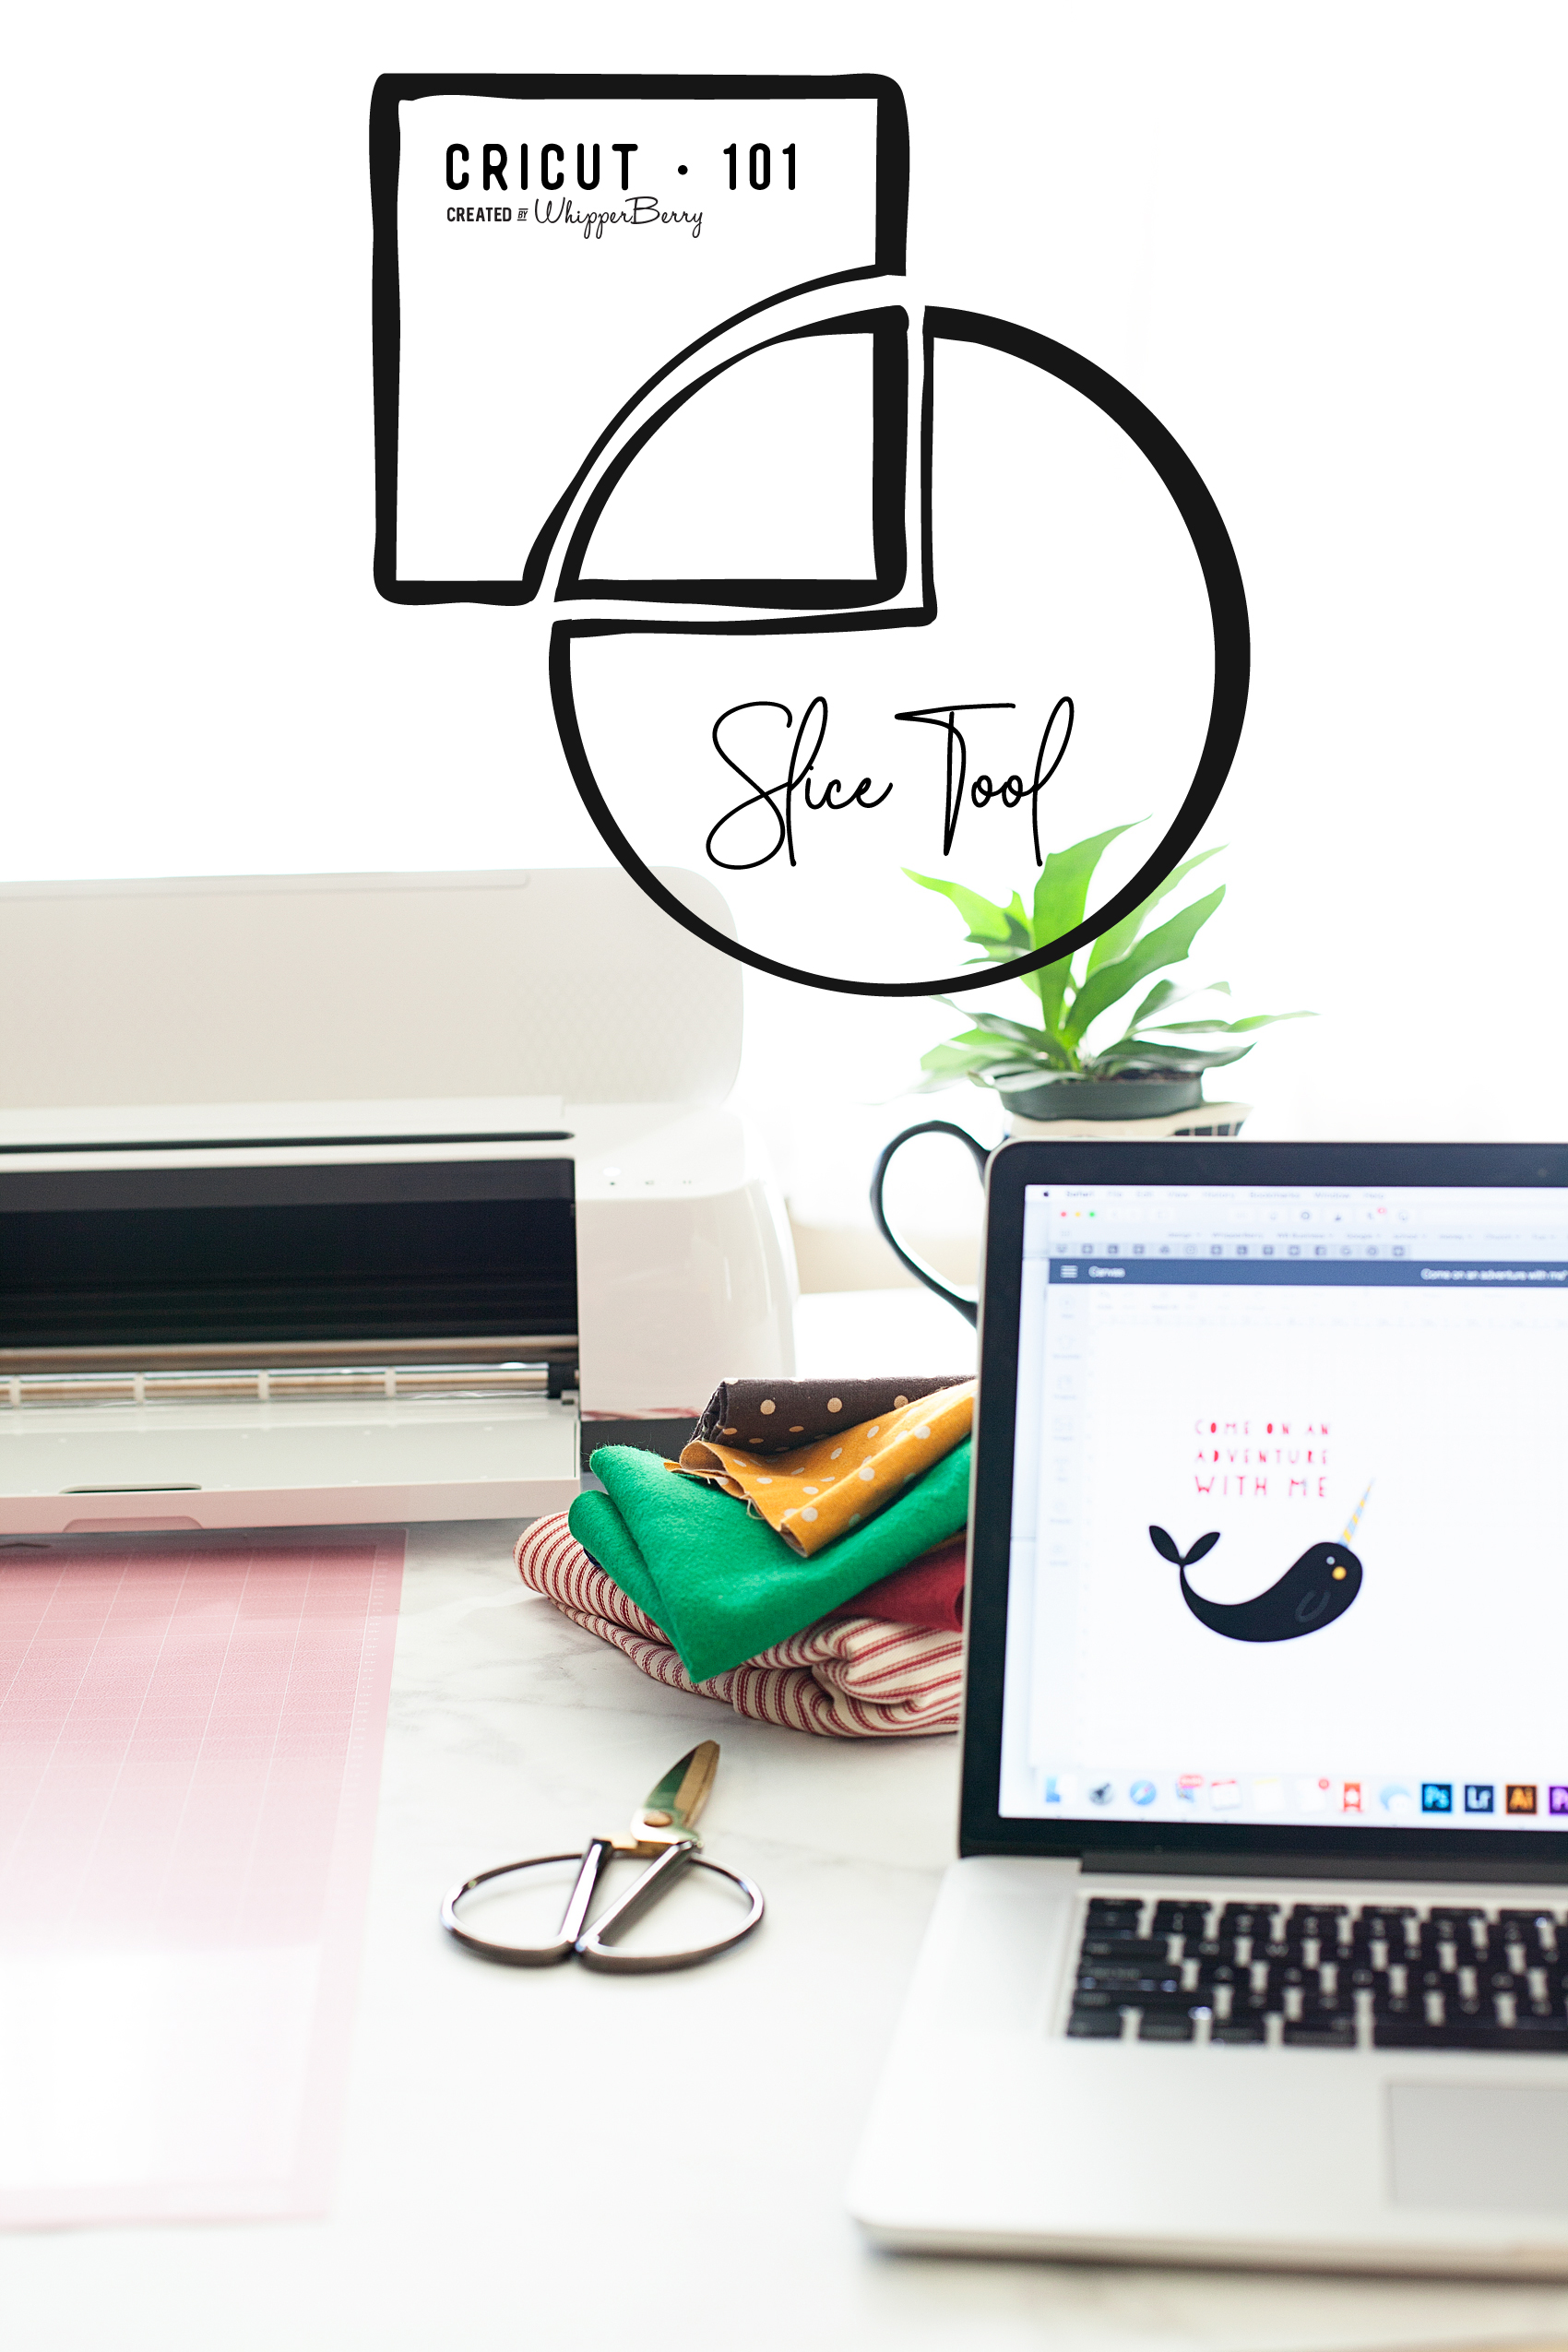
When I first started using Cricut Design Space, I looked at that tool and really could not figure out what the point was. It turned into my little wallflower that stood away from my favorite tools begging to be invited to dance as well. One day, just by happenstance, I started to play around with the Slice Tool and boy, I’ve been a huge fan ever since.

Cricut Slice Tool Video Tutorial

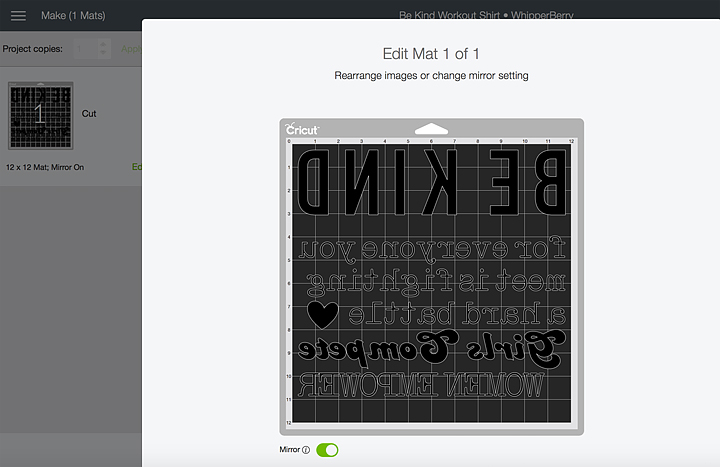
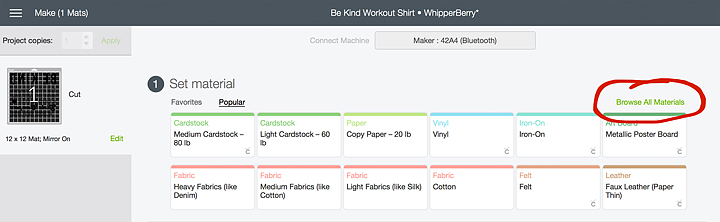
I’ve put together a video tutorial on three different ways to effectively use the Slice Tool when working in Cricut Design Space. It’s going to totally change the way you create your graphics for use with your favorite Cricut cutting machine. The video is about 14 minutes long but, it is well worth the time if you’re wanting to stretch your design muscles in Design Space.

What do you think? Has this tutorial inspired you to create with a little more flexibility in Design Space? I hope so! I would love to see what you design, tag me in your social media posts so I can see what you’ve created with the Slice Tool!

Disclaimer

This is an unpaid post. I have been independently creating my Cricut 101 Video Tutorial Series without any financial incentive from the lovely folks at Cricut.

Garden Girl Canvas Zipper Bag Tutorial • Mother’s Day Gift Idea

2 · Apr 28, 2018 · 2 Comments

Hello… Mother’s Day is right around the corner, are you getting ready? I always love to create something fun for my Mom and for all the “Mothers” in my life. My Mom is a true garden girl and I thought it would be fun to create a cute garden girl canvas zipper bag using the new Cricut Patterned Iron-On for Mother’s Day. Have you guys seen this? It’s the cutest stuff!

+ This post brought to you by the amazing crew at Cricut +My Mom is a true garden girl and I thought it would be fun to create a cute garden girl canvas zipper bag using the new Cricut Patterned Iron-On for Mother's Day. Have you guys seen this? It's the cutest stuff! • created by whipperberry

Cricut Patterned Iron-On

You guys… This stuff is so fun to work with! It comes in florals, lace, polka-dots, geometrics, plus more. The Cricut Patterned Iron-On is the next creative wave coming out of the fabulous minds of the crew at Cricut. They are constantly working to make more and even better consumable products for us to use as we create with our favorite crafting machine. This iron-on vinyl is created with the long-lasting Strong Bond™ technology and adheres nicely to many types of fabrics. It works like a dream when using the Cricut EasyPress or even your home iron.

My Mom is a true garden girl and I thought it would be fun to create a cute garden girl canvas zipper bag using the new Cricut Patterned Iron-On for Mother's Day. Have you guys seen this? It's the cutest stuff! • created by whipperberry

Garden Girl Design

If your mom or a loved one enjoys tending to their garden or sprucing up their home’s exterior, you might want to complement this handmade gift with something unique for the outdoors. Beautiful flower arrangements look wonderful both inside and outside, especially in window displays. Consider exploring options like Custom Made Window Boxes that can be tailored to fit specific styles and window sizes, adding a personalized touch to any garden lover’s home.

Since my Mom loves flowers, I thought the Anna Griffin floral patterns in the Francesca sampler would be perfect. I’ve been crushing on Anna Griffin’s work for years so, this was a natural fit for me as I started to design this Garden Girl bag.

My Mom is a true garden girl and I thought it would be fun to create a cute garden girl canvas zipper bag using the new Cricut Patterned Iron-On for Mother's Day. Have you guys seen this? It's the cutest stuff! • created by whipperberry

The design is pretty simple, it’s a flower that I found in the Cricut Design Space and then sliced the words into the flower and added a couple of leaves. But, no worries… I’ve got you covered. You can click on the link below, in the project supplies section, it will open this project up for you to use in Cricut Design Space.

Supplies

  • canvas zipper pouch
  • Cricut Patterned Iron-On
  • Garden Girl Cricut Design Space Project
  • Cricut machine
  • Cricut EasyPress or home iron
  • Cricut EasyPress Mat or towel
  • Cricut Iron-On Protective Sheet
  • Sharpie

Instructions

Now, that you’ve seen the video, here is the step by step instructions.

  1. Open the project in Cricut Design Space and click on the customize button. You may need to resize the design in order to fit your canvas bag.
  2. Cut the design on your Cricut machine following the steps that Cricut Design Space will walk you through. Make sure that when working with any iron-on material you need to MIRROR YOUR IMAGE and CUT ON THE WRONG SIDE of the iron-on vinyl.
  3. Weed your iron-on material. To “weed” vinyl or iron-on material means that you remove any iron-on material that you don’t want on your bag. For this design, you’ll want to remove the outside of the flower and leaves, then remove the letters from the inside of the flower.
  4. Pre-heat your Cricut EasyPress to 340˚ and set-up your EasyPress Mat.
  5. Place the canvas bag on the EasyPress Mat and prepare the surface by pre-heating the space where you are going to add the design for 15 seconds. This allows for greater adhesion for the Patterned Iron-On.
  6. Place your flower down on the surface of your bag then, slide the leaves under the flower and place them where you would like them. I trimmed the bottom of the leaves a bit since they were going to be covered by the flower.
  7. Remove the flower, cover the leaves with the Protective Iron-On Sheet and press the leaves at 340˚ for 30 seconds and gently pressing down on the EasyPress. First, on one side and then an additional 30 seconds on the other side.
  8. Remove the Iron-On Protective Sheet and then, peel back the clear protective film on the leaves.
  9. Place the flower over the leaves. Replace the Cricut Iron-On Protective Sheet and press again, like before. 30 seconds on one side, then 30 more on the other side.
  10. Let cool for a few minutes and then remove the protective film.
  11. At this point, you can decide whether you want to fill in the letters with Sharpie. I wanted my Garden Girl to stand out a little more so I decided to fill them in. You may have selected a Patterned Iron-On where the words standout just fine and you won’t need to fill them in. This is your call basically.

With that, your bag is finished and ready to gift to your favorite Garden Girl!

What would you like to create with the new Cricut Patterned Iron-On? Leave a comment and let me know, I love to see what you guys are working on!

My Mom is a true garden girl and I thought it would be fun to create a cute garden girl canvas zipper bag using the new Cricut Patterned Iron-On for Mother's Day. Have you guys seen this? It's the cutest stuff! • created by whipperberry

This is a sponsored conversation written by me on behalf of Cricut. The opinions and text are all mine.

Be Kind Workout Shirt Design with the NEW Cricut SportFlex Iron-On

2 · Mar 28, 2018 · 5 Comments

How is “Body Shaming” even a thing?  The fact that couples like Drew & Jenna Kutcher, positive body advocates, are shamed for being a normal curvy girl with a hot guy, is shameful and makes my heart hurt. When has it become “O.K.” and even celebrated to “shame” people, celebrities and non-celebrities alike, all whilst hiding behind their computer screen? For some, they don’t even have to hide. Being a plus-size girl myself, the idea of going to the gym nearly sends me into a panic attack. People can be so MEAN! I have recently shared on my Instagram account that I have started my weight loss journey with Weight Watchers and when Cricut asked if I would design a new shirt for the launch of a new product, all I could think about was creating a BE KIND workout shirt to wear at the gym.

• This post is brought to you by the folks at Cricut •

Be Kind for everyone you meet is fighting a hard battle workout shirt created with Cricut SportFlex Iron-on vinyl - created by WhipperBerry

Getting Personal About My Struggles

This isn’t easy so, buckle-up, I’m getting a personal today… I have always been on the curvy side. Even as a child, I was a little more “fluffy” than the rest of my friends. Nothing too crazy, never the less, I was always very hard on myself, as most of us are, when I was younger. Then I had four beautiful babies and with each pregnancy, I would put on more and more weight. Being a Mom was just so hard and I struggled to put myself ahead of the pack to take care of my health. Was I a little lazy, yes, I will admit that but, I was exhausted as most moms with littles are… Every single day!

I also had more hidden challenges that were hard to share, hard to admit and hard to accept. With a family history of chronic depression & anxiety, I often struggled with basic day to day tasks. I always wanted to push it off as postpartum depression and just try and wish it away. I didn’t want to be labeled as someone with mental challenges. I also had chronic pain that I tried to wish away too. Wishing really doesn’t get you anywhere when it comes to your mental and physical health. I tried to just stick my head in the sand and soldier on. That’s what we’re taught to do, right? I’m here to tell you, that doesn’t work.

I have since been diagnosed with Fibromyalgia and I’m happy to say that I have been working for over a year to get both of these issues in check. I’ve finally come to the point where I feel like I can actually start working on becoming a healthier me. Mid-January, I decided to join weight watchers and so far I’ve lost 13.8 lbs. The first few weeks were great, then I struggled for a few. But, I’ll share more about that later.

Making Changes for the Better

I’m finally at the point where I feel I can start adding more physical activity into my daily routine. You have to understand though when you have Fibromyalgia, any type of physical movement can be a little scary. You never really know what is going to trigger a flair-up. Sometimes it is even simple everyday tasks that can send your body over the edge. I’ve spent years trying to avoid those painful, debilitating flair-ups so, the idea of actually pushing my body is terrifying!

What’s even more terrifying is going to the gym and having people stare at the fluffy lady trying to work out. What do they know? They don’t know my struggles, what I battle with every day. They don’t know my heart and how hard I work to make sure I stay healthy mentally and physically for my family. Sometimes, even getting out of bed is a challenge for me. Who are they to judge?

Be Kind Workout Shirt SportFlex Material

Cricut is launching a new product that I’ve fallen in love with of course. They have a new SportFlex Iron-On™ that works like a dream with your polyester and nylon fabrics. To celebrate the new release, Cricut is having a huge shirt design event. I, of course, couldn’t pass up a chance to share more of my favorite type of design, creating and inspiring with words.

Be Kind for everyone you meet is fighting a hard battle workout shirt created with Cricut SportFlex Iron-on vinyl - created by WhipperBerry

Now, this new SportFlex Iron-On™ is perfect for your workout shirts, swimsuits, pajamas and the like. Made especially for activewear, SportFlex Iron-On™ features the Cricut StrongBond™ Guarantee* for long-lasting iron-on results that stick. This flexible, stretchable iron-on material moves and bends with the body and keeps your high-performance clothing lightweight.  SportFlex Iron-On is highly recommended for tech fabrics like polyester and nylon like my workout tank.

*Cricut stands behind its iron-on products with the Cricut StrongBond™ Guarantee when used and applied as directed.

Workout Shirt Design Supplies

First, you’ll need to find your favorite workout shirt and select what color of the SportFlex Iron-On you want to use. They have a bunch to choose from. Then all you need to do is fire-up your Cricut cutting machine. The SportFlex works with any Cricut machine, which is awesome! Here’s what else you’ll need:

  • high-performance shirt or jacket
  • Cricut SportFlex Iron-On vinyl – I used black but, they have orange, red, midnight blue, bright yellow, fuschia, metallic gold, metallic silver & white
  • weeding tools
  • Cricut Easy Press or your iron
  • Cricut Easy Press Mat or a protected hard surface – You can use a quilting ironing board on a hard surface but, not a clothing ironing board. They aren’t firm enough. You can also place a towel on a hard surface if you don’t have either of these two options.
  • Cricut Iron-On Protective Sheet or a light cotton towel

Be Kind Workout SportFlex Iron-On Shirt Instructions

The Design

First, you need to open Cricut Design Space with my Be Kind design. I’m even giving you a bonus design that I love too. Be Kind for everyone you meet is fighting a hard battle workout shirt created with Cricut SportFlex Iron-on vinyl - created by WhipperBerry

Sizing

Once that is loaded, you’ll need to check your sizing. I’m a 2X and it’s sized right for the larger shirts. If you are smaller then that, you’ll want to change up the size a bit. Measure across your chest, right at your underarms and decide how wide you’ll want it to be.

Loading the SportFlex Iron-On

Now, if you haven’t ever worked with iron-on vinyl before, it’s a smidge different than traditional vinyl. You actually cut it on the underside of the material. Therefore, you’ll need to load your cutting mat with the shiny side of the SportFlex Iron-On face side down with the more matte side, right-side up.

Be Kind for everyone you meet is fighting a hard battle workout shirt created with Cricut SportFlex Iron-on vinyl - created by WhipperBerry

Then you’ll load your cutting mat into your Cricut Machine and prepare your design in Cricut Design Space. One great feature in Design Space is the template feature. You can select a t-shirt template and it will help you figure out measurements and spacing for your design. You’ll need to select the template button at the top left of your screen in Design Space.

How to select templates in Cricut Design Space

Then select the basic tee and it will load into your workspace. Now, keep in mind, the template only shows up when you select it this way. Your design doesn’t save with the template attached. If you want to use the template, you need to go and select it again each time you open the design.

Cricut T-Shirt template in Cricut Design Space

Now, I know my shirt is a tank but, at least this template gives me a little bit of a guide. You’ll know what works best for your shirt. Keep a measuring tape handy so that you can get proper measurements.

Preparing Your Design To Cut

At this point, you’re ready to cut out your design on SportFlex Iron-On material. Your mat is loaded into your machine and you press make it. This is the point where you double check your cutting mat to see if you need to make any adjustments. If you aren’t comfortable with this quite yet, no worries, I have a Cricut 101 video that will guide you through that process. Visit this How To post and scroll down a bit for the video.

When you are working with multiply colors of fabric or paper, Cricut Design Space has some brilliant features that I really like. Instead of typing them all out I thought I would create a video for you watch that teaches you exactly how to prepare your designs to cut that really makes the cutting process so much easier.- WhipperBerry

Now, your design is loaded into the preview workspace. At this point, you want to make sure to MIRROR YOUR IMAGE. Like I said before, you are going to need to cut your design on the underside of the SportFlex material. Your preview workspace looks like this,

How to mirror your image in Cricut Design Space

All you need to do is click on that little switch button to active the mirror option.

Mirrored image in Cricut Design Space

Now, it’s mirrored and you’re ready to move on.

Selecting The Right Material In Cricut Design Space

With a new iron-on product like SportFlex, you need to make sure that you select the right material settings when you’re getting ready to cut your design. After your machine has connected via Bluetooth, this screen will appear. Select Browse All Materials in the top right.

how to select the right settings for Cricut SportFlex Iron-On material

Then click on the Categories Down Down List and Select Iron-On.

This screen will open and you’ll need to select SportFlex Iron-On. The reason why you need to be so specific is, each material in the Cricut Design Space has been calibrated meticulously buy the design team at Cricut. Each material cuts just a little different from the next. SportFlex Iron-On is a very thin material so as to not add a lot of bulk to your performance ware & to allow for movement. Therefore it needs a “Kiss Cut,” that means the machine will only cut the vinyl, not the protective film underneath. These guys are really good at what they do, aren’t they!

Now, you’re ready to cut. Press the GO button when it starts flashing and your design will begin cutting.

Weeding the SportFlex Iron-On Material

Typically, most iron-on or heat transfer type materials are easier to weed than traditional vinyl. That’s why I LOVE it soooooo much! One thing that you need to keep in mind. Weeding tools are really helpful. I can’t even imagine trying to weed without them. Second, even though the SportFlex is easy to weed, you want to take it slowly. It’s a very thin material and moving to fast will increases the chances of tearing your vinyl.

Be Kind for everyone you meet is fighting a hard battle t-shirt design

Applying the SportFlex Iron-On to Your Shirt

We’re almost finished, now all you need to do is apply the design to your shirt. I used a quilters Cut’n Press for this project because I had not yet received my Easy Press Mat. Sure enough, the mat just arrived as I am writing this post, therefore, I will use it for my next iron-on project. I can’t wait!!

I place the shirt on the mat and placed my Easy Press, which was preheated to 305˚, onto the area of shirt that I was planning on applying the vinyl for 15 seconds. This preheats the fabric and allows your SportFlex to adhere better. Then place your design on the shirt making sure to center and line it up properly.

I covered mine with a light cotton cloth and then placed the Easy Press on my design for 30 seconds. Make sure if your design is larger than the 9-inch plate of the Easy Press, you move to another section and press again for 30 seconds.

Then, turn your shirt inside-out and press again for 30 seconds over the entire surface of the design.

Turn the shirt right-side out and let it cool for a few minutes and then carefully remove the protective sheet.

That’s it… Your shirt is all ready for the gym!

Bottom Line

The bottom line is, no matter where you are on your wellness journey, we ALL need to be more kind to each other. We are all unique in our own way and we should love ourselves more no matter our shape, size, skin color and so on. This saying may not resonate with you, that’s alright. Jump into Cricut Design Space and design your own. It’s so easy! This saying really means a lot to me and I will wear it proudly as I work on becoming my best self!

Gulp, I feel like I’m in my sports bra and in bike shorts on top of the scale on The Biggest Loser. Why is this so hard to share our imperfections. What are you struggling with? What quote do you need on your shirt?

WhipperBerry - Be kind for everyone you meet is fighting a hard battle workout shirt

SaveSave

SaveSave

SaveSave

SaveSave

SaveSave

SaveSave

SaveSave

This is a sponsored conversation written by me on behalf of Cricut. The opinions and text are all mine.

SaveSave

SaveSave

SaveSave

How to Make Stylish Fabric Banners with the Cricut Maker

7 · Feb 26, 2018 · Leave a Comment

Forget the scissors & craft knife! I have a sure-fire way to create the most amazing graphic-driven fabric banners for your kiddos room or next event. NO sewing skills required! How cool are those fabric banners that are made out of felt? You know where I’m going with this! Come learn how to make graphic banners with the fabric without mind-numbing hand-cutting. If you want to see which is best, the Cricut or the Silhouette then read about that comparison here.

+ This post brought to you by the lovely folks at Cricut +How to Create Fabric Banners • They are easy to make with the Cricut Maker and have such impact in your room or for a party. Come learn how easy they are to make at whipperBerry.

Tools of the Trade

Having always been in LOVE with creating graphics, the idea of being able to design graphic driven projects out of fabric has always been a desire of mine. However, I don’t have the patience to sit with scissors or craft knifes to cut out my graphic elements. I was thrilled at the advent of the original Cricut back in the day. It revolutionized crafting, as we knew it, at the time. However, it just didn’t have the cutting chops for fabric. The new Cricut Maker is just as revolutionary as the first cartridge based Cricut in the Fabric world. It’s TOPS for sure!

Vintage Adventure Room

I’ve been working on a room makeover for my little guy, Gage. We created a vintage adventure room that covers everything land and sea. It’s all about adventure in this great big world of ours. I wanted to have some animals of the sea & land represented in the room. I used my Cricut Maker to make a vinyl stencil for this cute fox storage chest for his little gadgets and gizmos.

Transform a simple mini storage chest from IKEA into this cute little fox storage chest for your little ones little toys and trinkets. I used some of the @decoart chalky finish paint along with my @cricut Maker to create this fun design for my little boys room • WhipperBerry

Next, I wanted to make some sea loving creatures for some fabric banners on his wall. We LOVE Narwhals and jellyfish at our house quite a bit so, I knew I had to create something with these two ocean gems. After a little design work, I came up with these cute designs. Let's Explore the Deep Blue Banner created by WhipperBerry • A great banner idea for your little ones room.

Supplies for Fabric Banners

The next trick, making these designs into fabric banners for Gage’s room. I rummaged through my fabric stash and found some colors that would go well with the room design.

Fabric Banners • Great colors for a little boys room

Here’s the rest of the supplies you will need.

  • fabric
  • Heat n’ Bond
  • Cricut Maker
  • Cricut Rotary Cutter
  • Cricut Bonded Fabric Blade
  • Cricut Fabric Cutting Mat
  • fabric glue
  • wood dowel
  • cotton rope
  • sewing machine (optional)
  • thread (optional)

How to Create Graphic Banners with Fabric • They are easy to make with the Cricut Maker and have such impact in your room or for a party. Come learn how easy they are to make at whipperBerry.

Instructions

First, you need to create your design within Cricut Design Space. You can use either the large library of fonts that they have compiled at Cricut or, use your favorite fonts on your computer. You also have access to thousands of graphics that you can use to personalize your space or dress-up your party.

How to Prepare Graphic to Cut in Cricut Design Space

When you are working with multiply colors of fabric or paper, Cricut Design Space has some brilliant features that I really like. Instead of typing them all out I thought I would create a video for you watch that teaches you exactly how to prepare your designs to cut that really makes the cutting process so much easier. Click on the image below to watch the video.When you are working with multiply colors of fabric or paper, Cricut Design Space has some brilliant features that I really like. Instead of typing them all out I thought I would create a video for you watch that teaches you exactly how to prepare your designs to cut that really makes the cutting process so much easier.- WhipperBerry

Cutting Fabric

Now that your designs are ready to cut, it’s time to prepare your cutting mats. If you are cutting fabric, you need to make sure you are using the fabric cutting mat and the fabric rotary cutter. If you happen to have a rotary cutter that needs to be changed, here is a tutorial on how to do that. Cut your fabric to fit the cutting mat and place it on the mat.

PRO TIP • Don’t worry about cleaning the fabric cutting mat of all the fuzz & threads after you use it. It will work just fine with fuzz & threads. Attempting to clean the mat actually does more harm than good.

If you are planning on ironing your graphics onto the banners, you’ll want to iron-on the Heat n’Bond BEFORE you cut your fabric. (I use my Easy Press, which I LOVE!) In that case, you may want to use the Bonded Fabric Blade when cutting your fabric. I say that with a caveat, I found that the bonded felt that I used cut better with the rotary cutting blade.

Graphic Placement on Banners

Once you have all of your graphic element cut, you’re ready to place them on the banners. I like to layout my design onto the fabric banner first, to make sure I like the placement. That’s where the Cricut Weeding Tools come in real handy. I LOVE those tweezers!

Next, I use the Easy Press to warm the surface of the fabric banner and then lay down my graphics again quickly. Then, I cover them with the Iron-On Protective Sheet or a cotton dish towel if using a standard iron and press my graphics onto the banner according to the Heat n’ Bond directions.

3D Graphics on Banner

One really fun thing you can do when cutting graphics in this manner, you can add some little 3D elements to your design. I thought it would be fun to have my narwhal’s fin to pop out a bit to give him a little more character. When I was pressing the narwhal onto the banner, I placed the used backing of the Heat n’ Bond under the fin with the shiny side of the paper facing the fin. That would mean the it wouldn’t stick to the fabric or the paper.

Now, his cute little fin will pop right out!

Creating Banner Hanger

Now, to hand the cute banners that you just made. You need to either sew a pocket for the dowel or use fabric glue to create create the pocket. I prefer the sewing method however, if you don’t have a sewing machine, you don’t need to run out and purchase one just for this project.

You need to fold your fabric over to create a pocket large enough to feed your dowel through.

When you have the banner with the dowel ready to hang, attach the rope and hang on the wall!

How to Create Graphic Banners with Fabric • They are easy to make with the Cricut Maker and have such impact in your room or for a party. Come learn how easy they are to make at whipperBerry.

Now, I know you are going to want to save this tutorial and share it with all of your friends (wink, wink!) Here is a handy graphic to Pin…

How to Create Graphic Banners with Fabric • They are easy to make with the Cricut Maker and have such impact in your room or for a party. Come learn how easy they are to make at whipperBerry.

SaveSave

SaveSave

SaveSave

SaveSaveSaveSave

This is a sponsored conversation written by me on behalf of Cricut. The opinions and text are all mine.

SaveSave

SaveSave

SaveSave

SaveSave

SaveSave

SaveSave

  • « Go to Previous Page
  • Page 1
  • Page 2
  • Page 3
  • Page 4
  • Interim pages omitted …
  • Page 7
  • Go to Next Page »

Primary Sidebar

Heather from Whipperberry
Hello... my name is Heather and I'm the creator of WhipperBerry a creative lifestyle blog packed full of great recipes and creative ideas for your home and family. I find I am happiest when I'm living a creative life and I love to share what I've been up to along the way... Come explore, my hope is that you'll leave inspired!

Footer

  • Privacy Policy
  • Crafts
  • Food
  • Gifts
  • Holidays
  • Home
  • Mom Life
  • Recipes
  • Travel

Copyright © 2026 · Seasoned Pro