• Skip to primary navigation
  • Skip to main content
  • Skip to primary sidebar
  • Skip to footer

Whipperberry

WhipperBerry • Your Home For Creative Inspiration

  • Home
  • Recipes
    • Starters
    • Easy Weeknight Dinners
    • Main Dish
    • Salads
    • Side Dish
    • Soups & Stews
    • Desserts
    • Breakfast
    • Miscellaneous
  • Tutorials
    • Creative Crafts
    • DIY Decor
    • Fabric Crafts
    • Food How-To
    • Jewlery
    • Paint Projects
    • Paper Art
    • Party Styling
    • Photography and Graphic Design
    • Silhouette
  • Holidays
    • Easter
    • Mother’s Day
    • Father’s Day
    • 4th of July
    • Halloween
    • Thanksgiving
    • Christmas
    • Valentine’s Day
  • Gift Ideas
    • Gifts For Everyone
    • Gifts for Dad
    • Mother’s day
    • For The Girls
    • For The Kids
    • Teacher Gift Ideas
    • Christmas
  • Printables
    • Holiday
    • Gift Idea
    • LDS Primary
  • Travel
  • About
    • Terms
  • Contact
  • Nav Social Menu

    • Facebook
    • Instagram
    • Pinterest
    • RSS
    • Twitter

Baking

Black Cherry Jell-o Cake

6 · Mar 27, 2013 · 16 Comments

Black Cherry Jell-o Cake in a Jar // This is a repost of a jell-o cake recipe that I shared back in 2011 and has been lost and forgotten about, so I thought I would share it again. It is one of my favorite recipes and it's one that could be shared over and over again! 
 

Black Cherry Jell-o Cake

This cake, my friends encompasses several of my loves in life all into one perfect little bite. I was known in high school for being a connoisseur of all things black cherry.  Black cherry soda, black cherry ice cream, you name it to this day I LOVE it.  Other loves; Jell-o, white chocolate, white cake & and luscious whipped cream.  Generally you think of all of these ingredients and they don’t normal play nice with each other, but I’m hear to tell you they DO!!

Have you heard of a Jell-o cake or a poke cake?  This is a fun summer treat where you bake a white or vanilla cake,  poke holes in it with a toothpick and pour liquid Jell-o slowly into the cake.  It’s generally made with strawberry Jell-o and then topped with whipped cream or Cool Whip and it’s super yummy.  What I’ve done it incorporated a few new twists on the classic to make something heavenly, here’s what you will need…
 

Cake in a Jar

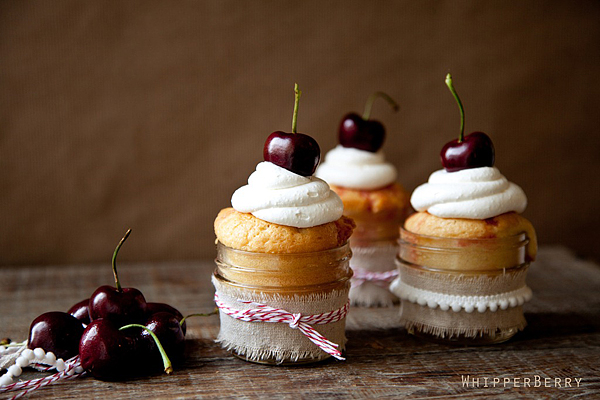
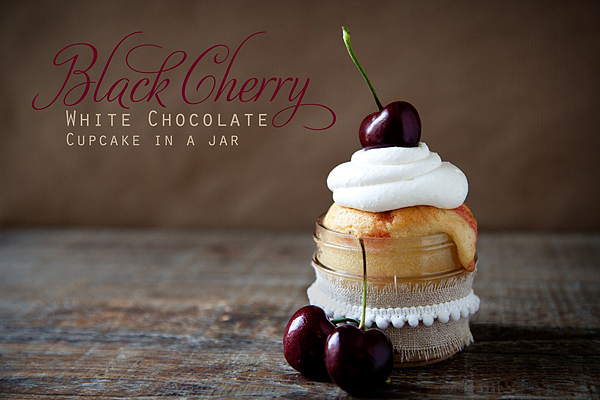
Black Cherry Jell-o Cake Recipe with Whipped Cream Topping

Jell-o Cake:

1 box of white or vanilla cake mix
1 small box of Black Cherry Jell-o

Whipped Cream Topping:

1 small box of instant white chocolate pudding mix

1 cup of milk

1 container of Cool Whip

Prepare according to package directions and bake in one of the following methods, 9×13 pan, cupcakes or cupcakes in a jar.  I would steer clear of a layered cake application, because after you add the jell-o this cake is super moist. 
 
Personally, I have fallen in love with the cupcake in a jar! I’ve seen a lot of people baking cupcakes, cutting them up and then adding them to a jar and then topping with frosting.  Did you know that you could bake the cake directly in the jar? 
I use the 4 oz. wide mouth jars and I fill the jar up a little over half way to prevent the cake spilling over and causing a big mess.  I also baked the cake a little longer that the normal cupcake time because it is a little bigger than your standard cupcake.  I baked it for a solid 30 minutes.  
 
For the Jell-O, boil one cup of water and dissolve jell-o in water, stirring mixture for 2 minutes until completely dissolved.  Add one cup of cold water.

With a fork or a toothpick poke holes into cooled caked and gently pour jell-o mixture over the cake.  Refrigerate for at least three hours.

Mix instant pudding with milk until completely smooth {I used my trusty Magic Bullet, yes I have one of those things} and then combine with Cool Whip.  Place in piping bag and pipe onto cupcakes or frost your cake with the luscious mixture.

Cherry cake in a jar


Cake Decorating Made Easy

14 · Mar 21, 2013 · 25 Comments

Cake Decorating // Let's face it, we all see those amazing cakes on Pinterest and it deflates us a bit. How on earth can we create a cake so stunning. Are you less of a woman if you can't? NOT AT ALL!! I'm not a professional baker but I have found a few tricks that help to create some fun cakes for my family and friends on their special days.

WhipperBerry's Cake Decorating Secrets

This is a cake that I made for my little guy's 3rd birthday. It looks pretty and… It was pretty easy to make. Over the years I've learned a few tips to make things a little easier for those of us who aren't professional bakers / decorators. Here are a few of my secrets…

The Cake

I have made many different types of cake in my life; homemade, box mix cakes, doctored box mix cakes and I've even… bought naked cake!!

From Scratch // Homemade can be challenging if you don't have a lot of baking experience. In my early years when I was aspiring to be just like Martha, I made my first from scratch cake for a friend's party, and it was a disaster. The cake was dense and awful!! I had to go back to the drawing board on that one. After a little more practice, I can now make a much better from scratch cake, but I don't have a fabulous go to recipe just yet.

Box mixes // I have been a cooking show junky for years and many different chefs / bakers on various different shows have said that todays box mixes are as close to perfect as you can get. They say there is no need to try any other method.  I have to agree with this as well. Don't feel any shame at all when you use a box mix. You can even take a box mix to a whole new level by doctoring the mix a bit. One of my most popular posts is a post that my friend Janeen helped me create. She has an amazing recipe for a doctored chocolate cake that is DIVINE!!

WhipperBerry's Most Amazing Chocoalte Cake

Naked Cake // Here is my favorite cake secret… When in a pinch, buy naked cake from your favorite bakery. Yep, you can do that!! The week of Gage's birthday was super crazy, and I really wanted to make a fun cake for him. I just didn't have time to bake and decorate a cake so I went to the bakery at my local market and asked to buy three cake rounds. They always have cakes in the freezer waiting to be decorated. However, if you have a specific flavor in mind, you may want to call a couple of days ahead. On the fly, you kind of have to take what you can get. My bakery charged me $5 per round, not bad considering the time that was going to save me. 

The Frosting

My sweet friend Lara from Less Cake… More Frosting would say, frosting is the most important part of the cake. Others may say, they can take it or leave it. For me, you need to make sure you have a fabulous frosting. That means… steer clear of the store bought brands and learn how to make a signature frosting that can act as a good base for many different flavors. My signature frosting is my Simple Vanilla Buttercream recipe…

vanillabuttercream017

It is a perfect, easy to make frosting that even a beginner baker can't mess up. For Gage's cake I went a step further and added the paste from a vanilla bean to the frosting to make it a little extra special. I just love the little flecks of vanilla in the frosting. I order my vanilla beans from Beanilla. They have some of the best product around. Steer clear of the dried-up, stale vanilla beans you find for a premium price at the super market. 

WhipperBerry Vanilla Bean Frosting

Building the Cake

Here are the boring mechanics that many people like to skip.  Since the inception of Pinterest, there have been a ton of blogs out there who's main purpose is to see if you can recreate what you see on Pinterest. They LOVE to show-off if they have a fail and they want everyone to know that the feat is impossible. Case in point…

slide_265764_1805033_free

img source // I wish I could find the original source, I would love to show them how easy it is!

Here is how you can avoid this mess.

  1. Make sure you have a good frosting that will hold up to a layered cake. That frosting looks more like a glaze, not the type of frosting that will hold a layered cake together.
  2. Freeze your cake. A frozen cake is much easier to work with. 
  3. Trim off the dome of the cake if it has one, creating a nice flat cake. Then flip the cake over and have the bottom be the top of the cake. That way you have a nice flat surface to work with.
  4. Place a small amount of frosting on the cake plate to provide a stable base for the bottom layer.
  5. Skewer your cake. Add a few bamboo skewers to the cake to keep it stable. 
  6. Create a crumb layer. What is this you ask? You will frost the cake with a thin layer of frosting and then place in the fridge for a bit to create a clean work surface.
  7. Take your time, work clean and your cake will look like the top cake. Rushing before you've mastered a skill is the bakers worst enemy. 

IMG_5938

Decorating the Cake

Here is where the fun begins! For Gage's cake I worked in stages. First I frosted a crumb layer and then put the cake in the fridge for a bit to create a clean, solid, workable surface. Next, I frosted the smooth layer of the cake with a small off-set spatula and since the cake was cold, it made that process really easy. I then used one of my favorite tools a jumbo star decorator tip that I purchased at Sweet Baking Supply. Having the right tools makes all the difference. Those small decorator tips that you can find at your local craft store will not do the trick for this cake. You NEED to have the jumbo tips which I have only been able to find online. Then all you have to do is create a large rosette with a small circular motion. It's really easy, just practice a few times on a plate. When you have the technique down all you have to do is scrape the practice rosettes back into the frosting bowl so you don't have to waste the frosting. 

Large rosettes

Another tip… If you mess-up on a rosette, take your off-set spatula and carefully take it off the cake and start over. Frosting is very forgiving!

I found these lovely blue gum balls at Target and bought several containers because I knew I would find something to make with them. They are so pretty!  I thought they would be the perfect addition to the cake around the base and on top of the rosettes. I loved how they turned out. 

WhipperBerry Vanilla Cake

Now, hind sight being 20/20 I would've left off the polka-dot straws. I was wanting something vertical and something that showed that Gage was turning three. If I had to do it over again, I would've just stuck with the extra tall candles, but that's just me. Just keeping it real.

Now, keep in mind… I'm not a professional, far from it. These are just some of the tips and tricks that I've learned over the years that have made my cake decorating what it is. I hope they can inspire you to try something fun and different the next time your loved ones have something to celebrate!

What are some tips, tricks or secrets that you've learned when it comes to cake decorating? Let's all take a minute to share, so we can all become EXPERT cake decorators.

Goat Cheese Puff Pastry with Raspberry Chili Chutney

3 · Jan 24, 2013 · 2 Comments

Goat Cheese Puffs with Raspberry Chili Chutney // Morning everyone!! I don't know if you happened to see yesterday's post about my Raspberry Chili Chutney? Today, I have the perfect appetizer made with puff pastry, goat cheese and topped with my chutney, and it's SUPER easy!!

Goat Cheese Puffs with Raspberry Chili Chutney from WhipperBerry

This recipe couldn't be easier… It was inspired by Marcela Valladolid from Food Networks Mexican Made Easy show. I had been watching her show and this recipe caught my attention. Earlier in the month I had been invited to a cooking club here in Lincoln. The challenge for January was appetizers and decided I wanted to give this recipe a go. I loved that it was a little different, not your normal boring cheese and cracker type appetizer. It's light and classy with a lovely burst of flavor from the chutney. Frankly, it's divine!

Goat Cheese Puff Pastry with Raspberry Chili Chutney

1 package frozen Pepperidge Farm Puff Pastry

11 oz. goat cheese

1 1/2 cups of Raspberry Chili Chutney

Agave

Directions

Thaw the puff pastry according to package directions. Flour your rolling and cutting surface. Gently unfold the pastry and roll it out a bit just to smooth out the dough. Using a round 2 1/2 inch cookie cutter cut the pastry dough into rounds. 

How to cut the puff pastry for whipperBerry's goat cheese puffs with raspberry chili chutney

I used a jumbo decorator tip from Sweet Baking Supply, generally used for decorating cakes as a round tool to score the tops of the rounds. You don't want to cut all the way through the dough when scoring. You just want to create a neat round that will make it easier to fill your pastry once baked. Place the pastry in the oven and bake according to package directions. Remove from oven and place on cooling rack to cool for a few minutes. 

Once cool, gentle with your thumb push down on the scored round section of your little puff pastry bite. It will neatly push through and create a perfect little cup for you to add a bit of goat cheese. Take your goat cheese which has been sitting out at room temperature for about an hour and place little bite sized spoonfuls into the round center of the puff pastry. Top with a little dollop of the raspberry chili chutney and drizzle with a little bit of agave.

Raspberry Chili Goat Cheese Puffs

This recipe yields approx. 40 bite sized appetizers.

If you are a puff pastry lover like I am, here is another recipe that I know you are going to love… Nutella Marshmallow Puffs!

What are some of your favorite appetizers? Do you like to be adventurous or do you like to stick with the classics?

Pineapple Surprise Cake // Recipe

12 · Jan 16, 2013 · 17 Comments

Pineapple Suprise Cake // Who's ready for a trip to the tropics? Not that I'm complaining about the cold weather… I'm actually kind of liking it. I'm a winter girl at hear, however… I also, love to escape to the tropics every once in a while. I have a few recipes that can definatley help with that. One of them is one of my husband's favorites… A tropcial Pineapple Surprise Cake. It's actually Pineapple Upside Down Cake that I of course had to create a "in a jar" version.

pineapple surprise cake

 I played around a bit, added a couple of ingredients and left it right-side up. I know… SHOCKER! Adding it to the JAR genre makes for a fun presentation. 

Pineapple Surprise Cake Recipe

Ingredients:

  • 1/4 cup butter
  • 1 cup brown sugar
  • 6 slices pineapple
  • 6 maraschino cherries without stems
  • 1 1/3 cup AP flour
  • 1 cup sugar
  • 1 cup sweetened coconut (3/4 cup for the cake and 1/4 cup for garnish)
  • 1/3 cup Crisco
  • 1/2 teaspoon baking powder
  • 1/2 teaspoon salt
  • 2 teaspoons of vanilla extract
  • 3/4 cup heavy cream
  • 1 egg

Directions:

Turn on oven to 350 degrees and prepare the jars. You will need 6 clean jars. Spray each jar with cooking spray and set aside while you make the cake batter.

Sift the flour, sugar, baking powder, and salt into a large mixing bowl. Add coconut and mix for a few seconds in order for the coconut to be covered with the flour mixture. Add the Crisco and mix for 30 seconds. Add vanilla, cream, and the egg and mix on high for 2 minutes.

Add a pat of butter to the jars and place in the oven. Once the butter is melted add a tablespoon of brown sugar to the jar and mix with the butter.

add butter and brown sugar to the jar

Add a ring of pineapple and a cherry to the bottom of the jar and then fill the jar half way with cake batter.

add pineapple, cherry and cake batter to the jars

Place the jars on a cookie sheet and place in the oven. Bake for 30-35 minutes at 350 degrees or until the top of the cake is slightly brown. Remove from the oven and let cool. Now you can make the coconut whipped cream to top off the surprise cake!!

Coconut Whipped Cream Recipe

  • 2 cups heavy whipping cream
  • 2 teaspoons coconut extract
  • 1/4 cup powdered sugar

Pour cream into a chilled mixing bowl and mix on high for 1 minute. Add coconut extract and slowly add powdered sugar while the mixer is on low. Return the mixer to high until the cream becomes stiff. Keep a close eye on it. If it is over beaten it will become butter.

Prepare your Jars for Presentation

One of the things that makes desserts in jars so appealing is how you can decorate the jar for your guests. For this cake, I just tied a yellow jute ribbon around the jar to dress it up a bit. Then pipe the whipped cream on top with a star tip to give it a little pizzazz.

add a ribbon to the jar and top with the coconut whipped cream

Ahead of time, toast up the 1/4 cup of the sweetened coconut in the oven under the broiler. Keep a close eye on it, it only takes a few minutes. Let cool. When you are ready to serve your cake sprinkle the coconut on top and place a cherry on top and voila, you have a lovely tropical treat to drive away the frozen winter (for a little bit at least!)

whipperberry tropical pineapple cake


  • « Go to Previous Page
  • Page 1
  • Interim pages omitted …
  • Page 18
  • Page 19
  • Page 20
  • Page 21
  • Page 22
  • Interim pages omitted …
  • Page 24
  • Go to Next Page »

Primary Sidebar

Heather from Whipperberry
Hello... my name is Heather and I'm the creator of WhipperBerry a creative lifestyle blog packed full of great recipes and creative ideas for your home and family. I find I am happiest when I'm living a creative life and I love to share what I've been up to along the way... Come explore, my hope is that you'll leave inspired!

Footer

  • Privacy Policy
  • Crafts
  • Food
  • Gifts
  • Holidays
  • Home
  • Mom Life
  • Recipes
  • Travel

Copyright © 2026 · Seasoned Pro