• Skip to primary navigation
  • Skip to main content
  • Skip to primary sidebar
  • Skip to footer

Whipperberry

WhipperBerry • Your Home For Creative Inspiration

  • Home
  • Recipes
    • Starters
    • Easy Weeknight Dinners
    • Main Dish
    • Salads
    • Side Dish
    • Soups & Stews
    • Desserts
    • Breakfast
    • Miscellaneous
  • Tutorials
    • Creative Crafts
    • DIY Decor
    • Fabric Crafts
    • Food How-To
    • Jewlery
    • Paint Projects
    • Paper Art
    • Party Styling
    • Photography and Graphic Design
    • Silhouette
  • Holidays
    • Easter
    • Mother’s Day
    • Father’s Day
    • 4th of July
    • Halloween
    • Thanksgiving
    • Christmas
    • Valentine’s Day
  • Gift Ideas
    • Gifts For Everyone
    • Gifts for Dad
    • Mother’s day
    • For The Girls
    • For The Kids
    • Teacher Gift Ideas
    • Christmas
  • Printables
    • Holiday
    • Gift Idea
    • LDS Primary
  • Travel
  • About
    • Terms
  • Contact
  • Nav Social Menu

    • Facebook
    • Instagram
    • Pinterest
    • RSS
    • Twitter

Breakfast

Easy New Years Quiche with the Kiddos and Toca Kitchen 2

2 · Dec 27, 2014 · 3 Comments

+ This Easy New Years Quiche post brought to you by Toca Kitchen 2 App +

New-Years-Quiche-with-the-Kiddos

I am always looking for ways to get my kiddos involved in the kitchen. Cooking together teaches so many life skills like how to follow directions, how to share, how to clean-up after ourselves, how to be creative and so much more. I would have to admit that I don’t take all of the opportunities that I should because of the rush of life. It’s hard to slow down sometimes and remember to get the kiddos involved. Recently, I was introduced to a new App made especially for our kiddos called Toca Kitchen 2…

Toca-Kitchen-2-Logo-Image

So… funny story. When I was invited to review Toca Kitchen, I had downloaded the app onto our family iPad and really didn’t do anything with it right at that moment. I had so many other things on my plate right at that point.

A few hours later, my little guy Gage, who is four, was playing with the iPad. I started to hear him chatting while he was playing a game and it started to sound like a cooking show. He has a Mother who likes to watch the food network, so I guess it wasn’t too far fetched. I went over to see what he was playing, and sure enough, he was playing the new Toca Kitchen 2 and without any prompting from me, he had figured it out all on his own and was having a ball!

For me I thought the graphics were a bit silly, but when I saw it through HIS eyes it was super fun. I then proceeded to teach his older sister how to play the game and they have had hours of fun playing together coming up with all kinds of crazy concoctions. Here’s a video of him doing one of his cooking shows… It’s super cute and he came up with it all on his own!

Toca Kitchen with WhipperBerry from Heather Thoming on Vimeo.

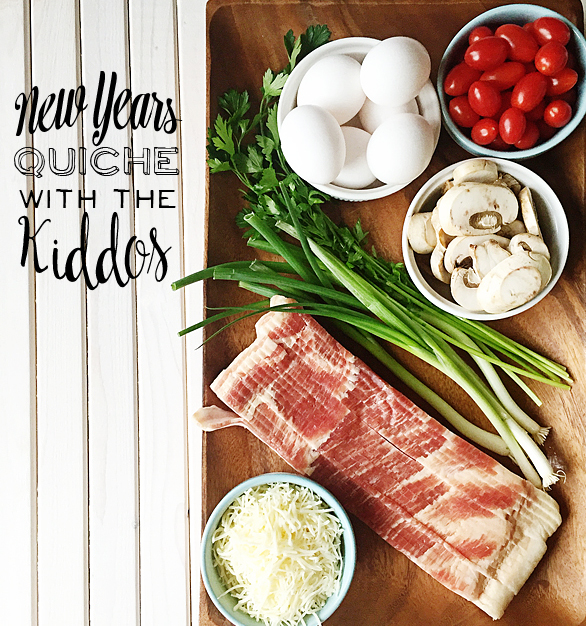
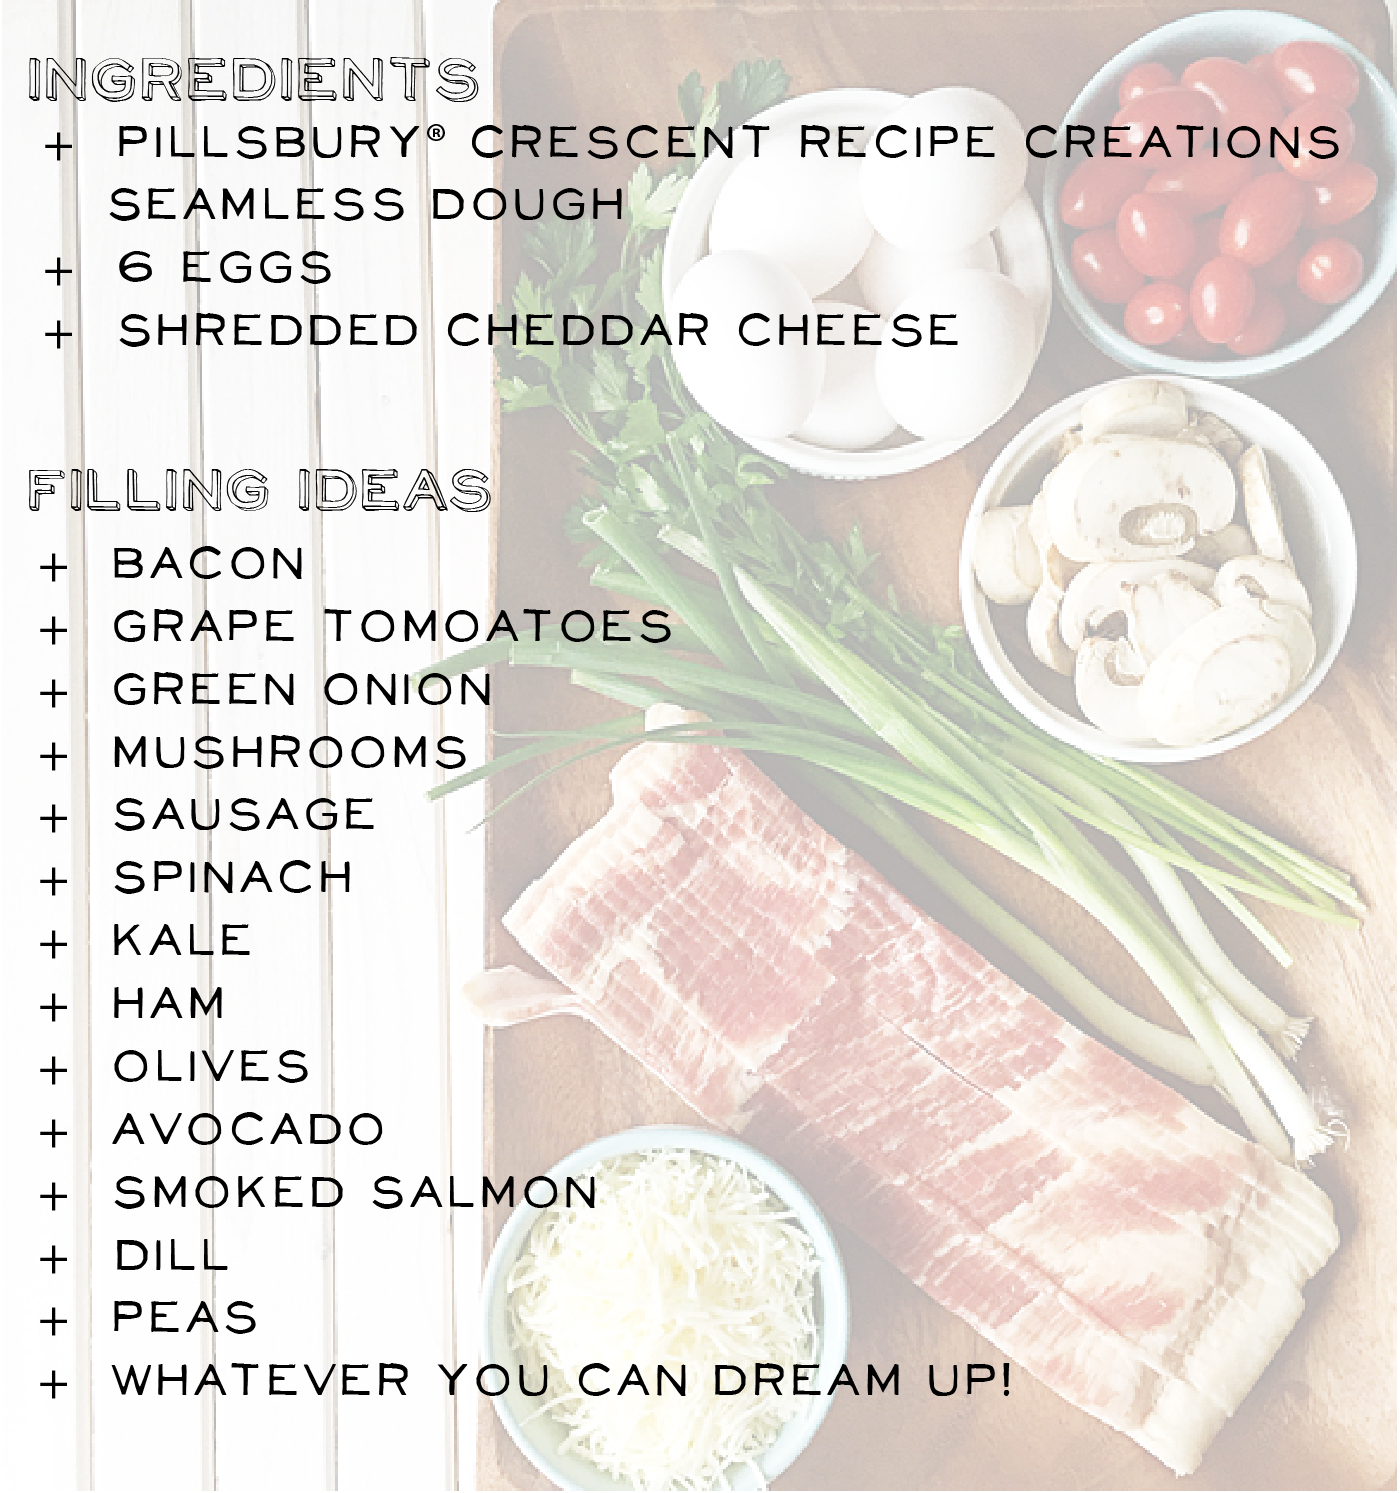
We decided to come up with our own Toca Kitchen recipe for the New Year. I created a simple quiche recipe and my daughter Emily picked all of the goodies to add to the quiche.

Easy-Quiche-Recipe

This is a super simple recipe that is PERFECT to make with your kiddos!

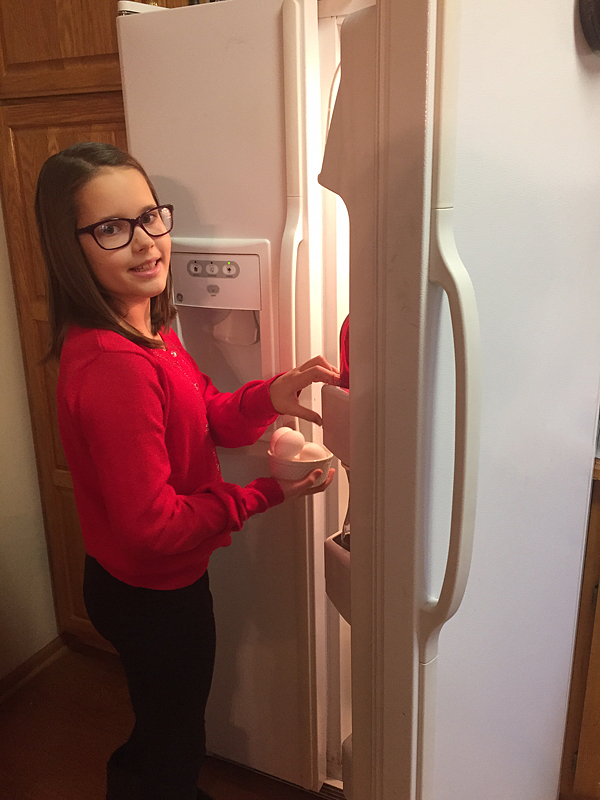
First, Emily grabbed all of our ingredients out of the fridge just like in the Toca Kitchen 2 App.

grabbing-out-ingredients-out-of-the-fridge

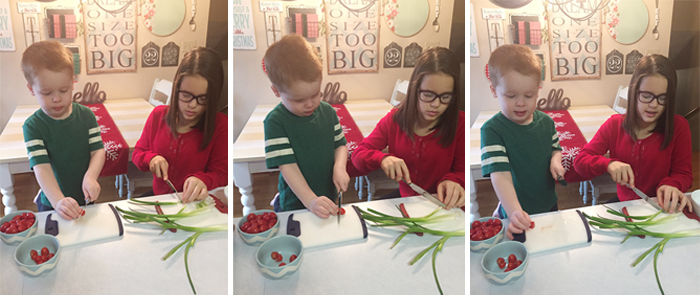
Both Emily and Gage washed their hands, and then using a kid safe butter knife, they prepped all of our ingredients for our quiches.

Prepping-ingredients-for-the-easy-quiche

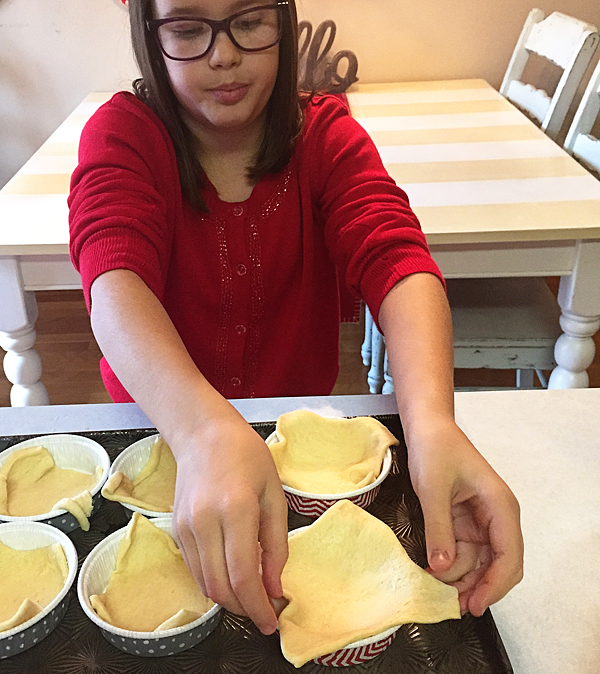
I used some baking cups that I found at Target that are perfect for individual quiches. Emily cut the Pillsbury® Crescent Dough into squares and placed them into the baking cups.

Pillsbury-Cresant-dough-crust

These are all things that your kiddos can do with just a little direction from you.

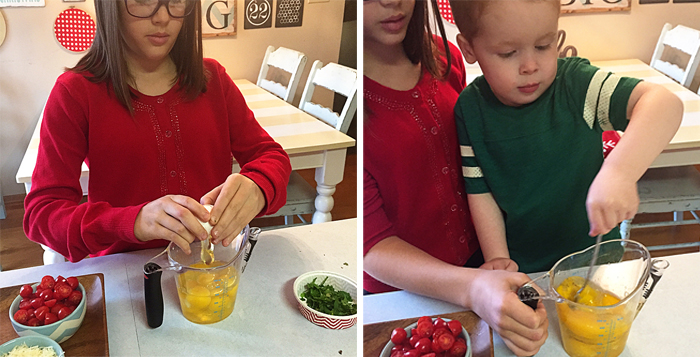
Emily cracked the eggs into a dish, and Gage whipped them up…

mixing-eggs-for-the-easy-quiche

They seasoned the eggs with salt and pepper and then poured it into the baking dishes. Then we each topped our quiches with our favorite toppings.

making-quiche

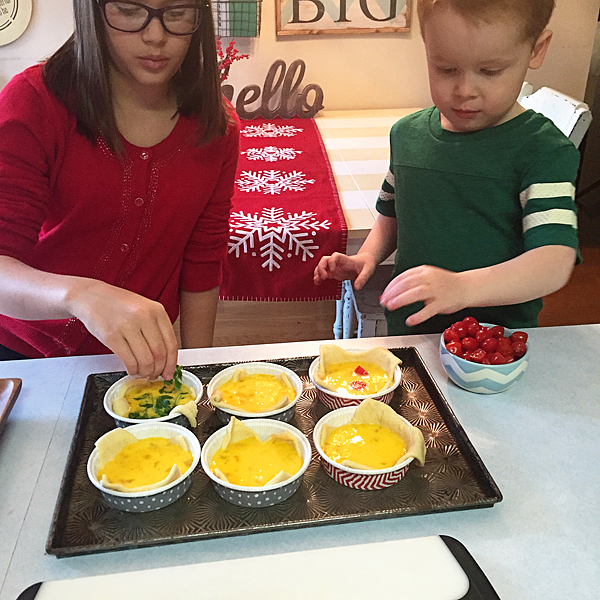
Emily loves all kinds of goodies in her quiche, she loves the whole kitchen sink. I opted for bacon, mushrooms & tomatoes.  Gage went non-traditional and packed his quiche full of tomatoes which was actually rather good! We topped all of ours with cheese and then Emily placed them into a 350˚ oven for 20-25 minutes.

Putting-the-quiche-into-the-oven

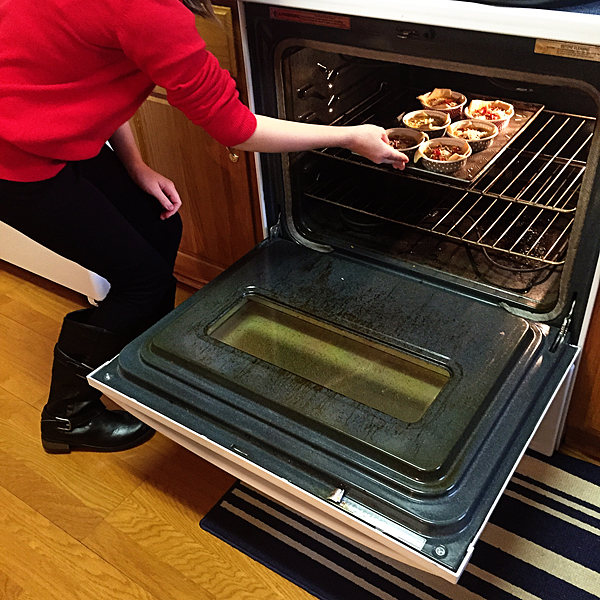
Make sure the eggs are fully set and then remove from the oven. Let cool for a few minutes and then ENJOY!

IMG_0089

WhipperBerry-Easy-Breakfast-Quiche

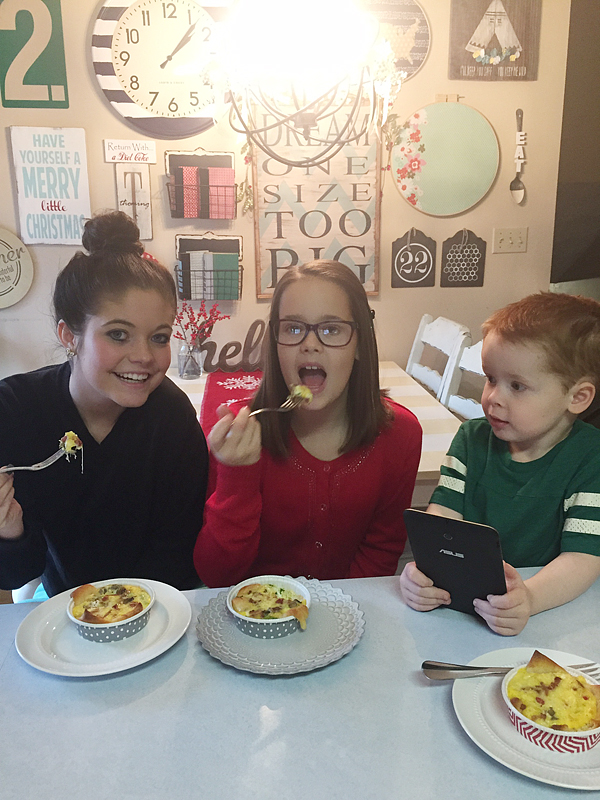
It was so fun to take Gage’s new favorite app and bring it to life for him!

You can get Toca Kitchen 2 today and enjoy some kitchen fun with your kiddos. It’s only $0.99 in the Apple app store.

Disclaimer // This post is brought to you by Toca Boca Kitchen 2 via Mom it Forward. All thoughts, ideas & opinions are my very own.

Holiday Nog Pull Apart Bread + Neighbor Gift

74 · Nov 12, 2014 ·

+ This Holiday Nog Pull Apart Bread post brought to you by Silk +

Silk-Holiday-Nog-Pull-Apart-Bread-WhipperBerry

I’m so excited for this time of year… I LOVE baking and creating goodies for my friends and neighbors. I grew-up with a Mom who kicked it into high gear for a few weeks in December every year, pumping out Holiday goodies like peanut brittle, chocolate peanut butter bars, and fudge along with cookies galore. I remember watching both my parents working together on those scrumptious neighbor treats, and it always made my heart happy.

I remember the year when I ate SO MUCH of my favorite Chocolate Peanut Butter Bars, I swore I would never eat chocolate again! It took me a few years, but I eventually found my way back.

Now that I’m the Mom, I try to come up with some fun goodie each to year to share with our friends. A few weeks ago, I was at the Pillsbury Bake-Off and was inspired. A few of the entires were fun pull-apart breads with various different flavor profiles. I thought it would be fun to have a Holiday Nog Pull Apart Bread for a neighbor gift.

Silk-Holiday-Nog-Pull-Apart-Bread-2

This is really just a simplified cinnamon roll with the addition of a Silk Holiday Nog glaze on top. Why Silk Holiday Nog you ask?

Well… First off, I LOVE it! It has all the Holiday flavor without all the guilt. It is free of dairy, egg, casein, MSG & lactose. It has no cholesterol or saturated fat and has a fraction of the calories of traditional Egg Nog. It’s the perfect Holiday treat minus the guilt. I thought it would be the perfect flavor profile for my pull-apart bread!

Silk-Holiday-Nog-Pull-Apart-Bread-1

Now, the real secret to this pull apart bread is how EASY it is to make! You will look like you slaved over it for hours, but no… It really only took minutes to make. Here’s how you make it.

Holiday Nog Pull Apart Bread Recipe

1 can of Pillsbury Crescent Seamless Dough Sheets

3 tablespoons melted unsalted butter

1 teaspoon pumpkin pie seasoning

2 teaspoons of sugar

1 teaspoon of Swedish Pearl Sugar (optional)

1 cup powdered sugar

1 tablespoon Silk Holiday Nog

​pinch of salt

non-stick baking spray

Preheat the oven to 350˚

You will need small paper loaf baking pans to bake your bread in. This will also make it easier to give as gifts to your friends. Spray the pan with a non-stick baking spray and set aside.

Open your Pillsbury dough and unroll on a clean surface and brush with melted butter.

IMG_0007

Then sprinkle the entire surface with pumpkin pie seasoning and sugars.

IMG_0008

I like to add the Swedish Pearl Sugar to my bread, but it’s not totally needed. It just gives it that little extra something. You can find this in most grocery stores these days in the baking isle.

IMG_0010

Next, cut your dough into squares roughly the width of your baking pan.

IMG_0011

Stack your squares, and place them in your pan.

IMG_0013

You should have some extra room for the dough to expand. Brush the top with more melted butter and sprinkle with more sugar.

Place in a 350˚ oven for 30 minutes. Remove from oven and let cool.

In the meantime, you can whisk-up your glaze. In a small bowl add 1 cup of powdered sugar and pour 1 tablespoon of Silk Holiday Nog into the sugar, whisk together. The sugar should melt right into the Holiday Nog. Play with the consistency, If you like a thick glaze, don’t add as much liquid, if you like a thinner glaze, add more. Once you get your desired consistency, add a good pinch of salt. Carefully drizzle glaze over your pull-apart bread.

Package it up in a cellophane bag for your friends and neighbors. I think I am also going to add a carton of Silk Holiday Nog to the basket when deliverthis treat! It will taste so good with the bread!!

Silk-Holiday-Nog-Pull-Apart-Bread-WhipperBerry

Now this recipe makes one loaf. If you are wanting to make more than one, you will need to grab more cans of dough and double or triple the recipe.

I will have you know… NONE of the bread that I made for this post even left the house! My husband and the kiddos got to it first and they inhaled them before they even had time to cool and be photographed. Yep they are that tasty!

For more fun holiday treat ideas from Silk, sign-up for their club and get special deals as well. You can also find great ideas on the Silk Facebook page.

What’s your favorite Holiday treat to share?

This conversation is sponsored by Silk. The opinions and text are all mine.

German Ham and Cheese Garlic Toast // GIVEAWAY

16 · May 27, 2014 · 6 Comments

This post brought to you by the Panasonic FlashXpress™ Toaster Oven// A few years ago, our family traveled to Germany and one of the first meals I had there was a simple ham & cheese toast from one of the local bakeries. We had stopped at the Rhine Neckar Zentrum (Mall) in Viernhiem for dinner, my husband and the girls decided to eat at KFC and I just couldn’t swallow the idea of eating American food while in Germany. I mean really?

I set out on a hunt for a more “German” quick bite to eat while the family was eating their “American” chicken. I found a little bakery inside the mall there and had the most interesting, simple meal. It was a loaf a good German bread cut in half with some type of garlic spread, diced ham and lots of  sharp melted cheese. It was simple and boy was it tasty!

Ham-and-Cheese-Toast-WhipperBerry

 Recently, the folks at Panasonic asked it I would be interested in trying out their FlashXpress™ Toaster Oven and to develop a quick, in a flash meal with the FlashXpress™ and I immediately thought of my first German meal. It would be perfect in a toaster oven! Of course I said yes, and set out to recreate one of my favorite quick German meals.

Ham-and-Cheese-Toast-2

 Once I found a good garlic spread it was super simple to recreate. I used Mezzetta’s Savory Garlic Everything Spread which is SUPER tasty.  I spread that on some good bread that I found in the bakery at Super Target, topped that with some diced ham that I sautéed in a little bit of butter, shredded sharp cheddar cheese and a little parmesan cheese.

Ham-and-Cheese-Toast-3

 Popped it into the Panasonic FlashXpress™ Toaster oven and within 10 minutes I had a perfect quick meal for the family, in a flash!

Ham-and-Cheese-Toast-4

The nice thing… I didn’t have to heat up my oven and my kitchen at all and the ham and cheese garlic toast turned out perfect!

Ham-and-Cheese-Toast-6

I will have to admit, when I was approached by Panasonic to do this post I was going to turn it down. I didn’t want one more thing cluttering up my counter tops. I mentioned it to my husband and he flipped… He’s been wanted to get a toaster oven for some time and I just wouldn’t jump on board. I have never had a toaster oven and I just didn’t understand the magic that you can create in this little toasting machine.

This one especially is compact, it doesn’t take up much space, you can get it in white or silver and it has some of the best infrared technology around. I especially love that the rack is designed to pull out when you open the door, making retrieving your food easier and safer.  It has several presets or you can just use the temperature and time controls. It’s super easy to use and clean and I will have to admit… I use it ALL THE TIME now! I hardly ever use my microwave anymore. I’ve been making homemade croutons, baking cookies and of course making toast of all kinds. I have been TOTALLY converted!

The folks at Panasonic would love to giveaway a FlashXpress™ to one of YOU!!

Panasonic-FlashXpress-Giveaway-on-WhipperBerry

All you have to do is follow the direction in the Rafflecopter box below…

a Rafflecopter giveaway

Disclaimer // This is a sponsored post. I received a Panasonic FlashXpress™ Toaster oven to review along with funds to create a recipe. All thoughts, ideas and opinions are my very own.

Maple Apple Bacon Waffle Recipe

2 · Apr 17, 2014 · 4 Comments

// Maple Apple Bacon Waffle Recipe //

Maple-Bacon-Apple-Waffles-from-#whipperberry-1

My Husband LOVES waffles! He loves them so much for Christmas this last year I bought him an All-Clad Waffle Maker as his big WOW present and he was giddy when he opened it.  It’s like when I receive my Kitchenaid Mixer… a BIG deal!! Because of that, we have a waffle night each week and we’re getting pretty good and coming up with fun new waffle ideas. This one has been my favorite so far, a Maple Apple Bacon Waffle! Yep, it’s as good as it sounds!!

This recipe is actually easier than it sounds. You just need FOUR ingredients for the waffles because we use our favorite waffle mix, Hungry Jack®.  You will need bacon, Hungry Jack® Complete Buttermilk Pancake and Waffle Mix and your favorite apple pie filling… Super simple!

For the maple part of the recipe, you can use your basic maple syrup like Hungry Jack® Syrup or you can make your own. My husband’s Mother used to make her own syrup and he LOVES that kind of syrup so for special occasions we make our own and that’s super easy as well. It’s just white sugar, brown sugar, water, maple extract and butter extract. It only takes about 15 minutes to make and is TOTALLY worth it!

Here is how to make our Maple Apple Bacon Waffles…

Maple-Bacon-Apple-Waffles-from-#whipperberry-4

Maple Apple Bacon Waffle Recipe
 
Save Print
Prep time
25 mins
Cook time
20 mins
Total time
45 mins
 
This scrumptious waffle recipe is perfect for breakfast, brunch or even dinner. Your family will be WOW'd with your amazing waffle making skills, they won't even know how easy they really are to make!
Author: Heather // WhipperBerry
Recipe type: Breakfast
Cuisine: American
Serves: 5-6
Ingredients
  • Apple Bacon Waffles
  • 1 lb. bacon
  • 2 cans of apple pie filling
  • 3¼ cups of Hungry Jack® Complete Buttermilk pancake & waffle mix
  • 1½ cups water
  • 1 container of Cool Whip or fresh whipping cream
  • Maple Syrup
  • 1 cup sugar
  • 1 cup brown sugar
  • 1-2 tsp. imitation maple extract
  • ½ tsp. butter extract
Instructions
  1. Waffle Instructions
  2. Before we start the waffles, I put a pound of bacon into a preheated 375˚ oven on a wire rack over a baking sheet. I spray the wire rack with Crisco® Non-Stick Cooking Spray before I place the bacon on the rack. I cook the bacon for 10 minutes on one side and then turn the bacon and bake for an additional 10 minutes on the other side. Keep an eye on the bacon, you don't want it to become to crisp. You want it to still be a little pliable so that you can place it in the waffle iron with out it crumbling. Remove from oven and set aside.
  3. To start the waffles, pour your apple pie filling into a large bowl and using an immersion blender break down the apples. If you don't have an immersion blender, you can put the pie filling into a food processor, blender or even a food mill to break down the apples. Any option works fine.
  4. Add the waffle mix to the apples and stir. The package directions for the waffle mix calls for water, you will still add water, but it will be less than the normal amount because of the apples. Slowly add the water to the waffle and apple mixture until you achieve the desired waffle consistency.
  5. Preheat your waffle iron. Depending on the size of your waffle iron, you typically put about ¾ cup of waffle mix into the iron for one waffle. To add the bacon into the waffle, pour half of the waffle mix into the waffle iron and then lay your bacon onto of the mix in an "X" and then pour the remaining mix ontop of the bacon. Close the waffle iron and cook for 3-4 minutes or until you achieve your desired waffle color. I like mine pretty light, my husband like them darker and crispier.
  6. Top with a little more warmed apple pie filling, some warm maple syrup and a dollop of Cool Whip or fresh whipped cream and enjoy!
  7. Homemade Maple Syrup
  8. In a small sauce pan, combine sugars and water and place of medium high heat. Bring to a boil and lower the temperature to medium and let simmer for 10 minutes. Remove from heat and add maple and butter extracts. Let cool for a few minutes and then serve with your waffles.
3.2.2310

Disclaimer // This is not a sponsored post, however I am a member of the Amazon Affiliate program and I do have some affiliate links included in the post.

  • « Go to Previous Page
  • Page 1
  • Interim pages omitted …
  • Page 6
  • Page 7
  • Page 8
  • Page 9
  • Page 10
  • Interim pages omitted …
  • Page 13
  • Go to Next Page »

Primary Sidebar

Heather from Whipperberry
Hello... my name is Heather and I'm the creator of WhipperBerry a creative lifestyle blog packed full of great recipes and creative ideas for your home and family. I find I am happiest when I'm living a creative life and I love to share what I've been up to along the way... Come explore, my hope is that you'll leave inspired!

Footer

  • Privacy Policy
  • Crafts
  • Food
  • Gifts
  • Holidays
  • Home
  • Mom Life
  • Recipes
  • Travel

Copyright © 2026 · Seasoned Pro