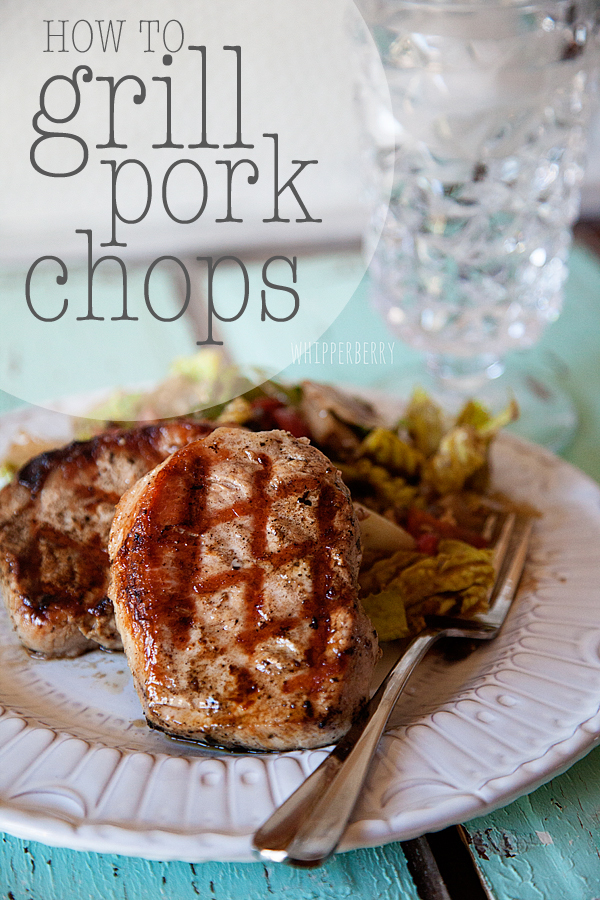
• Skip to primary navigation
  • Skip to main content
  • Skip to primary sidebar
  • Skip to footer

Whipperberry

WhipperBerry • Your Home For Creative Inspiration

  • Home
  • Recipes
    • Starters
    • Easy Weeknight Dinners
    • Main Dish
    • Salads
    • Side Dish
    • Soups & Stews
    • Desserts
    • Breakfast
    • Miscellaneous
  • Tutorials
    • Creative Crafts
    • DIY Decor
    • Fabric Crafts
    • Food How-To
    • Jewlery
    • Paint Projects
    • Paper Art
    • Party Styling
    • Photography and Graphic Design
    • Silhouette
  • Holidays
    • Easter
    • Mother’s Day
    • Father’s Day
    • 4th of July
    • Halloween
    • Thanksgiving
    • Christmas
    • Valentine’s Day
  • Gift Ideas
    • Gifts For Everyone
    • Gifts for Dad
    • Mother’s day
    • For The Girls
    • For The Kids
    • Teacher Gift Ideas
    • Christmas
  • Printables
    • Holiday
    • Gift Idea
    • LDS Primary
  • Travel
  • About
    • Terms
  • Contact
  • Nav Social Menu

    • Facebook
    • Instagram
    • Pinterest
    • RSS
    • Twitter

Crafts

Plum Berry Basil Ice Cream

1 · Jul 30, 2013 · 3 Comments

 
A couple years ago my sister in law introduced me to the flavor combination of strawberries and basil. Sounds odd at first, but they compliment each other beautifully! And I recently found a love for a frozen treat put plum and basil together, so when I was assigned to make one of the flavors of homemade ice cream for a family reunion, I knew what I wanted to do! Considering that one of my husband's uncles was hesitant to try it because of the basil, but then asked for the recipe later, I'd say it was a success.
 
 
Homemade Plum Berry Basil Ice Cream
Yields: 1 quart
 
Ingredients:
1 lbs very ripe plums, pitted and chopped, with skins (I used 4 large plums)
7-8 strawberries, sliced
2/3 cups blueberries (fresh or frozen)
1/2 cup agave (or 3/4 cup sugar)
2 cups heavy whipping cream
1/3 cup fresh basil, chopped and bruised
 
In a medium pot, cook the plums and strawberries over medium heat, stirring often. Continue until the fruit softens and the plums start to break down — about 15 minutes. Pour into a heat proof bowl (I used a 9×13" glass pan to cool it down faster), add blueberries, then cover and refrigerate until the mixture is room temperature — about 30 minutes. 
 
Pour the cream in the pot you just used for the fruit, and add the agave (or sugar) and basil, which has been finely chopped and bruised by pressing it with the flat part of the knife to release the oils. Warm the cream mixture over medium-low heat, stirring often. Cook for about 5 minutes (if you use sugar, make sure it has dissolved), then remove from heat to let steep — about 15-20 minutes.
 
Pour cream mixture through a strainer into the bowl (or 9×13" pan) with the fruit mixture to strain the basil, make sure to press the basil leaves with a wooden spoon to release any extra liquid and as much flavor as possible. And if you really like the basil flavor, like myself, you can put a spoonful of it back in. 🙂 Stir the mixture, then cover and refrigerate, until the ingredients are very cold — 1 to 2 hours, or more.
 
Pour ice cream into an ice cream machine and freeze/churn until desired consistency. You could serve immediately, or place in a freezer container and freeze for another few hours to harden it up. The lovely fuchsia color comes from the plum!
 
** If you don't have an ice cream maker, go here for great directions on how to make/freeze ice cream without a machine. 
 
 
Thank you again for having me Heather! Hope everyone is enjoying an extra sweet summer!
 
xo,
Haley


 Pear & Gorgonzola Pizza // DIY Sillhouettes on Canvas // Tuxedo Zucchini Bread Muffins
 
Haley life is sweet
 

Family Selfies… Keeping it Real Folks

0 · Jul 29, 2013 ·

This post brought to you by Clorox // Did you know that National Parents Day is coming up? I for one, would like to nominate myself for the National Parent award. My house is spotless 100% of the time, not a pillow out of place. My children behave like angels at home and in public. They were all potty trained within their first year and never have they ever had any accidents from that point forward. Never have we ever had spilled milk at the dinner table or a dryer lint explosion in laundry room… ok, well the last one did happen… yesterday.  So, I may have exaggerated a bit… Let's be honest with ourselves. Life is messy sometimes… Life is silly and together it can be messy fun.

Case in point… my son.

This photo pretty much sums up all of my efforts at potty training the boy. He is far more interested in wearing the toilet seat, than sitting on it an using it as it is intended. Every ounce of me is cringing at all the possible germs that are jumping on board his face at that moment, but rather than jumping up and sterilizing the boy, I took two seconds to document the real story. He'll thank me some day for sure.

I could have a thousand perfect photos of Gage with him looking like a perfect gentleman like this…

Which is nice, or I can tell the real story about when he played Mister Distructo during nap time and emptied out all of the diapers into his bed…

… Instead of taking a nap. Don't even get me started on when he decided to play finger paints, in his bed, with a not so desirable paint medium from inside his diaper. I have to admit, I didn't snap a photo of that one. I had a hard time seeing the silver lining on that fun episode at the time. 

He also was so kind to unroll all of the toilet paper for me when I was sick, in bed…

What a kind and thoughtful boy he is.  And then there are those days when it's just to hard being three…

The poor boy, it's hard having three big sisters and not being able to get your way all, or any of the time really.

Then there are those precious moments that we never want to forget. Those moments that aren't scripted that quietly tap us on the shoulder, sometime we miss them. Those are the special moments I want to remember forever…

I am so grateful for camera phones and fabulous apps like Instagram that make documenting these moments so easy. I regret to say, I don't have very many of these types of photos of my girls at that age, because I NEVER had a camera in hand when the messy fun was happening. I'm making up for it now… I try and look through the haze a frustrating parent moments to find the silly, the messy and the downright embarrassing at times…

Yea, YOU try shopping with this crew!!

It may not be pretty, or perfect but I'm still down right proud of my family and proud to be a parent. 

Tell me about one of your favorite real family moments for a chance to win $500 from Clorox! This National Parents Day, July 28th, Clorox is celebrating real family moments by asking parents to share their #RealFamilySelfies on Instagram. July 24th through July 31st, share your photo by simply uploading it to Instagram with “#RealFamilySelfies” and you could win $500 Visa gift card.

This National Parents Day Clorox is celebrating  family moments – you know, those big or small, heart-warming and funny moments that today’s families all encounter – by asking parents to snap a pic and share their #RealFamilySelfies, the moments parents want to remember forever. Selfies capture those spur of the moment feelings and happenings that “official” family portraits may not exactly capture. 

This post is brought to you by The Clorox Company. I have partnered with them to spread the word about Clorox's #RealFamilySelfies program. For more information and to view the official rules visit this site. All opinions and stories are my own.

{C}

This post is brought to you by The Clorox Company.  I have partnered with them to spread the word about Clorox's #RealFamilySelfies program.  For more information and to view the official rules visit www.statigr.am/contest/ppgx/celebrate-national-parents-day-with-clorox-by-sharing-realfamilyselfies.  All opinions and stories are my own.
 

Friday Flair Link Party // Features no.5

0 · Jul 26, 2013 · 20 Comments

Friday Flair Link Party // Well, happy Friday everyone! We are home from Colorado and finally getting back into the swing of things. Why does it take so long to get back to normal after a fun trip?  

Currently, we are soaking up all of the last few weeks of summer before school starts again in August. the kiddos and I have been staying up late and sleeping in with all kinds on crazy summer fun in between. From the looks of all of the posts from the last Friday Flair, it seems like you've all been doing some of the very same. Here are a few of the fun goodies that caught my eye last time…

friday flair features

cherry ricotta ice cream // the world in a jar // baked blueberry sour cream donuts

Friday Flair Feature 2

painted floral table cloth // raspberry & chantilly cream meringue nests // mint night stand

Friday Flair Feature 3

travel bingo // dirty diet coke kit // jell-o shaved ice

Friday Flair Feature 4

salty & sweet summer pie // thai ice cream sandwiches // kitchen art printable

Friday Flair Feature 5

blueberries & cream hand pies // dirty dr. pepper // no-bake cherry chocolate cheesecake

Here's what the WhipperBerry Creative Team has been up to lately…

WB Creative Team

healthy ice cream sandwiches // diy beach bag // beeswax candle & wood burned bowl

Don't forget to enter this week's Silhouette Portrait GIVEAWAY!!


Now let's Get this Link Party Started!!

$2.00 DIY Beach Bag

0 · Jul 25, 2013 · 3 Comments

Hi Whipperberry readers!  It's Jenn from My Fabuless Life back this month to show you a super simple, super affordable little beach bag I threw together for a recent family vacation.  Literally, if you have five minutes and a five dollar bill, you can make this–you don't even need a personal cutter!  And what's extra awesome about this project is that you can use this method to "screen print" just about anything that's fabric!  


Our family recently went on vacation to the beautiful Oregon Coast and this trip meant two things for us: LOTS of time in the car (we drove from Utah to Oregon) and LOTS of time at the beach.  I always pack my 3 year old daughter a road trip bag and a brand new bag to hold all of the goodies is part of the fun.  For this trip, my $2.00 bag pulled double-duty by holding all of her stuff during the car ride and then all of our treasures and toys once we got there and were ready to spend our days on the beach.

To make your own bag you'll need:
Freezer paper
Craft paint + Fabric Medium
A cloth bag (I got mine for $1.99 at Hobby Lobby without the 40% coupon)
Iron

Find the image you want to use: for this one, I just Googled "Whale Silhouette" and found one that I liked.  Click on the image so it shows up on your screen like this (in Google, you can also click "view original image"):


Zoom in or out on the image until it's the size you want and then just lay your freezer paper right over the computer screen and trace GENTLY!  Let's not go ruining any computer screens here, since that would sort of negate this whole $2.00 project thing.  You should be tracing on the freezer paper shiny side down (pencil marks will be on the dull side).

Next, just cut out the image with an Exacto knife.  Make sure to leave plenty of room around your shape to "slop" your paint so it stays on the paper and doesn't smudge all over your fabric.  Make sense?  If not, you'll see what I mean below.


I wanted this to be sort of "kid chic" so I left the cute little face off of the whale–not to mention, it makes it that much easier to cut and paint.  Next, iron your freezer paper onto your fabric shiny side down.  Make sure to iron it down good and tight so your paint doesn't bleed underneath (I do it with my iron on the highest setting).  Also be sure to iron your bag or shirt or whatever you're using prior to painting it.  Painting on wrinkled fabric will not give you pretty results.

Next comes paint: mix the paint and medium according to the instructions on the bottle of fabric medium (which can be found with the craft paints).  I used gold paint (like I said, I was going "kid chic" here and it glitters in the sun–BONUS!) and my fabric medium ratio was 2 parts paint to 1 part medium.  This gives you a softer finish on the fabric once the paint dries.  You can do this without the medium, but your paint will be stiff and won't soften as much in the wash.  YES–you CAN wash it!!

Apply your paint (you can use a brush or a dobber), let the paint dry a little and then pull the freezer paper off and let the paint dry overnight.  DONE & DONE!!
 

This is such a fun easy way to personalize gifts.  Onesies for baby showers, book bags for kids, team t-shirts for little ones…the possibilities are really endless.  Later this week over at MFL, I'll be showing you what I filled this bag with for my little one and my favorite tips for LONG road trips with kids so make sure to stop by!

My Fabuless Life

diy screen printed team shirts // summer printable // memories in a jar 

jenn from my fabuless life

Chocolate Biscoff Buttercream Cupcakes

5 · Jul 24, 2013 · 19 Comments

This post is brought to you by Biscoff Spread // Have you “Spread the Love” yet? You know, the spread that has taken the nation by storm… Biscoff Spread.  I have dipped my toe in the Biscoff pool a couple of times and today I’m sharing my Chocolate Biscoff Cupcakes along with sharing about the Biscoff Spread the Love Challenge. All you have to do is share your photos of how you use Biscoff. You could win a trip to Belgium to the Biscoff factory, cash prizes or a years worth of Biscoff!!

Chocolate Biscoff Cupcakes from WhipperBerry

What is Biscoff? Well, if you’ve ever flown on a commercial airline within the last 20 years you may have had a Lotus Biscoff cookie as a in-flight treat.  They are a tasty cookie created in Belgium, and in Europe they are called Lotus Speculoos cookies.


Lotus Cookies from WhipperBerry


Back in 2007 a culinary enthusiast brought their Speculoos creation to a Belgium reality television show, not unlike our Shark Tank here in the U.S. and pitched an idea for turning the Speculoos cookies into a spread. The folks at Lotus LOVED the idea and that is how Biscoff Spread was born. Within 3 hours of it’s first release, the Biscoff spread sold out and it has become an overnight sensation all over the world!! Click here to find out where you can buy Biscoff.


Baking with Biscoff and WhipperBerry


All Biscoff products are made with all-natural ingredients and are preservative-free. They are free of trans fat and cholesterol and made without genetically modified ingredients or artificial colors. They are Vegan and also do not contain nuts. 


You can enjoy Biscoff in many ways, on toast, with apple slices, in a sandwich or in all kinds of sweet goodies. About a year ago, I created a Biscoff Crepe Raspberry Cake that was truly a show stopper. 


Raspberry-and-Biscoff-Crepe-Cake-copy


When I was developing that recipe I created my Biscoff buttercream recipe that is perfect for all types of desserts. This week I topped my favorite chocolate cupcakes with that amazing Biscoff buttercream and it was heaven in cupcake form. 


Chocolate Cupcakes with Biscoff Buttercream from WhipperBerry

Chocolate Biscoff Buttercream Cupcakes


Chocolate Cake:


1 Chocolate Cake Mix (any kind, I've used chocolate fudge, Swiss chocolate, or milk chocolate)


1 C Mini Chocolate Chips


1 cup Sour Cream


1 Pkg. of Chocolate Pudding (small 3.5 oz. box)


Biscoff Buttercream:


2 sticks of unsalted butter at room temperature


1 cup Biscoff


1 tsp. vanilla extract


pinch of salt


3-4 cups of powder sugar


1-2 tbsp. whole milk


Directions

For the most amazing chocolate cake ever, prepare cake batter as directed on box, and add sour cream, pudding and chocolate chips.  Pour into cupcake liners.  Bake as directed on box (you might need to add a minute or two to the baking time because of the added ingredients).  Place on a wire rack to cool.

For the buttercream I just modified my Simple Vanilla Buttercream recipe a bit by adding the Biscoff and lowering the amount of vanilla extract.  It’s a good classic and easy buttercream recipe.

In a bowl of an electric mixer with the paddle attachment,  place softened butter and Biscoff.  Cream the two together and add vanilla extract.  Turn mixer off and add half of the powder sugar, carefully turn the mixer on low and mix the sugar in completely. Add the remaining sugar slowly until it creates a dough like consistency. Add 1 tbsp. of milk and mix on high. Check the consistency of the buttercream. If it’s too tight add more milk. Mix on high for 5-7 minutes until light and fluffy.


If needed store in a air tight container in the refrigerator for up to a week.  Take out of the fridge for an hour or two before you want to use it to make sure that it is at room temperature when you need it.


Using a jumbo closed star decorating tip with a pastry bag from Sweet Baking Supply, I iced the cupcakes with a simple swirl and then drizzled a little melted Biscoff on top. For some added flair you can break-off a piece of a Lotus Biscoff cookie and place it on top of the frosting. These cupcakes will hold up quite well as long as the temperatures aren't too hot. Refrigerate if don't plan on eating them for a bit, but make sure to bring them back up to room temperature before serving. 


Biscoff Cupcakes


Don't forget to visit the Biscoff challenge for a chance to win a fun trip or a years worth of Biscoff. You can also find fun ideas on their Pinterest Boards along with their Facebook page.


  • « Go to Previous Page
  • Page 1
  • Interim pages omitted …
  • Page 310
  • Page 311
  • Page 312
  • Page 313
  • Page 314
  • Interim pages omitted …
  • Page 456
  • Go to Next Page »

Primary Sidebar

Heather from Whipperberry
Hello... my name is Heather and I'm the creator of WhipperBerry a creative lifestyle blog packed full of great recipes and creative ideas for your home and family. I find I am happiest when I'm living a creative life and I love to share what I've been up to along the way... Come explore, my hope is that you'll leave inspired!

Footer

  • Privacy Policy
  • Crafts
  • Food
  • Gifts
  • Holidays
  • Home
  • Mom Life
  • Recipes
  • Travel

Copyright © 2026 · Seasoned Pro