• Skip to primary navigation
  • Skip to main content
  • Skip to primary sidebar
  • Skip to footer

Whipperberry

WhipperBerry • Your Home For Creative Inspiration

  • Home
  • Recipes
    • Starters
    • Easy Weeknight Dinners
    • Main Dish
    • Salads
    • Side Dish
    • Soups & Stews
    • Desserts
    • Breakfast
    • Miscellaneous
  • Tutorials
    • Creative Crafts
    • DIY Decor
    • Fabric Crafts
    • Food How-To
    • Jewlery
    • Paint Projects
    • Paper Art
    • Party Styling
    • Photography and Graphic Design
    • Silhouette
  • Holidays
    • Easter
    • Mother’s Day
    • Father’s Day
    • 4th of July
    • Halloween
    • Thanksgiving
    • Christmas
    • Valentine’s Day
  • Gift Ideas
    • Gifts For Everyone
    • Gifts for Dad
    • Mother’s day
    • For The Girls
    • For The Kids
    • Teacher Gift Ideas
    • Christmas
  • Printables
    • Holiday
    • Gift Idea
    • LDS Primary
  • Travel
  • About
    • Terms
  • Contact
  • Nav Social Menu

    • Facebook
    • Instagram
    • Pinterest
    • RSS
    • Twitter

Food

What Does Trip Interruption Mean in Travel Insurance? A Guide for Family Trips?

0 · Sep 27, 2026 · Leave a Comment

There’s a lot that goes into getting a family trip off the ground. By the time you’ve booked where you’re staying, figured out transportation, packed for everyone, and made it out the door, coming home early is probably the last thing on your mind.

Unfortunately, vacations don’t always follow the itinerary. Someone might get sick, something urgent could happen back home, or bad weather could force you to change your plans halfway through the trip.

This is when it helps to understand trip interruption coverage. In simple terms, it generally applies when a trip has already started but has to end early because of an unexpected event covered by your travel insurance policy. Depending on your plan and what happened, it may help with certain prepaid expenses you can no longer use or additional costs involved in getting home.

It’s not the most exciting part of planning a family vacation, but knowing how it works beforehand can make an already stressful change of plans a little easier to deal with.

Trip Interruption and Travel Insurance

Trip Interruption Means Ending Your Trip Early

Trip interruption comes into play after your journey has already started. If an unexpected covered event means you need to cut the vacation short and head home, this part of your insurance may provide some financial protection.

When comparing the best travel insurance for your needs, look beyond the headline price and check how the policy defines trip interruption, which situations qualify, and what expenses may be covered. The details can differ quite a bit from one policy to another.

In general:

  • The trip must have already started.
  • You need to leave earlier than originally planned.
  • The reason for leaving must meet the policy’s conditions.
  • What you can claim will depend on the cover you purchased.

It Covers Unexpected Events That Force You to Return Home

Simply deciding that you’re ready to go home usually isn’t enough to make a trip interruption claim. There generally needs to be an unexpected event covered by the policy that makes continuing the journey impractical or requires you to return home.

If something does happen, don’t assume that changing your plans automatically means the additional costs will be covered. Check the policy or contact your insurer first when circumstances allow.

  • The event should fall within the policy’s list of covered circumstances.
  • You may need documents showing what happened and why the trip changed.
  • Changing your mind or deciding you no longer want to travel generally won’t qualify.
  • Your policy should explain which interruption benefits apply and under what circumstances.

Medical Emergencies Can Cause a Trip Interruption

Getting sick away from home is difficult enough. When you’re travelling as a family, an illness or injury involving one person can quickly change the plans for everyone else too.

If you or one of your kids becomes sick or injured during the trip, continuing with the original itinerary may no longer be realistic. The same can apply if another family member travelling with you has a medical emergency. If the situation meets your policy’s requirements, trip interruption coverage may help with certain eligible expenses related to ending the trip early.

  • A parent, child, or other traveller may become medically unable to continue the journey.
  • An emergency involving someone travelling with you can affect the whole family’s plans.
  • Medical advice, reports, or other records may be needed when making a claim.
  • The expenses covered will depend on the terms and limits of your particular policy.

Family Emergencies May Be Covered

Sometimes the reason for coming home has nothing to do with what’s happening at your vacation destination. An emergency involving a close family member back home could mean packing everyone up and returning sooner than expected.

Some policies include specified family emergencies among their covered reasons for trip interruption. Don’t assume every relative or every situation is automatically included, though. Insurers can define “family member” differently, so this is worth checking before you travel.

  • Find out who your policy considers a family member.
  • Look at the specific family emergencies included under trip interruption.
  • Keep any medical or other supporting records that may be relevant.
  • Contact the insurer as soon as reasonably possible if your plans have to change.
  • Whether the claim is accepted will ultimately depend on the policy terms and circumstances.

Natural Disasters Can Interrupt Your Travel Plans

Severe weather and natural disasters have a way of changing even the most carefully planned family itinerary. A storm, wildfire, flood, or other event could affect your accommodation, transportation, or destination and make it difficult to continue as planned.

Trip interruption coverage may apply in some of these situations, but inconvenience by itself doesn’t necessarily mean you’re covered. The event and its impact on your trip still need to meet the conditions in your policy.

  • Check whether the event meets your insurer’s definition of a covered reason.
  • Be prepared to show how it affected your travel plans.
  • Save airline, hotel, tour operator, or other travel-provider updates.
  • Hold on to receipts for additional expenses you think may be eligible.
  • If it’s practical to do so, check with your insurer before making major changes to your arrangements.

Travel Insurance May Reimburse Unused Trip Costs

Coming home early can mean leaving behind hotel nights, activities, tours, or transportation that you’ve already paid for. That can be especially frustrating on a family vacation, where several bookings may have been made for multiple people.

Depending on the policy, trip interruption coverage may reimburse some eligible, unused, and non-refundable prepaid expenses after any refunds or credits from the travel provider have been taken into account.

If you need to make a claim:

  • Keep your original booking confirmations and proof of payment.
  • Ask hotels, airlines, and other providers about any refunds or credits available.
  • Save documentation showing which parts of the trip you couldn’t use.
  • Check whether each prepaid expense is eligible under your policy.
  • Remember that reimbursement will still be subject to the policy’s limits and claim assessment.

It Can Cover the Cost of Returning Home Early

Getting a family home at short notice can be expensive, particularly if flights need to be changed or entirely new tickets have to be booked.

Some trip interruption policies may help with eligible additional transportation costs when a covered event requires an early return. Exactly what is included and how much you can claim will depend on the policy, so check the requirements before booking replacement transportation whenever circumstances allow.

  • Find out what type of return transportation your policy covers.
  • Follow your insurer’s assistance instructions if the policy requires you to contact them first.
  • Keep new tickets, change-fee receipts, and other payment records.
  • Make a note of any refunds or travel credits you receive.
  • Choose reasonable replacement arrangements that fit the policy conditions.

Trip Interruption Coverage Has Specific Terms and Exclusions

Trip interruption coverage isn’t open-ended, and this is one section of your travel insurance that’s worth reading rather than skimming past.

Every policy has its own covered reasons, definitions, limits, and exclusions. Taking a few minutes to understand them before your family leaves can save you from trying to work everything out while you’re already dealing with an unexpected change of plans.

Before travelling:

  • Read through the covered reasons for trip interruption.
  • Make a note of any important definitions or benefit limits.
  • Check what documentation would be required if you needed to make a claim.
  • Look for any special conditions attached to the benefit.
  • Read the exclusions alongside the coverage details so you understand both.
  • Ask your insurer directly if anything in the wording isn’t clear.

Conclusion

No one wants to spend too much time thinking about what could go wrong on a family vacation. I’d much rather plan where we’re going to eat or what the kids will want to do when we get there. Still, travel plans can change quickly, and it helps to know what your insurance actually covers before you need it.

Before leaving, take a few minutes to read the trip interruption section of your policy. Pay attention to what counts as a covered reason and what expenses are included, and keep your booking confirmations and insurance information somewhere easy to find while you’re away.

Then put it aside and enjoy the trip. You may never need to look at those details again, but if your family does have to come home unexpectedly, you’ll have a much better idea of what to do next.

7 Best Arts Camps in Riverside: Where Kids Learn Real Drawing and Painting Technique

0 · Sep 25, 2026 · Leave a Comment

We share plenty of projects here at Whipperberry that kids can make right at the kitchen table. But when a child really loves to draw, paint, or build things, an art camp can give them something a home craft project can’t: time with an instructor who can help them practice and improve.

So for families searching for art camps in Riverside, we did some digging. We looked through museum programs, city recreation offerings, art schools, and summer camps in Riverside and nearby communities.

The seven programs below stood out for teaching actual art skills, including drawing, painting, color theory, composition, and sculpture. There’s a nice mix, too. You’ll find short city programs for kids who want to give art camp a try, museum classes, full-day options, and more intensive programs for serious young artists.

We’ve gathered the important details in one place so you can compare the options before checking current dates and availability with the camps themselves.

Quick Comparison of the Best Arts Camps in Riverside and Nearby

Arts Camps Where Kids Learn Real Drawing and Painting Technique

Need a quick snapshot? The table below lists each program’s city, format, core techniques, safety cues, and whether fees are posted. Use it as a reference, then explore the detailed reviews that follow.

CampCityFormatAgesTechnique focusSafety cueBest for
Pali AdventuresRunning SpringsOvernight6–16Drawing, painting, mosaic, jewelry, stained glassACA & WAIC accreditation; LiveScan & DOJ checksChoice-driven fine arts
Riverside Art Museum & The CheechRiversideHalf-day blocks5–17Drawing, painting, Procreate, street artMuseum staff supervisionIn-city museum learning
Idyllwild ArtsIdyllwildDay or residential14–17Observational drawing, oil painting, portfolio workPublished staff ratios; dorm oversightTeen intensive
StudioWorks Arts CollectiveRedlandsDay6–17Drawing, painting, dedicated watercolor weeksCity recreation background checksTechnique-focused day camp
Drawn2Art Rancho CucamongaRancho CucamongaHalf- or full-day6–17Portrait, anime, clay sculptureStudio safety policiesCharacter art & sculpture
City of Riverside Art MastersRiverside3-day session6–14Intro drawing, color theoryCity recreation staff on siteBudget-friendly intro
Fontana Arts CampFontanaFull-day7–12Painting, 2-D design, sculpture, mixed mediaMunicipal program guidelinesFull-day municipal care

Program details last verified September 2026; confirm dates, fees, and ratios with each camp before registering.

7 Best Arts Camps in Riverside, CA

How We Chose the Best Arts Camps Near Riverside

7 Best Arts Camps in Riverside, CA

What Counts as Real Art Instruction

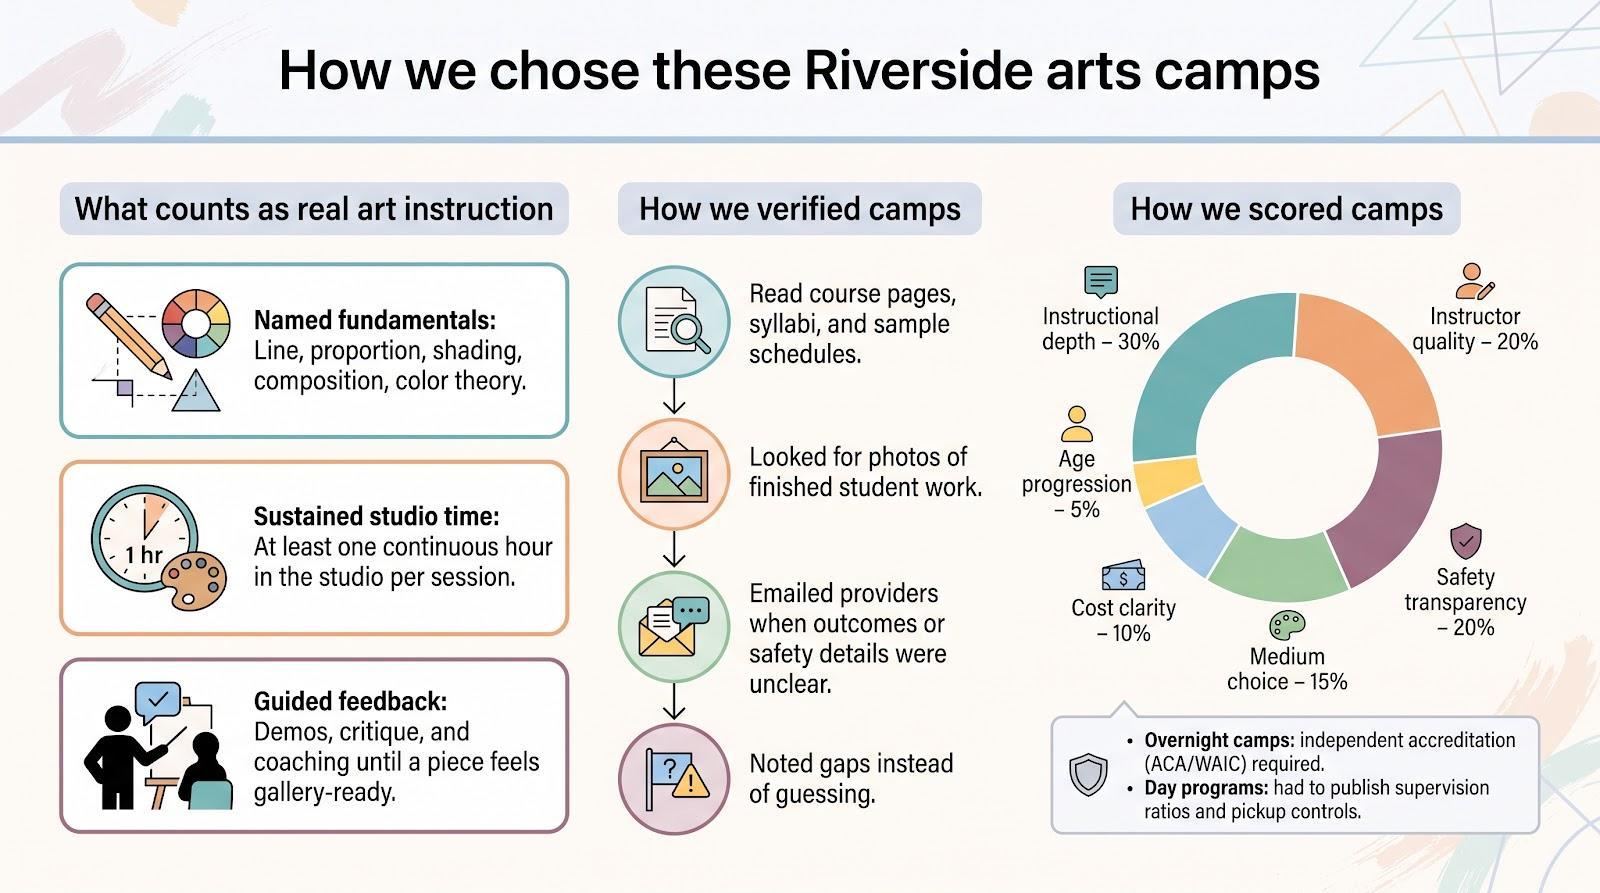
Real instruction means campers learn drawing and painting skills instead of quick glue-stick crafts. Programs had to meet three checkpoints:

  1. Named fundamentals. Course pages had to cite line, proportion, shading, composition, or color theory.
  2. Sustained studio time. Each session needed at least one continuous hour in the studio (not five-minute breaks between dodgeball games).
  3. Guided feedback. Instructors had to demo, critique, and coach students until a piece felt gallery-ready.

Our Verification Steps

We read every public syllabus, cross-checked sample schedules, and looked for photos of finished work. When a provider skimmed over learning outcomes, we emailed follow-up questions or noted the gap rather than guessing.

Weighted Criteria

Final picks scored highest across six factors: instructional depth (30 percent), instructor quality (20 percent), safety transparency (20 percent), medium choice (15 percent), cost clarity (10 percent), and age progression (5 percent). Overnight camps also needed independent accreditation evidence, while day programs had to publish clear ratios and pickup controls.

1. Pali Adventures: Best Overnight Camp for Choice-Driven Fine Arts

The fine arts camp at Pali Adventures spotlights a different medium each day such as charcoal sketching, watercolor painting, jewelry fabrication, stained glass, and mosaic, giving campers three focused morning hours to master new techniques before they dive into afternoon electives.

Why It Stands Out

Pali offers 27 specialties across three tracks: Adventure, Creative, and Performance. At the fine arts camp in Running Springs, campers spend three focused hours each morning on drawing, acrylic or watercolor painting, mosaic, jewelry making, and stained-glass design. After lunch they choose from more than 70 electives, such as a ropes course, zip lining, or water wars, so art stays central without feeling confining.

Safety and Parent Trust

Pali holds both ACA and WAIC accreditation and requires LiveScan and U.S. Department of Justice background checks for every staffer. First aid/CPR/AED-certified counselors and on-site registered nurses support a camp-wide supervision ratio better than 3:1. The Better Business Bureau lists an A+ rating (non-accredited file).

Age Fit and All-Inclusive Value

The overnight program groups campers into Mini (6–8), Junior (8–12), and Senior (13–16) paths. Pali does not publish pricing, and families must contact the camp directly, but the rate covers lodging, meals, activities, and all specialty supplies, with no surprise add-ons. Weigh the phone-free, sleep-away format and the need to request pricing against the deep morning art block and broad elective menu.

2. Riverside Art Museum & The Cheech: Best In-City Museum Program

Riverside Art Museum

What Kids Learn

Inside the galleries at 3425 Mission Inn Avenue, classes feel like working studios. Campers ages five to seventeen master confident lines in “Mastering the Line,” layer expressive brushwork in “Paint-tastic,” and shift to clay or collage without leaving the building.

Older students alternate plein-air sketching on the terrace with digital color studies in Procreate. A rotating street-art week adds stencils and lettering, showing that classical technique and urban style can share the same canvas.

Why It Made Our List

Families enjoy true drop-off convenience plus museum-quality instruction: every course description lists skills such as contour, shading, or color theory, not generic “arts and crafts.”

Weekly half-day blocks let parents pair a morning drawing class with an afternoon digital session, and a supervised lunch bridges the gap. Gallery walk-throughs between studio blocks give campers live composition examples most classrooms can’t match.

Parent Checkpoints

  • Ask whether the fee covers all supplies (RAM loans iPads for Procreate, but sketchbooks or specialty papers may cost extra).
  • Confirm that supervised lunch is available when you pair two half-day blocks.
  • Class sizes and staff screening details are not publicly posted; request ratios and background-check information before enrolling.

3. Idyllwild Arts: Best Drawing and Painting Intensive for Teens

Idyllwild Arts

What Teens Learn

Over two weeks, the Drawing & Painting Intensive (ages 14–17) covers what many school programs only skim. Mornings begin with rapid observational sketches; afternoons add proportion studies, color-mixing drills, and composition walk-throughs.

By week two, easels pivot to oil techniques: glazing, scumbling, and edge control. Each student leaves with several portfolio-ready pieces and a stronger artistic voice. Groups cap at 12, giving instructors room to demo, circle the studio, and offer one-on-one critique.

Why It Made Our List

Depth paired with duration is rare. The schedule offers ten full studio days, evening open labs, and a forested campus with newly air-conditioned dorms as of summer 2026.

Teens can attend as day campers or stay in supervised dorms, and faculty bios list working artists who exhibit, publish, or teach at universities. Tuition, room, and board are publicly posted on the program page, so parents know the full cost before applying.

Parent Checkpoints

  • Block out the calendar; the intensive runs two weeks and seats 24 students split into two groups of 12.
  • Ask whether materials fees cover stretched canvases and oil mediums, or if extra supplies are needed.
  • Residential families should confirm roommate matching, weekend supervision, and medical staffing; day families need a daily mountain drive plan.
  • Request current class ratios and safety protocols. Idyllwild is not ACA-accredited but publishes its own supervision standards.

4. StudioWorks Arts Collective: Best Technique-Focused Day Camp Near Riverside

What Kids Learn

StudioWorks in Redlands splits summer into focused weeks covering drawing, painting, and watercolor. Campers ages 6–17 master one medium at a time. Each morning starts with a mini-lesson on proportion or brush control, then moves into guided practice while instructors correct posture, grip, and stroke direction.

By day three, every student critiques and finishes a piece on stretched paper or canvas. Watercolor week adds wet-on-wet blends, dry-brush texture, and masking tricks that translate to school projects.

Why It Made Our List

Many municipal art camps squeeze drawing between dodgeball breaks. StudioWorks offers full art days inside an air-conditioned city venue. Practicing artists lead classes, and the City of Redlands posts tuition publicly, making this one of the most budget-friendly routes to multi-day, technique-heavy instruction without a mountain drive.

Parent Checkpoints

  • Verify which artist teaches your chosen week and whether materials are included or require a supply list.
  • Session caps hover around 15 but vary; request the exact ratio and ask about background checks.
  • Need extended care? Confirm whether the camp links to Redlands’ regular recreation program.
  • A separate teen session runs later in summer; ask if your high-schooler needs portfolio depth.

5. Drawn2Art Rancho Cucamonga: Best for Character Drawing and Sculpture

Drawn2Art Rancho Cucamonga

What Kids Learn

At Drawn2Art’s Rancho Cucamonga studio, campers ages 6–17 start the morning with graphite facial-proportion studies. After lunch they explore color with pastels.

The day ends in the clay room, where they turn 2-D concepts into small sculptures. Students measure angles, block shadow shapes, build wire armatures, and add expressive details, then finish the week with a concept sketch and a fired (or air-dry) 3-D figure.

Why It Made Our List

Many “character art” camps rely on quick crafts. Drawn2Art combines classical drawing with anime and fantasy themes, so students learn bone structure before armor and wings.

Sample lessons and finished pieces appear online, and families can choose half-day or full-day slots to fit swim meets or sibling schedules. Tuition is publicly posted on the registration page, making budgeting simple.

Parent Checkpoints

  • Verify the session’s year stamp; some web cards lack a date.
  • Ask for current class size, student-to-instructor ratio, and what background checks the studio conducts.
  • Confirm whether full-day campers need a second snack and if clay pieces will be kiln-fired or air-dried.
  • Anime focus draws many kids but may not suit teens building a realism portfolio; review the project plan before enrolling.

6. City of Riverside Art Masters Camp: Best Budget-Friendly Introduction

What Kids Learn

Across a concise three-day schedule, campers ages 6–14 explore essentials without the time or cost of a full week. Day one covers the color wheel and simple mixing to show how warm and cool hues shift mood.

Day two moves into basic drawing: fluid lines, shape blocking, and light shadow. Day three spotlights a master painter; students recreate a small work using the techniques they practiced, finishing with a take-home piece that shows real progress.

Why It Made Our List

Few programs post every fee upfront, but Art Masters lists tuition and the small materials charge on the city’s ActiveKids page. Classes meet at a familiar recreation center in Riverside, sparing families a long commute. For children trying formal art lessons for the first time, the short format keeps both risk and price low.

Parent Checkpoints

  • Materials cost extra; confirm whether brushes and paper are supplied or if kids need a personal kit.
  • Ask about staff-to-student ratio and background-check policy; the city program follows municipal standards but doesn’t publish exact numbers.
  • Sessions fill quickly once summer calendars land on fridges, so book early and review the refund window.
  • A three-day intro builds basics but may not satisfy kids seeking deeper technique; consider a week-long camp if your young artist wants more studio time.

7. Fontana Arts Camp: Best Full-Day Municipal Option

What Kids Learn

At the Art Depot, campers ages 7–12 rotate through painting, two-dimensional design, sculpture, and media experiments from 9 a.m.–5 p.m. Mornings focus on drawing basics and color mixing. Afternoons pivot to projects such as papier-mâché masks or recycled-material sculptures. The daily mix keeps projects fresh while still building core technique.

Why It Made Our List

Working parents need coverage as much as curriculum, and Fontana offers both. Tuition is publicly posted on the city site, lunch is included, and staffing follows municipal background-check rules.

The itinerary feels like a mini art school. One day features texture layering with acrylics; the next, additive sculpture; then a short photography session to document finished work. Kids sample several media without leaving the Inland Empire.

Parent Checkpoints

  • Review the current itinerary; disciplines can shift each summer.
  • Ask whether non-resident pricing applies to your address and confirm allergy options on the lunch menu.
  • Request class size, instructor credentials, and student-to-staff ratio; these details are not posted online.
  • Broad rotations suit explorers; children seeking a week of pure drawing may prefer a single-medium camp.

Conclusion

The best choice really comes down to your child. Some kids want to spend all week improving their drawing, while others would rather try painting one day, sculpture the next, and something completely new after that.

Riverside families have both kinds of options on this list, along with a few programs that are worth considering if you don’t mind driving outside the city. Before you sign up, check the camp’s current schedule, prices, supply list, and supervision policies since those details can change from one summer to the next.

Then make a little room on the fridge. Chances are, at least a few new masterpieces will be coming home.

5 Simple Ways to Create a Healthier and Cozier Bedroom

0 · Sep 25, 2026 · Leave a Comment

Just for a moment, let’s be totally honest: with the time it takes to look after our family’s schedules, the endless pile of laundry to deal with, and the constant need to keep the main parts of the house in order, our own bedrooms tend to be forgotten about. It’s very easy for the master bedroom to turn into a place where unfolded clothes, books that have only just been started, and all sorts of other household items are stored.

Your bedroom shouldn’t be just the room where you end your exhausting day by collapsing into bed. It should act as your personal sanctuary, a calm and comfortable setting that enables you to recharge both physically and mentally. The good news is you don’t need a huge remodeling budget or a professional interior designer to change your room’s atmosphere completely.

If you make a few thoughtful changes to your surroundings, you can greatly improve your room’s comfort. Here are five easy, practical ways to make your bedroom healthier and cozier today.

1. Clear the Clutter for a Calmer Space

Have you ever realized how difficult it is to wind down when there’s a mess all around? Visual clutter can sometimes create a sense of restlessness. It can be harder to relax when the last thing you see before bed is a heap of laundry on ‘that one chair’ or a nightstand filled with kids’ receipts and chive toys.

Begin with the obvious surfaces; you don’t need to go through the entire closet in one weekend, but simply clearing the nightstands and dressers will make at once. Buy a couple of nice woven baskets or fabric storage bins since they are ideal for temporarily storing things that don’t have a fixed place and for keeping them out of sight.

Woman relaxing in bed next to a humidifier

Here’s a quick tip: observe the ‘five-minute sweep’ rule by taking five minutes before you brush your teeth to collect up any loose items. This simple habit means that you’ll find your space cleaner in the morning.

2. Improve the Air Quality

We spend a large part of our lives in our bedrooms, even though the quality of the indoor air is usually neglected. A well-maintained bedroom can still have airborne particles from dust, pollen, pet dander, and other sources inside the house. For people sensitive to these allergens and particles, they can worsen symptoms and make it harder to sleep comfortably.

All good initial steps include opening windows when the weather allows, keeping the bedding of pets clean, and vacuuming regularly. Moreover, one way of reducing the amount of airborne particles that stay in the room is to use air purifiers. These purifiers run in the background and capture microscopic particles, which can be especially beneficial for people sensitive to dust, pollen, or pet dander.

3. Keep Indoor Humidity Comfortable

Indoor humidity levels can vary a great deal depending on the season, since cold outdoor air usually has less moisture in it and when it is brought indoors and then heated in the winter the relative humidity decreases. In a similar way, air conditioning can also reduce the humidity level inside buildings since cooling systems tend to remove moisture from the air as they work.

Low indoor humidity can lead to dry skin, dry lips, and dry nasal passages and thus make the room less comfortable to be in at night. One simple solution to this problem is to put some moisture back into the environment. A quiet humidifier can add moisture to dry indoor air and so may make the bedroom more comfortable when the humidity levels are low.

It’s important to remember that higher humidity isn’t always preferable, since maintaining moderate levels can help prevent excess moisture and condensation. Additionally, some people find the continuous background noise of a humidifier less distracting than the occasional noises coming from outside.

4. Choose Breathable Bedding

The bed is the central feature of the room and the items placed on it are very important. A great many people have difficulty in regulating their body temperature at night, and the materials you use for bedding can have an effect. While some synthetic bedding may feel warmer or less breathable than some natural fabrics, comfort will differ depending on the material, the weave, and the way it is constructed.

If you want your bed to seem more appealing, then you should replace fabrics that don’t breathe with natural ones; cotton and linen are commonly used for bedding because they are breathable, and some fabrics derived from bamboo can also feel smooth and comfortable for people who sleep in warm conditions.

Layering is just as important for creating a cozy bed; instead of using a single thick comforter, use a breathable duvet with a thick knit throw blanket at the foot of the bed. This arrangement doesn’t only give a very appealing and fashionable appearance but also enables you to easily regulate your temperature during the night.

5. Soften the Lighting

The lighting in your bedroom has a great influence on your body’s natural circadian rhythm; exposure to bright light in the evening can cause the body to feel awake and at the same time suppress or delay the normal increase in melatonin.

In order to achieve a pleasant and relaxing atmosphere, you should soften the lighting. At least one hour before you intend to go to bed, switch off the ‘main light’. Instead, use bedside lamps. Bulbs with a colour temperature of about 2700K or other warm colour temperatures will produce a softer evening atmosphere.

You should also consider improving your window coverings; attractive blackout curtains can help cut down on light from streetlights or the early morning sun and make your room feel warmer and more suitable for rest.

Final Thoughts

You don’t need a complicated setup to have a healthier bedroom; minor adjustments to the clutter, air quality, humidity, bedding, and lighting can make the room seem more comfortable and purposeful.

What about yourself? Do you have any particular nighttime routines, or favorite tips for making your bedroom feel especially cozy? Please let me know in the comments section below—I’m always on the lookout for new ideas to try!

How to Plan a Home Remodel While Your Family Still Lives There

0 · Sep 25, 2026 · Leave a Comment

Home remodeling is an exciting process for every homeowner. But if you are planning a remodeling project in the home you are currently living in, the process is going to be challenging. Dust, noise, limited access to rooms, unexpected delays, and workers continuously coming and going can disrupt the peace and routine at home.

The good news is that you don’t have to move out while the home remodeling process is taking place. Planning a whole-home remodeling project through expert guidance can ensure that your family stays comfortable and safe while the work gets done. In the article below, we will look at how you should plan a home remodeling project while your family still lives there.

Decide the Area Where Your Family Can Live

Before the construction begins, you must identify the areas where your family can live comfortably. For example, if you have a small family, a bedroom, a place to prepare food, and a bathroom are important.

If you are planning to remodel the kitchen, you can set up a temporary kitchen in another room. A microwave, a small refrigerator, and an electric stove are enough to prepare most of the daily meals. On the other hand, if you are remodeling the bathroom, make sure that another bathroom in the house is available for use. It is important to discuss the overall construction schedule with your contractor to understand exactly when a certain room will be unavailable for use.

Create a Temporary Living Plan

You may have to change your lifestyle while the remodeling project is underway. For example, if you prefer to spend quality time alone after work, you may have to compromise, as the spaces around the house are going to be congested. Simple home refresh hacks may help you keep the area you are currently living in comfortable, but a home remodeling project is definitely going to impact your daily lifestyle. Now, if you absolutely crave some alone time after work, you can also create a “remodel-free zone,” which can be a room or area that is free from noise, dust, and activity.

Protect Your Precious Belongings

Construction dust can ruin your furniture, electronics, artwork, clothing, and other valuables. Hence, it is important to keep them away from the work area. If you can’t move them, ensure that they are properly covered. You can use plastic sheeting to cover your belongings. Along with this, you can seal the doorways or add temporary walls to separate the construction area from the other living spaces. Remember that protecting your precious belongings doesn’t only mean the expensive ones. It also includes items that are close to your heart and have sentimental value.

Also, before your contractor starts the project, ask them about the dust control measures that they plan to implement in your home to protect it from dust. Dust can cause serious health issues and allergies. Protecting your home and family from dust will help safeguard their well-being.

Plan the Remodeling Around Your Family’s Schedule

Construction is difficult when you have your family living with you. If you work from home, attend online classes, or have young children, quiet time can sometimes be a non-negotiable. Moreover, if you have an important meeting or event, you may want to discuss your schedule with the contractor. So, when you know that a particular construction activity will most likely create a lot of noise, ask your contractor to delay it so that you can complete your tasks.

Kitchen with white cabinets and wood floors

Make Safety the Top Priority

A construction site will have different tools, electrical equipment, sharp materials, exposed wiring, nails, dust, and uneven surfaces. Children and pets should never have unrestricted access to these work areas. Keep construction zones physically separated whenever possible, and make sure tools and hazardous materials are secured when workers leave.

Ask your contractor how they will handle temporary electrical connections, open walls, debris, and other potential hazards. Don’t assume that a site is safe simply because the workers are gone.

Conclusion

Living at home during a remodel is not easy. You need careful preparation to make the experience more manageable. Consider where you can live temporarily, protect your belongings, and establish clear expectations.

Remember that the disruptions are temporary. But with a clear strategy and open communication, you will be able to enhance the functionality and curb appeal of your home.

A Practical Guide to Making Plant-Based Milk at Home: Methods, Equipment, and Safety

0 · Sep 22, 2026 · Leave a Comment

Plant-based milk is a beverage made by blending nuts, seeds, grains, or legumes with water, then usually straining out the solids. People come to making plant-based milk at home for all sorts of reasons—wanting control over ingredients, chasing a particular taste, managing dietary restrictions, or simply trying to cut down on packaging waste.

The process itself can be as basic as a blender and a strainer, or as hands-off as a dedicated appliance does the work for you. Whether you stick with a simple blender-and-strainer setup or invest in a milk maker machine, making your own plant-based milk puts you in charge of ingredients, texture, and flavor in a way store-bought cartons rarely allow.

This guide covers methods, equipment, ingredient choices, and safety considerations for beginners and seasoned home cooks alike.

Key Takeaway: Homemade plant-based milk is flexible, but the method and equipment you choose will shape texture, flavor, and how convenient the whole process feels.

Plant-Based Milk

Understanding Plant-Based Milk: Ingredients and Basics

Almond, oat, soy, cashew, coconut, and hemp are the usual suspects when it comes to plant milk bases. Most recipes fall somewhere in an ingredient-to-water ratio of 1:3 to 1:5—one cup of almonds to three or four cups of water works as a reasonable starting point. Nudge that ratio up or down and you’ll notice real differences in creaminess and how intense the flavor comes through.

Extras like salt, dates, or vanilla can round out the taste, though they tend to shorten how long the milk stays fresh. Nutritionally, these bases aren’t interchangeable either: soy leans protein-heavy, while oats bring more carbohydrates to the table.

  • Almonds: mild, slightly nutty
  • Oats: neutral, quick to prepare
  • Soy: protein-rich, versatile for cooking
  • Cashews: naturally creamy, blends smooth

Methods for Making Plant-Based Milk at Home

At its core, the process is soak (if needed), blend with water, then strain through a nut milk bag or fine mesh sieve. Oats usually skip the soaking step entirely, while soybeans often need cooking after blending to make them safe and palatable.

Some people swear by a dedicated milk maker appliance for the sake of consistency and convenience; others are perfectly happy using a blender and strainer they already own.

Each path has its trade-offs—machines cut down on time and mess but take up counter space and come with a bit of a learning curve, while manual methods stay flexible and cheap but ask more of your time and attention.

Key Takeaway: Pick whichever method suits your kitchen, schedule, and patience level—good results come down to technique far more than how much you spent on equipment.

Choosing Ingredients Wisely: Nutrition, Taste, and Tolerances

Matching your base to your goals makes a real difference: reach for soy or pea milk if protein matters most, cashew or coconut for richness, oats or rice when you want something neutral enough to disappear into a recipe.

It’s also worth factoring in allergies, gluten sensitivity, and how much sugar you’re comfortable with. One of the clearest advantages of going homemade is ingredient transparency—many store-bought versions rely on stabilizers or added sugars that a homemade batch can simply do without.

Equipment Considerations: What You Really Need

Essential equipment boils down to a blender, something to strain with, and containers for storage. Optional equipment—funnels, measuring cups, specialized machines—adds convenience, but none of it is strictly necessary for a good result.

  • Must-have: blender, strainer, glass storage jars
  • Nice-to-have: dedicated milk-making appliance, funnel

Key Takeaway: Start with what’s already in your kitchen, and only upgrade once homemade milk earns a permanent spot in your routine.

Safety, Storage, and Quality: Doing It Right

Good food safety habits here are simple but non-negotiable: wash your equipment thoroughly, get the milk into the fridge promptly, and drink it within a few days. Keep an eye out for signs of spoilage—a sour smell, mold, or clumping that goes beyond the gentle separation that’s normal for these milks. If the texture turns grainy, blending longer or straining more finely usually solves it; oat milk that comes out slimy tends to improve with colder water and a shorter blend time.

Practical Examples and Everyday Use

Plenty of people settle into a weekly rhythm—oat milk for the morning coffee, almond milk blended into smoothies, soy milk reserved for cooking. Homemade milk doesn’t always behave exactly like the store-bought version, so it pays to experiment and adjust rather than expect a perfect match right out of the gate.

  • Coffee and tea
  • Smoothies
  • Baking
  • Sauces

Bringing It All Together

Homemade plant-based milk gives you flexibility and control, but getting it right depends on careful technique and proper storage. The best plant-based milk is the one you can make safely, enjoy consistently, and adapt to your needs. With a bit of practice, small tweaks to ratio, soak time, or straining method will get you to results that fit your taste and your routine.

  • « Go to Previous Page
  • Page 1
  • Interim pages omitted …
  • Page 4
  • Page 5
  • Page 6
  • Page 7
  • Page 8
  • Interim pages omitted …
  • Page 511
  • Go to Next Page »

Primary Sidebar

Heather from Whipperberry
Hello... my name is Heather and I'm the creator of WhipperBerry a creative lifestyle blog packed full of great recipes and creative ideas for your home and family. I find I am happiest when I'm living a creative life and I love to share what I've been up to along the way... Come explore, my hope is that you'll leave inspired!

Footer

  • Privacy Policy
  • Crafts
  • Food
  • Gifts
  • Holidays
  • Home
  • Mom Life
  • Recipes
  • Travel

Copyright © 2026 · Seasoned Pro