• Skip to primary navigation
  • Skip to main content
  • Skip to primary sidebar
  • Skip to footer

Whipperberry

WhipperBerry • Your Home For Creative Inspiration

  • Home
  • Recipes
    • Starters
    • Easy Weeknight Dinners
    • Main Dish
    • Salads
    • Side Dish
    • Soups & Stews
    • Desserts
    • Breakfast
    • Miscellaneous
  • Tutorials
    • Creative Crafts
    • DIY Decor
    • Fabric Crafts
    • Food How-To
    • Jewlery
    • Paint Projects
    • Paper Art
    • Party Styling
    • Photography and Graphic Design
    • Silhouette
  • Holidays
    • Easter
    • Mother’s Day
    • Father’s Day
    • 4th of July
    • Halloween
    • Thanksgiving
    • Christmas
    • Valentine’s Day
  • Gift Ideas
    • Gifts For Everyone
    • Gifts for Dad
    • Mother’s day
    • For The Girls
    • For The Kids
    • Teacher Gift Ideas
    • Christmas
  • Printables
    • Holiday
    • Gift Idea
    • LDS Primary
  • Travel
  • About
    • Terms
  • Contact
  • Nav Social Menu

    • Facebook
    • Instagram
    • Pinterest
    • RSS
    • Twitter

Cricut

Canvas Hygge Sign with Cricut Iron-On Lite • Sign Making 101

21 · Dec 31, 2017 ·

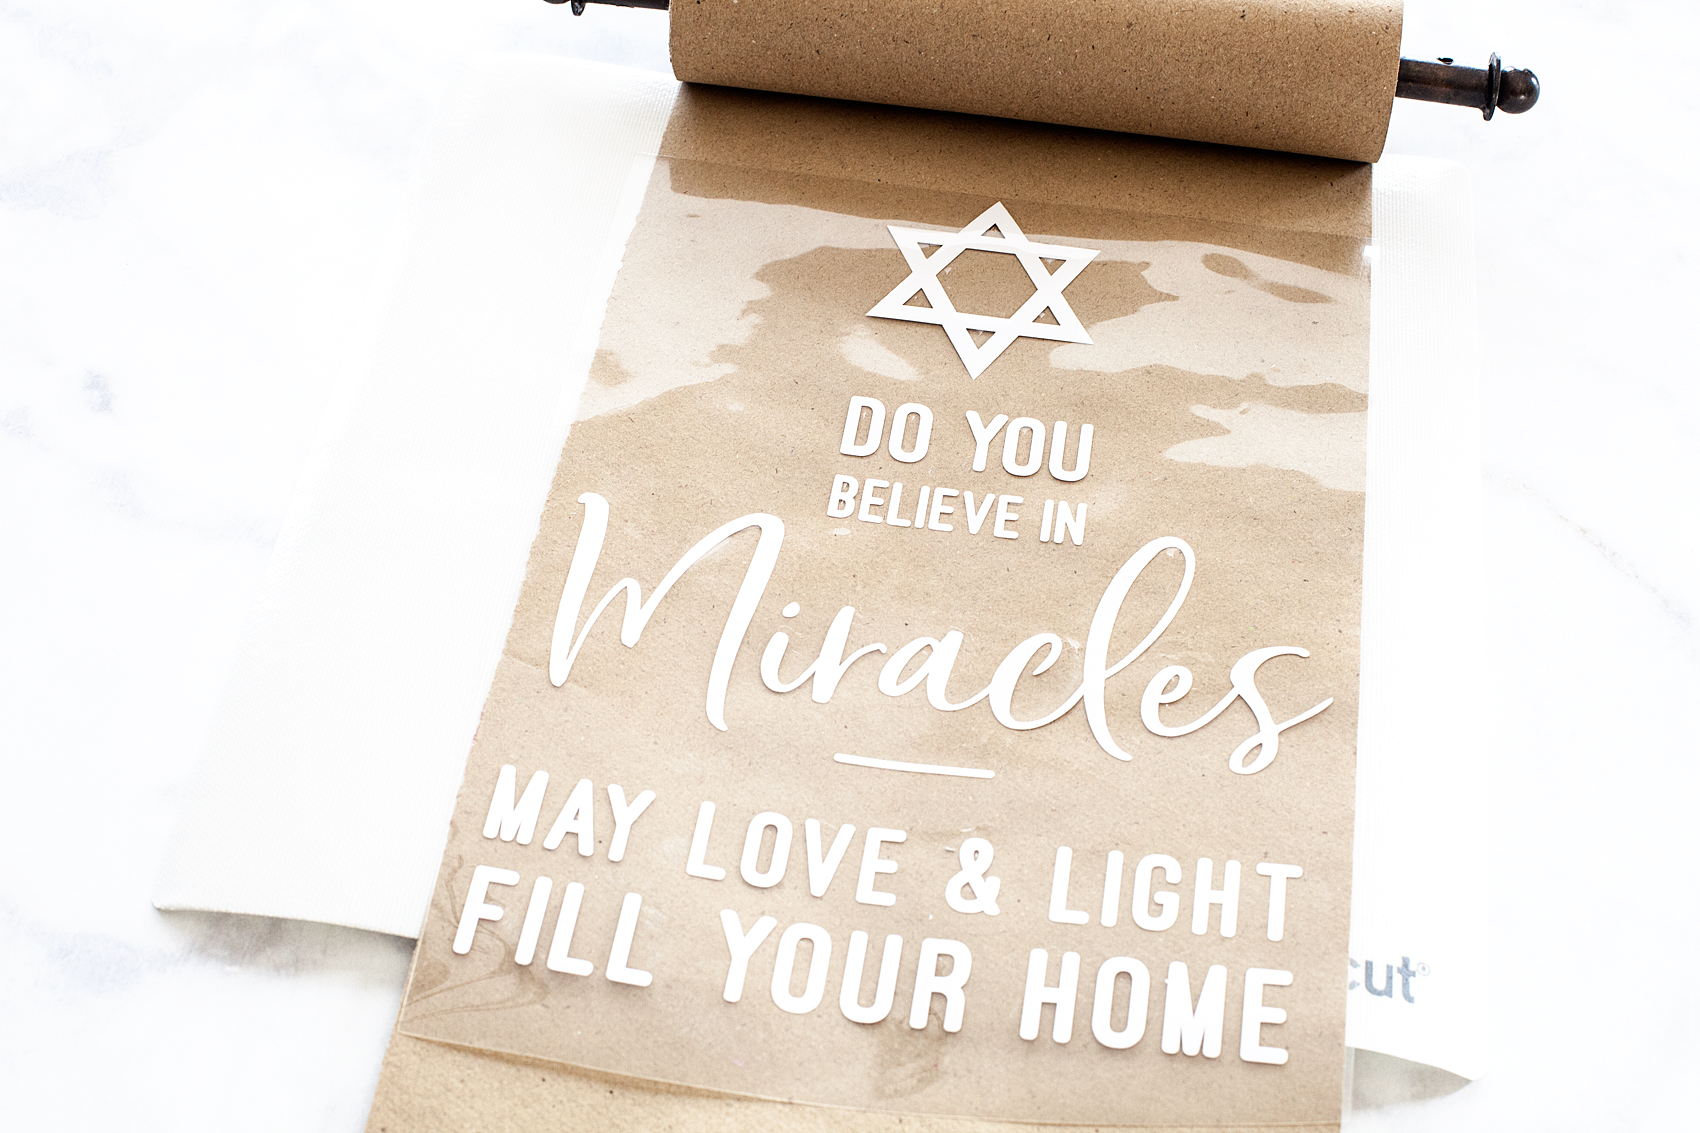
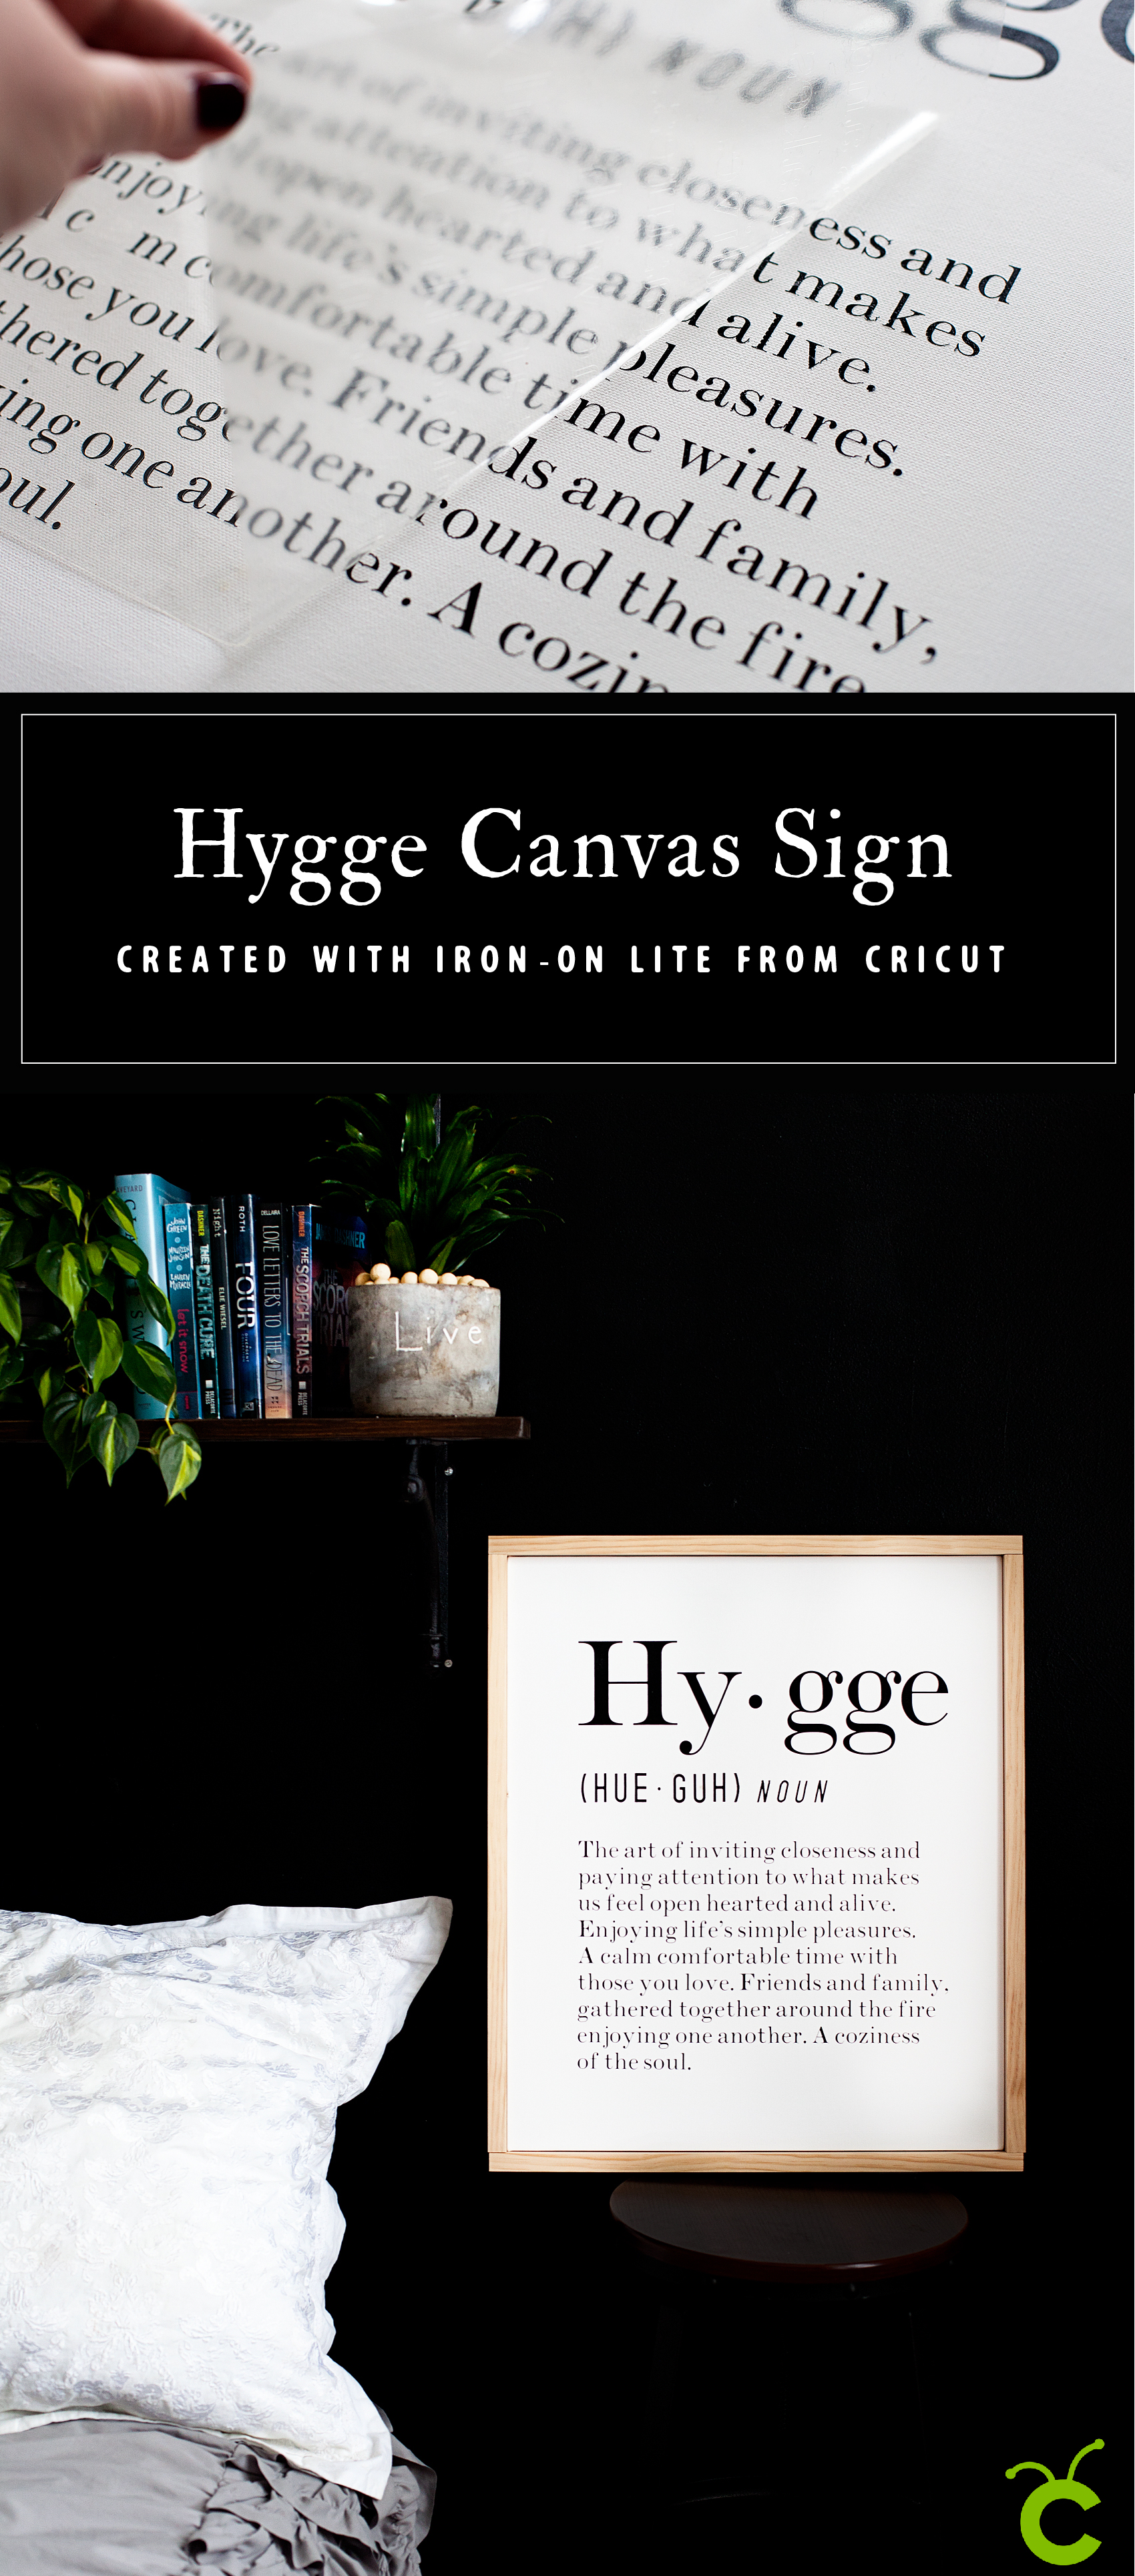
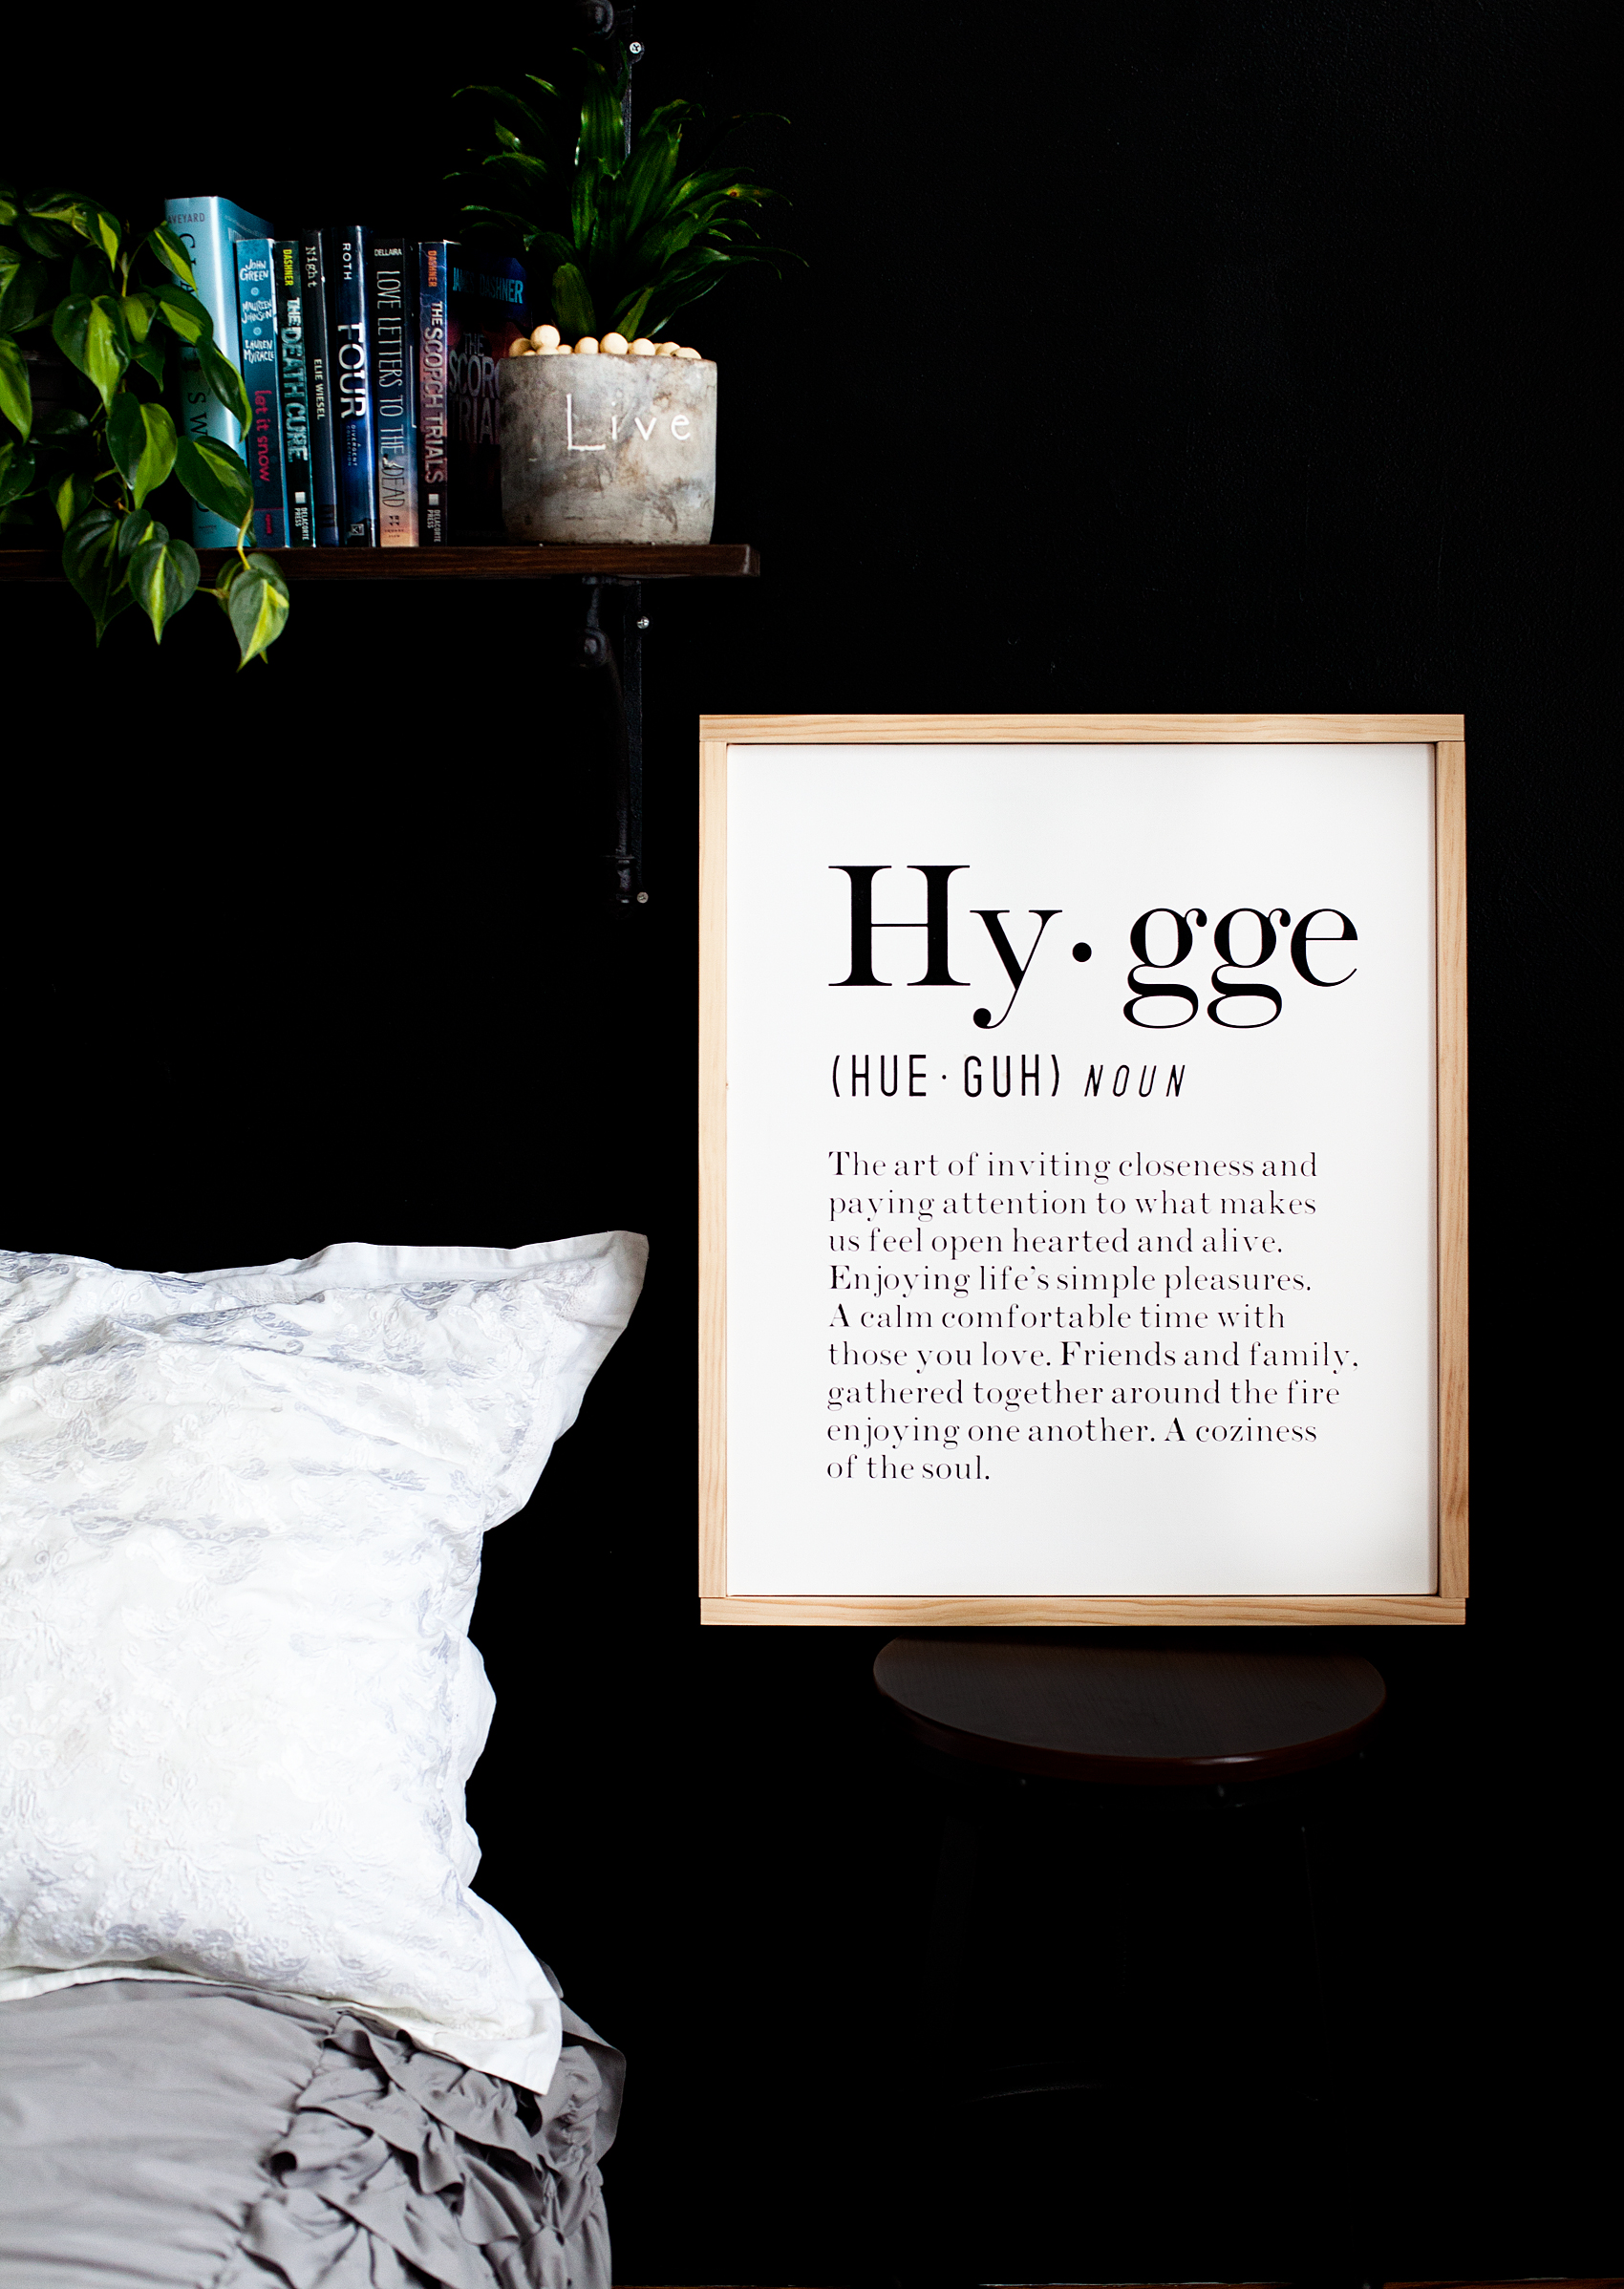
Did you know that you can make beautiful canvas signs with heat transfer vinyl like the Cricut Iron-On Lite? It’s super EASY! Continue reading to learn how, in my Sign Making 101 series. Plus, you can learn all about the magic of the Danish concept of Hygge! Canvas Hygge Sign designed by WhipperBerry and created with Cricut Iron-On lite along with the Cricut Maker & Cricut Easy Press.

+ This post brought to you by the lovely folks at Cricut +
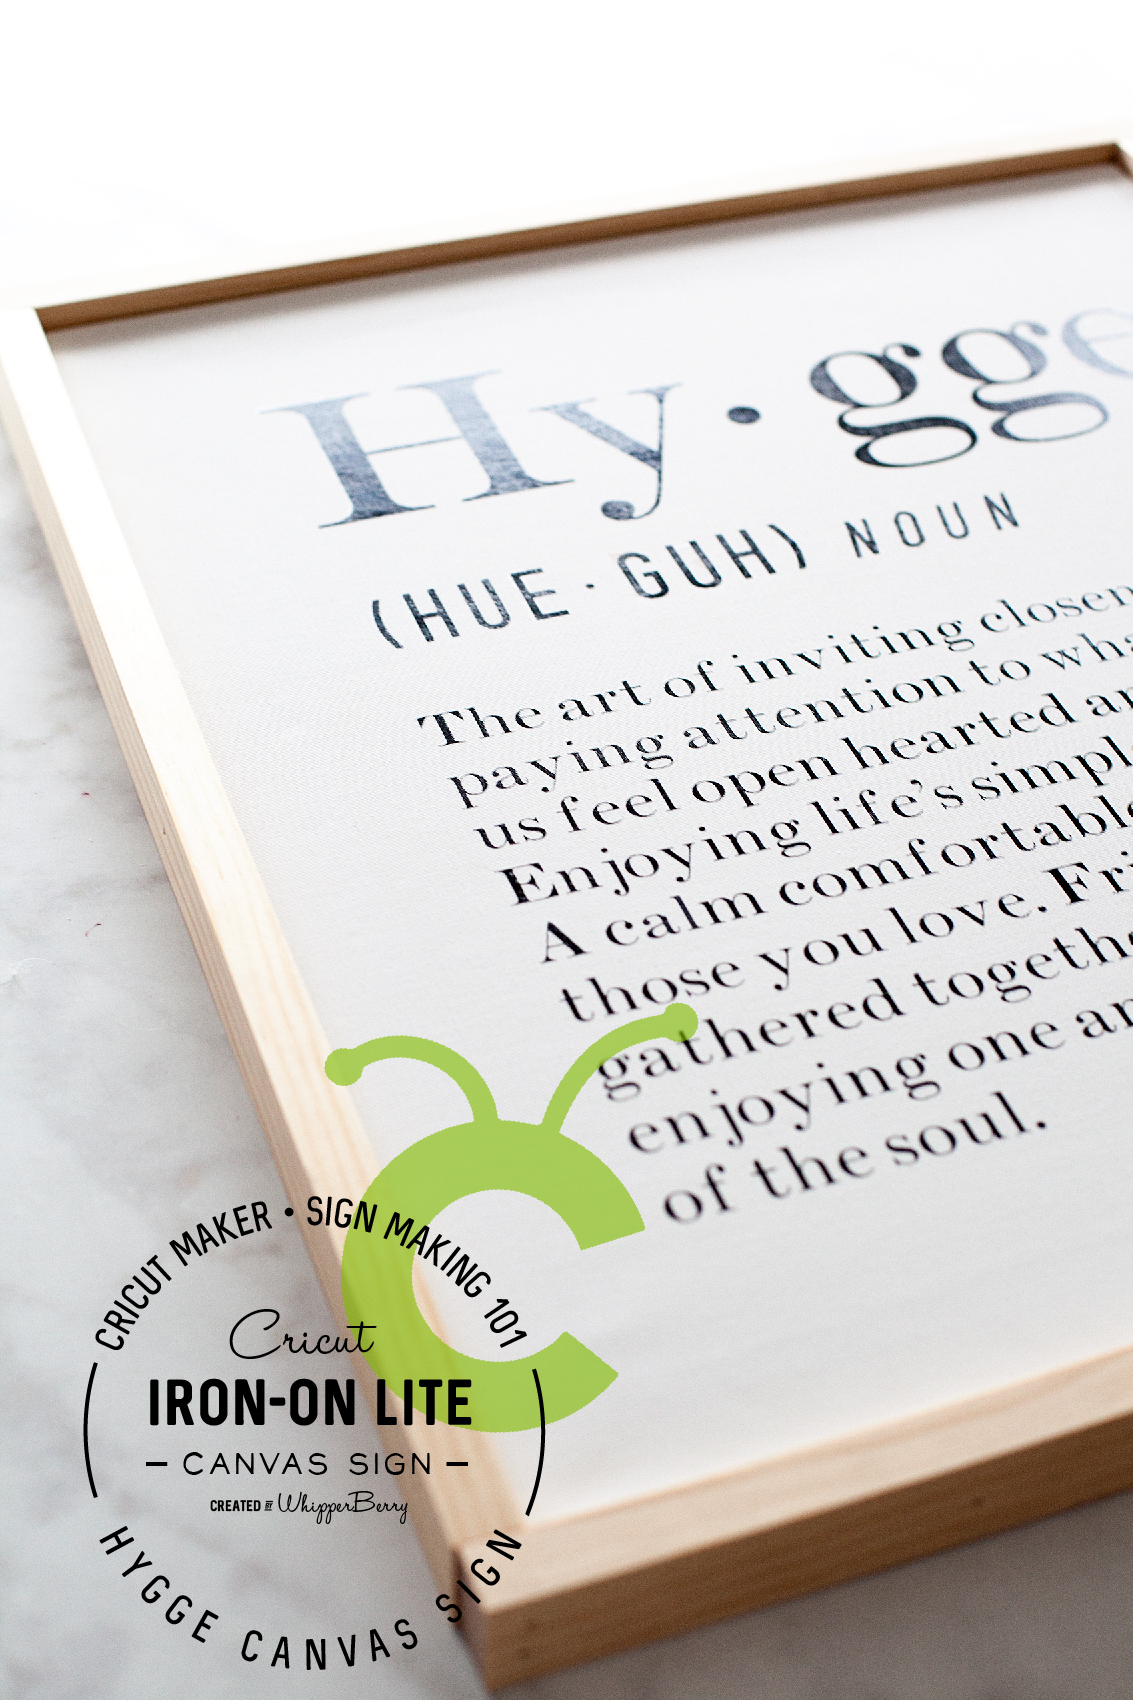
Hygge Canvas Sign designed by WhipperBerry and created with @cricut Iron-On lite along with the Cricut Easy Press. Did you know that you can make beautiful signs with heat transfer vinyl like the Cricut Iron-On Lite? It’s super EASY come on over to WhipperBerry to learn how in my Sign Making 101 series + You can learn all about the magic of the Danish concept of Hygge!

What is Hygge?

You guys… The Holidays are over (well, we still have New Years) and it’s time to hunker down and create a little more Hygge in our homes to help us get through these cold months. Seriously, It’s supposed to be -38˚ F (that includes windchill of course) this weekend here in Lincoln! We need a little extra cozy to help us weather those types of temperatures.  We need something to help us enjoy this time of year rather than dreading it.

The Danish have come-up with a great concept to help them through this cold and dark months. It’s the concept of Hygge. Directly translated, the word means “fun.” However, in Denmark it means so much more than that. It’s really more of a feeling. That feeling that you get when you are sitting with those you love in a candlelit room, in front of the fire, eating good food, playing fun games or even just reading good books. It’s a time to snuggle-up together, leaving all of the drama behind, a time to build and strengthen relationships, and find joy in the season of your life. You can’t buy hygge, but you can work to create this feeling in your home.

I’ve fallen in love with the concept along with the word therefore, I had to make a sign to help those around me understand the feeling we are looking for this winter.

Hygge Canvas Sign designed by WhipperBerry and created with @cricut Iron-On lite along with the Cricut Easy Press. Did you know that you can make beautiful signs with heat transfer vinyl like the Cricut Iron-On Lite? It’s super EASY come on over to WhipperBerry to learn how in my Sign Making 101 series + You can learn all about the magic of the Danish concept of Hygge!

Why Use Canvas When Making Signs?

My friends… This type of sign making has become my all time favorite way to create signs for my home. It’s clean, modern and works with all kinds of styles. In addition, it is the EASIEST way to make a nice looking sign EVER!!! With wood signs, it involves messy paint, traditional vinyl (which is not my favorite to weed) and a little more room for error. The canvas sign uses heat transfer vinyl from Cricut called Iron-On Lite. It’s super easy to weed (more on weeding in a bit) and adhere to your canvas surface. Because of the texture of canvas, traditional vinyl does not work… at all. Believe me, I’ve tried it.

Another bonus to creating with canvas rather than wood… It’s much lighter. I created a ton of wood signs a few years ago for a creative market. My husband and I nearly killed ourselves loading the signs into the building because they were so heavy. I truly wish I would have figured this out before hand.

Tips and Tricks for Sign Making with Canvas

After making a few canvas signs with Cricut Iron-On Lite I’ve come up with a list of tips and tricks to help make the process smooth for you.

Hygge Canvas Sign designed by WhipperBerry and created with @cricut Iron-On lite along with the Cricut Easy Press. Did you know that you can make beautiful signs with heat transfer vinyl like the Cricut Iron-On Lite? It’s super EASY come on over to WhipperBerry to learn how in my Sign Making 101 series + You can learn all about the magic of the Danish concept of Hygge!

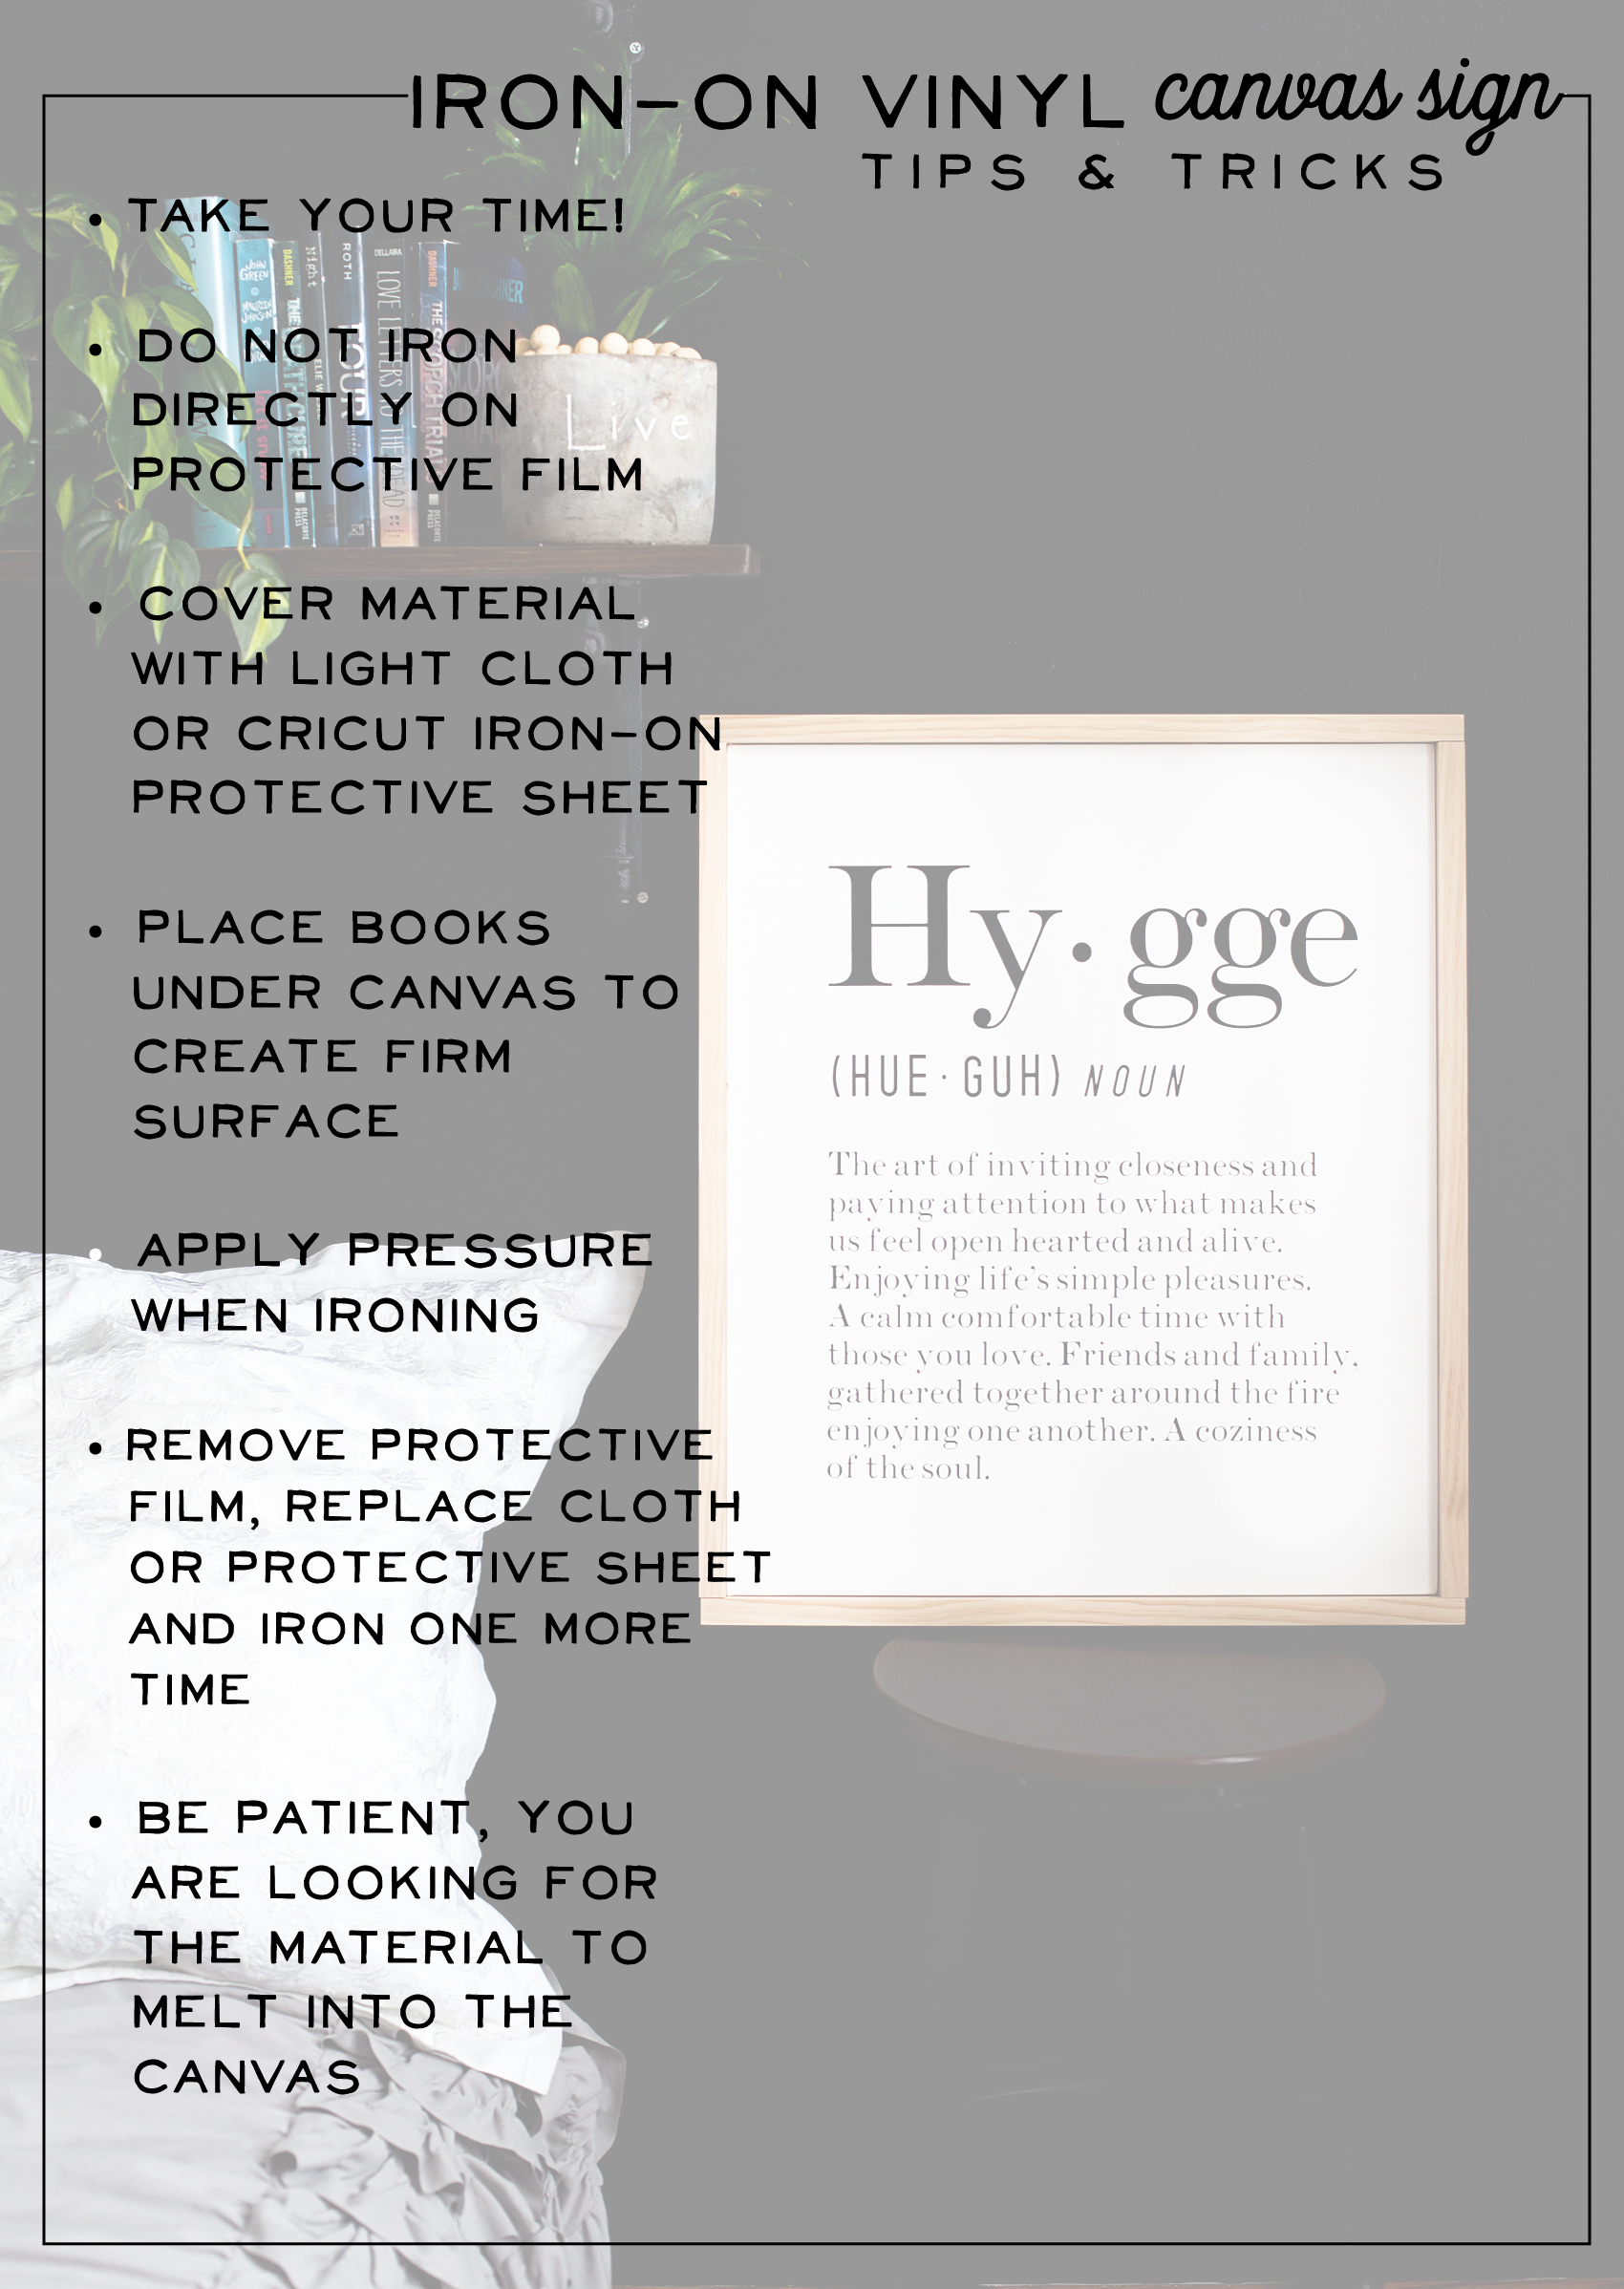
  • Take your time – As with pretty much any creative endeavor, rushing has never produced wonderful results. Take your time and you love what you end-up with.
  • Do not iron directly on protective film – This is the clear plastic that the heat transfer material comes on. Ironing or using the Cricut Easy Press directly on this film will cause scorching of your materials and will create undesirable results. Always use the Cricut Protective Sheet when doing any type of iron-on project.
  • Cover material with light cloth or Cricut Protective Sheet – Again, you want to protect the surface of your canvas along with the heat transfer vinyl.
  • Place books under the canvas to create a firm surface – Canvas is traditionally stretched on a frame and if you were to press directly on the canvas, you would stretch the canvas and your sign would turn out really wonky. My trick… Place a book or a few magazines under the canvas to create a firm surface for you to work on. Hygge-Sign--Canvas-and-Heat-Transfer-Vinyl-with-Cricut-Maker---created-by-WhipperBerry-8
  • Apply pressure when ironing – It really helps to put a little pressure on the Cricut Easy Press or your iron to achieve the results that you are looking for.
  • Remove protective film and replace Cricut Protective Sheet or cloth and press one more time – This will make sure that the HT vinyl has fully adhered to the canvas.
  • Be patient – You are looking for the Iron-On Lite to melt into the canvas or really whatever material you are using. Take a little time, especially if you are using an iron rather than the Cricut Easy Press. Typical clothes-irons don’t have a consistent heat plate so you are going to have hot spots and cools spots. Therefore, it’s going to take a little extra time to get full adhesion.
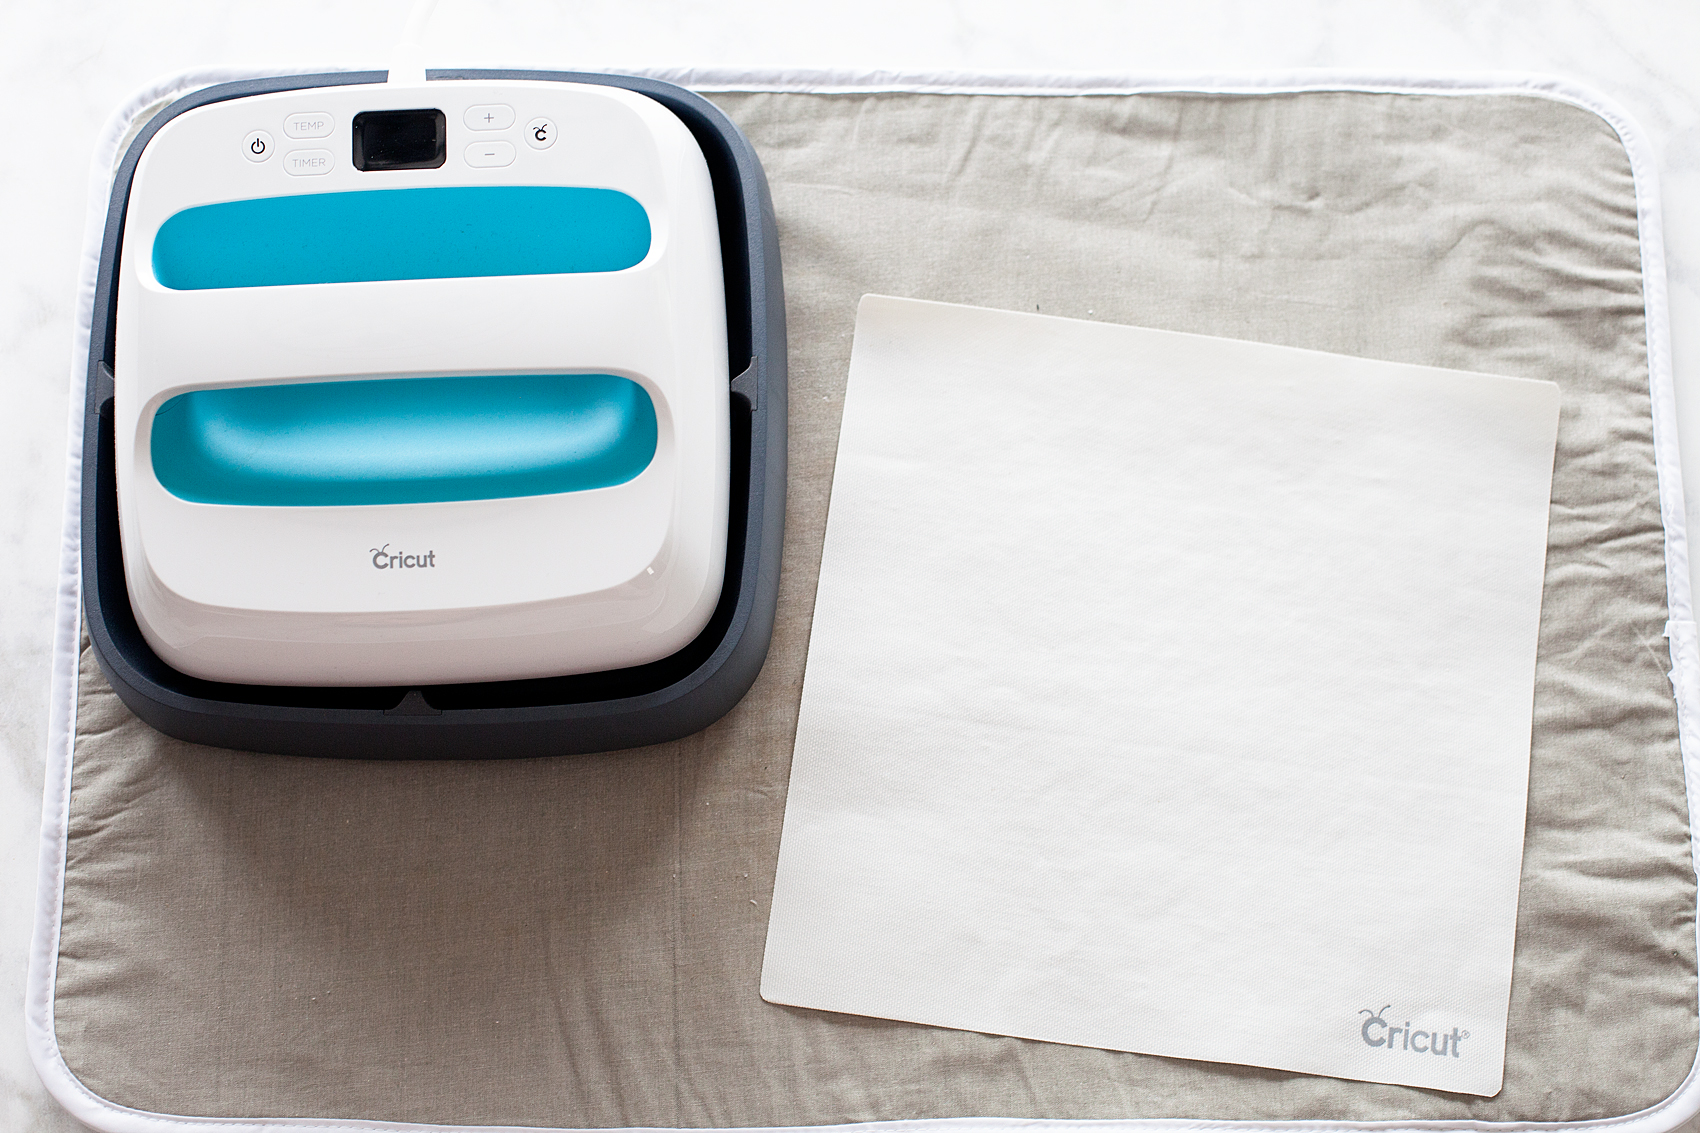
Materials

  • canvas – for this sign I used a 20×24 level 1 canvas from Michaels
  • Cricut cutting machine – I use the Cricut Maker
  • 12×24 inch Light Cutting Mat
  • Cricut Iron-On Lite – Black
  • Cricut Protective Sheet or light cloth
  • Cricut Easy Press or IronHygge Canvas Sign designed by WhipperBerry and created with @cricut Iron-On lite along with the Cricut Easy Press. Did you know that you can make beautiful signs with heat transfer vinyl like the Cricut Iron-On Lite? It’s super EASY come on over to WhipperBerry to learn how in my Sign Making 101 series + You can learn all about the magic of the Danish concept of Hygge!

Material for frame • Optional

  • 1x2x8 premium wood – 2×24 inch boards, 2×21 inch boards
  • hot glue gun
  • hot glue stick
  • Brad Nailer & nails

Hygge Canvas Sign Design

Of course you’re going to need the design for this Hygge sign. I created the whole thing in Cricut Design Space with Cricut fonts so it’s easy to share with you guys.

Hygge Canvas Sign designed by WhipperBerry and created with @cricut Iron-On lite along with the Cricut Easy Press. Did you know that you can make beautiful signs with heat transfer vinyl like the Cricut Iron-On Lite? It’s super EASY come on over to WhipperBerry to learn how in my Sign Making 101 series + You can learn all about the magic of the Danish concept of Hygge!

Now, I have a Cricut Access account which is super fabulous! It gives me access to many, many different graphics and fonts within Design Space. Here what it has to offer…

• For use with Cricut Explore and Cricut MakerTM only
• Unlimited access to over 30,000 images and 1,000 projects
• Includes the 370+ fonts in Cricut Access Fonts
• 10% off purchases on Cricut.com and Design Space®
• Exclusive images and fonts
• Includes multilayer images, single-layered images, 3D projects, and much more!

That is a great deal, especially if you love to create. Now, not everything is included in Cricut Access. Some images and fonts have a special license, and therefore, they can’t be included. One of the fonts I used for my Hygge canvas sign is a paid font BUT… Once I purchase the font, I will have it forever in my Cricut account.

Instructions

Guys… This is so easy. All you need to do is open Cricut Design Space HERE to open the design. Size the design to the size of your canvas. My canvas is rather large so I broke the design into 2 pieces and turned it sideways so that it would fit nicely on a 12×24 inch cutting mat. As long as the design is sized right, load your Cricut Iron-On Lite into your machine and click the Make It button.

Hygge Canvas Sign designed by WhipperBerry and created with @cricut Iron-On lite along with the Cricut Easy Press. Did you know that you can make beautiful signs with heat transfer vinyl like the Cricut Iron-On Lite? It’s super EASY come on over to WhipperBerry to learn how in my Sign Making 101 series + You can learn all about the magic of the Danish concept of Hygge!

Your design will load into the Prepare Mat screen.

Hygge Canvas Sign designed by WhipperBerry and created with @cricut Iron-On lite along with the Cricut Easy Press. Did you know that you can make beautiful signs with heat transfer vinyl like the Cricut Iron-On Lite? It’s super EASY come on over to WhipperBerry to learn how in my Sign Making 101 series + You can learn all about the magic of the Danish concept of Hygge!

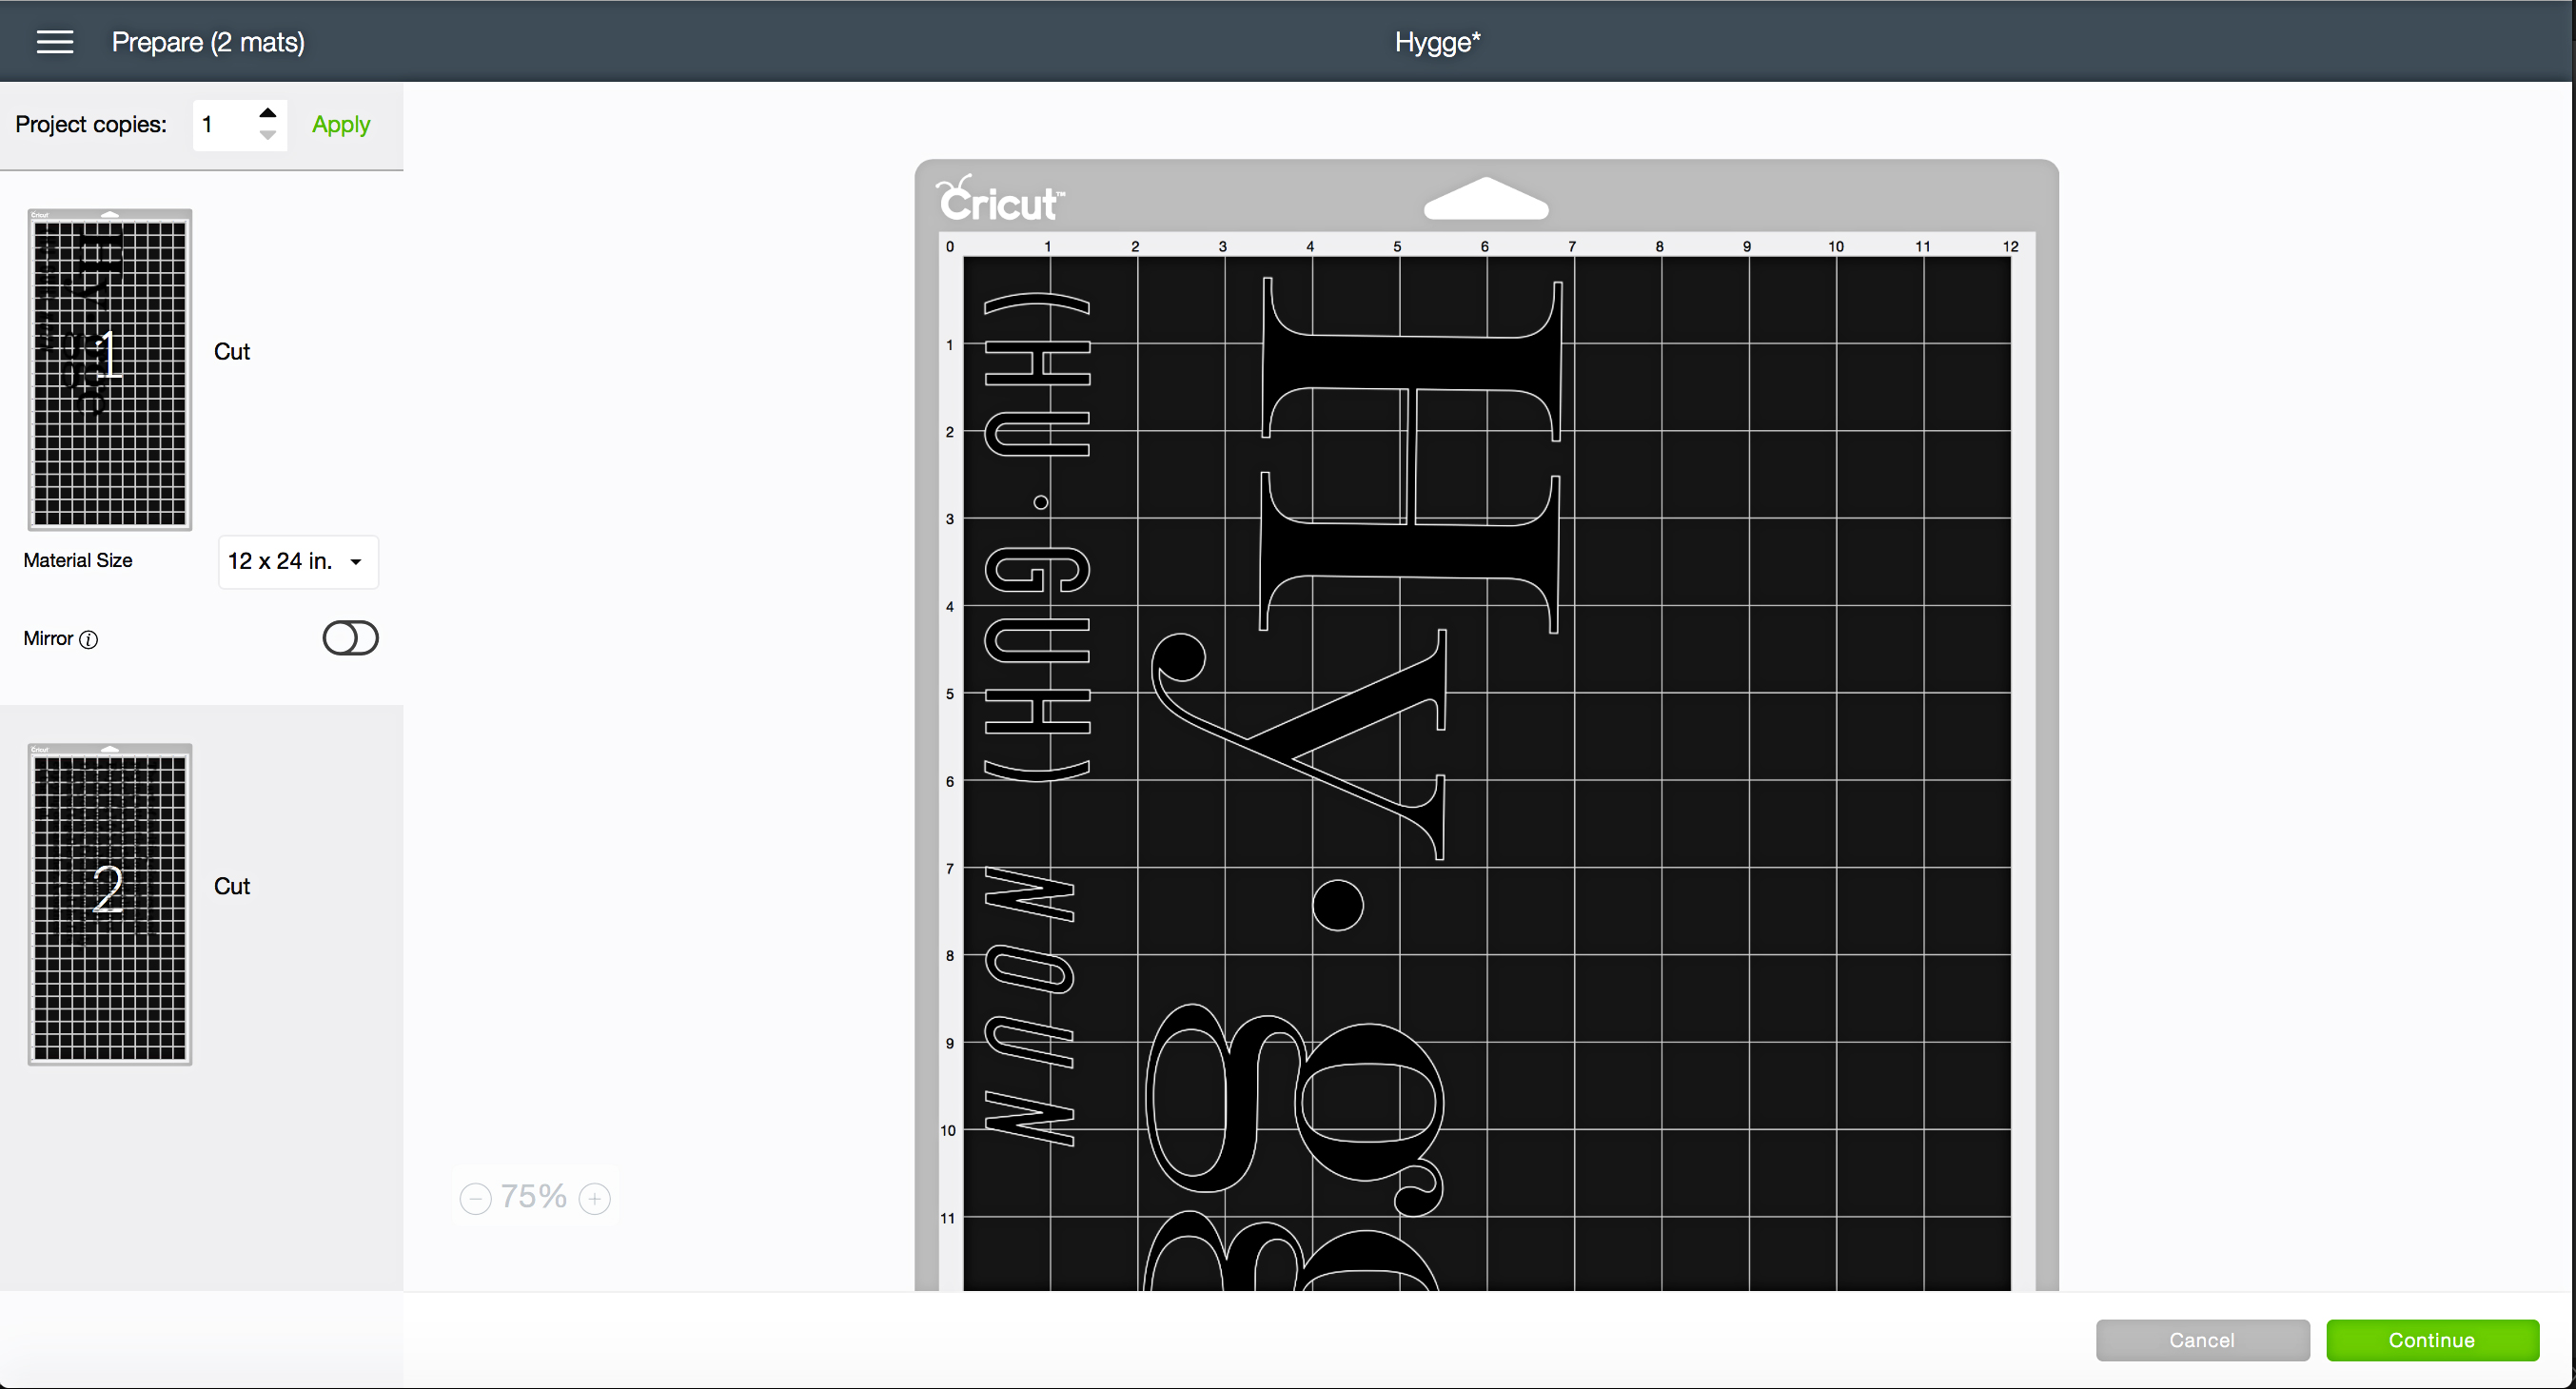
Now, this is VERY IMPORTANT! On the left side of the screen, you’ll see a button that says MIRROR. Click on that slider button and watch how your design flips and becomes mirrored.

Hygge Canvas Sign designed by WhipperBerry and created with @cricut Iron-On lite along with the Cricut Easy Press. Did you know that you can make beautiful signs with heat transfer vinyl like the Cricut Iron-On Lite? It’s super EASY come on over to WhipperBerry to learn how in my Sign Making 101 series + You can learn all about the magic of the Danish concept of Hygge!

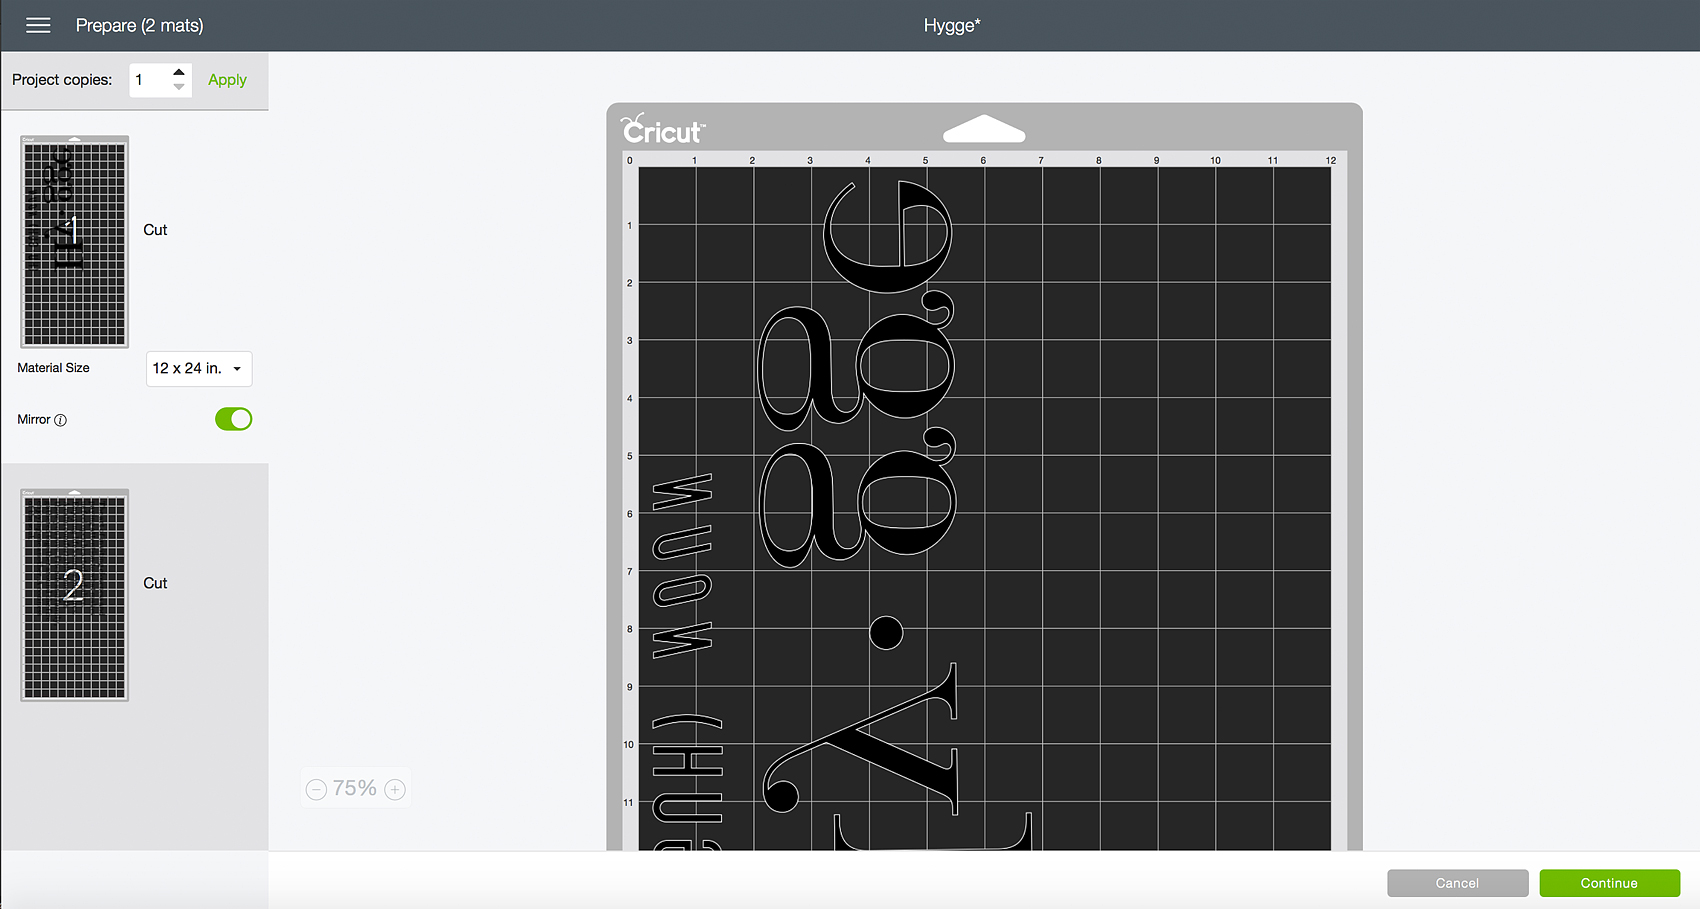
When using Cricut Iron-On Lite, you need to mirror your image because of the way the heat transfer vinyl works. The actual vinyl lays on a clear plastic sheet with the side of the vinyl that is meant to be melted into your surface facing up. Many people get confused as to which side of the material to cut on. You want to make sure the shiny side of the Iron-On Lite is face down on your cutting mat with the matte side of the vinyl facing up.

With your image mirrored and your vinyl correctly placed on your mat, you are ready to cut your design. Click on the Continue button, connect your machine, select your cutting material which is Iron-On, load your mat into the machine. When the Cut button on your machine starts flashing, press it and your design will start cutting.

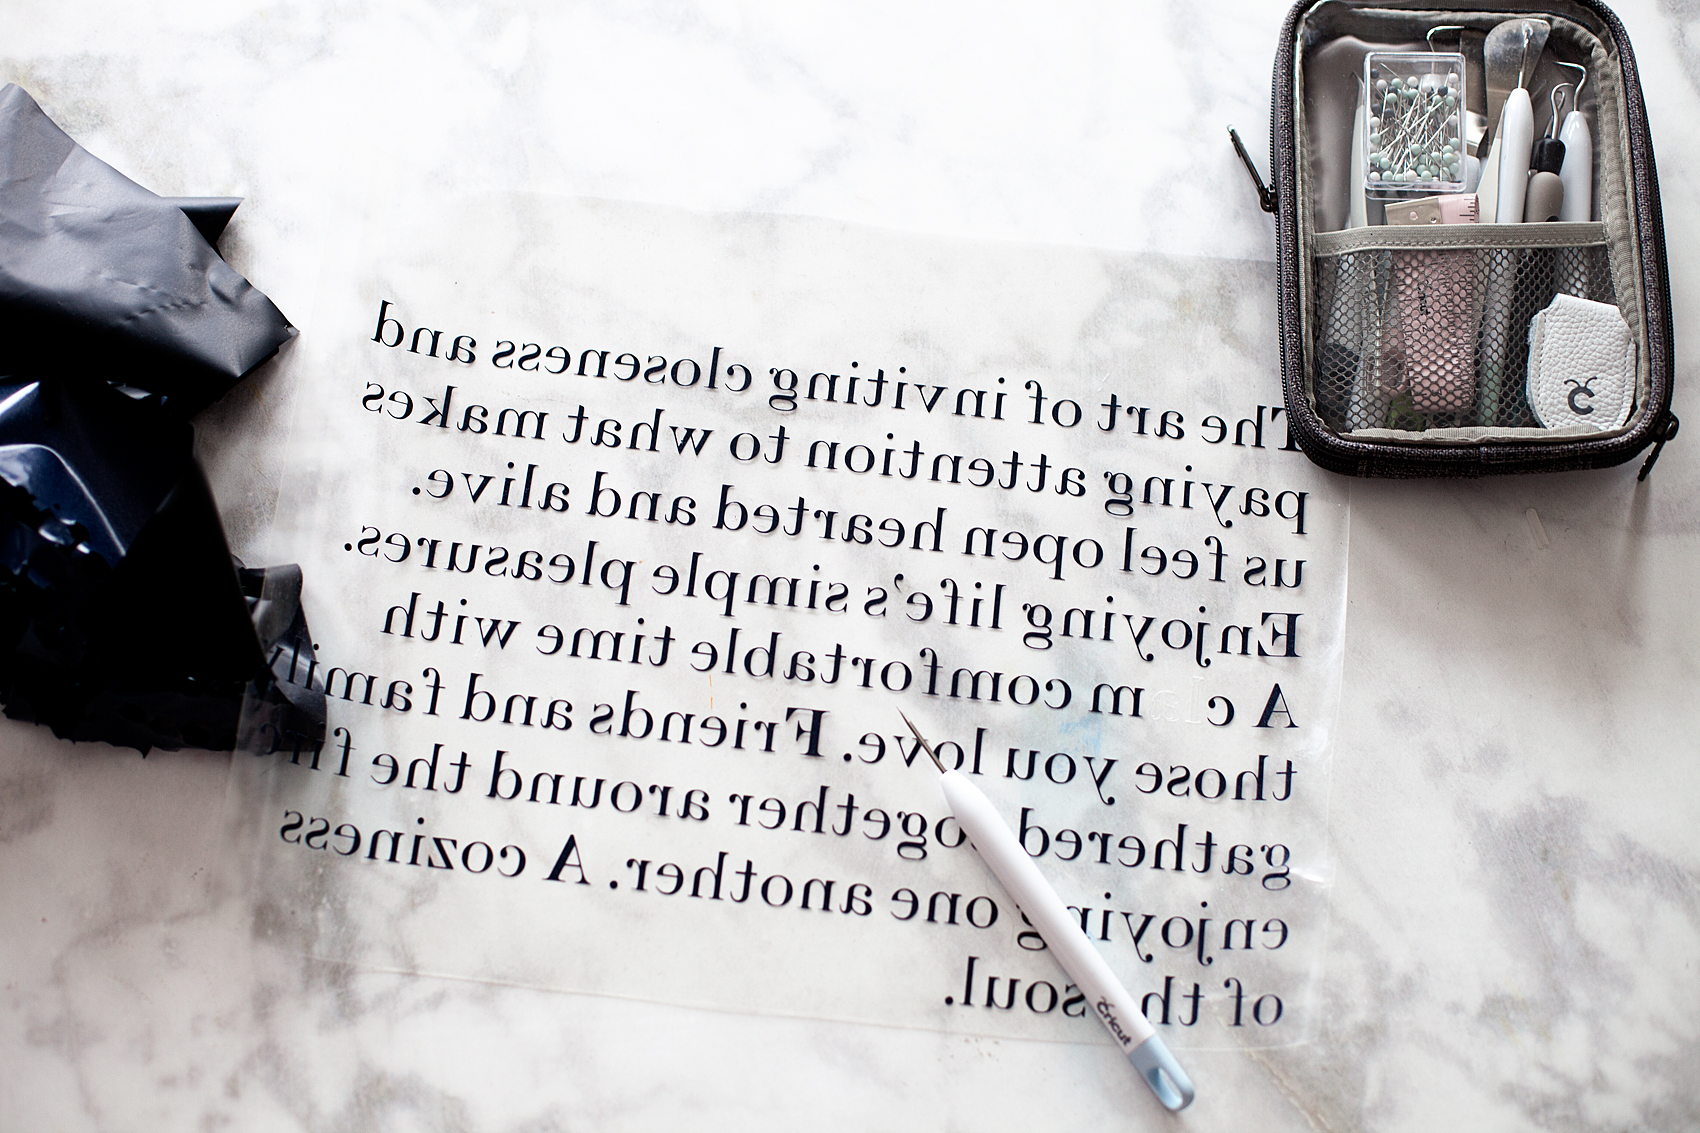
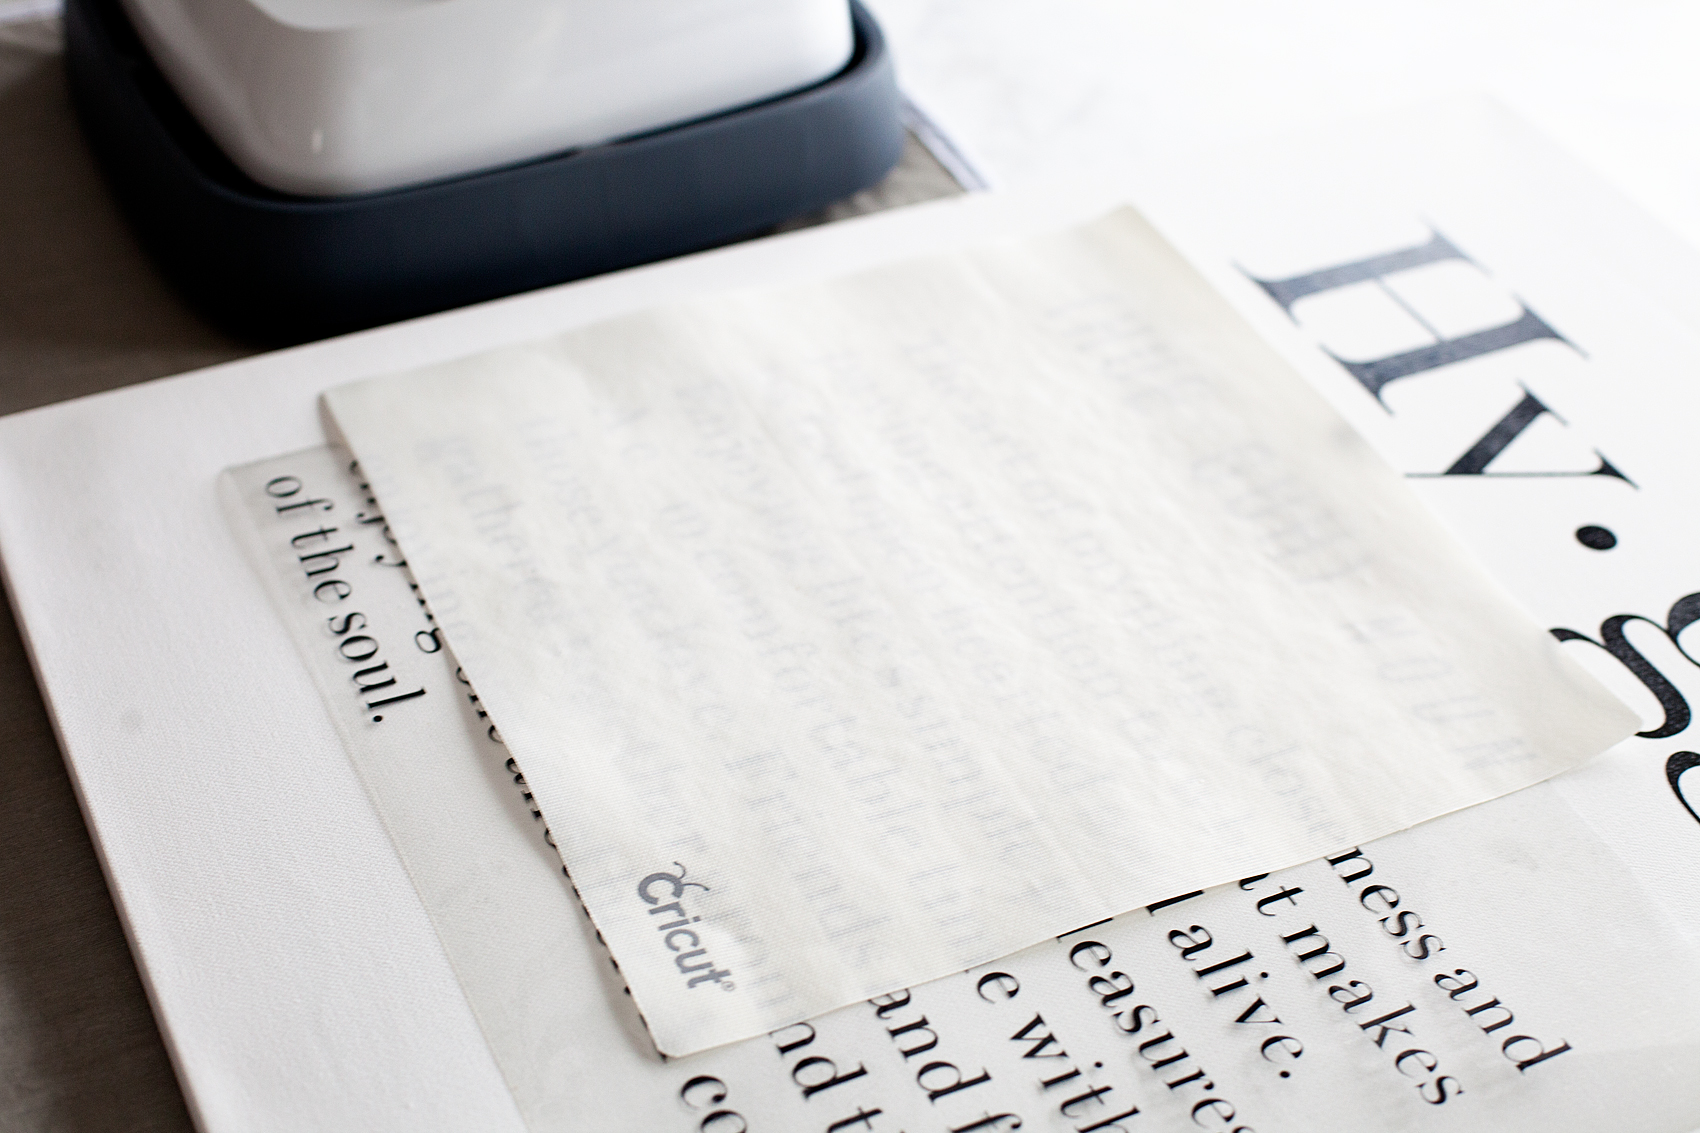
When your design is finished cutting, remove the mat from the machine, remove the iron-on vinyl and weed your design. What does weeding mean? That is when you use one of the great Weeding Tools that Cricut makes to remove the excess vinyl from your design leaving only the design itself.

Hygge Canvas Sign designed by WhipperBerry and created with @cricut Iron-On lite along with the Cricut Easy Press. Did you know that you can make beautiful signs with heat transfer vinyl like the Cricut Iron-On Lite? It’s super EASY come on over to WhipperBerry to learn how in my Sign Making 101 series + You can learn all about the magic of the Danish concept of Hygge!

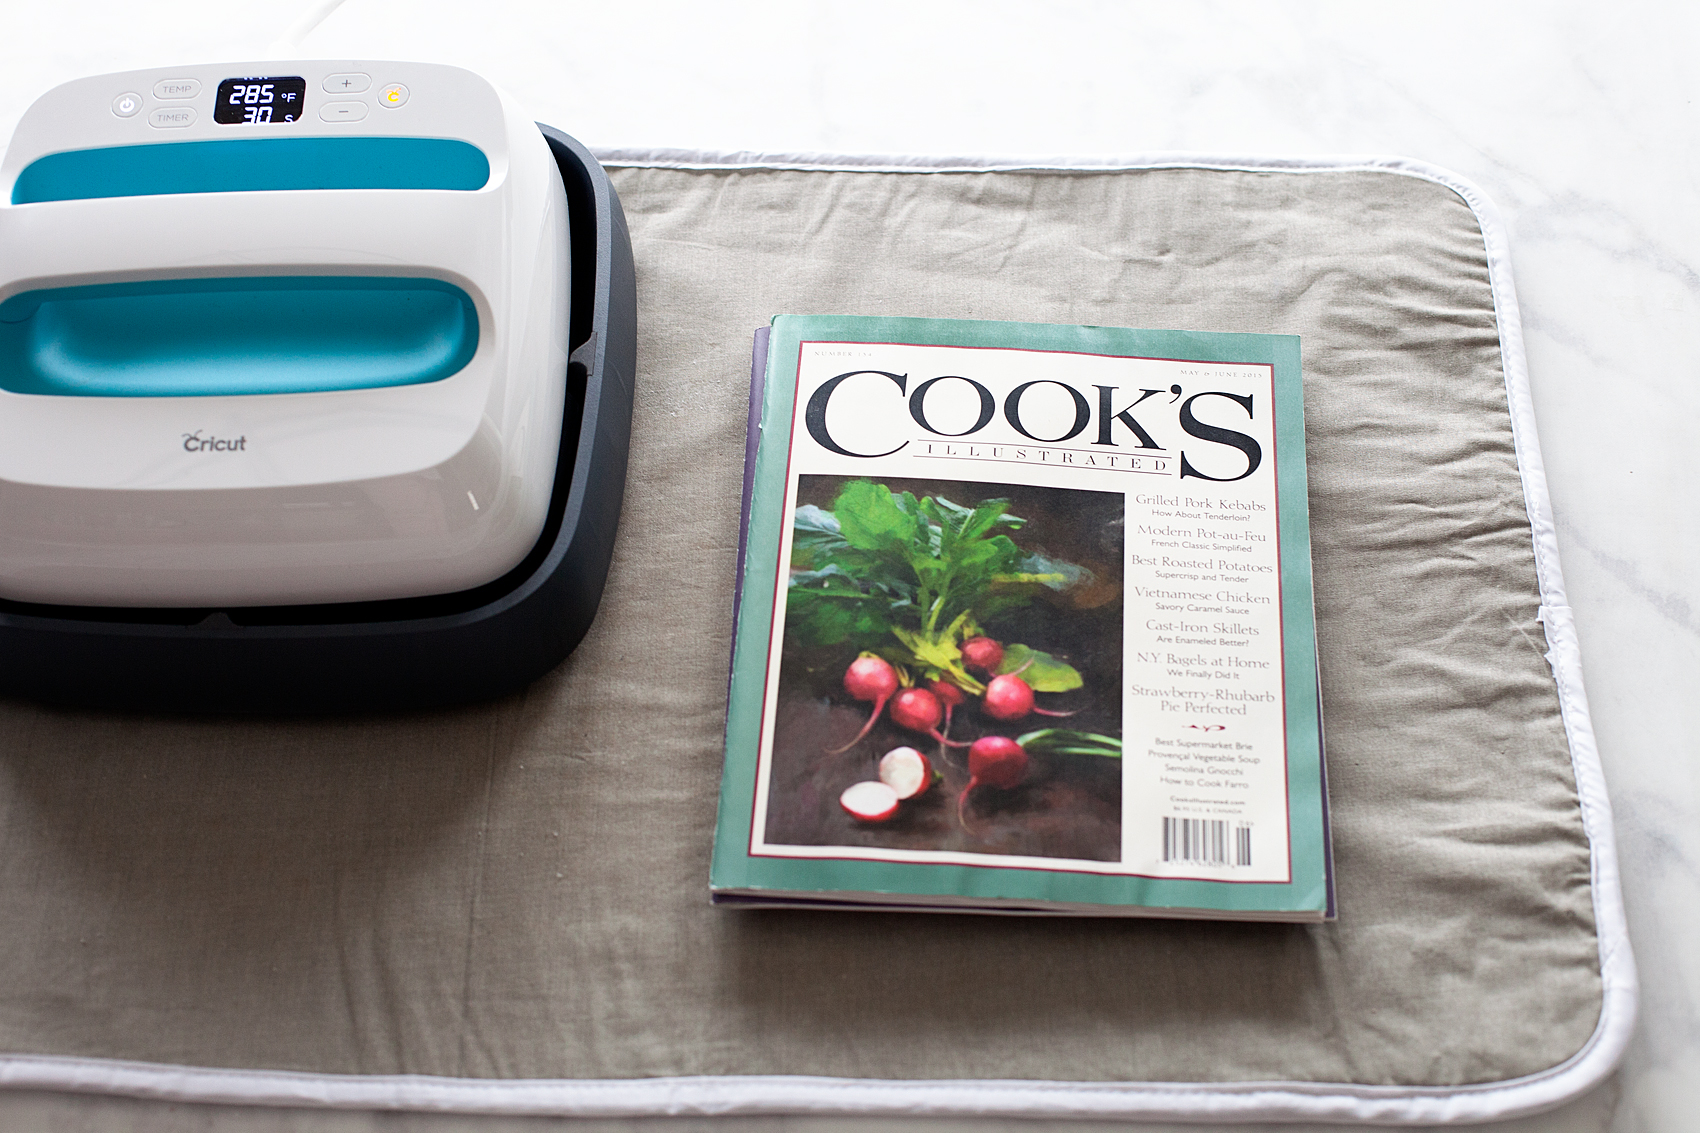
Next, you’ll turn on your Cricut Easy Press or your iron and prepare your canvas. When I’m using my Easy Press, I use either a towel or a protective heat mat that I found in the laundry section at Walmart, placing that on a firm surface like a counter top, or table, NOT an ironing board. They aren’t firm enough.

Then, I grab a book or a stack on magazines to place under the canvas, like I talked about before in the tips and tricks section.

Hygge-Sign--Canvas-and-Heat-Transfer-Vinyl-with-Cricut-Maker---created-by-WhipperBerry-7

Place the design onto my canvas with the protective film facing up. Place the Cricut Protective Sheet on top of your first section…

Hygge Canvas Sign designed by WhipperBerry and created with @cricut Iron-On lite along with the Cricut Easy Press. Did you know that you can make beautiful signs with heat transfer vinyl like the Cricut Iron-On Lite? It’s super EASY come on over to WhipperBerry to learn how in my Sign Making 101 series + You can learn all about the magic of the Danish concept of Hygge!

Then press your design with the Easy Press or your Iron.

Hygge Canvas Sign designed by WhipperBerry and created with @cricut Iron-On lite along with the Cricut Easy Press. Did you know that you can make beautiful signs with heat transfer vinyl like the Cricut Iron-On Lite? It’s super EASY come on over to WhipperBerry to learn how in my Sign Making 101 series + You can learn all about the magic of the Danish concept of Hygge!

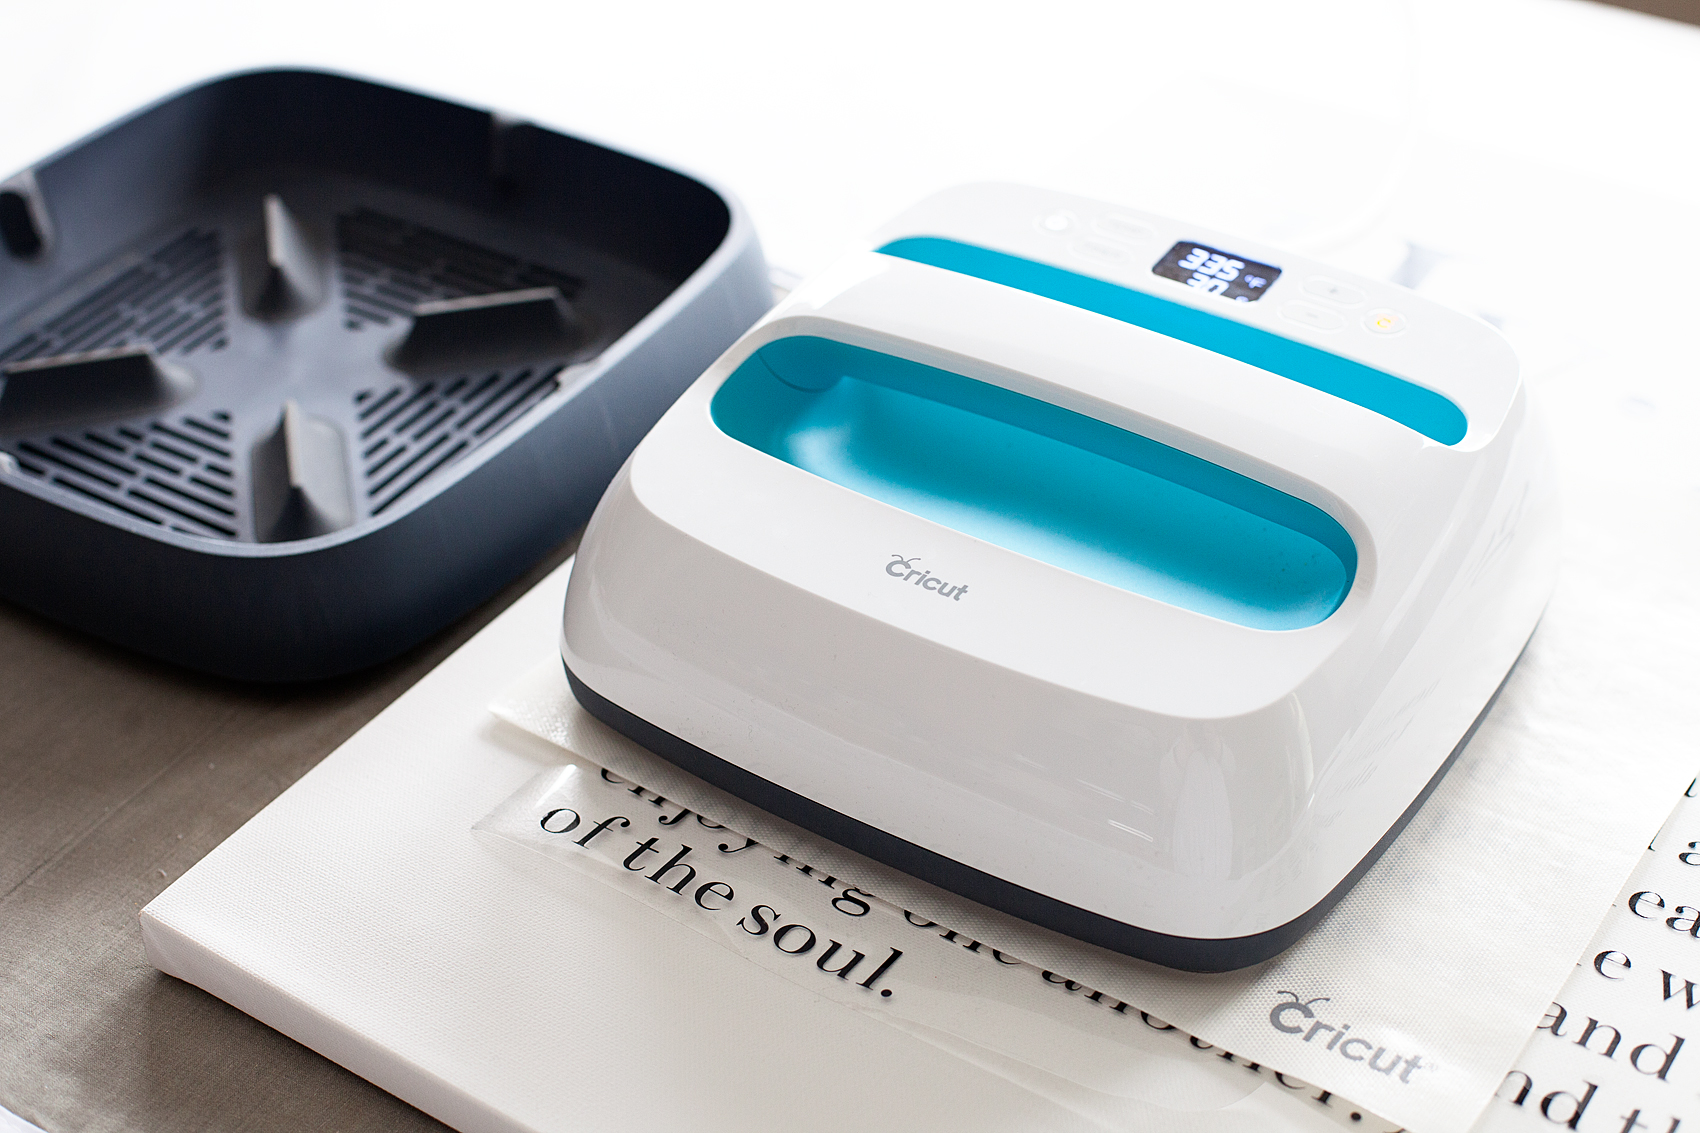
I set my temperature on the Easy Press to 350˚ and let it do it’s thing for about 40-50 seconds. You need to be careful not to let it sit for too long, the vinyl will melt in a way that you won’t like.

If you are using an iron, this will take a bit longer, just be patient.

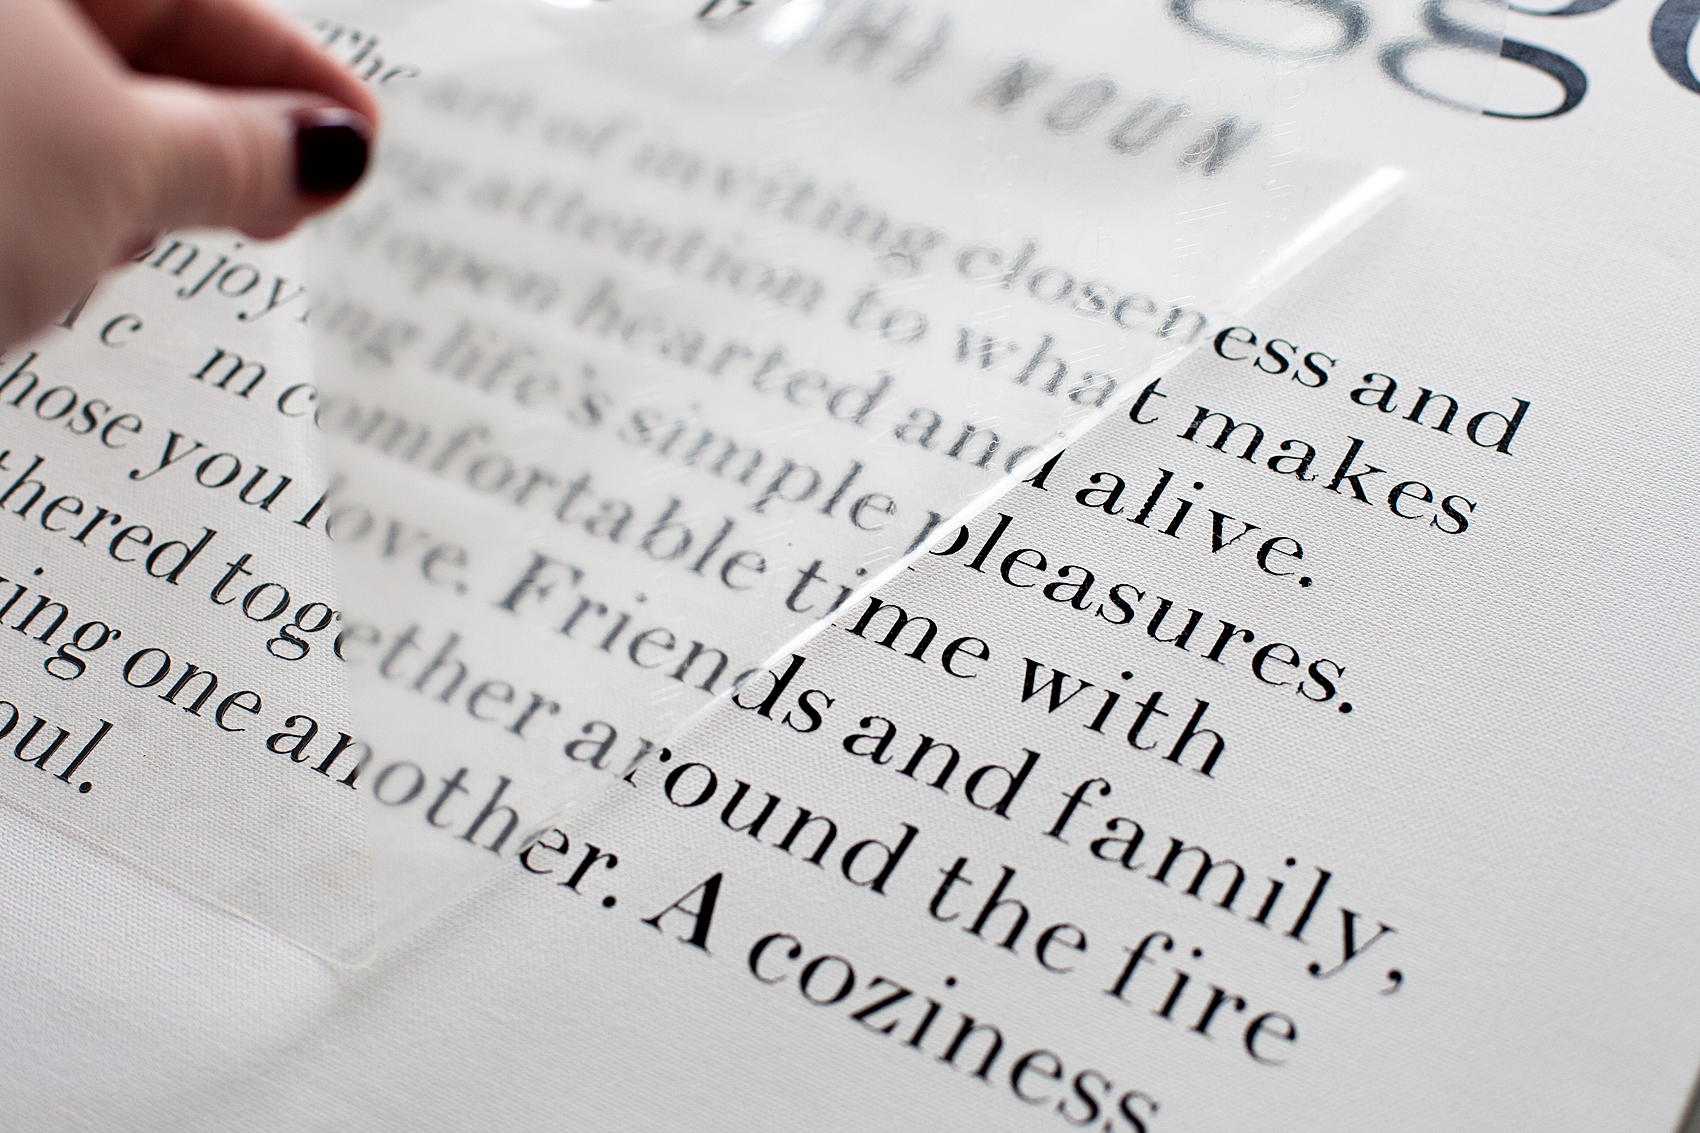
Continue pressing the vinyl until you have covered the entire design. Let cool for a few seconds then, remove the protective film and voilá, you have a beautiful new canvas sign for your home!

Hygge Canvas Sign designed by WhipperBerry and created with @cricut Iron-On lite along with the Cricut Easy Press. Did you know that you can make beautiful signs with heat transfer vinyl like the Cricut Iron-On Lite? It’s super EASY come on over to WhipperBerry to learn how in my Sign Making 101 series + You can learn all about the magic of the Danish concept of Hygge!

If you would like to add the frame, all you need to do is hot glue the frame pieces onto the canvas, one at a time. I place my canvas on top of a stack of three ball jar lids. A stack of three in each corner. That seems to be the perfect placement for adding the frame.

Glue one of the frame sides onto the canvas then firmly attach it with the brad nailer while the glue is still warm. Move onto the next side until you have completed all four sides.

Hygge Canvas Sign designed by WhipperBerry and created with @cricut Iron-On lite along with the Cricut Easy Press. Did you know that you can make beautiful signs with heat transfer vinyl like the Cricut Iron-On Lite? It’s super EASY come on over to WhipperBerry to learn how in my Sign Making 101 series + You can learn all about the magic of the Danish concept of Hygge!

This is a sponsored conversation written by me on behalf of Cricut. The opinions and text are all mine.

How to Make a Paper Roll Sign for Hanukkah • Video Tutorial

4 · Dec 12, 2017 · 1 Comment

Back in October, I ventured out of the sign-making box and tried the idea of making paper rolls signs with heat transfer vinyl. As much as I would love to have mad hand lettering skills, I have come to accept the fact that this is a talent I do not have. I can however, design on the computer and cut my design with my Cricut Maker out of Cricut Iron-On Lite and press the vinyl onto the sign with my Cricut Easy Press. It’s PERFECT!! I decided I wanted to make a meaningful sign for my Jewish friends as they begin their Hanukkah celebrations this week and the paper roll sign is perfect for that. Now, if you don’t have a Cricut, then I’d suggest checking out the Cricut vs Silhouette post to see if we can change that.

+ This post brought to you by Cricut +Create this meaningful sign for Hanukkah this year using a vintage style paper roll and your Cricut Maker or Explore Air machine and the @cricut Easy Press • Video Tutorial created by WhipperBerry

Why a Paper Roll Sign

Now, whether you celebrate Hanukkah or not, this tutorial is fun for all kinds of sign making. My last sign was for Halloween and my next sign will most likely be for the New Year.

I love the concept of the paper roll sign because I don’t typically like to use the same stuff year after year. I want something new for each new season. The paper roll is so much more economical that making the sign out of wood or canvas every time I want to change-up my decor. When I am finished with that sign, I tear off the bottom of the paper with the vinyl on it and start over with a new design. It’s totally the way I like to “roll.”

I found my paper roll (NOT and affiliate) on Amazon. I know that many home decor stores carry them as well. They also come in various sizes. I am using the small size for this project.

Tools and Materials

I am using my trusted Cricut tools again for this project. You just can’t go wrong with them. Even the New York Times feels the same way. They listed the Cricut Explore Air 2 as one of the best gifts this holiday season in The New York Times 2017 Holiday Gift Guide with the Cricut Maker as the upgrade gift. Can’t go wrong there!

For this project you only need a few items…

  • vintage style paper roll
  • Cricut Iron-On Lite
  • Cricut Machine
  • Cricut Easy Press
  • Cricut Iron-On Protective Sheet
  • towel or heat resistant ironing mat
  • Hanukkah Sign SVG file

Create this meaningful sign for Hanukkah this year using a vintage style paper roll and your Cricut Maker or Explore Air machine and the @cricut Easy Press • Video Tutorial created by WhipperBerry

Instructions

First, you’ll need to download the design file listed above or create your own design in Cricut Design Space. Once you have your design ready in Design Space, you are ready to cut your file and make your sign. Here is a quick video showing you how I created my paper roll sign.

How to Create a Paper Roll Sign for Hanukkah created by WhipperBerry from Heather Thoming on Vimeo.

Super easy, right? All you need to do is make sure you have the RIGHT tools and the skies the limit. Here’s a quick recap…

  • Cut design on your cutting machine out of Cricut Iron-On Lite. Make sure that you mirror the image so that it will cut right. You will also want to make sure that the shiny side of the heat transfer vinyl is down when cutting out your design.
  • Weed the vinyl. This means to remove the excess vinyl from your cut vinyl leaving only the design that is mirrored and ready to adhere to your paper roll.
  • Lay the design down onto the surface of the paper.

Create this meaningful sign for Hanukkah this year using a vintage style paper roll and your Cricut Maker or Explore Air machine and the @cricut Easy Press • Video Tutorial created by WhipperBerry

  • Cover the design with the Cricut Iron-On Protective Sheet.
  • Turn your Cricut Easy Press onto 325˚ and set the timer for 50 seconds.
  • Place the Easy Press or your iron onto the paper and hold for 50 seconds. Make sure to heat the entire surface of the sign before removing the clear protective sheet on top of the heat transfer vinyl.
  • Remove clear plastic sheet.
  • Hang your new sign!

For more Cricut inspiration, follow Cricut on Pinterest. They have all kinds of amazing project! Want to make sure you don’t forget this idea and tutorial? Here’s an image that you can pin to make sure you can find it again…

Create this meaningful sign for Hanukkah this year using a vintage style paper roll and your Cricut Maker or Explore Air machine and the @cricut Easy Press • Video Tutorial created by WhipperBerry

This is a sponsored conversation written by me on behalf of Cricut. The opinions and text are all mine.

Create Curved Text in Cricut Design Space • Video Tutorial

9 · Nov 30, 2017 · 5 Comments

I have been creating all kinds of goodies for our home in Cricut Design Space and then making them on my Cricut Maker. If you use a Silhouette then I’d recommend checking out my post where I compare Silhouette vs Cricut. One of the biggest questions I receive time and time again is, “how do you create curved text in Cricut Design Space?” It has been a conundrum for many people who like to create fun typography for their Cricut projects. Well, I’m here to the rescue! I’ve created a video tutorial on how to create more stylized text within the Cricut Design Space platform. Come check it out…

+ This post brought to you by Cricut +

Learn how to create stylish curved text in Cricut Design Space • Video Tutorial created by WhipperBerry

For quite some time now, I would design most of my creations in Adobe Illustrator and then import them into Cricut Design Space mainly because I wanted more freedom with my word art. I wanted to create curves, waves, archs & arches. I felt like the Cricut Design Space kind of tied my hands here. Then I did a little playing around and figured out how much freedom we really have when designing with words in Design Space. It may not be as quick as clicking a button, BUT… You can do so much more, you just need to have a little imagination. Here’s the video tutorial that I put together to teach you how.

WhipperBerry Cricut Design School – How to Create Curved Text in Cricut Design Space from Heather Thoming on Vimeo.

 If you’re looking for more tutorials on how to create with your Cricut machine and within Design Space, visit my other posts that help walk you though creating with Cricut. Like this one on how to import and use your SVG files within Cricut Design Space. If you have questions or would like a video tutorial on how to create with Cricut, leave a comment and I’ll work on putting one together for you!

Whether you are a sign maker, a paper crafter or you love to work with fabric, chances are you've wanted to either create your own SVG files or download files that you've purchased and use them with your Cricut Projects Here’s a great video tutorial on how to import your own SVG files into Cricut Design Space and how to easily use it in the software.

This is the project that I made with that tutorial. A stylish zipper pouch, a perfect Holiday gift for friends and family.

Everyone loves thoughtful homemade gifts and this stylish zipper pouch is the perfect gift to whip-up in a fews hours to give as a fabulous Christmas gift this year + you can take the guess work out of cutting the pattern with the Cricut Maker! Come on over and learn how to make one of your own on WhipperBerry.

Christmas Tree Truck Mug • Cricut Holiday Gift Giving

10 · Nov 29, 2017 · 2 Comments

Always, always, always… Looking for fun and unique gifts that I can create for friends and family during the holidays. This Christmas Tree Truck Mug, that I created with my Cricut Maker, has my heart! I Now if you aren’t sure which is better, Cricut vs Silhouette, then make sure you check out that comparison! Anyways, I love how it turned out. This Christmas Tree Mug filled with hot chocolate packets is fun to give to friends, neighbors, teachers, and so on. I typically stick with black and white in my designs because I LOVE black and white. This time, I branched out and layered different colors of vinyl to create a fun look on a white and black enamelware mug. While I was making them I created a video tutorial on how to layer your vinyl when working with multicolored vinyl projects. Come check it out…

+ This post brought to you by Cricut +Always, always always looking for fun and unique gifts that I can create for friends and family during the holidays. This one that I created with my Cricut Maker has my heart! I love how it turned out. This Christmas Tree Mug is so cute and fun to give to friends, neighbors, teachers and so on.

Christmas Tree Truck Mug

Inspired by the ever-popular red truck with a Christmas Tree in the back, I thought it would translate nicely into a fun neighbor gift. This project is really quite simple. However, it looks impressive and your friends who receive it are going to LOVE it! I know I would if someone gave it to me. Here’s what you’ll need to make some of your own.

Materials

For the mug, I found some enamel ware mugs at Amazon (I’m not an affiliate) but they can be pretty pricey. If you want a more budget friendly option, I would visit a Dollar Store, Dollar Tree or even a thrift store to find just some basic white mugs.

  • white mug
  • design file for Cricut Design Space
  • black vinyl
  • red vinyl
  • green vinyl
  • Cricut Transfer Tape
  • Cricut Cutting Machine ie. Cricut Maker or Cricut Explore Air 2
  • Cricut Light Grip Cutting Mat
  • hot chocolate packets

Instructions

The first thing you might want to do is watch a video tutorial that I created that shows how to create curved text in Cricut Design Space AND how to apply the vinyl to the mug. It would be really helpful. Don’t worry though, I’ve handled the entire design process for you! Once you watch the video, make sure you have clicked on the link to my design file so that you can easily create this project in Cricut Design Space. Select the click it button on the bottom right and follow the steps to cut all three colors of vinyl. Next step, you’ll need to weed your vinyl. That means that you need to remove all of the vinyl around your image and inside the image. Once you’ve weeded the vinyl, you’re ready to apply it to the mug. Here is a quick video tutorial on how to easily layer your vinyl.

WhipperBerry Cricut Design School-How to Easily Layer Vinyl Video Tutorial from Heather Thoming on Vimeo.

Now, all you need to do is fill your cute mugs with your favorite hot chocolate packets. Then, make a list of all your favorite friends & neighbors to give one if these fun mugs to this Christmas.

Learn how to create stylish curved text in Cricut Design Space • Video Tutorial created by WhipperBerry

Cricut Questions

Have any Cricut questions? I’d be happy to tackle them if you’d like. Leave a comment or email me at heather @ whipperberry . com and I’ll put together a video to help shine some light on what has been perplexing you.

This is a sponsored conversation written by me on behalf of Cricut. The opinions and text are all mine. I have included some Share-a-Sale links for tracking purposes only. I am not a Cricut Affiliate.

  • « Go to Previous Page
  • Page 1
  • Interim pages omitted …
  • Page 5
  • Page 6
  • Page 7
  • Page 8
  • Page 9
  • Interim pages omitted …
  • Page 11
  • Go to Next Page »

Primary Sidebar

Heather from Whipperberry
Hello... my name is Heather and I'm the creator of WhipperBerry a creative lifestyle blog packed full of great recipes and creative ideas for your home and family. I find I am happiest when I'm living a creative life and I love to share what I've been up to along the way... Come explore, my hope is that you'll leave inspired!

Footer

  • Privacy Policy
  • Crafts
  • Food
  • Gifts
  • Holidays
  • Home
  • Mom Life
  • Recipes
  • Travel

Copyright © 2026 · Seasoned Pro