• Skip to primary navigation
  • Skip to main content
  • Skip to primary sidebar
  • Skip to footer

Whipperberry

WhipperBerry • Your Home For Creative Inspiration

  • Home
  • Recipes
    • Starters
    • Easy Weeknight Dinners
    • Main Dish
    • Salads
    • Side Dish
    • Soups & Stews
    • Desserts
    • Breakfast
    • Miscellaneous
  • Tutorials
    • Creative Crafts
    • DIY Decor
    • Fabric Crafts
    • Food How-To
    • Jewlery
    • Paint Projects
    • Paper Art
    • Party Styling
    • Photography and Graphic Design
    • Silhouette
  • Holidays
    • Easter
    • Mother’s Day
    • Father’s Day
    • 4th of July
    • Halloween
    • Thanksgiving
    • Christmas
    • Valentine’s Day
  • Gift Ideas
    • Gifts For Everyone
    • Gifts for Dad
    • Mother’s day
    • For The Girls
    • For The Kids
    • Teacher Gift Ideas
    • Christmas
  • Printables
    • Holiday
    • Gift Idea
    • LDS Primary
  • Travel
  • About
    • Terms
  • Contact
  • Nav Social Menu

    • Facebook
    • Instagram
    • Pinterest
    • RSS
    • Twitter

DecoArt

Gnome Garden

4 · May 1, 2017 · 3 Comments

A Gnome Garden is the perfect project for the entire family! With a little imagination, a good container, plants, some sticks from your yard and a little DecoArt Patio Paint,  you can transform a simple garden into a gnome wonderland. Come learn how…Gnome Gardens are a fun trend that the whole family can participate in. Create your own Gnomes with some sticks and @decoart Patio Paint.

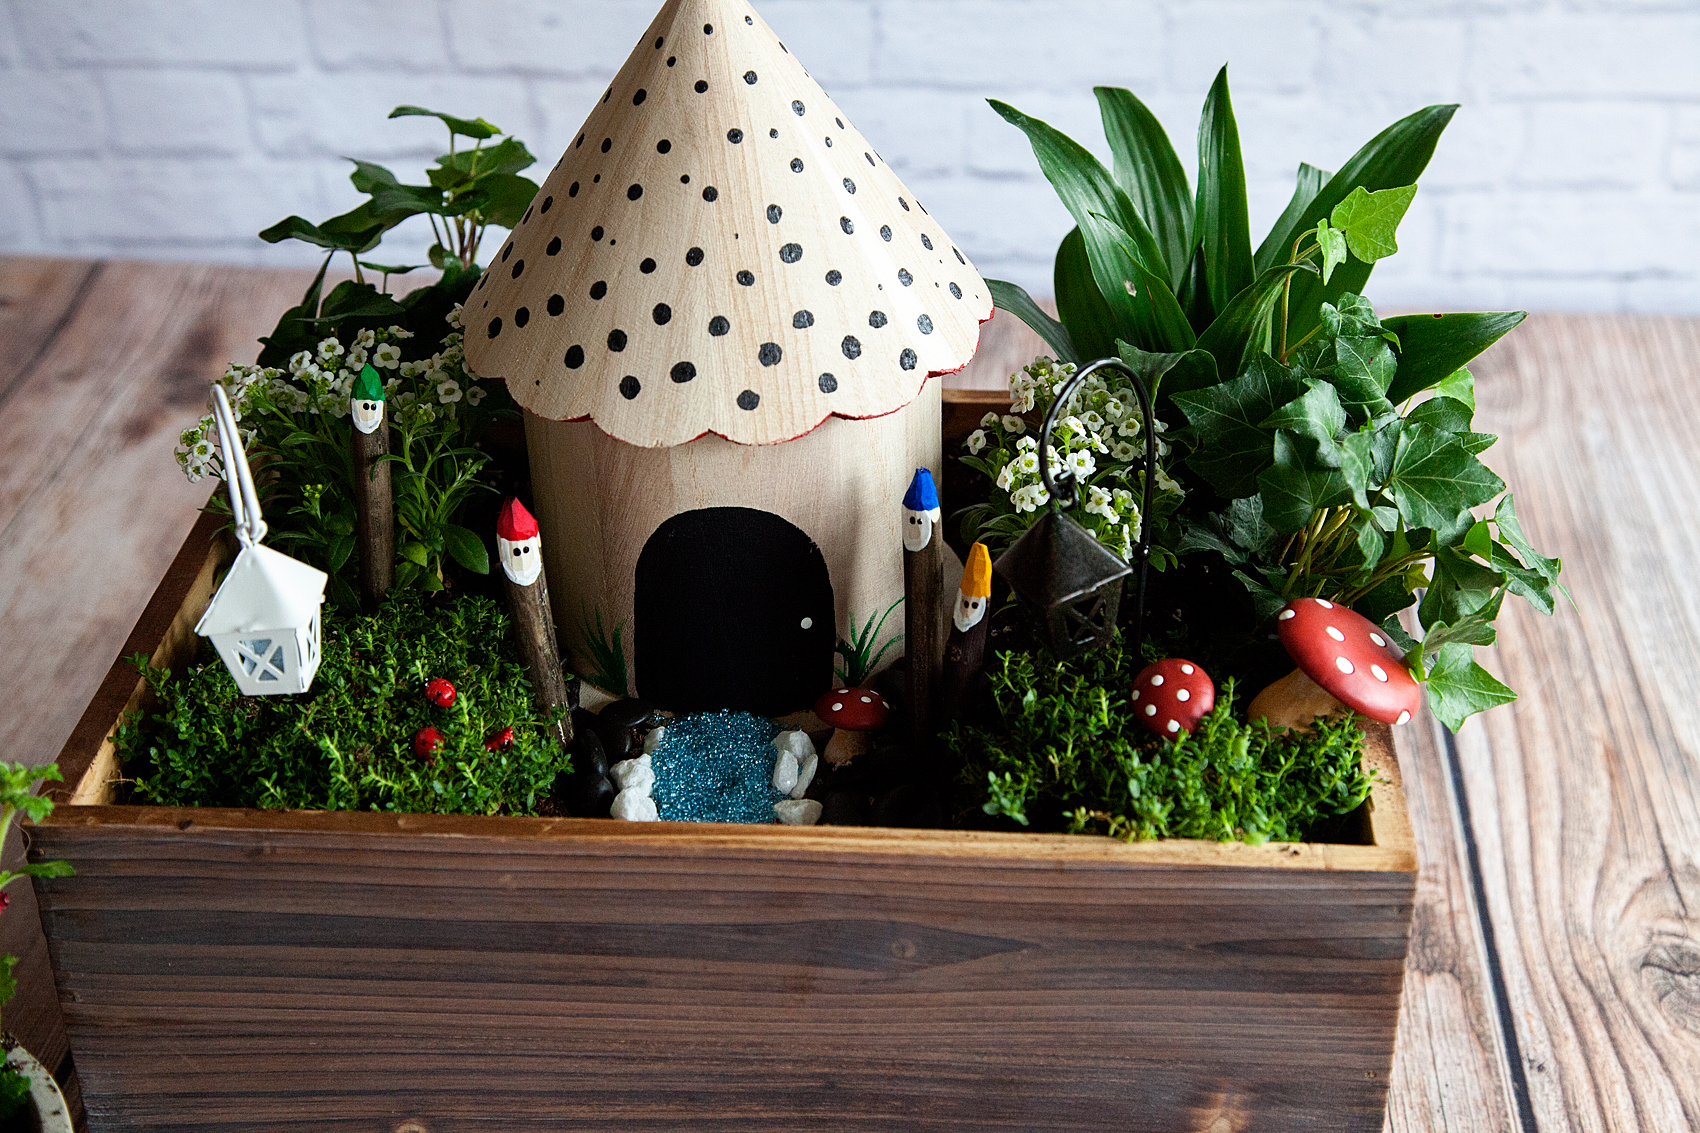
This Gnome Garden post brought to you by DecoArt

I have always been fascinated by gardening. Gardening is in my gene pool. I have a sister with a degree in horticulture & landscape design (gardening) and a mother who adores gardening. I SHOULD be an amazing gardener, right?

Well… I’m getting there. To be completely honest, that darn gardening gene is taking awhile to really kick into gear.  Every spring I bring home a new set of, what my husband likes to refer to as, “this years sacrifices!” What?

I’ve tried and tried for a few years to maintain some plants in my home and finally, I feel like I can mange some simple plant care. However, I am no expert. What I love to do is, create with my family and a gnome garden is PERFECT for that.

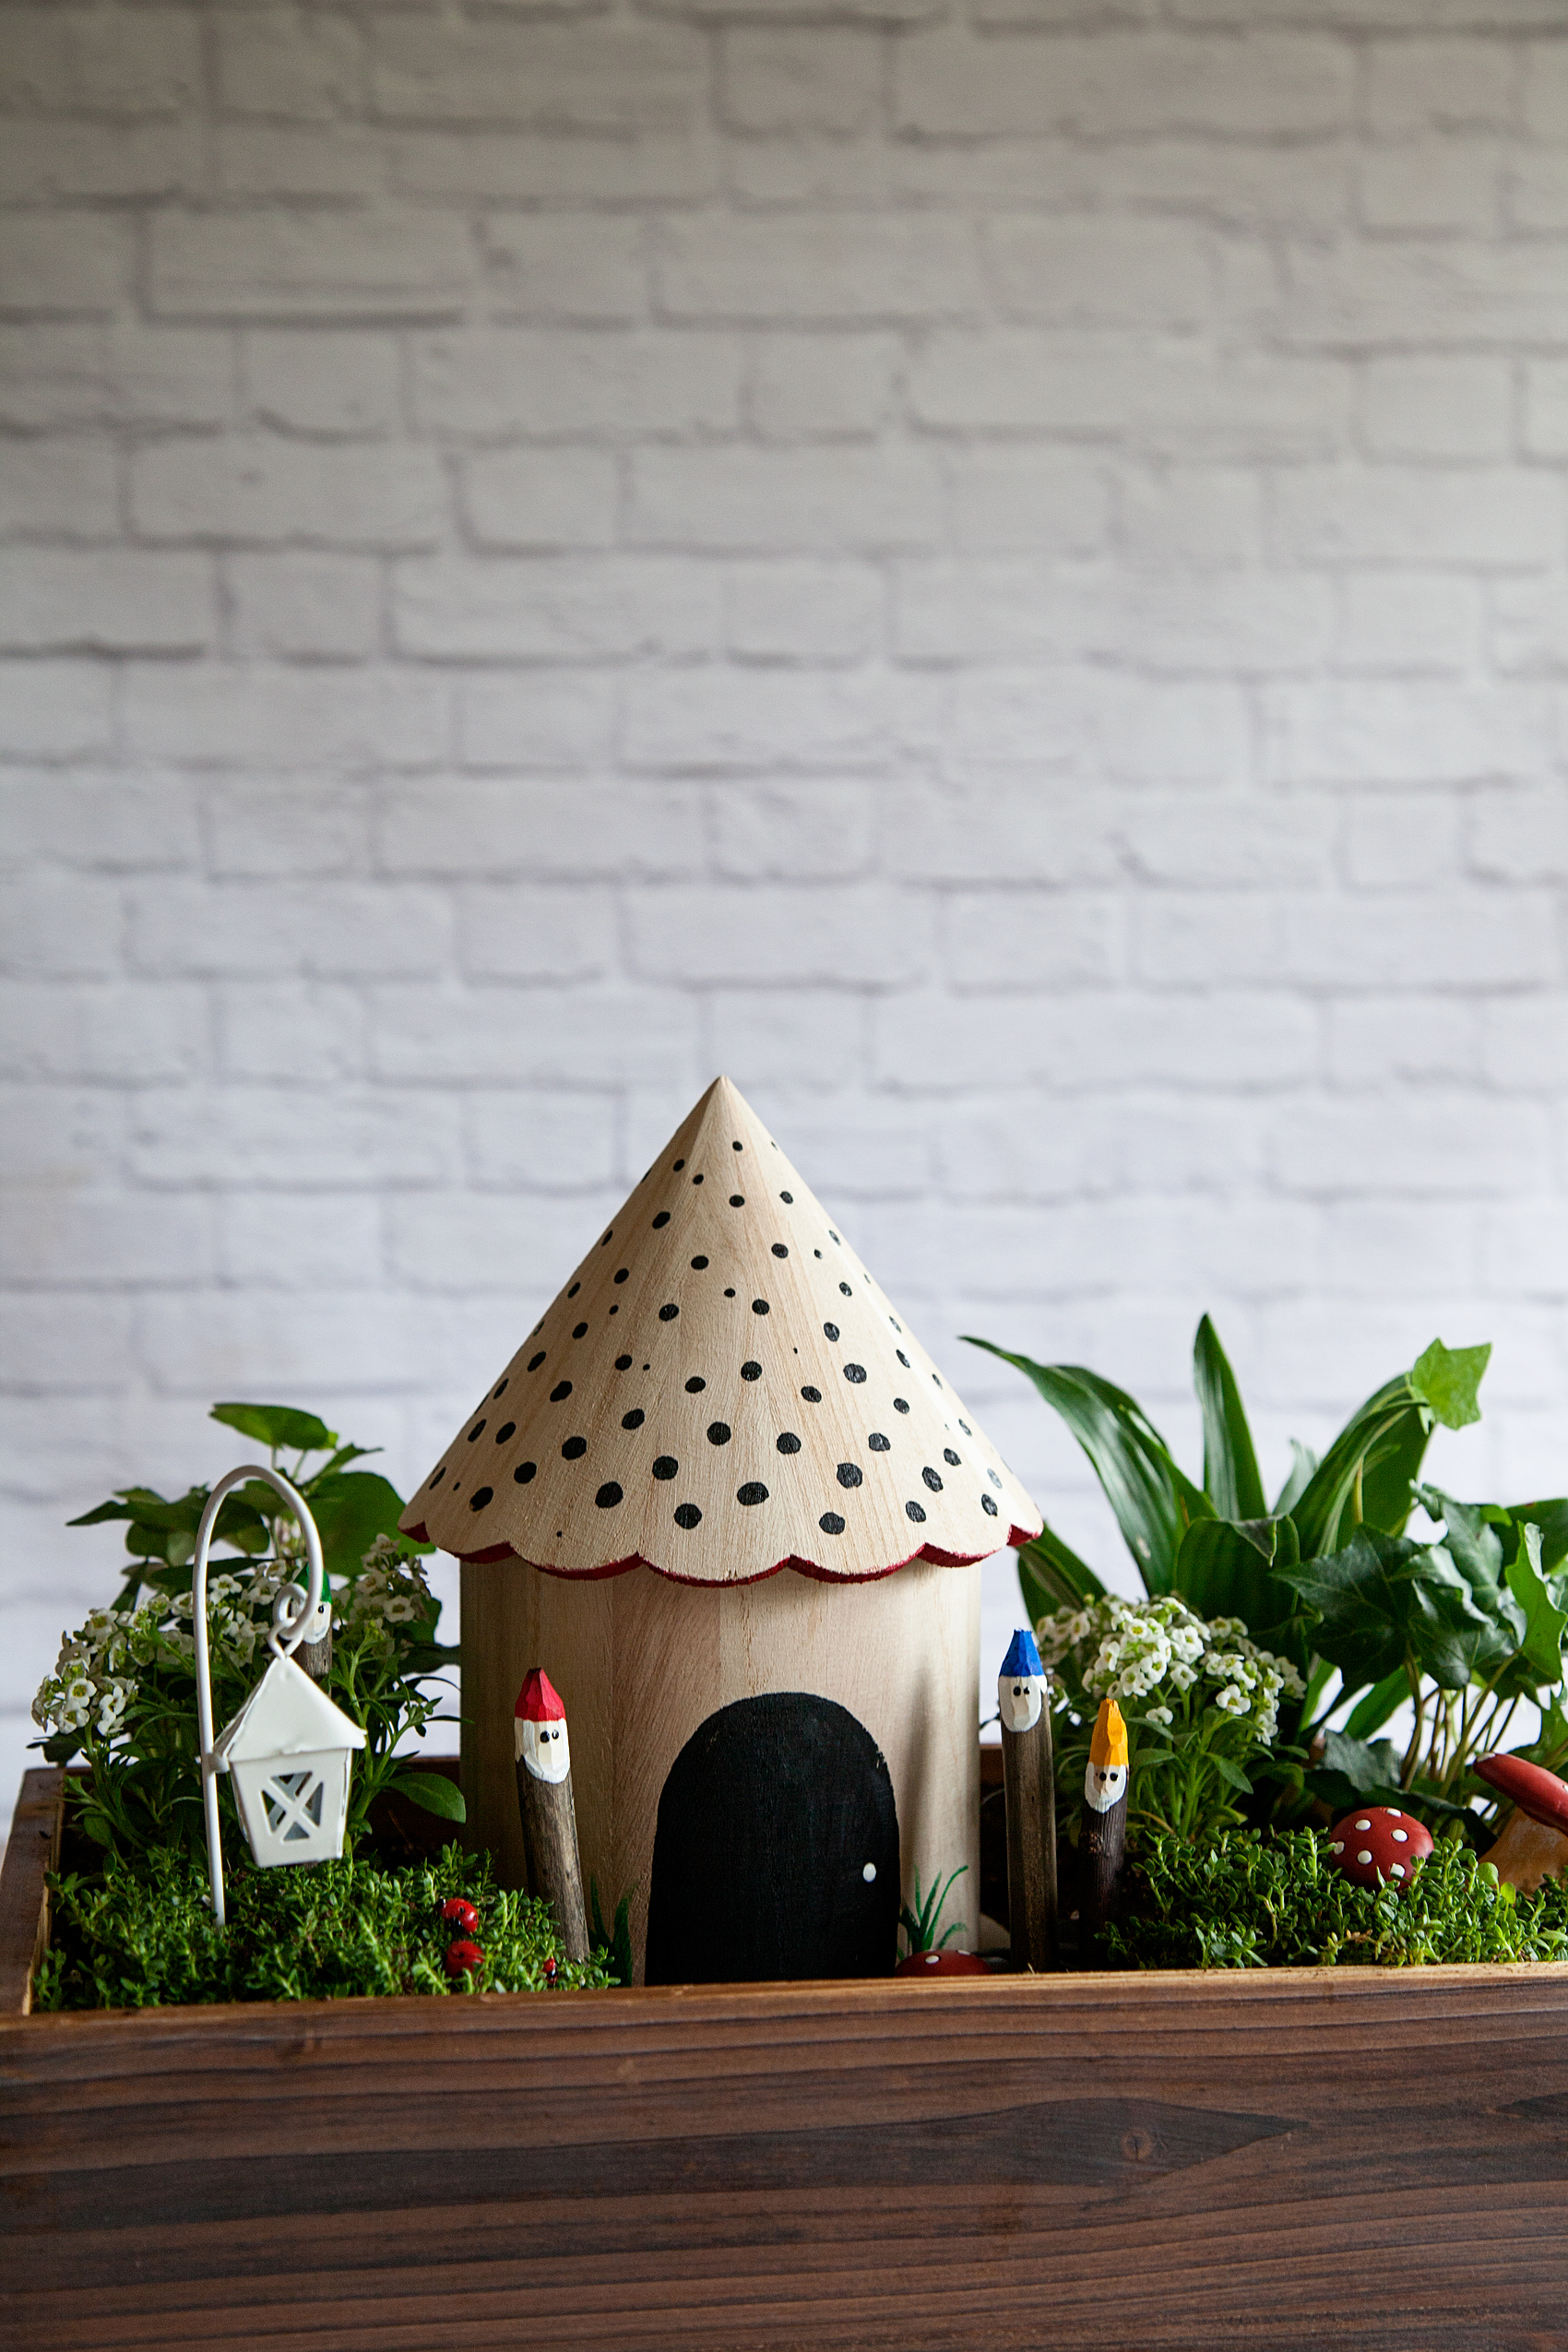
Gnome and Fairy Gardens are becoming all the rage these days. If you walk into Michaels right now, they have a whole section dedicated to these fun gardens with all kinds of gnomes and their accessories. I decided it would be fun to create a gnome garden together with the family using some budget friendly items like sticks from the backyard as our gnomes & a raw wood bird house that I found at Michaels as their cute home. Here’s what you’ll need to make one with your family…

Gnome Gardens are a fun trend that the whole family can participate in. Create your own Gnomes with some sticks and @decoart Patio Paint.

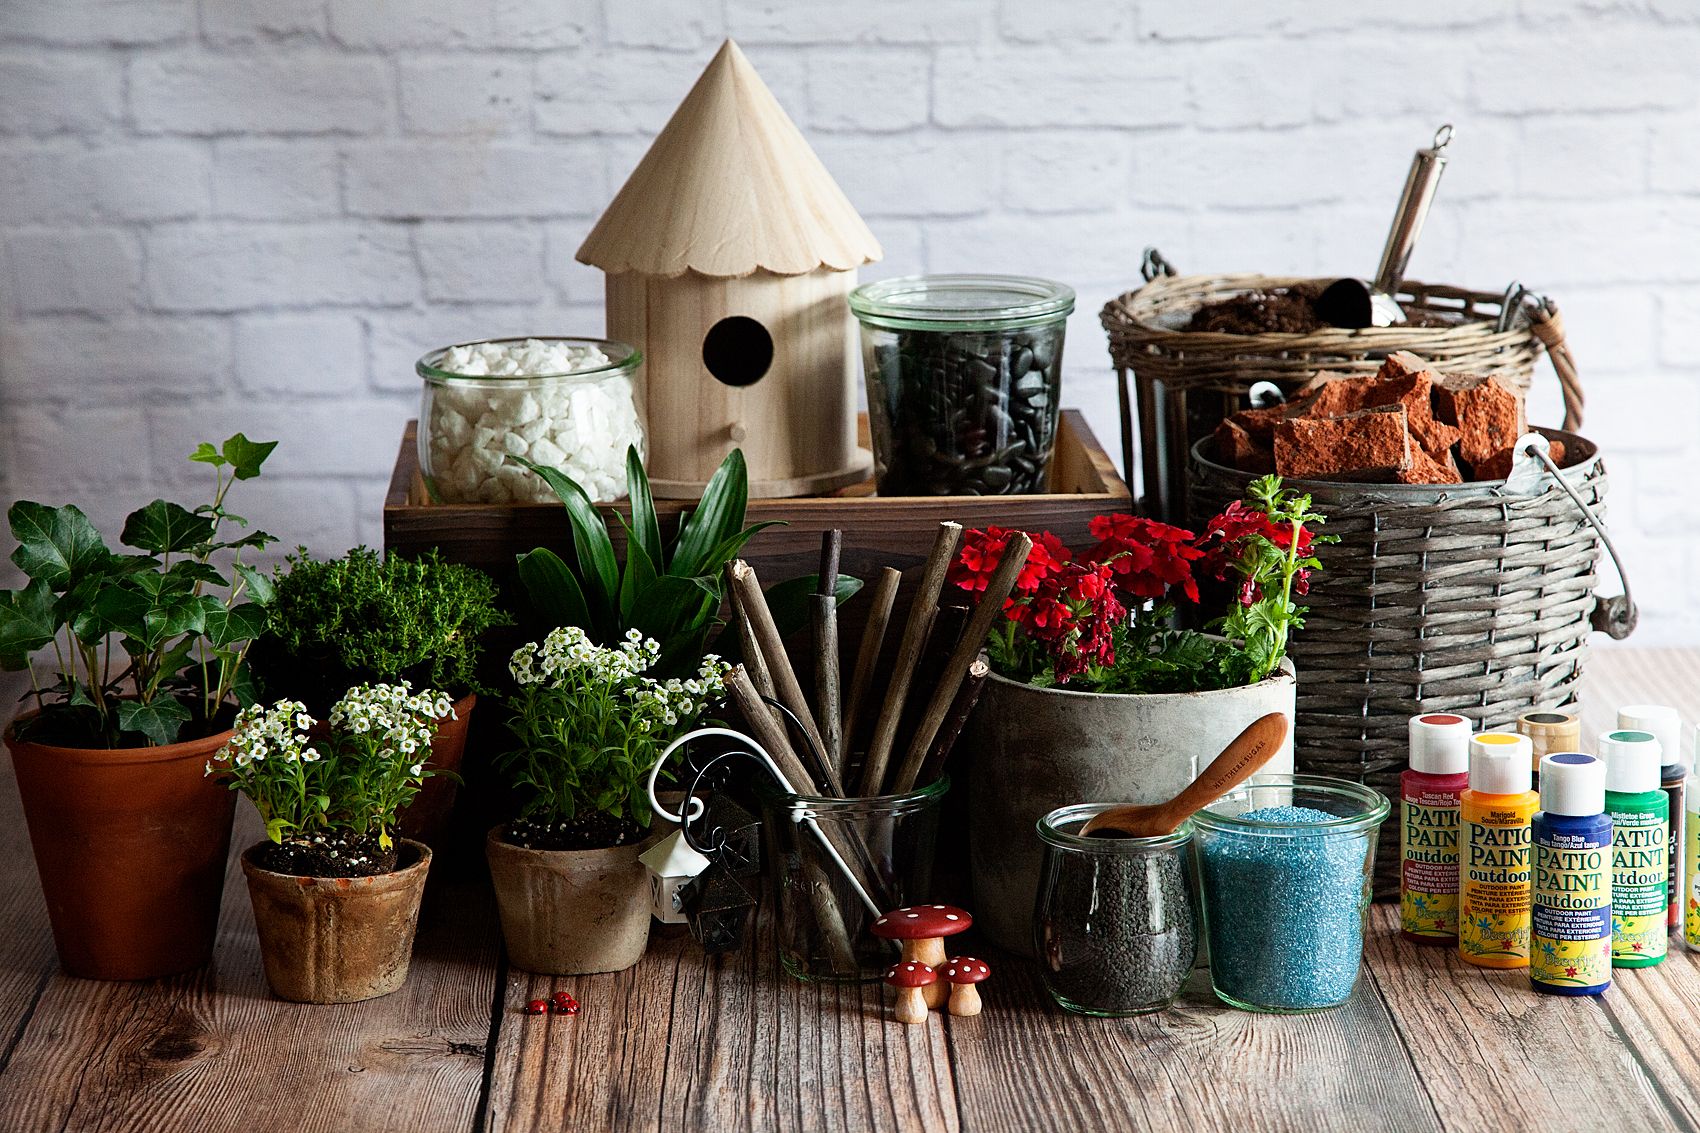
Gnome Garden Supply List

  • Garden container
  • rocks
  • soil
  • 7-8 small plants
  • 4-5 sticks roughly 6 inches tall
  • DecoArt Patio Paint
    • Suggested Colors
    • Tuscan Red
    • Marigold Yellow
    • Tango Blue
    • Mistletoe Green
    • Cloud White
    • Wrought Iron Black
  • Small round tip paint brush
  • Small flat tip paint brush
  • pencil
  • a sharp whittling knife
  • jar of water
  • paper towels
  • small decorative rocks
  • colored decorative sand
  • garden accessories

gnome-garden

Why Patio Paint is Perfect for Gardens

Not all paint is created equal. Some paint is more durable than others and that’s alright, every type of paint has it’s purpose. What you are looking for with this project is a highly durable paint that is non-toxic, water based and adheres nicely to things that will likely be outdoors or will endure repeated watering like this project. The DecoArt Patio Paint is PERFECT for this! Here are the specifics…

  • No sealer required for a durable, long-lasting finish
  • Weather-proof
  • Satin finish
  • Scuff-resistant
  • Superior coverage
  • Will not crack or peel
  • Water-based and non-toxic
  • Easy to clean
  • Made in the USA

How to Create a Gnome Garden

Here’s a quick video to show you how easy it is to create a special gnome garden of your own…

Gnome Garden from Heather Thoming on Vimeo.

Isn’t that easy and fun for the family? Here’s the step by step…

  1. Place rocks at the bottom of your container. This helps with drainage for your plants. Plants love water, but they typically don’t like to sit in it all of the time. You’ll need to make sure they have proper drainage.
  2. Pour in your potting soil. Fill your container about 3/4 full.
  3. Plant your plants in the container with the lower plants in front and the taller toward the back. Keep in mind, you are trying to set a scene. If you are wondering what plants to use and how to maintain them, here’s a good article from the Empress of Dirt.
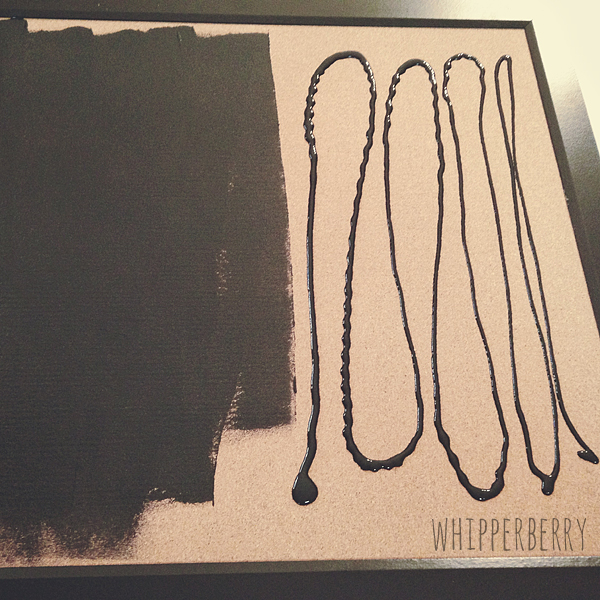
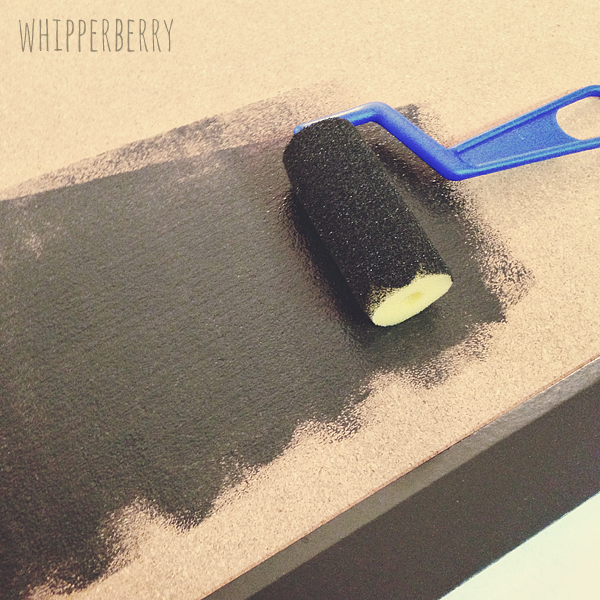
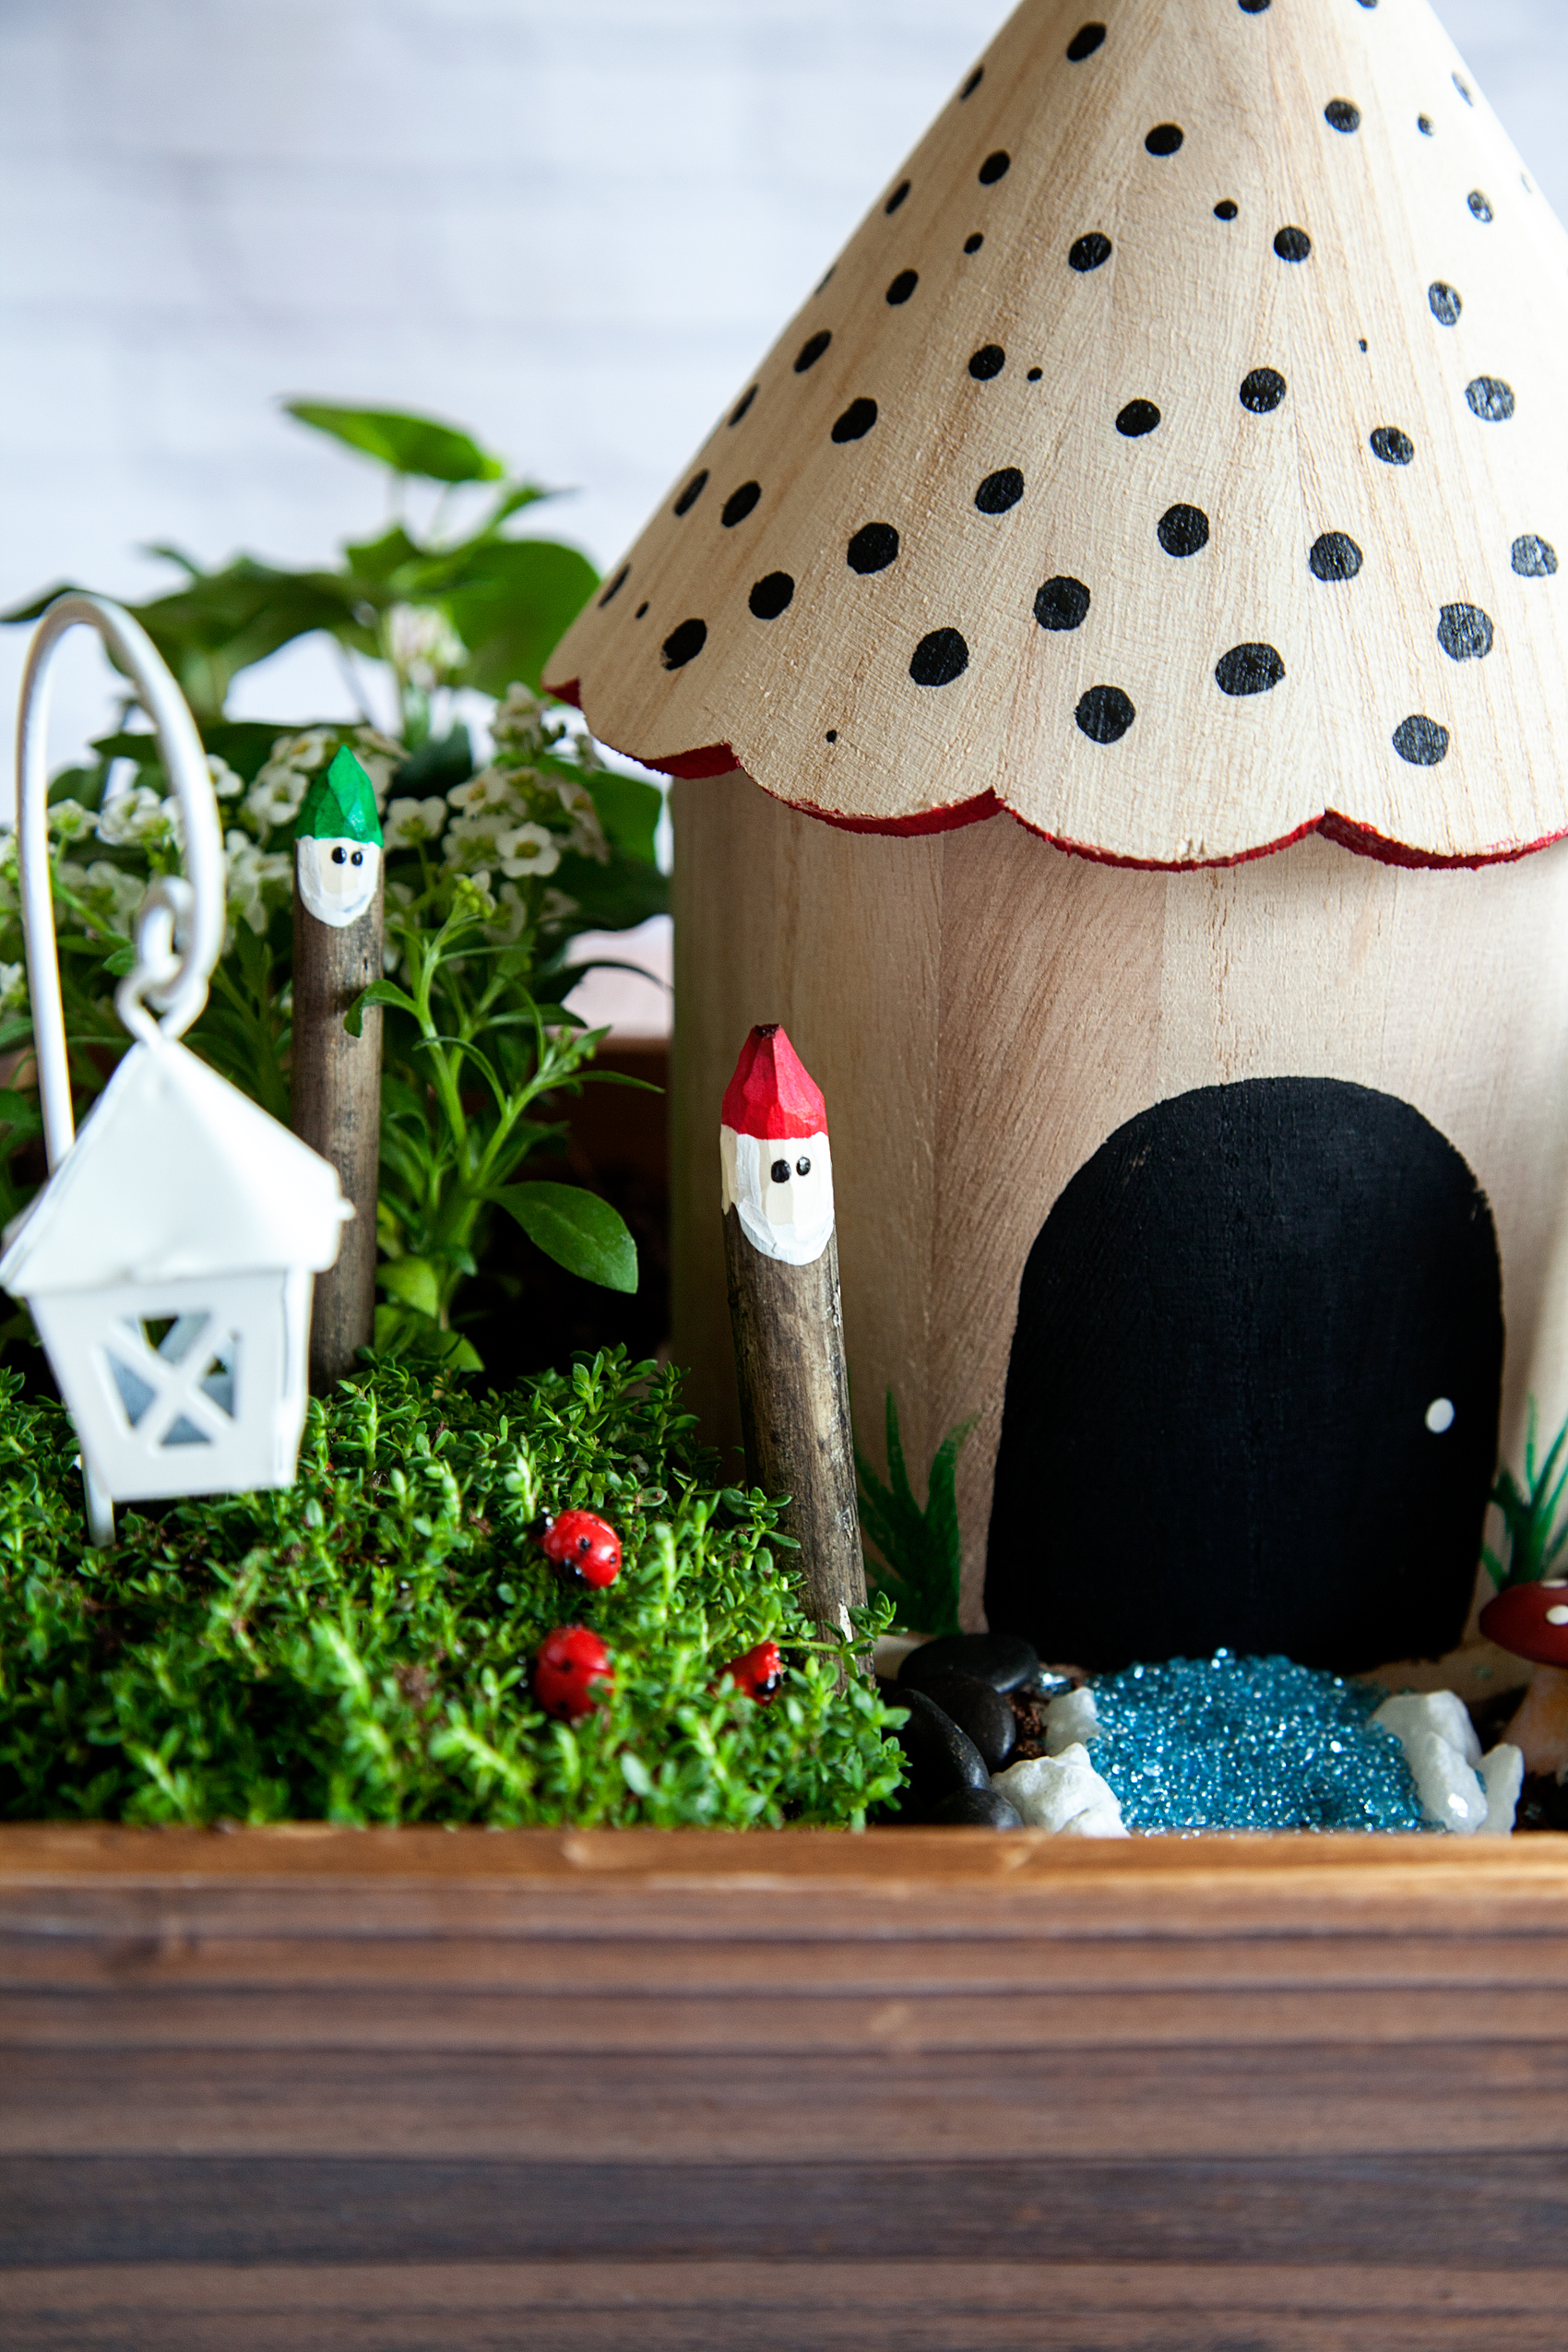
  4. Paint your birdhouse. Keep it simple or go crazy… This is your design. I wanted to keep our simple. We painted the door on the back of the bird house and added dots to the roof with a nice red peek-a-boo trim around the scalloped edge of the roof. I used the tip of the brush handle to create the dots on the roof.
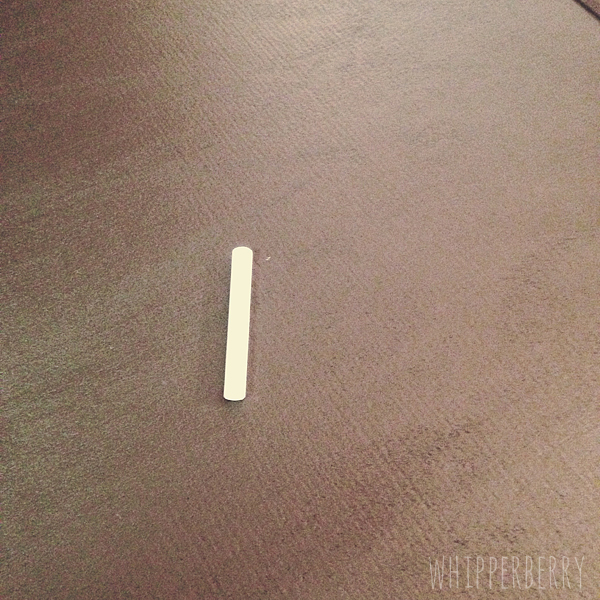
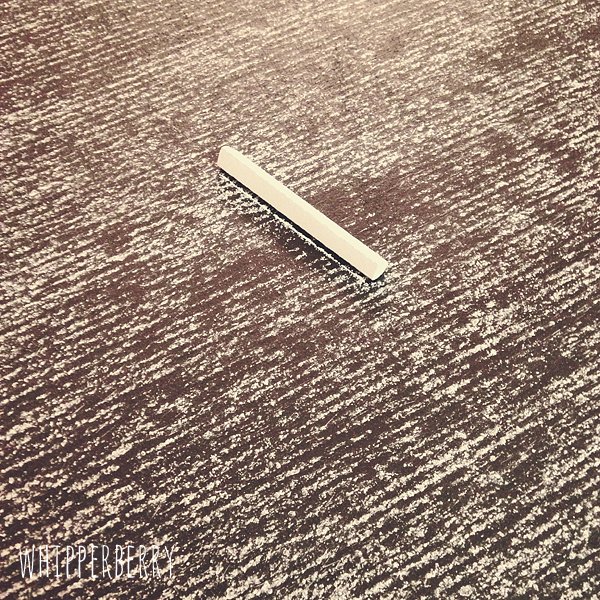
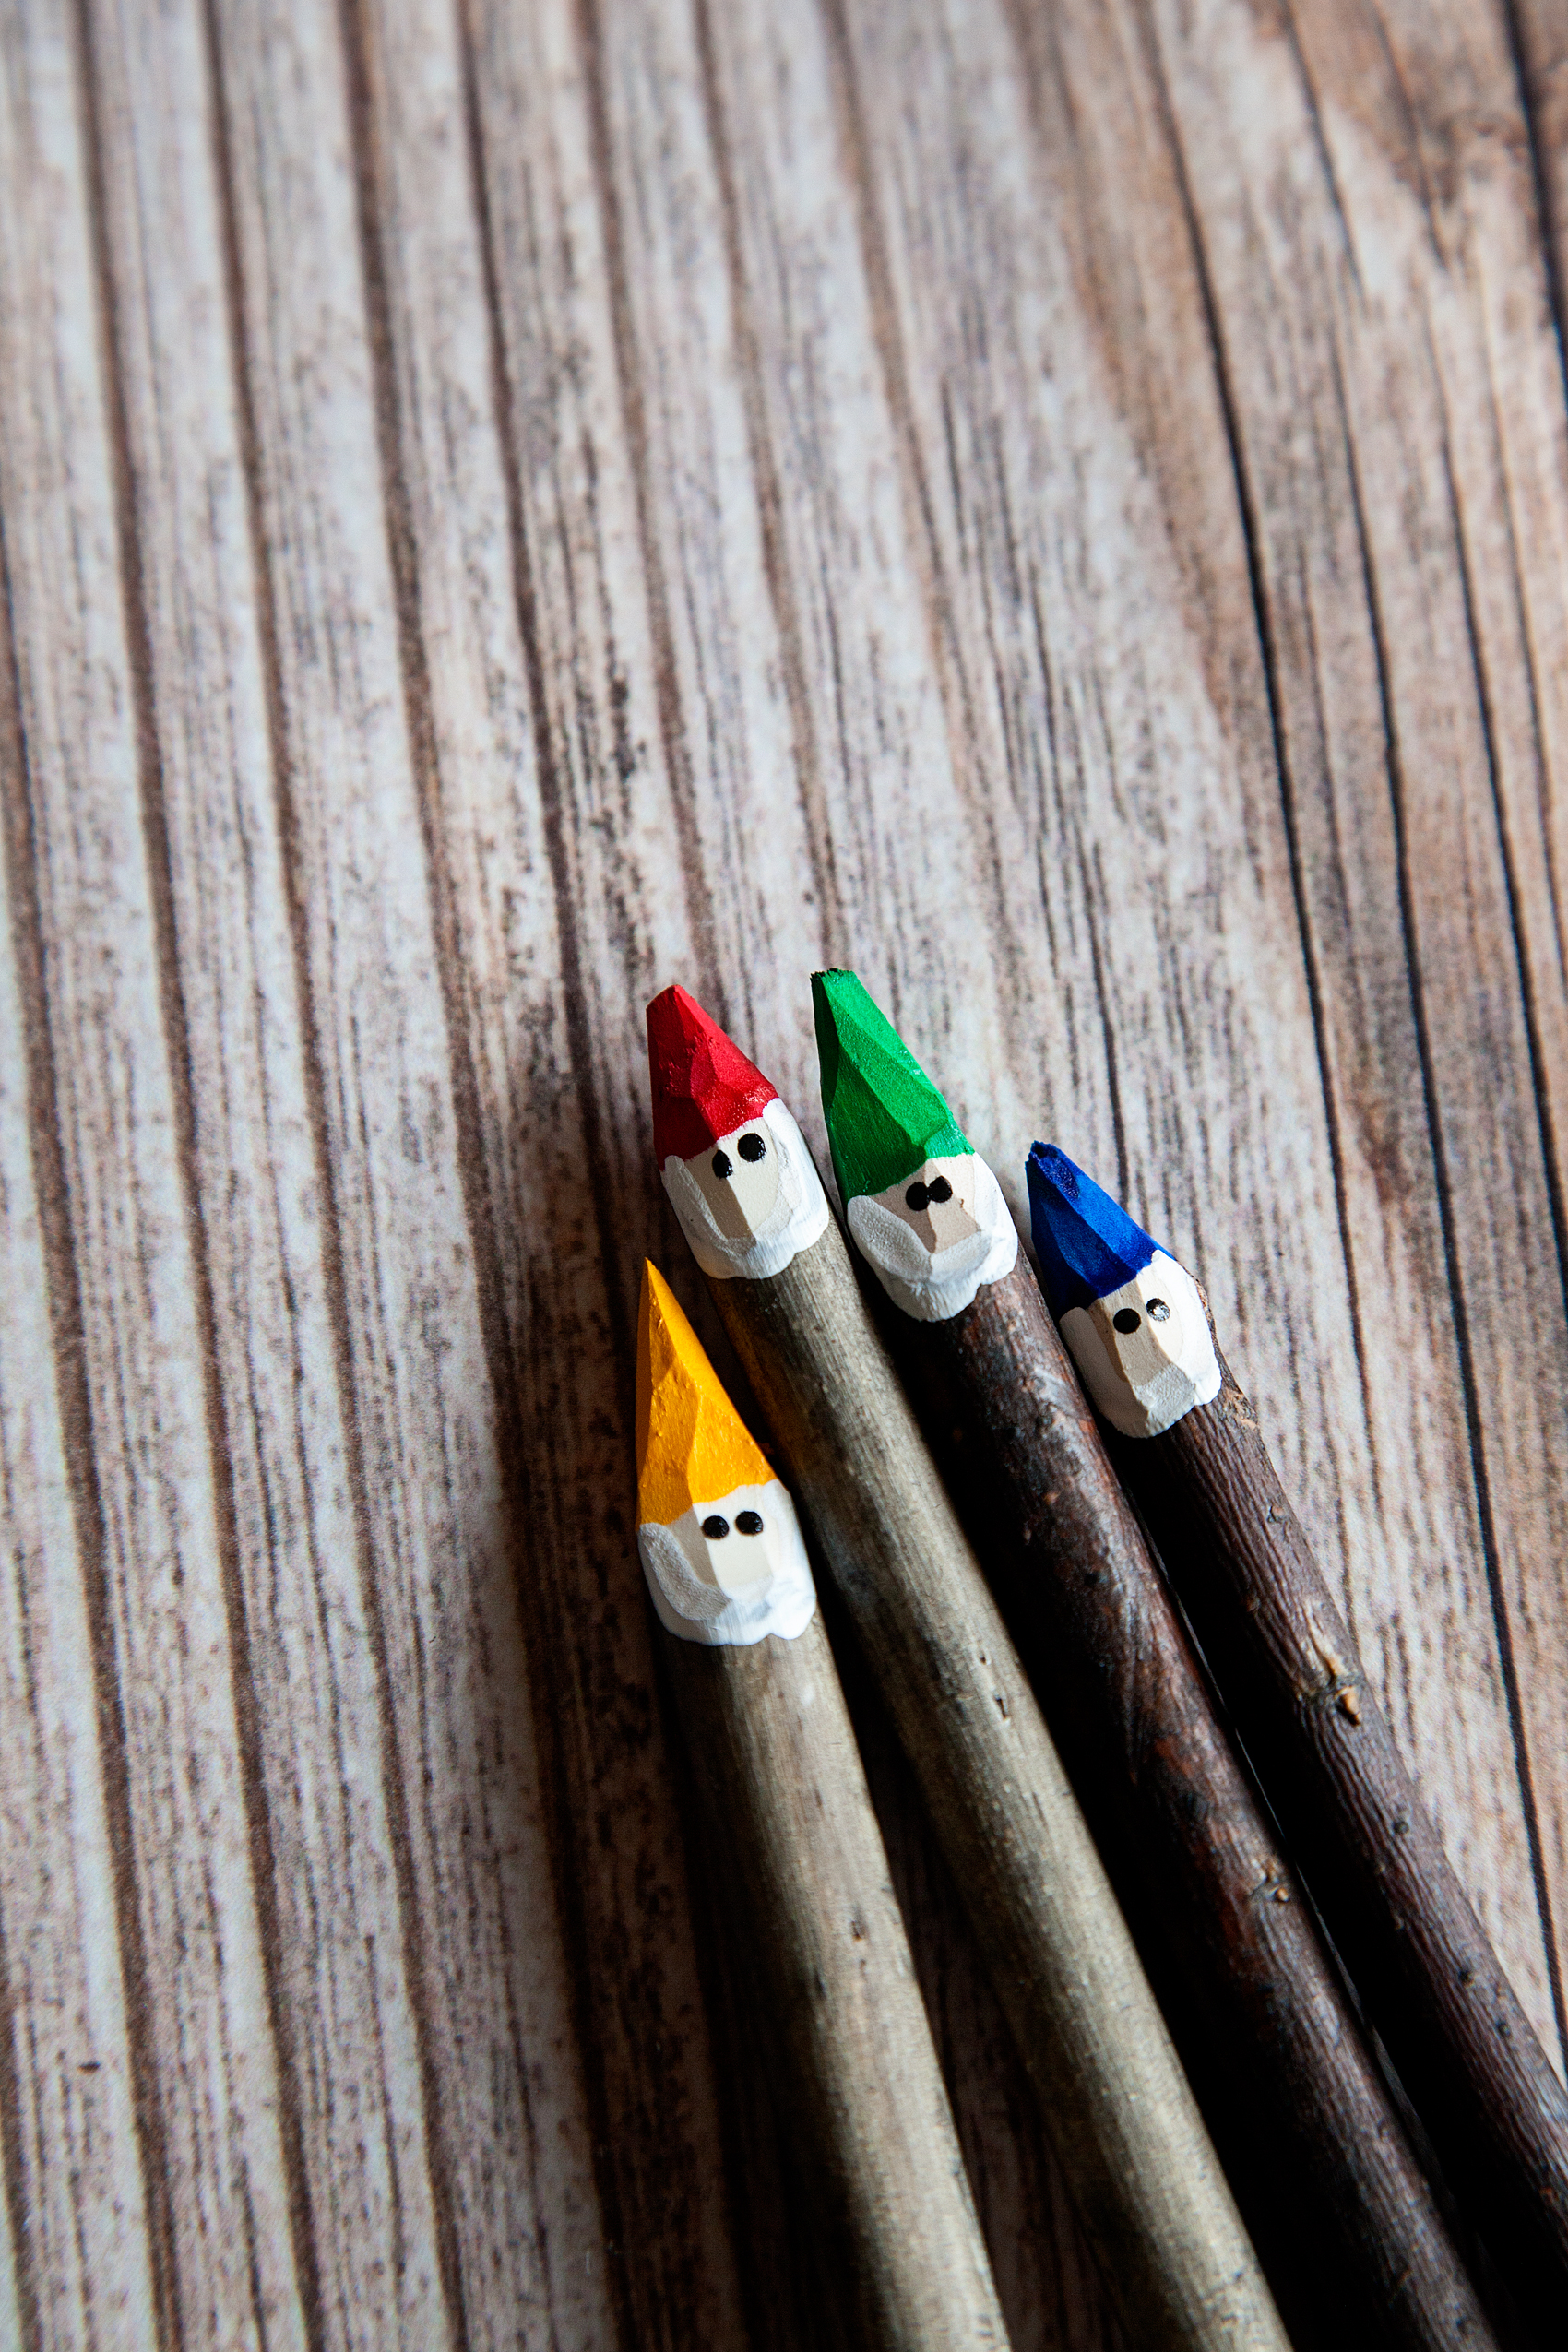
  5. ADULT TASK • Whittle the end of your branches into a tip like a pencil. The top portion of the tip will be your gnomes hat. Keep in mind this task either needs to be done by an adult OR supervised by an adult. Gnome Gardens are a fun trend that the whole family can participate in. Create your own Gnomes with some sticks and @decoart Patio Paint.
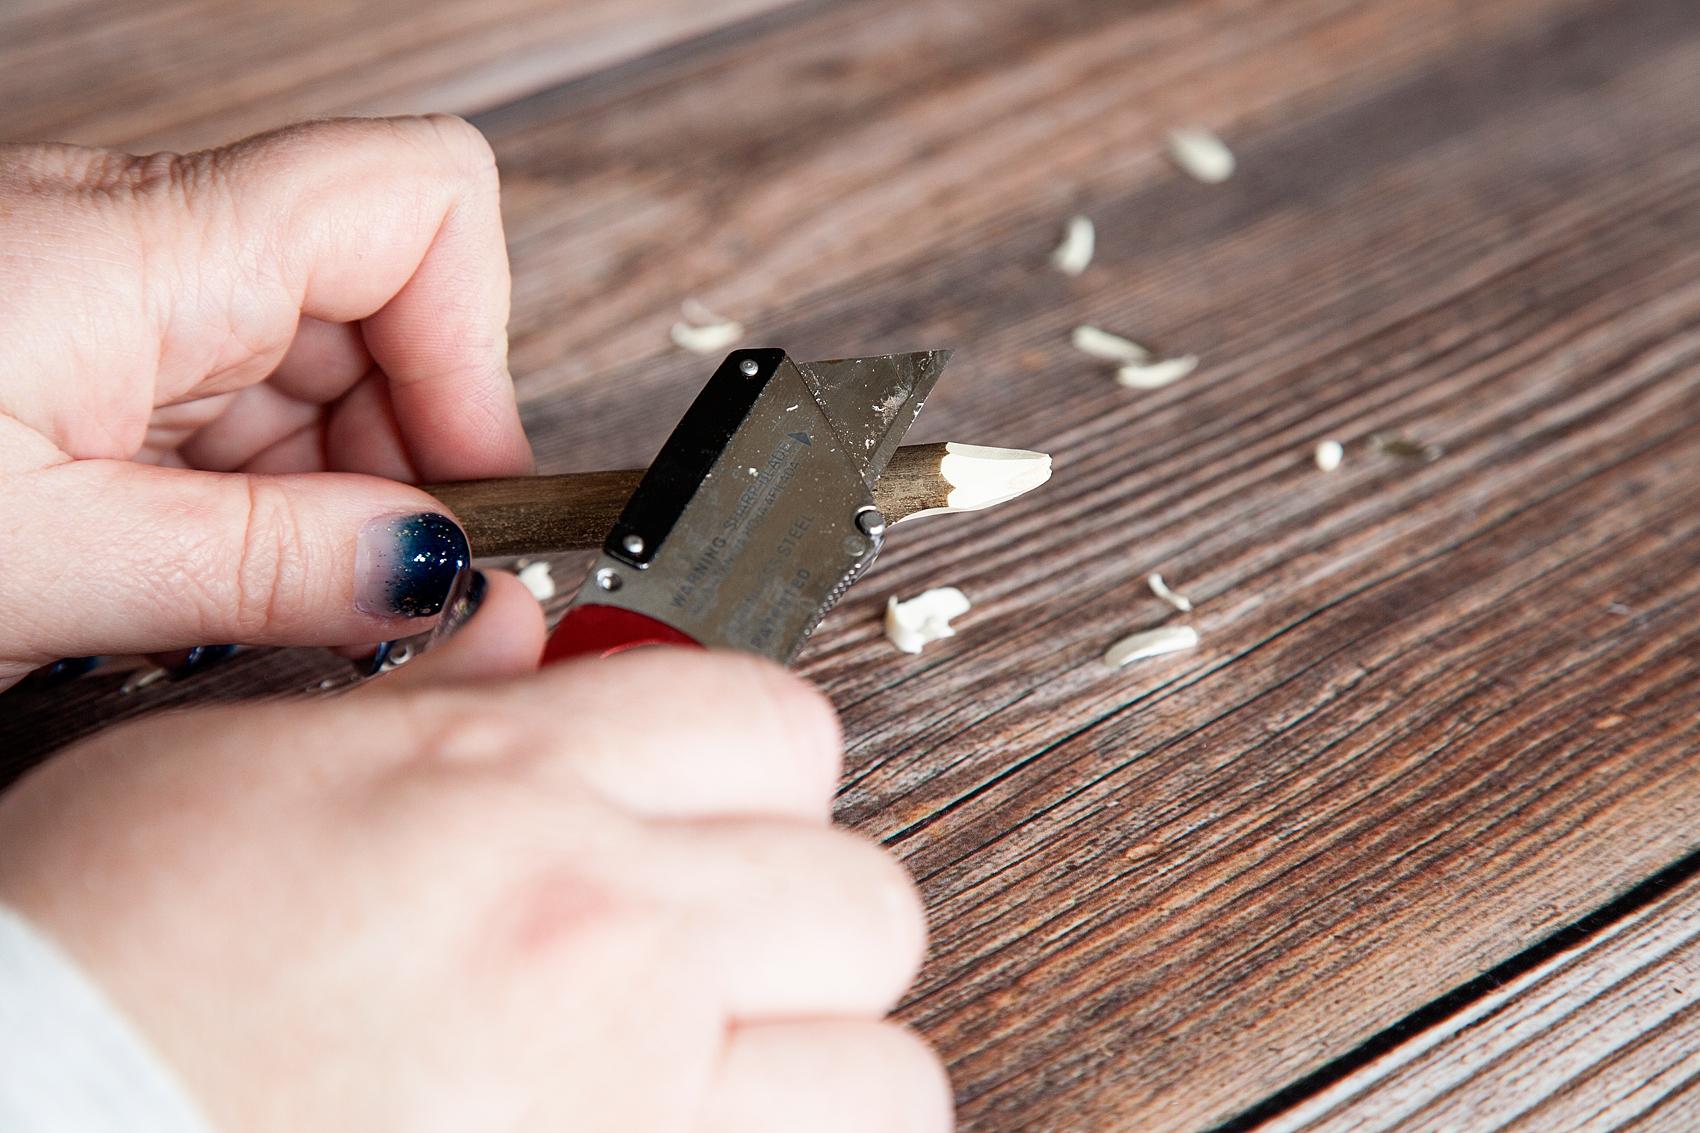
  6. On one side of your stick, whittle a “U” shaped section for the face of your gnome.Gnome Gardens are a fun trend that the whole family can participate in. Create your own Gnomes with some sticks and @decoart Patio Paint.
  7. Using the DecoArt Patio Paint and your small flat brush, paint on your gnomes hat and let dry.
  8. Take the white paint and paint on your gnome’s beard. Basically in a “U” shape following the line of the face that you whittle in before. Set aside and let dry. Refer to video for more details on how to paint your gnome.
  9. Using a sharped pencil, dip your pencil tip into the black paint and gently place one gnome eye. Reapply the paint to your pencil tip and create another eye. Dipping into the paint twice will help to create eyes that a similar in shape and size. Set aside and let dry.
  10. Once dry, name your cute little little gnomes! Ours are Max (red), Sven (yellow), Einar (green) & Ole (blue). Then place them into your gnome garden.Gnome Gardens are a fun trend that the whole family can participate in. Create your own Gnomes with some sticks and @decoart Patio Paint.
  11. Using the small rocks and colored sand, create a walkway in front of the house.

Gnome Gardens are a fun trend that the whole family can participate in. Create your own Gnomes with some sticks and @decoart Patio Paint.

DIY Black and White Wall Art

0 · May 8, 2014 · 8 Comments

DIY Black and White Wall Art // I have always been a huge fan of black & white. I love the stunning contrast and knew that when I was ready to dress up our front room in our new house I wanted a strong black & white theme. I also LOVE typography wall art and adore the hand painted typography displays that I’ve seen all over the place.

I however, CAN NOT hand paint a stick figure, let alone a beautiful hand lettered canvas… So, I did the next best thing! I busted out my Silhouette CAMEO, some black paper and a lovely large 24 x 24 canvas and went to work…

WhipperBerry-Sprint-Room-Makeover-12

I LOVE how it turned out! It’s an element in my HUGE gold frame that is in my front room that I have redesigned for the spring/summer…

WhipperBerry-Sprint-Room-Makeover-16

This is how it looked for Christmas this last year…

Michaels-Mini-Frames-justaddmichaels-5

The frame is HUGE and I love it, but it can be a challenge trying to find stuff to fill the space, a large canvas is perfect!

This project is really quite simple. I used the Meddon font which has an imperfect hand lettered look to design my typography art. Then I cut my saying, “Leave a little sparkle wherever you go” out of black textured card stock paper with my Silhouette CAMEO and then used Decoupage from DecoArt to affix the letters onto the canvas.

WhipperBerry-Sprint-Room-Makeover-1

Want to know a little secret to successful decoupaging? Wet your paper that you are wanting to affix to your surface FIRST before you place it onto your surface. I had a plate with a wet paper towel sitting next to me and placed the paper words on the towel for a few seconds to get them a little damp before I placed it on the canvas. This will help with any bubbling problem you may have once you add the Decoupage.

How to make typography wall art with Silhouette CAMEO and Decoupage

  1. Cut your words out on the Silhouette CAMEO. For this size of canvas I needed a machine that could cut large elements and the CAMEO is perfect for that. I used my 12×24 mat and it was perfect. I unfortunately didn’t have 12×24 black paper so I had to piece some of the words together, but that wasn’t a big deal.
  2. Figure out the placement of your words on the canvas.
  3. Starting in small areas, one word or part of a word at a time, remove the paper word and place on a wet paper towel. Then using a foam brush, place a thin layer of Decoupage onto your canvas. Replace the paper word onto your desired spot and gently press into the Decoupage. Then carefully with a light hand, brush another layer of Decoupage onto of the paper word. Be careful not to over work the paper. Especially when using black paper on a white canvas, the Decoupage will breakdown the paper and then you will have a muddy mess instead of a clean black and white canvas.  WhipperBerry-Sprint-Room-Makeover-2
  4.  Move onto the next word until you have the entire saying affixed with the Decoupage.
  5. Make sure you cover the entire canvas with Decoupage so that the canvas will have a uniformed appearance.
  6. Let the canvas dry and then hang!

WhipperBerry-Sprint-Room-Makeover-6

 I added a sheet of decorative metal that I found at Home Depot for a little added pop under the canvas and I LOVE how it looks!

WhipperBerry-Sprint-Room-Makeover-16


So… Do you love typography art? What saying would you like to create with this simple project? Leave a comment with your saying!!

Disclaimer // This is NOT a paid post, I am however a member of the Silhouette Circle which is an affiliate program.

Faux Fireplace // Turn a Cork Board into a Chalkboard

15 · Dec 20, 2013 · 3 Comments

The post brought to you by DecoArt //  We have moved TWICE in the last year.  Yea, good times! Along with new homes, we have also become renters for the first time ever. We decided that when we moved the family to Nebraska that we weren't in a huge hurry to buy a new place. We wanted to rent for a while to see if the Cornhusker state stuck, 'cause… You never know. To be honest,  I'm kind of loving renting right now. If something breaks, I don't have to figure out how to fix-it… I have a lovely landlord who takes care of it. One thing I don't like, being stuck with less than ideal style choices in the house.  

We were super excited to have a fireplace and a mantel for the first time in a while. However, our landlord had recently added a weird fake electric fire insert to the fireplace and totally ruined the whole look and feel of the thing. I scratched my head trying to figure out how to still decorate the fireplace without the dorky insert killing the whole effect. I decided to cover it with a chalkboard and create my own faux fireplace!

Faux Fireplace with DecoArt Chalkboard Paint by WhipperBerry-2

Now, of course I can't find a chalkboard that will fit just right for the size and shape that I was looking for, but that's NO PROBLEM with the Americana Chalkboard paint from DecoArt. You can make ANYTHING into a chalkboard! 

Americana Chalkboard Paint from DecoArt

I found a cork board at Target that was perfect. The size, the shape and even the frame were perfect… The question, how well will cork work as a chalkboard? The answer, amazingly well! Here is how I made it…

Supplies

Cork board

Americana Chalkboard paint – Black

Americana Multi-Surface Satin – Black

Sponge roller

Sponge brush

Chalk

Pencil sharpener

Directions

Now, this is the easiest pant project EVER!! Take your cork board and lay on a flat surface. Gather your supplies…

Americana Paint from DecoArt

Start with the Mulit-Surface satin. You don't even need a paint bowl, just pour a bit of paint on the board and roll-out.  Cover the whole cork board…

Just squeeze paint right onto the corkboard

use a roller to apply chalkboard paint

I used my foam brush to do the edging. Once that paint was dry, (it only took about 20-30 minutes) I repeated the process with the Americana Chalkboard Paint. I made sure the whole board was covered and then let it dry.

you now have a lovely chalkboard

Now this is the hard part… Even though the paint is dry, you need to wait for two days before you season your chalkboard. Your paint needs time to cure and to fully set, so give it time to do just that. After two days, you then need to season your chalkboard.

you will need to season your chalkboard

What is seasoning? When you use a chalkboard, you don't want to have ghost images left behind when you erase them. If you draw or write on a chalkboard before it has been seasoned little particles of chalk will fill in what ever holes are in the board. Little minuscule holes that you can't see, but the chalk undoubtedly will find, move in and never leave! In order to avoid that, you rub chalk all over the board and "season" it. That way you fill in any possible holes before you write on it and thus prevent any ghost images left behind.

season the chalkboard with chalk

Place the piece of chalk on it's side and rub all over the board. Then with a paper towel, rub the chalk into the board.

wipe off chalk with paper towel

Now, your chalkboard is ready to use. I commissioned my talented daughter Hannah to draw a fire for me. She has WAY more talent than I have when it comes to that kind of work.

WhipperBerry Faux Fireplace

Then all I had to do was place it in front of the fireplace insert and voilá the problem was solved! Now, I have a cute fireplace that I can finally dress up!

Faux Fireplace with DecoArt Chalkboard Paint by WhipperBerry-new

I placed a few birch logs that I bought at Michaels in front to add to the illusion. I think it turned out super CUTE!!

Faux Fireplace with DecoArt Chalkboard Paint by WhipperBerry-1

The "May your Days be Merry & Bright" hand painted sign was created by At Home with K, she is a local artist here in Lincoln and her work is SUPER CUTE!! You should check her out. 

I made the stockings myself and even though it's a little late for this year, I will post a tutorial and you can save it for next year if you are interested. They turned out super fun and you won't believe what I made them out of. 

Disclaimer // I am part of the DecoArt Core Blogger Group. I received product and payment for this post. 

Black & White Halloween Pumpkins for The Great Pumpkin Challenge

28 · Sep 4, 2013 · 15 Comments

The Great Pumpkin Challenge brought to you by Michaels Craft Stores // I CAN"T WAIT FOR FALL!! I've thoroughly enjoyed summer, ate it up really but, I'm over the heat and the bugs and I'm ready for those cool crisp fall days. More than anything I'm ready to start decorating for fall and all the fun holidays that come with the cool temperatures. Not too long ago, Michaels sent me some of their famous pumpkins and invited me to participate in The Great Pumpkin Challenge and this is what I came up with…

WhipperBerry Halloween Pumpkins from Michaels

A classic black & white Halloween display. As much as I love color, there is just something stunning about black & white when it comes to Halloween. Here's a breakdown of each pumpkin…

ribbon pumpkin from Michaels

This one is just a simple decorative ribbon that I found at Michaels and wrapped it using small t-pins to secure the ribbon at the top and bottom of the pumpkin. Super easy!!

Clock pumpkin with DecoArt Patio Paint and Mixed Media Stencil

Love, love, love this one that I stenciled using Black DecoArt Patio Paint and their Mixed Media Stencils. This one was a little more challenging. I pinned the stencil to the pumpkin and then carefully laid each section of the stencil down onto the pumpkin using my finger to press each section down.  Going section by section, I used a makeup sponge as a pouncer and carefully went around the clock, making sure not to overload the pouncer and it turned out great.  Slow & steady wins the race on this one.

how to stencil on a pumpkin

I also painted an orange pumpkin black with the Patio Paint. This stuff is amazing!! This was ONE coat…

pumpking with DecoArt Patio Paint

I'm going to be using that paint a whole lot more now that I know how amazing it is.

polka dot pumpkin from Michaels

For my polka dot pumpkin I used the DecoArt Patio Paint again, on the inside of the pumpkin and then a Hot Knife from Micheals to cut out the polka dots. That tool is a must when it comes to working with this type of pumpkin. It cuts like butter!!

ribbon pumpkins

These two are just wrapped in ribbon with a couple of cute bows. For these I used t-pins and a couple of glue dots to secure the ribbon in place. Again, super easy.

What's your favorite way to dress up your pumpkins for Fall or for Halloween? Michaels is hosting a fun Great Pumpkin event on October 5th from 1:00-3:00. For $6 your kiddos can design their very own pumpkin and there will be a face painter on hand for even more festive fun.

A little intimidated to carve you own pumpkin? Not to worry, Michaels is also offering professional carving services at their store. You can choose from 25 designs and then personalize them as well. Prices start at $19.99 and if you want it by Halloween, you need to place your order by October 13th.

So… What are you going to create for The Great Pumpkin challenge this year? Take some photos and tag me on Instagram or Facebook so I can see what you create!

  • « Go to Previous Page
  • Page 1
  • Interim pages omitted …
  • Page 3
  • Page 4
  • Page 5
  • Page 6
  • Page 7
  • Go to Next Page »

Primary Sidebar

Heather from Whipperberry
Hello... my name is Heather and I'm the creator of WhipperBerry a creative lifestyle blog packed full of great recipes and creative ideas for your home and family. I find I am happiest when I'm living a creative life and I love to share what I've been up to along the way... Come explore, my hope is that you'll leave inspired!

Footer

  • Privacy Policy
  • Crafts
  • Food
  • Gifts
  • Holidays
  • Home
  • Mom Life
  • Recipes
  • Travel

Copyright © 2026 · Seasoned Pro