• Skip to primary navigation
  • Skip to main content
  • Skip to primary sidebar
  • Skip to footer

Whipperberry

WhipperBerry • Your Home For Creative Inspiration

  • Home
  • Recipes
    • Starters
    • Easy Weeknight Dinners
    • Main Dish
    • Salads
    • Side Dish
    • Soups & Stews
    • Desserts
    • Breakfast
    • Miscellaneous
  • Tutorials
    • Creative Crafts
    • DIY Decor
    • Fabric Crafts
    • Food How-To
    • Jewlery
    • Paint Projects
    • Paper Art
    • Party Styling
    • Photography and Graphic Design
    • Silhouette
  • Holidays
    • Easter
    • Mother’s Day
    • Father’s Day
    • 4th of July
    • Halloween
    • Thanksgiving
    • Christmas
    • Valentine’s Day
  • Gift Ideas
    • Gifts For Everyone
    • Gifts for Dad
    • Mother’s day
    • For The Girls
    • For The Kids
    • Teacher Gift Ideas
    • Christmas
  • Printables
    • Holiday
    • Gift Idea
    • LDS Primary
  • Travel
  • About
    • Terms
  • Contact
  • Nav Social Menu

    • Facebook
    • Instagram
    • Pinterest
    • RSS
    • Twitter

Breakfast

The Secret to Perfect Hot Chocolate

2 · Nov 12, 2015 ·

+ This Perfect Hot Chocolate post is brought to you by International Delights +

The-Secret-to-the-Perfect-Hot-Chocolate-from-WhipperBerry

Ohhhhh, Hot Chocolate…

Need I say more?

I spent my younger years searching for THE PERFECT HOT CHOCOLATE. The minute the weather would turn chilly I would be on the hunt. I’ve tried all kinds… Powder packets, chocolate syrup in milk, actually melting chocolate in milk.

I’ve tried it all.

In my searching, I discovered that I loved to have some extra spice in my chocolatey drink. I’ve added all kinds of spices trying to find the perfect one. For some reason… The Holidays just couldn’t be the Holidays without a nice warm cup of Hot Chocolate. That little treat just seemed to usher in the season.

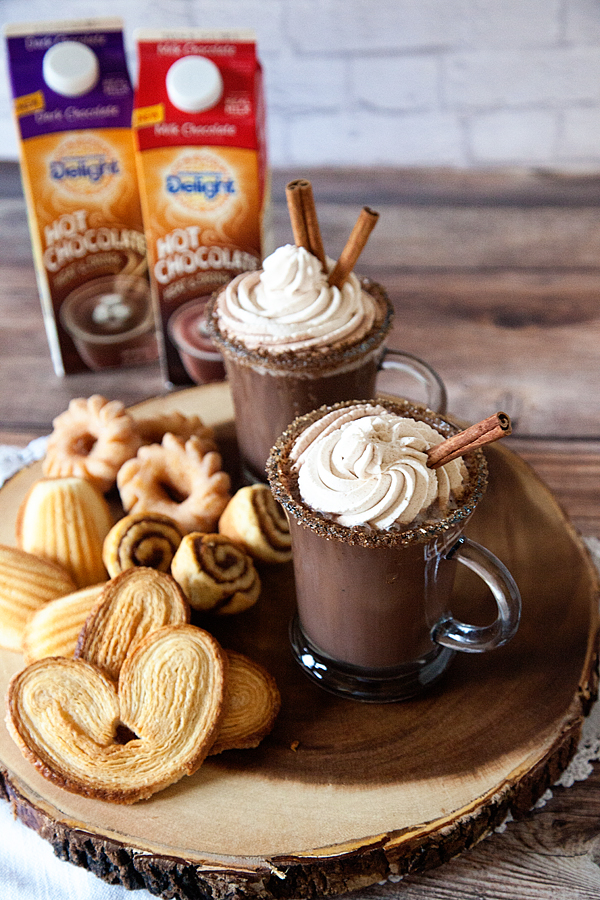
We’ve hit the jackpot this year… International Delights has introduced a yummy heat & serve Hot Chocolate that you can find in the dairy case. YEP… It’s rich and creamy and so convenient!

International-Delights-Hot-Chocolate-from-WhipperBerry-10

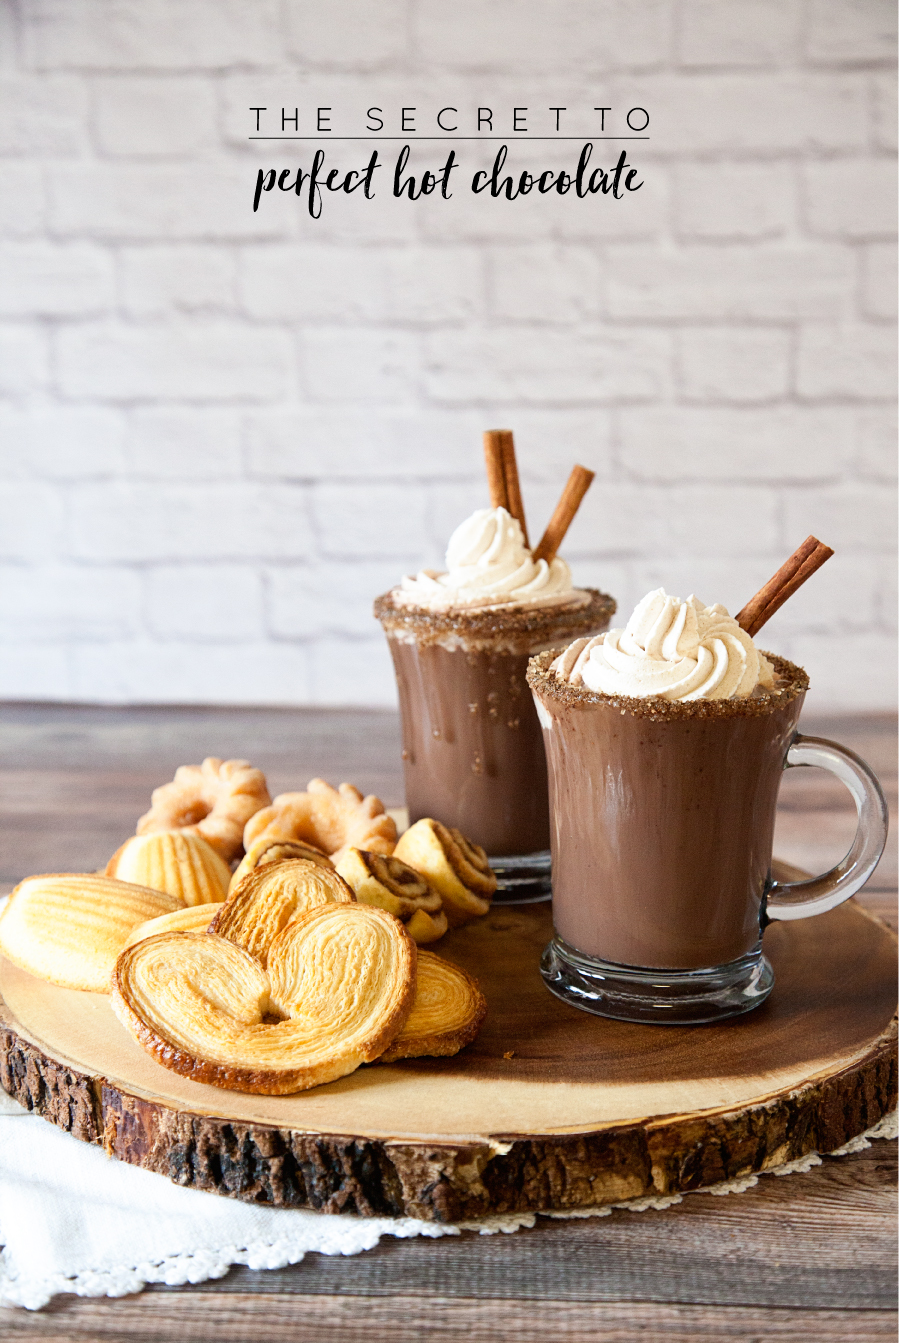
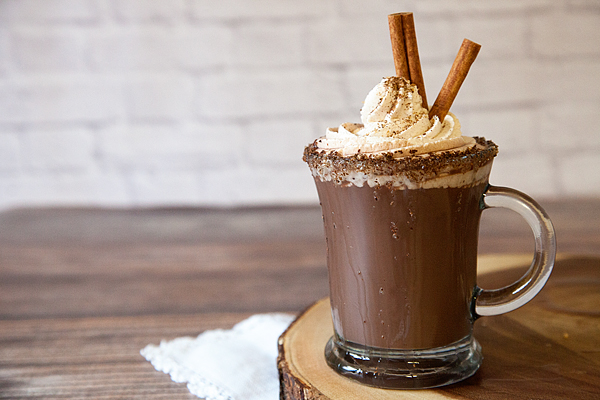
I decided I wanted to warm mine up with a little cinnamon spice. I made a cinnamon whipped cream and them rimmed the mugs with a cinnamon sugar mixture. Here’s what you need for this Holiday treat.

Cinnamon Whipped Cream for the Perfect Hot Chocolate

1 1/2 cups heavy whipping cream

2 table spoons powdered sugar

1 teaspoon vanilla

1 tablespoon cinnamon

For the rim of the mug

3 tablespoons cinnamon Turbinado sugar

(What is Turbinado Sugar? Turbinado sugar is raw sugar that has been steam-cleaned. The coarse Turbinado crystals are blond colored and have a delicate molasses flavor. If you can’t find cinnamon Turbinado Sugar, just add a 1/4 teaspoon to the 3 tablespoons of sugar.)

Instructions for Cinnamon Whipped Cream

In a chilled mixing bowl, add cream and using the whisk attachment whip at medium to high speed. Let mix for 1 minute or until the cream starts to thicken. Add powdered sugar, vanilla and cinnamon and continue to mix on high until the mixture thickens into whipped cream.

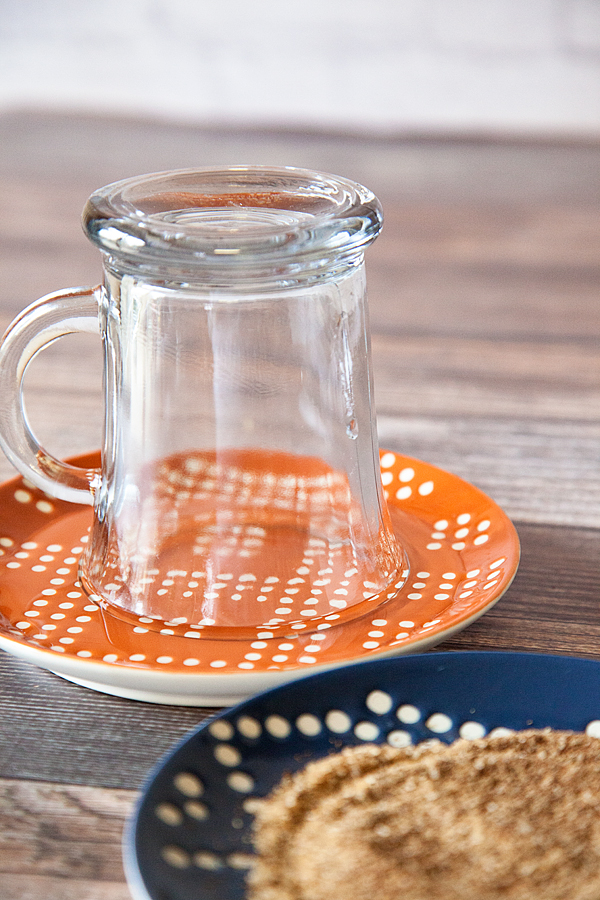
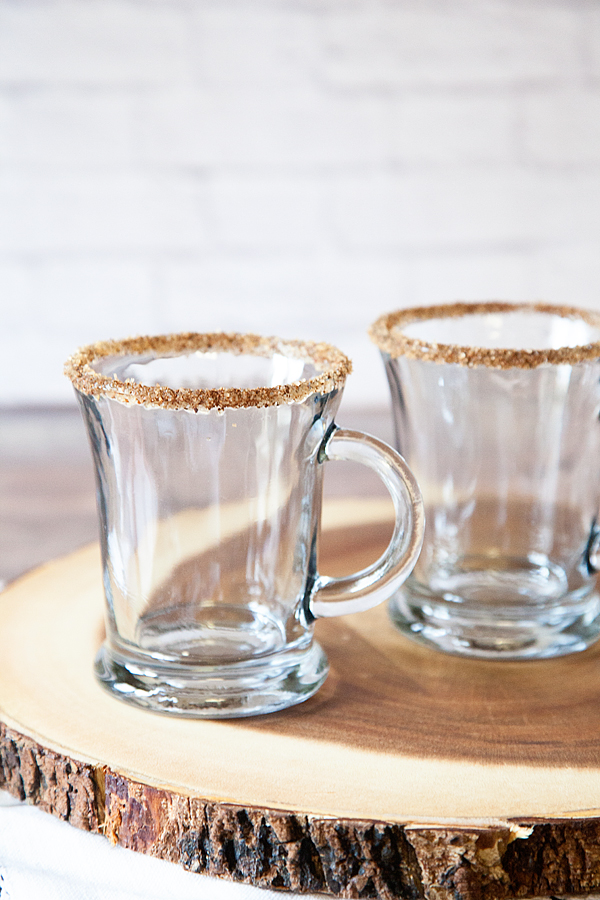
Next, use the cinnamon Turbinado sugar to rim the mugs. Put a few (2-3) tablespoons of water onto a plate or shallow bowl and place your mug, rim side down onto the plate.

International-Delights-Hot-Chocolate-from-WhipperBerry-2

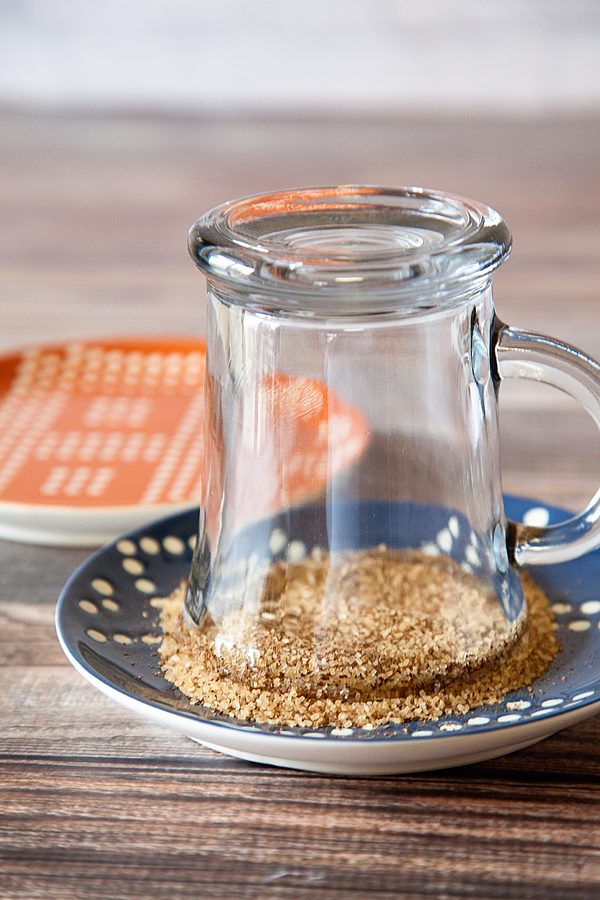
Then, place your sugar onto a 2nd plate and place your mug, rim side down onto the plate, like so…

International-Delights-Hot-Chocolate-from-WhipperBerry-1


International-Delights-Hot-Chocolate-from-WhipperBerry-3

Now, you’re ready to heat your International Delights Hot Chocolate according to package directions. Pour your Hot Chocolate into your mugs, top with Cinnamon Whipped Cream and garnish with a cinnamon stick. Serve immediately.

International-Delights-Hot-Chocolate-from-WhipperBerry-12

Ummmmm, YES… It’s as good as it sounds!

What brings the spirit into the Holidays for you? Is it the sights and sounds of the season or is there a specific flavor that brings them to life for you? Visit the folks at International Delights to learn how you can win a $5000 Holiday Brunch just by sharing your story!

International-Delights-Hot-Chocolate-from-WhipperBerry-11

This is a sponsored conversation written by me on behalf of International Delight. The opinions and text are all mine.

Cinnamon Praline Sauce Recipe

0 · Sep 30, 2015 · Leave a Comment

Cinnamon-Praline-Sauce-from-WhipperBerry

Not too long ago, my husband and I were celebrating my birthday at Famous Dave’s restaurant here in Lincoln and we were introduced to the most amazing concoction! Part of their birthday deal there is you receive a free Sundae of your choice… Hot Fudge or Praline. I decided on Praline and it was the most heavenly experience. My husband and I were blown away by this scrumptious sauce. Bite after bite, we tried to deconstruct it to figure out the magic. It wasn’t your typical praline sauce, it had nice hint of cinnamon with a beautiful tang that paired amazingly well with the vanilla ice cream. I decided I needed to come home and figure out how to make this lovely sauce.

It’s really quite simple, It’s basically buttered pecans mixed with a lovely caramel sauce with a surprise addition at the end. Make sure you use quality ingredients like J.R. Watkins Vanilla and Cinnamon to ensure a top quality sauce.  I put together a quick video on how to make this amazing Cinnamon Praline Sauce. After the video I have a full recipe that you can print.

It’s really just that easy! We love this sauce on vanilla ice cream, bread pudding, waffles, pancakes… I could go on and on. I’m actually thinking of making up a bunch and bottling it for Holiday gifts this year. Forget cookies, this sauce is the ticket to Holiday bliss!

Cinnamon-Praline-Sauce-from-WhipperBerry-2

Cinnamon Praline Sauce Recipe
 
Save Print
Prep time
2 mins
Cook time
20 mins
Total time
22 mins
 
This sauce is a perfect addition to all kinds of desserts and breakfast items. Make-up a batch and store in the refrigerator for up to 2 weeks.
Author: Heather // WhipperBerry
Recipe type: Dessert
Serves: 15
Ingredients
  • 1 cup butter
  • 1 cup pecans
  • 2 cups brown sugar
  • 1 tsp. cinnamon
  • ¾ cup heavy cream
  • 1 tsp. vanilla
  • a pinch of salt
  • 1 cup sour cream
Instructions
  1. In a heavy bottomed sauce pan add ½ cup of butter and melt over medium heat.
  2. Add pecans and bring to a simmer. Simmer the pecans in the butter for 3-4 minutes or until the nuts start to brown. Keep a close eye on them, they will burn quickly if left unattended.
  3. Once they are sufficiently browned remove the pan from the heat. Cut butter into pats and add to the buttered pecan mixture to cool it down.
  4. Let mixture cool while making the caramel.
  5. Again, in a heavy bottomed sauce pan over low heat add brown sugar, cinnamon and cream. Stir to combine and slowly raise the heat to medium.
  6. Stir constantly.
  7. Using a candy thermometer, bring mixture up to 230˚ then remove from heat.
  8. Add vanilla, salt, sour cream and buttered pecan mixture and mix well.
  9. Serve warm over vanilla ice cream, bread pudding, waffles, pancakes or other desserts.
3.2.2925

Cinnamon-Praline-Sauce-from-WhipperBerry-4

Summer Brunch Recipes // Peas with Bacon Side Dish

4 · Sep 8, 2015 · 1 Comment

Compensation for this post was provided by Unilever via AOL Media.  The opinions expressed herein are those of the author and are not indicative of the opinions or positions of Unilever or AOL.

Who’s ready for a beautiful summer brunch?

Lemon-Drop-Crepes-WhipperBerry

In the last little bit, I’ve shared some of my favorite brunch dishes. First, we have the Lemon Drop Crêpes…

Lemon-Drop-Crepes-by-WhipperBerry-10

Followed by a savory Summer Vegetable Frittata…

Vegetable-Frittata-by-WhipperBerry

Today… To round off the entire meal, I’m sharing a perfect side dish, Peas with Bacon…

Spring-Peas-&-Bacon---WhipperBerry-7

To me, fresh peas just scream summer. I’ve loved peas my whole life. I know they are one of those love-em-or-hate-em foods, but I LOVE them. I have fond memories of my mom giving me little bowls of frozen peas to snack-on while she was making dinner when I was little.

For this menu, I thought a nice peas dish would round out the menu nicely. I’m keeping it simple with just a few basic ingredients.

Peas with Bacon

Spring-Peas-&-Bacon---WhipperBerry-1

1 10 oz. package of fresh or frozen peas

1 tablespoon I Can’t Believe it’s Not Butter®

1/2 of a small white onion diced

3 pieces of thick cut bacon (feel free to substitute with turkey bacon as a lighter option!)

Cut your bacon into small pieces called lardons and cook in a medium sauté pan over medium heat until fully cooked. Remove the bacon and drain the remaining bacon grease. I also wipe the pan out with a paper towel to remove as much of the bacon grease as possible. As much as I love to have the bacon in this and many other dishes, I don’t want to use the bacon grease as the fat to cook my food in. Any kind of animal fat is full of saturated or trans fat that we don’t really need in our diet, but that doesn’t mean that we shouldn’t have any kind of fat.

When I am planning out meals for my family, I look for ways to add good fats to our meals, such as plant-based fats like avocados, sunflower oil, almonds (which contain omega-3 ALA) and salmon (which contain omega-3 EPA/DHA fatty acids). I’ve found one of the easiest ways to incorporate some of those good fats is to use I Can’t Believe It’s Not Butter® to my meal planning. I Can’t Believe It’s Not Butter® has 40% fewer calories and 70% less saturated fat than butter per serving. Not to mention, it has no artificial flavors, no artificial preservatives and no partially hydrogenated oils. It has non-GMO sourced ingredients, it’s cholesterol-free with 0 grams of trans fats per serving plus so much more! Now that’s the kind of good fat that I want my family eating. You can find out all kinds of good stuff about I Can’t Believe it’s Not Butter® HERE.

With all that… I took out as much bacon grease out of my pan as possible and replaced it with I Can’t Believe It’s Not Butter®. I let the I Can’t Believe It’s Not Butter melt in the pan and then add the onion and let it sweat.

spring peas 1 - whipperberry

After a minute or two I add the peas. If you are using fresh peas make sure you steam them first.

spring peas 2 - whipperberry

Sauté the peas for 3-4 minutes in the onion and I Can’t Believe It’s Not Butter add salt & pepper to taste. When the peas are cooked through, add your bacon and give it a toss.

Spring-Peas-&-Bacon---WhipperBerry-4

Add to a serving bowl and top with a dollop of I Can’t Believe It’s Not Butter & chives if you have them on hand…

Spring-Peas-&-Bacon---WhipperBerry-5

This tasty side-dish rounds out our summer brunch menu. All you need to complete the menu is to add some fresh fruit and a tasty drink like my Herbal Tea Lemonade and it will be lovely!

Herbal-tea-lemonade-from-WhipperBerry-8

One serving (1 Tbsp.) contains 295mg of omega-3 ALA, which is 18% of the 1.6g daily value for ALA

I Can’t Believe It’s Not Butter! sources ingredients that are not genetically modified. However, in the field-to-tub journey of making our buttery spread there is some contact with genetically modified vegetable oils, resulting in a small amount in this product.

Pineapple Coconut Scones Recipe // Dairy-Free

7 · Sep 3, 2015 · Leave a Comment

+ This Pineapple Coconut Scones Recipe brought to you by the folks at Crisco +

Pineapple-Coconut-Scones-Dairy-free-whipperberry

I adore scones. I mean really, what’s not to like? It’s like a sweet biscuit with a bit of a crunchy exterior and soft, fluffy interior. It’s a sweet addition to any breakfast or brunch. Not to mention that scones can be a blank canvas for all kinds of flavor profiles.

I’ve had blueberry, chocolate, raspberry, strawberry, cinnamon sugar scones in my life and I’m sure there are many more variations out there. After my recent trip to Hawaii, I thought a pineapple coconut scone would be LOVELY!

After doing a little playing around, I thought I would also make my pineapple coconut scones dairy-free.

WHAT’S that you say… You can’t even image your scones without their creamy buttery base? I’m telling you it’s possible. Not only possible, but scrumptious! The secret, I use Crisco Organic Coconut Oil instead of butter and rich Coconut Milk instead of cream. Crisco Organic Coconut Oil is PERFECT for this application, because it stays firmer than most coconut oils which is a must when baking goodies such as scones. I also love that it is certified organic and non-GMO. Crisco Organic Coconut Oil is an easy substitute in recipes calling for butter, margarine, and other oils, making it a go-to pantry staple. It has no coconut aroma or flavor, offering maximum cooking versatility without changing the taste of your food. Plus, I love that it is a better fat for your body than traditional animal fats.

Looking for more Crisco inspiration? Visit the Crisco Heritage Kitchen a hub dedicated to all things food, tradition and family, where generations of home cooks can gather and discover tried-and-true fresh summer recipes with this seasons bounty that will delight and inspire.

Pineapple Coconut Scones

Want to watch how I make my pineapple coconut scones? Here’s a quick video showing the entire process…

Pineapple Coconut Scones from Heather Thoming on Vimeo.

It truly couldn’t be any easier. The other secret is using Self-Rising Flour.

I found those fun dried young pineapple that looks like flowers at Trader Joe’s. I thought they really added to the presentation and taste of the overall scone, but they aren’t a deal breaker by any means if you can’t find them.

Pineapple-Coconut-Scones---Dairy-free-8

Pineapple Coconut Scones Recipe

Pineapple Coconut Scones // Dairy-Free
 
Save Print
Prep time
10 mins
Cook time
10 mins
Total time
20 mins
 
These tropical scones are perfect for any breakfast or brunch table. Packed with all kinds of tropical goodness and thanks to Crisco Organic Coconut Oil they are also DAIRY-FREE.
Author: Heather // WhipperBerry
Serves: 11-12
Ingredients
  • 2 cups SELF-RISING flour
  • ½ teaspoon salt
  • ¼ cup Crisco Organic Coconut Oil
  • 1 cup crushed pineapple
  • 1 tablespoon + 1 teaspoon sugar
  • 3-4 tablespoons Coconut Milk
  • ½ cup sweetened shredded coconut
  • 1 egg
  • GLAZE
  • 1 cup powdered sugar
  • 1 pinch of salt
  • 1½ tablespoons pineapple juice
Instructions
  1. Pre-heat oven to 425˚
  2. In a large bowl, add the flour, salt and coconut oil. Cut the coconut oil into the flour with a pastry cutter or two knives.
  3. Add the pineapple and coconut milk. Mix until just combined.
  4. Mix in shredded coconut until combined. Make sure not to over mix.
  5. Place on a floured surface and shape into a disk about 1 to ½ inches thick. Cut out with a biscuit cutter or just cut into wedges.
  6. Place on a parchment lined baking sheet.
  7. Brush an egg wash onto the top of the scones and then add a light layer of sugar on top.
  8. Bake in a 425˚ oven for 10 minutes.
  9. While the scones are baking, mix up the glaze.
  10. In a small bowl, add powdered sugar, salt and pineapple juice. Stir until the sugar and juice turn into a smooth glaze.
  11. 11 If you are garnishing with dried young pineapple. Add them to the tops of the scones in the last two minutes of baking.
  12. 12 Remove the scones from the oven and brush the tops with the pineapple glaze.
  13. 13 Serve warm, or store in an air tight container for a day or two.
3.2.2925

 *Disclosure: As a participant of the Crisco Ambassador Program, I’ve received compensation for my time and product samples for review purposes. Opinions are my own.

  • « Go to Previous Page
  • Page 1
  • Interim pages omitted …
  • Page 3
  • Page 4
  • Page 5
  • Page 6
  • Page 7
  • Interim pages omitted …
  • Page 13
  • Go to Next Page »

Primary Sidebar

Heather from Whipperberry
Hello... my name is Heather and I'm the creator of WhipperBerry a creative lifestyle blog packed full of great recipes and creative ideas for your home and family. I find I am happiest when I'm living a creative life and I love to share what I've been up to along the way... Come explore, my hope is that you'll leave inspired!

Footer

  • Privacy Policy
  • Crafts
  • Food
  • Gifts
  • Holidays
  • Home
  • Mom Life
  • Recipes
  • Travel

Copyright © 2026 · Seasoned Pro