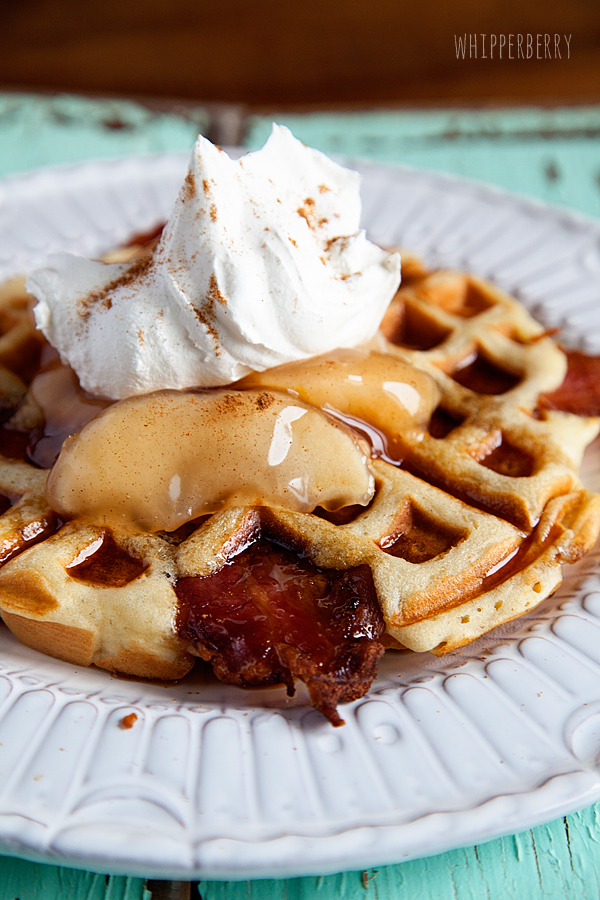
• Skip to primary navigation
  • Skip to main content
  • Skip to primary sidebar
  • Skip to footer

Whipperberry

WhipperBerry • Your Home For Creative Inspiration

  • Home
  • Recipes
    • Starters
    • Easy Weeknight Dinners
    • Main Dish
    • Salads
    • Side Dish
    • Soups & Stews
    • Desserts
    • Breakfast
    • Miscellaneous
  • Tutorials
    • Creative Crafts
    • DIY Decor
    • Fabric Crafts
    • Food How-To
    • Jewlery
    • Paint Projects
    • Paper Art
    • Party Styling
    • Photography and Graphic Design
    • Silhouette
  • Holidays
    • Easter
    • Mother’s Day
    • Father’s Day
    • 4th of July
    • Halloween
    • Thanksgiving
    • Christmas
    • Valentine’s Day
  • Gift Ideas
    • Gifts For Everyone
    • Gifts for Dad
    • Mother’s day
    • For The Girls
    • For The Kids
    • Teacher Gift Ideas
    • Christmas
  • Printables
    • Holiday
    • Gift Idea
    • LDS Primary
  • Travel
  • About
    • Terms
  • Contact
  • Nav Social Menu

    • Facebook
    • Instagram
    • Pinterest
    • RSS
    • Twitter

Recipes

Funfetti Bold Strawberry Shortcake

0 · Apr 8, 2014 · 3 Comments

// This post brought to you by the new vibrant Pillsbury Funfetti® Cake Mixes //

Pillsbury-Funfetti-Strawberry-Shortcake-#gobold-#whipperberry

I LOVE going BOLD! I LOVE finding something a little different… I LOVE standing out in a crowd!

Who doesn’t really? We all like to feel like a STAR at times…

Even on those normal, hum drum days…

When the day is normal, the meal is just your typical fair and there is nothing special to celebrate… You CAN add a little FLAIR and turn something typical, into something Funfettilicious!

Our family LOVES strawberry shortcake and we are always looking for fun new “cake” options. We’ve tried several different types of cake from sponge to pound and almost everything in-between! The folks at Pillsbury made my day when they released their new Funfetti® line of cake mixes and bold frostings.

Pillsbury-Funfetti

So many fun colors to play with… Immediately I thought of creating a BOLD Strawberry Shortcake with the Vibrant Green Cake Mix…

I knew that the bold green color would look amazing with the strawberries and the cream, together they could turn a normal dessert into something extra special!

Pillsbury-Funfetti-Strawberry-Shortcake-#gobold-#whipperberry-6

What I really love about these new products is how it make baking even more fun with your kiddos! My little guy, Gage and I worked on this project together. It was so fun to open the cake mix together and to our surprise the mix was blue. I thought this would be a fun opportunity for a little kitchen magic so I took a video of the two of us mixing the cake…

Bold Strawberry Shortcake from Heather Thoming on Vimeo.

 We had so much fun making this dessert for the family and couldn’t wait to share our goodies. We decided to make it two ways. I found these super cute baking cups from Target that are quite a bit larger than a cupcake liner. They are actually baking cups and create the cutest single serving little cake… We mixed up our cake batter…

Pillsbury-Funfetti-Strawberry-Shortcake-#gobold-#whipperberry-1

Then poured it into our cake molds…

Pillsbury-Funfetti-Strawberry-Shortcake-#gobold-#whipperberry-2

And baked them for about 19 minutes. We pulled them from the oven and let them cool for 20-30 minutes and then we got to work building our strawberry shortcakes.  First we made our simple Strawberry Shortcake by just topping a few of the single serving cakes with some strawberries and fresh whipped cream…

Pillsbury-Funfetti-Strawberry-Shortcake-#gobold-#whipperberry-4

Then for a couple more, we decided to make Strawberry Shortcake parfait’s or we could also call them a trifle. No matter what you want to call it… They turned into beautiful, layered strawberry goodness in just a few simple steps.

Pillsbury-Funfetti-Strawberry-Shortcake-#gobold-#whipperberry-10

Gage and I tore up the cake into bite sized pieces and simply layered cake, strawberries, fresh whipped cream, cake, strawberries and topped it all off with a nice dollop of whipped cream.

Pillsbury-Funfetti-Strawberry-Shortcake-#gobold-#whipperberry-11

You know what one of the perks is to helping Mom? You get the first taste…

Bold-Strawberry-Shortcake

To quote Gage, “This is TASTY!”

So… How are YOU going to GO BOLD? Check out all of the fun colors you have to choose from…

Pillsbury-Funfetti

Visit Pillsbury Baking for all kinds of fun ideas on how to turn the everyday into something special! You can even enter to win a Pillsbury Baking Prize Pack!

Disclaimer // This is a sponsored post. I did receive product and payment for this post. However, all thoughts, ideas and opinions are all my own! ©/® The J.M. Smucker Company. Pillsbury is a trademark of The Pillsbury Company, LLC, used under license.

Hot Cross Scones

2 · Apr 7, 2014 · Leave a Comment

 Hello Whipperberry friends!  I’m thrilled to be back here to share another post with you!  Since Easter is just a few weeks away, I thought I’d share a festive recipe.  Tis’ the season!

I don’t know about you, but we love hot cross buns.  They’re really the best aren’t they?  I love them so much I was trying to think of other ways to enjoy the flavour.  Then I thought, what about scones?  So I did some digging and found a recipe for inspiration and came up with this delicious twist.

Hot Cross Scones with a Buttermilk Sugar Glaze.

Yum.

Hot-Cross-Scones-3{A-Pretty-Life}

Now I realize technically these should have the icing added in a cross shape to more resemble a hot cross bun, but I just could not resist getting all drizzly.  I just drizzled like it was going out of style!  Looks yummy, no?

Hot-Cross-Scones-{A-Pretty-Life}

Serve them up with a big glass of milk and you have the perfect snack!

Whisk

Hot Cross Scones
 
Save Print
Author: Jo-Anna // A Pretty Life in the Suburbs
Ingredients
Scone Ingredients:
  • 3 cups flour
  • 2 tbsp granulated sugar
  • 1 tsp cinnamon
  • ¼ tsp nutmeg
  • ¼ tsp cloves
  • 4½ tsp baking powder
  • ½ tsp salt
  • zest from 1 lemon
  • ½ cup currants
  • ¾ cup butter, cold and cut into small cubes
  • 1 egg
  • ¾ cup buttermilk
Icing Ingredients:
  • 1 cup icing sugar (confectioners sugar)
  • 1 - 2 tbsp buttermilk
Instructions
  1. Preheat your oven to 400 degrees.
  2. Line a baking sheet with parchment paper. Set aside.
  3. In a large bowl, sift together the flour, sugar, cinnamon, nutmeg cloves, baking powder and salt.
  4. Stir in the lemon zest.
  5. Using a pastry cutter, cut the butter into the dry ingredients until the mixture resembles coarse sand with a few pea-sized pieces.
  6. Whisk in the currants.
  7. In a separate bowl, whisk together the buttermilk and egg.
  8. Add the buttermilk/egg mixture to the flour mixture and stir until just combined.
  9. Turn the dough onto a lightly floured surface and knead until a loosely formed ball of dough is formed. Then gently work the dough into a 1 inch thick disk.
  10. You can use a 3 inch biscuit cutter to cut out the scones, or I like to use a pizza cutter and cut the disk into 12 equal sized pieces.
  11. Transfer the scones to your parchment paper lined baking sheet, and brush with a little buttermilk.
  12. Bake for 12 - 15 minutes or until the edges are golden brown.
  13. Transfer the scones to a rack to cool completely before applying the glaze.
  14. To make the glaze, stir together the buttermilk and icing sugar until the desired consistency.
  15. Transfer the glaze into a ziplock bag, cut a corner of the bag off, and pipe the icing onto the cooled scones.
  16. Enjoy!
3.2.2310

– – – – – – – – – – – – – –

These Hot Cross Scones would make a perfect addition to your Easter Brunch!

Hot-Cross-Scones-4{A-Pretty-Life}

I hope you enjoy this recipe!

Have a delicious day!
Signature

Tropical Shrimp Bites

20 · Apr 4, 2014 ·

This post brought to you by the folks at Hidden Valley® // With the weather slowly starting to warm up, I’m starting to get the itch to entertain a bit more. One of my favorite things to do when planning for a party or get together is coming up with unique menu items. Tasty dishes that are simple to make, but have a big WOW factor for my guests. Recently, the folks at Hidden Valley challenged me to come up with a new recipe for a appetizer using one of their fabulous Hidden Valley® products. I was super excited when I discovered their new Hidden Valley® Farmhouse Originals Mango Chipotle Vinaigrette and instantly I thought it would pair nicely with some type of shrimp dish. After some playing around, I came up with these super tasty Tropical Shrimp Bites…

Tropical-Shrimp-Bites-with-Hidden-Valley-Mango-Chipotle-Vinaigrette-#whipperberry-5

The Mango Chipotle Vinaigrette is amazing with the shrimp! I added a little coconut cream and shredded coconut to the shrimp and then quickly baked them in the oven. I topped off the little bites with some grilled mango and pineapple and together the pairing was amazing.

Unfortunately my market didn’t have any fresh mango at the time so I had to used bottled mango, but it worked just fine. Here is how I made my Tropical Shrimp Bites…

Tropical Shrimp Bites Recipe

1 lb raw shrimp

1 bottle Hidden Valley® Farmhouse Originals Mango Chipotle Vinaigrette

1 cup coconut cream

6 oz. sweetened shredded coconut

1 fresh pineapple

1 mango

cooking spray

Directions

Prepare your shrimp by rinsing thoroughly and peeling off the shell if necessary. In a large bowl, whisk together the coconut cream and Hidden Valley® Farmhouse Originals Mango Chipotle Vinaigrette. Add shrimp to the coconut and vinaigrette mixture. Let marinade for no more than 15 minutes. Any longer in the marinade and the acid in the dressing will start to cook the shrimp and you don’t want that.

Preheat your oven to 425˚. Remove your shrimp from the marinade and place in batches into a bowl of the shredded coconut. Coat the shrimp and then place on top of a wire rack that has been coated with cooking spray and placed on top of a baking sheet.

Lightly spray the shrimp with cooking spray and place in the preheated oven for five minutes. After five minutes, remove from oven and carefully turn the shrimp, lightly spray the other side with cooking spray and place back into the oven for an additional four to five minutes. Remove from oven and let cool.

In the mean time cut your pineapple and mango into bite sized pieces and grill either using a grill pan or directly on a grill. Grill for 1-2 minutes on one side, turn and grill for an additional 1-2 minutes on the other side. Remove from grill and set aside until the shrimp are ready.

Now all you need to do is assemble your tropical shrimp bites… I used a bamboo skewer and added one piece of grilled pineapple, a shrimp and finally a bite of mango. Your perfect tropical bite!

It’s amazing how much flavor the shrimp takes on from the vinaigrette in such a short time. You can really taste the mango with a little hint of the chipotle, it’s tasty!! Your guest are going to love this little bite from the tropics! This recipe will make roughly 40 tropical shrimp bites, perfect for a medium sized gathering. You can adjust accordingly to the size of your gathering. I served my shrimp bites on top of some sugar pea greens that had been lightly dressed with the Hidden Valley@ Farmhouse Originals Mango Chipotle Vinaigrette as well. That made for some added flavor along with a very pretty presentation.

From dressings and dips to sandwich spreads and side dish solutions, the special blend of herbs and spices makes Hidden Valley the perfect addition to any recipe. For more delectable ranch recipes, visit www.hiddenvalley.com.

This is a sponsored conversation written by me on behalf of Hidden Valley Ranch. The opinions and text are all mine.

Easy Eggplant Parmesan Stacks

1 · Apr 1, 2014 ·

The post brought to you by Ragú® // I LOVE eggplant. One of my favorite meal memories was when my dad went out of town (he’s not a huge fan of eggplant) and my Mom took the opportunity to make Eggplant Parmesan for the first time. I was in my early teens and boy, oh boy… My mind was blown. I had grown up eating pasta, namely spaghetti like most kiddos, but when my mom paired our favorite Ragú® sauce with the lovely breaded eggplant I thought I had gone to heaven. Recently, the folks at Ragú® came to me and asked if I could jazz up the classic eggplant parmesan recipe, I was thrilled! I was for sure up for this challenge.

Eggplant-Parmesan-Stacks-9

I decided to make a healthier version of this tasty meat free dinner. I oven “fried” my eggplant and then stack it with layers of Ragú® Old World Style® Traditional Sauce and fresh mozzarella Cheese. With 11 tomatoes in every jar, Ragú® Old World Style® Traditional Sauce is Ragú® richest, thickest recipe* ever and it’s PERFECT with this recipe!

Easy Eggplant Parmesan Stacks

2 large eggplants

salt & pepper

4 eggs

4 cups unseasoned Panko bread crumbs

cooking spray

24 oz jar of Ragú® Old World Style® Traditional Sauce

2 cups mozzarella cheese

1 cup parmesan cheese

Wash and cut eggplant into 1/2 inch slices.

Place on a baking sheet and generously salt both sides. Let sit for 15 minutes.

This will draw out some excess moisture. After 15 minutes wipe the water and salt off the eggplant slices with a paper towel and set aside.

Meanwhile, set-up a dredging station to prepare the eggplant to oven “fry.” In one bowl crack 4 eggs and whisk. The 2nd bowl will be for the Panko bread crumbs.

Take each eggplant slice and lightly cover with salt and pepper, then cover both sides with the egg wash and then place in the Panko bread crumb bowl, generously covering both sides. Place on a cooling rack on a baking sheet.

Spray the eggplant generously with cooking spray and place in a 425˚ oven for 8 minutes. Remove from oven and turn over each eggplant slice. Spray the eggplant one more time with cooking spray and return to oven for an additional 8-10 minutes. Remove from oven and let cool for a few minutes.

Here’s the fun part. Cover a baking sheet with parchment paper. Now you are going to create towers of eggplant. Lay down a large slice of eggplant. Add a spoonful of Ragú® Old World Style® Traditional Sauce and a slice of mozzarella.

Top that with another slice of eggplant and repeat the process until you have about 5 or 6 layers.

Top with a generous layer of parmesan cheese. Place in a 350˚ oven for 10-15 minutes or until the cheese has melted.

Remove from oven and let cool for a few minutes. Serve warm.

Yields 9 servings

For more easy and delicious Authentic Italian recipe ideas visit Ragú® Facebook page. It’s full of all kinds of tasty weeknight meals that your family and budget will love.

For even more fun you can visit Ragú® Better & Better Sweepstakes. It has a ton of fun prizes that you can enter to win. You could even win a trip to Italy!!

NO PURCHASE NECESSARY.  Legal residents of the 50 United States (D.C.) 18 years and older.  Ends 5/6/14.  To enter and for Official Rules, including odds, alternate method of entry, and prize descriptions, visit www.RaguSweeps.com.  Void where prohibited.

This is a sponsored conversation written by me on behalf of Ragú®. The opinions and text are all mine.

  • « Go to Previous Page
  • Page 1
  • Interim pages omitted …
  • Page 35
  • Page 36
  • Page 37
  • Page 38
  • Page 39
  • Interim pages omitted …
  • Page 65
  • Go to Next Page »

Primary Sidebar

Heather from Whipperberry
Hello... my name is Heather and I'm the creator of WhipperBerry a creative lifestyle blog packed full of great recipes and creative ideas for your home and family. I find I am happiest when I'm living a creative life and I love to share what I've been up to along the way... Come explore, my hope is that you'll leave inspired!

Footer

  • Privacy Policy
  • Crafts
  • Food
  • Gifts
  • Holidays
  • Home
  • Mom Life
  • Recipes
  • Travel

Copyright © 2026 · Seasoned Pro